EDIT August 2024:
Links to the oft-requested N50 service manuals and parts diagrams:
1) N50 Spec Sheet: https://nextcloud.ratiro.org.nz/s/7zR9YC7p7mdNLTc
2) N50 Mixer Parts Catalog: https://nextcloud.ratiro.org.nz/s/rr4yAK2Qb8a87PX
3) N50 Instruction Manual: https://nextcloud.ratiro.org.nz/s/YnFg9RnMNmkLNdJ
4) N50 Service manual (1983) with updates: https://nextcloud.ratiro.org.nz/s/ycGn7C6fPXXNdbN
Enjoy!
As a followup to my original N50 thread: http://www.thefreshloaf.com/node/23049/n50-arrivednow-refurb
I'm reporting my experiences stripping down and refurshing my recently-acquired second-hand Hobart N50 mixer (which now will sit alongside my DLX2000). Hopefully it will be useful to anyone else taking this (not too difficult) project on. Unfortunately I didn't take any before pictures (lazy me!), but it was in somewhat beaten-up shape with well-worn paint over most of the base. A nice collection of photos of another person's strip and rebuild can be found here: http://www.flickr.com/photos/zug/sets/72157622051782719/
Parts were missing - the rubber feet, attachment cap and thumbscrew, no dough hook or beater attachment. The Hobart logo sticker was worn. The gear cover plate was warped. The bowl latch spring was broken. She did run, and run smoothly in all gears, but I had always bought it with the goal of a full tear down, repaint and rebuild.
The N50 service manual helped a little, but it is definitely doable without it. It has some useful tips, such as how to split the motor and transmission housings from each other and also how to adjust the transmission for smooth, quiet operation. The pictures/photos are also helpful. It's worthwhile having in additon to the parts diagrams freely available from Hobart.
Firstly, I ordered all of the missing / worn / broken parts. So far so good. As discussed in the thread above, I ordered some Morey synthetic 'blue' food grade grease (expensive - and incorrect - see below). During the strip down, which is mostly a methodical and logical process assuming you have the usual basic tools, patience and a modicum of mechanical knowledge, all went well. You will need some pin punches to drive out the various shaft pins. Other than that, no special equipment needed. The technique in the service manual of hitting the accessory hub attachment with a hammer in order to separate the motor housing from the gear housing is very worthwhile.
The most major problem in the rebuild occurred at this stage: having removed the motor from the housing, I accidentally dropped the housing on the concrete floor! It was immediately obviously dented - ouch! I completed the tear down, removed all of the old (brown, discoloured) grease from the gear housing and took all of the paintable parts to the powder coaters. There, we discovered that the motor housing wouldn't mate properly to the gear housing due to the dent. Popping across to the engineering shop, I thought all was a relief, as they managed to gently tap the housing back into what looked like was the correct shape, as it aligned and fitted once more to the gear housing. Whew (or so I thought). Got the bits back from the powder coaters, and the bowl lift handle back from the metal re-platers (it's nickle, in case you're interested). Also got some new decals printed using a Hobart logo online: http://en.wikipedia.org/wiki/File:Hobart_logo.svg
I then reassembled the gears and transmission and packed it with the Morey synthetic blue... some disgustingly sticky, tacky stuff. Now the real pain - the stator wouldn't fit into the still-distorted motor housing - arrrrgh! It's such a tight fit with no tolerance for variance. I tried filing the fins off the inside of the motor housing - and did get it to fit - but of course the rotor then wouldn't line up within it, while still rotating freely with the starter housing on. Realising that I would need a new stator housing was painful in the extreme - but that's what you get for dropping the most expensive piece of the mixer! Determined to see the project through I bit the large bullet and ordered a new housing which arrived in due course. I finally refitted the the motor and connected it all up. Hit the start switch to test... A loud "hummmmmm", but no rotation!! It turns out two problems were occurring:
1) The blue synthetic morey grease was just too tacky. Although it's a NLGI grade 2 viscocity (the correct one), it is extremely tacky stuff. Changing to a different synthtic but soapy-type grease (similar to the original stuff, but synthetic) - hooray!
2) The contacts on the start switch (not the on-off switch, but the switch at the rear of the housing) were not being adequately compressed. I'm not sure why this is, but I have managed to shim between the rotor and switch so that it turns on and off. It's a fine balance between the mixer turning on properly and having the contacts too close so they're shorting. One day I might take it to the local mixer service agent for a quick look, but for now it's working just fine.
[UPDATE 26/12/15: the problem with the starter motor was eventually traced to needing a shim (metal washer) on the shaft of the rotor, in the motor housing. Finally working this out had two advantages as the rotor is now correctly positioned a few mm's further to the rear of the mixer. One, the starter works first time, every time without shims. Two, the (17T) drive pinion doesn't strip the (49T) main gear. Don't ask how I found out this was the problem, except know that it cost two replacement main gears to figure out. To assist, the location of the shim sits at part #18 on this diagram: http://thesmartpartsestore.hobartservice.com/category/7939/motor-parts and is listed as "spring, loading" (SL-005-10).
For older model N50's, the location of the shim is at part #14 & 15 on this parts diagram: http://thesmartpartsestore.hobartservice.com/category/7926/motor-parts. Part numbers are WS-007-21 and/or WS-007-19.
I made the first batch of pizza dough and a sourdough bread with it yesterday - and it is a fantastic mixer. It's less work than my DLX2000 - in fact it's no work at all, in that I don't have to babysit the initial process to ensure ingredients are properly incorporating, or ensure the dough is still rotating around the bowl properly. I look forward to trying it out with drier pasta and bagel dough later this week.
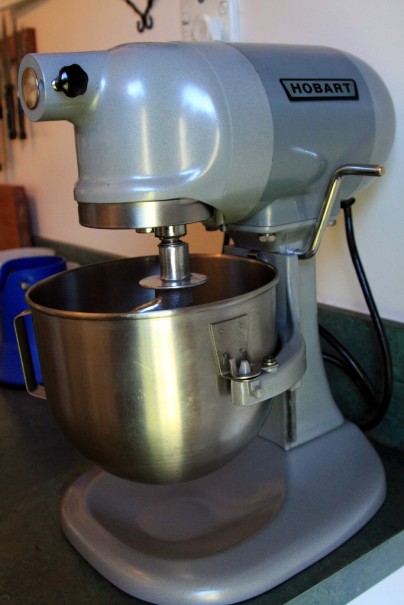
As you can see from the photos below - it's a custom two-tone colour, since I couldn't be bothered getting the new motor housing poweder coated in the same colour as the other bits I'd gotten done. I like the effect, I've decided! The new motor housing also came with the warning plate attached, and has a larger bolt at the front corner - visible in the first picture - holding it onto the column (which necessitated tapping a larger 3/8th" hole into the column).
Overall, it's been a fun project (dropped housing notwithstanding). I've learnt a lot - and can now pull the mixer to bits in about 5-10 minutes.
Look up circuit breaker in this same thread Givemethedough uses a 6 amp breaker mounted on the back.
http://www.thefreshloaf.com/node/24332/hobart-n50-restoration-experience#comment-372311
Jan 26 2017 - 10:15amCircuit breaker switch
Yes, I saw that. But I don't see how he came up with 6A. It sounded like a guess. I would like to make the calculation given the correct information. I can measure the stator gauge, so if I find the auxiliary windings, maybe I can find the weakest link.
I used a 6amp breaker based on N50s that have this feature built in from the factory. I am rebuilding a 4639 model with a screw in fuse that is 8amps. I am replacing the screw in fuse with an 8amp re-settable fuse. Hope this helps, let us know.
Funny. My ML-134262 version of the N50 came with a 3.5A breaker. I wonder if there is something different about the stator windings, or if the 3.5A breaker now supplied is just hyper careful.
Hi Dave,
Yes, you are correct there have been different size breakers used. Here is the post from January 2017 regarding the amp size. If you scroll (or click on the link in the post above) up you can see my red mixer and the factory installed with a 6amp breaker.
Limezy,
Yes I have added breaker switches to the N50. The photos will show the location, the specifications are: 6amp (you could go to 4amp but I was concerned with false tripping), push button thermal, 32v DC (not sure what your wall sockets are putting out), Reset method: Type 3 manual reset, Mount type: 1/4" quick connect blade.
I just purchased N-50 mixer from a closed bakery. I am doing some maintenance on the mixer, I wanted to change the grease in the transmission. I noticed there was no gasket or O Ring separating the transmission case from the field ring. I couldn’t find a gasket/O Ring in the Hobart catalog of replacement parts. Does anyone know if there should be a gasket? If so, can you please send me the parts number?
I do believe that you are refering to WS-007-19 and WS-007-21, they are washers on the motor side of bearing 00-290659 which is slotted ( I do believe mine had a little wicking packed in it as well.) As thick as #2 grease is under normal operating conditions it should never breakdown and get to the level of the motor.
Hello everyone,
Is the tumbler yoke stop inside an N50 designed to slide (during use when changing speeds) on the oval feature it sits over? Or is it meant to be tightened down "bloody"? I am having difficulty adjusting (making the transmission quieter)? The service manual instructs to turn the motor on and adjust the set screw near the planetary for fine tuning. I have tried this, but I think I can make it quieter with some help from the forum. Any help would greatly be appreciated. Thanks!
The tumbler yoke stop is designed to slide only during adjustment. It is kept in place by the prong on the tumbler that pushes against the stop by the force provided by the tumbler yoke spring at the appropriate stop level based on the speed setting and the adjustment adjustment screw.
Hello, i turn the locking set screw out, but another screw under it do not have slot to use screw driver. how to adjust it. thanks
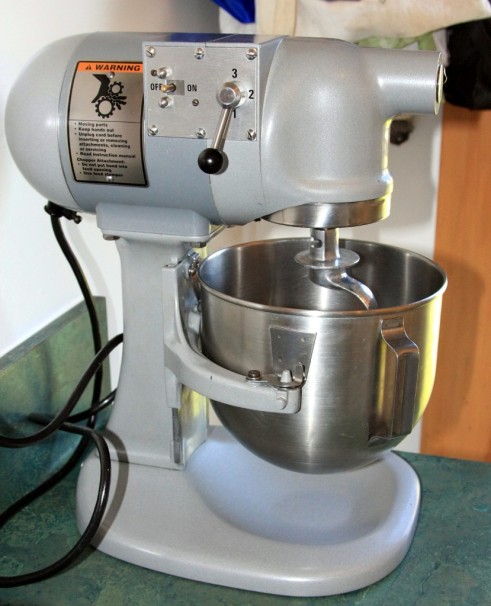
Same mixer; went from Cornflower Blue to Lolypop Red.
Your powder coater must love when you show up!
I just came upon some 1/8 alum sheet so I can make some covers for the powder coater.
Did you put silicone tape around the edge so the powder does not stick to the opening covers you made?
Thanks,
Bert
Hi Bert,
The powder coater takes care of of the slides on the column. The front accessory hole get a round aluminum plug held in by the thumb screw tapped hole, all tapped holes get screws put in them. The motor and transmission housings get aluminum covers held on with screws, no tape here on the edges. For the planetary, I used one long screw and washers and one nut. I also put in some steel wool in housings to arrest the sand that gets in during sandblasting. Despite all of the precautions I still spent 4 nights cleaning the sand out and using "Q" tips on my Dremel to clean the grit from the tapped holes. This time around I wrapped the pieces with saran wrap and masking tape while I worked on cleaning and assembly. What is your current project?
Too many projects at the same time, saveing money to get them done one at a time.
Just finished a univexpower head that I traded for a Hobart 20 Qt. Also have a buffalo chopper apart that previous owner hacked together that I am waithing to repair a bearing and shaft.
Also picked upa Vintage KA with a flat back, I actually like the flat back versus the N50 Dome I have vowed not to even look at it until my other stuff is finished.
My present project is to hydro dip a gun stock in muddy girl camo for my grandchild. I will also show him the mixer parts to check prices vs powder coating. Trying to use an illinois vendor but have not had too much luck yet.
I might have an Illinois vendor for the camo, he also does black. It all ends up being "E" coat. I will post it as soon I have details.
I know the pinion gear has been discussed but I just wanted to post a picture of the puller to remove it. Purchased from Amazon for $15.99, its the 2.00" model.
Help, I hope someone is still monitoring this fabulous thread.
My Hobart N50 jammed, and encouraged by this crew, I decided to disassemble, remove the 20 year old grease and fix it myself.
And I succeeded in getting it apart and cleaned out.
But now, I'm not sure my photo record is helping me make sure I'm putting it back together right, and the shop manual I found is vague enough that I'm even less sure.
Does anyone have some good photos of what it's supposed to look like when it's assembled but not greased yet?
My photos are right here.
Thanks all!
Seth
Hi Seth,
Welcome to the world of Hobart openers !
First of all : do you have a complete set of the repair & maintenance manual ? It's quite well done and you can follow the steps to re-assamble.
Then about your request :
https://nuage.de-ruffray.fr/s/F3fCBCX2o585XdZ
This is the best pic I have from my restauration.
All the best,
Limezy
That photo is ideal.
Do you have a link to the complete set of repair and maintenance manual? Because my googling has failed me.
thanks again.
Hi again !
Here is what I have : https://nuage.de-ruffray.fr/s/bTJ5odMA3qc7HJf
Good luck !
Hi everyone,
I have a model G from KitchenAid I hope to one day restore and I have some questions for the veterans in the forum.
I'm also looking for the original attachment knob, dough hook and pastry knife if anyone is willing to sell theirs :)
I'll work on organizing my questions first since there are many to ask! But for a first post for tonight this will suffice.
I have been reading the forums and find it all very informative. Thank you all for the contributions
Hello everyone,
Just posted a Chrome Model "G" in the for sale forum, if anyone is in the market. Take care!
-Givemethedough
I'm interested, how do we proceed?
Hi everyone,
Just a heads up; I have an Atlas Copper Bowl Liner for sale in the forum. If anyone is in the market. Take care!
Duplicate post in the For Sale Items: Regarding Model "G" sold through the FL forum.
Just a followup to everyone in the forum.
The shipped Kitchenaid Model "G" arrived broken at the column. If you ever decide shipping a Model "G" or N50 consider some dis-assembly. The buyer opted for his refund, Pay Pal facilitated the refund. I was of the opinion that the buyer should pay for the return shipping, I still emailed the prepaid FEDEX shipping label. The buyer (to date) has not returned the merchandise, I need the merchandise to file a damage claim with FEDEX. The buyer no longer responds to any emails, and has kept the merchandise and all accessories and has received his refund. You can call it many things, a couple of them are fraud and theft. I thought everyone here was truly for the most part honest. I was way off, I wish I had sold the mixer to the person who offered to pick it up in person. Pay Pal has not been very helpful, not best for buyer and seller as I originally thought. Any buyers be wary of the person I sold to. In a past case I had help with the State's Attorney in my state. The buyer's local law enforcement has been contacted (they are being receptive), I will also contact the State's Attorney that the buyer's state as well. I am pretty sure this falls within the realm of mail fraud which is a federal offense. I will not be posting any additional comments related to this experience but feel it is beneficial to others in avoiding potential problems when they buy or sell an item. Take care.
Good work everyone!
I'm hoping to purchase and restore a Hobart N50. I started a post about it here. Maybe you all have insight?
Thanks
I'm hoping someone can add information here. I haven't fully dissambled my n50 yet. But, it is full of grease that looks good.
The manual talks about adjusting clearances to 1/64. I wish they showed the power path for each speed. I have a noisy second gear and would really not like to adjust everything if possible.
Michael
Couple questions yall
1. Is the tumbler yoke stop supposed to slide back and forth freely when screwed in? I ask because if I flip the washer over, and screw the yoke stop down, it stays firm in place, if I flip the washer to the other side the yoke stop isn't fully held down and thus it can slide back and forth. I assume allowing it to slide is correct, so that it can be adjusted freely with the adjustment screw, otherwise I don't think the adjustment screw would be able to move the yoke stop at all if it's firmly screwed down.
2. Regarding play in the bevel gears, what is the proper amount? I looked at the manual. The service manual is from a newer generation, but I assume it's the same. It states 1/64" between the teeth, and the later image states 1/64" end play in the shaft. I'm not sure which is correct. I can't seem to get a feeler gauge between the teeth, or judge if the teeth gears are "matched" side to side.
I now see that the up and down movement in the planetary I was referring to previously, is actually too much play in the bevel gears. It looks as though I have far too much play. Something between 1/16-1/8". I had one of two washers break, though it was very very thin and it hardly made a difference.
3. Do the washers need to be fiber? Got any ideas for finding washers locally to take up that end play? I would love to finish this tomorrow. I doubt I can find an exact match, maybe a metal washer will work. I suppose I could fabricate some, or I might be able to find some nylon of fiber boards to make some with some punches.
edited.
Hello
I have several N50's but I just took one apart to repair it and change its color.
but i'm not a mechanic, nor an electrician....
when i removed the stator, inside, under the stator there were two wires, with a limit switch. i removed it, and put it in the trash.
Moreover in the column, there is a small electrical box with 6 wires.
I think it is an addition that I can also remove.
I disconnected everything...
I connected the phase and neutral directly to the motor.
it hums but does not start.
for the reassembly the electric motor does not start.
how to adjust the start of the motor?
i don't use a multimeter, i don't know how to use it.
thank you
Translated with www.DeepL.com/Translator (free version)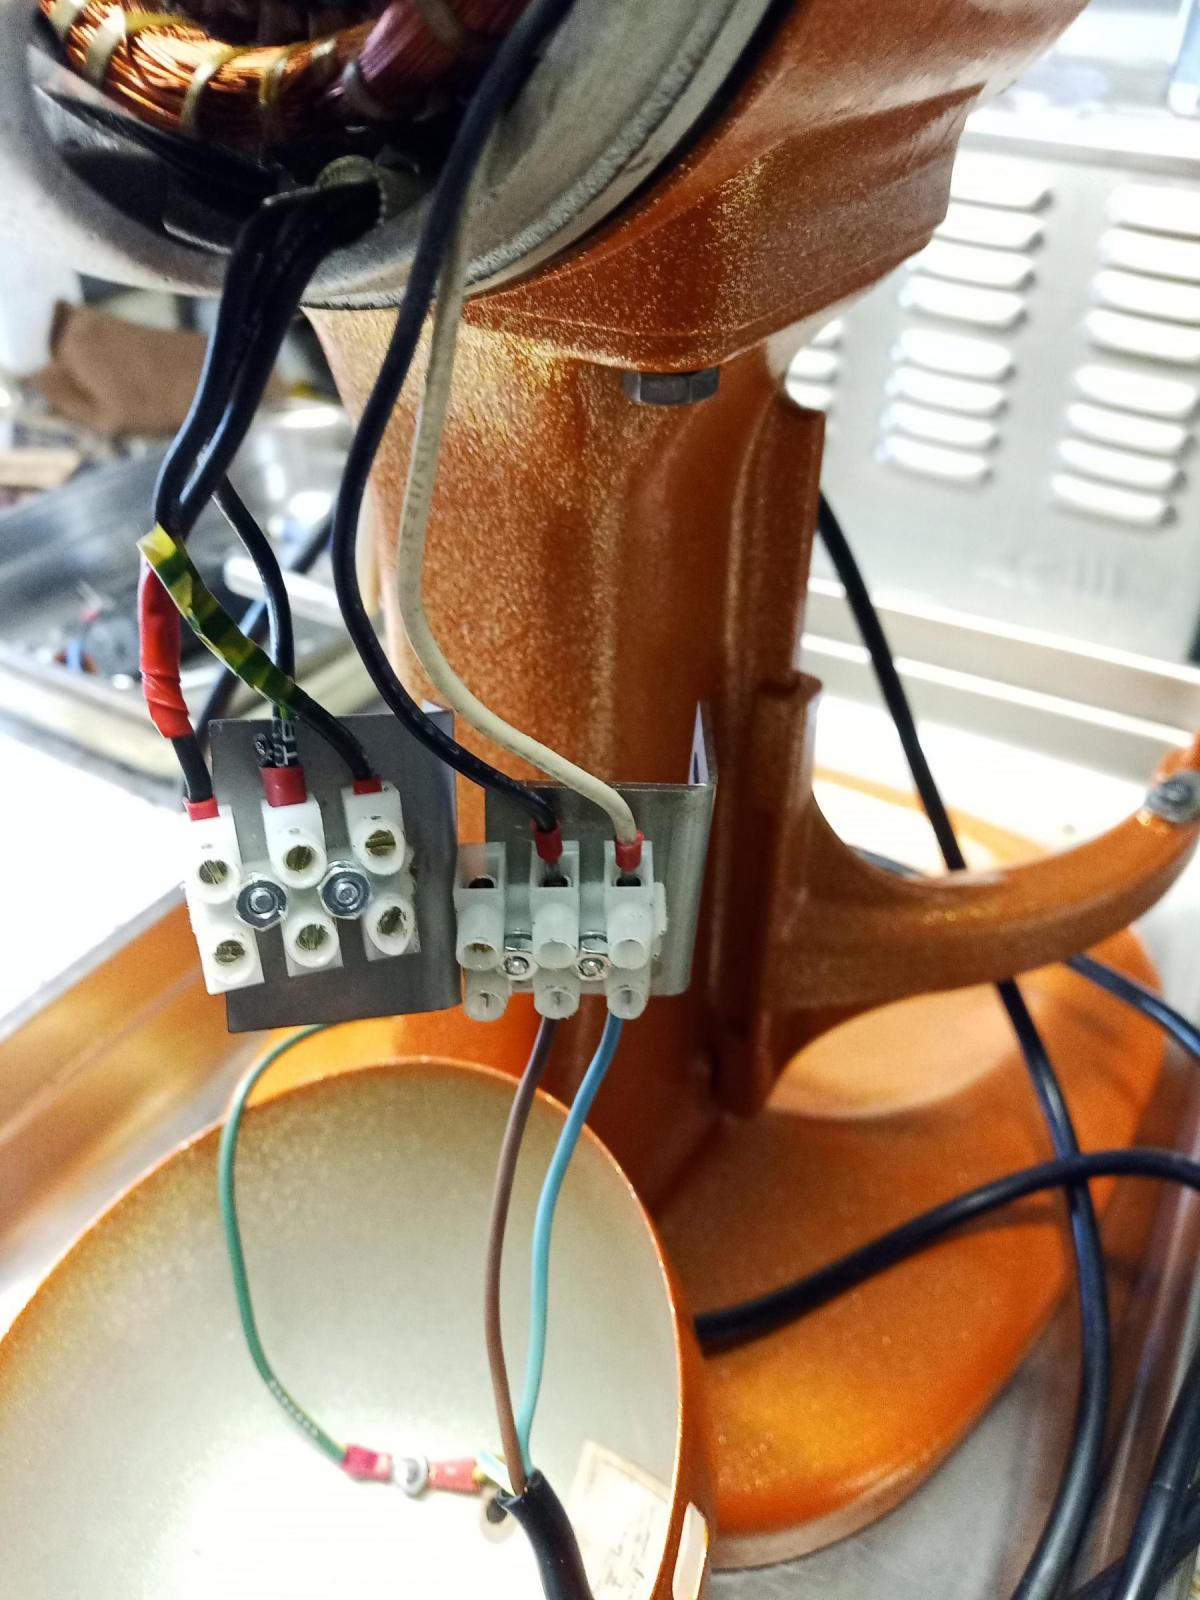
I think it might be this contact that is not made?
Does it have to be intermittent, or does it have to be glued all the time?
Hello
I read the whole post about the hobart n50.
I saw that there are at least two french people who went through it.
If you could give me some advices to start the engine of my n50.
Thanks
for the grease I took the famous "Belleville grease".
https://graisse.fr/produit/graisse-blanche-contact-alimentaire?attribute_conditionnements=Boite+700g
certainly equivalent to the mobil
Hello
is this obligatory?
and is it necessary?
thank you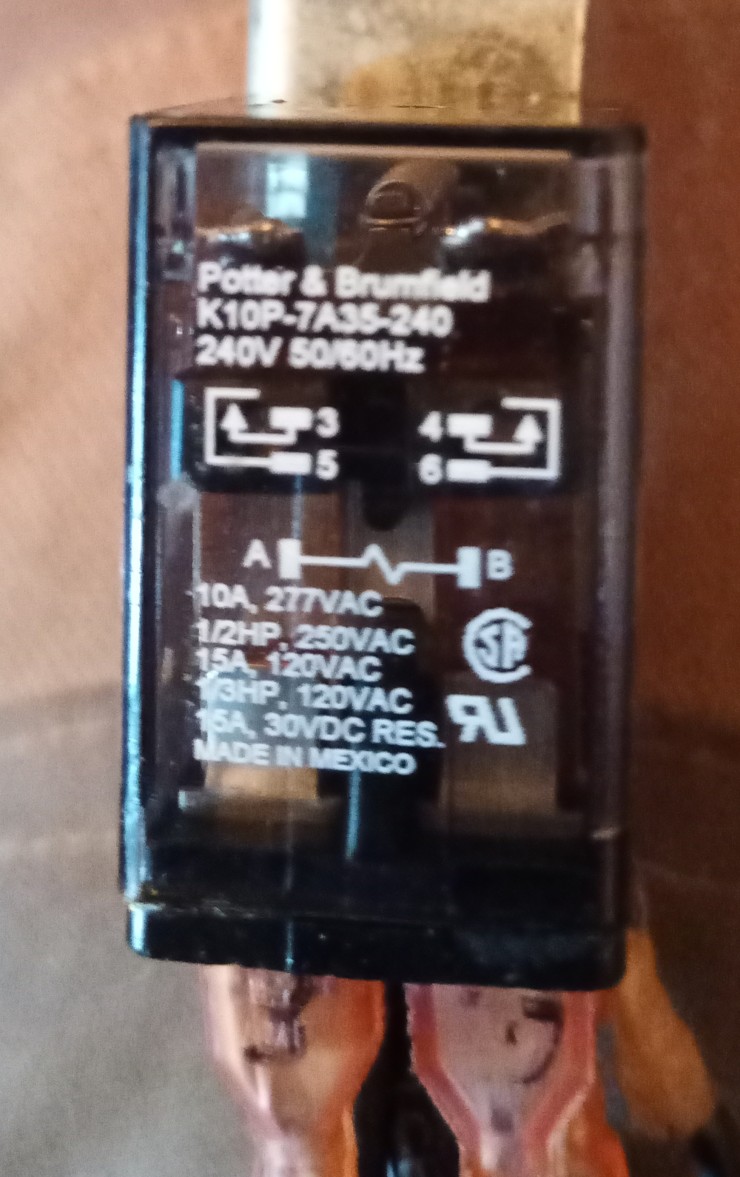
I will look at the rest of the post, but what i do know from people who make things ....if they could have not spent money on the part they would not have put it in.
Where is this part located? I have not seen it in older N50's or KA G's
As you deduced it rightly, this relay is the main part of "no-volt release" subsystem. It fits the N50CE version for the export market (at least, Europe) and is in production since at least 25 years old now as far as I know (= about 1/4 of the global life of the model, which is not negligible)..
Due to the successive retrofits the venerable KA G received, the only free place for this relay has been found within the column, below the bowl lifter cam&axis.
Note that "no-volt release" security option also involves a specific power switch which no longer provide the speed shift locking action.
That will probably work Ok. You do not need to spend extra money on NSF labled grease as the mixer is a sealed unit and there is no way for food to make contact with the gear transmission.
Any light NGL 2 or synthetic grease will last you a lifetime.
That is a contactor that is energized when power is applied. It starts the stator to turn and when it comes up to speed it disengages That is what the spring on the stator do.
That whole thing looks like someone did not know how it works and bypassed it all. That machine is newer and clean. I have a number of machines that are 50 years old that use the same contactor. They work .
I would grab the wireing diagram from the service manual and compare it to what you have. Was the machine working with the new set up? The mechanical cont actor works good. They have to be shimmed properly.
Hello
I bought this machine second hand.
as i am not an expert, and i dismantled it two months ago and more,
It made a rattling noise in the head when it started. the grease was grey instead of white. it was the bi-color wheel with 6 screws that had eaten its washer, and the screws were rubbing on the gear shift plate.
Before I found this forum, YES it was working...
a safety device was removed by the people who sold it to me; the one on this picture.
At the moment the rotor does not start every time.
It forces, hums, and I only plug it in for 2 or 3 seconds not longer, to try to start it without burning it...
Is the stator in its housing fixed?
That is to say that it must be blocked without moving back and forth?
because i started it a few times but with only 3 washers out of the 4 that are on the picture above.
I put some in the front and in the back, but since then it has stopped again.
The Potter&brumfield was in the column.
but it takes up all the space inside. it has 6 threads, that's a lot for me.
there must be an easier way, with 2 wires to do the same thing, because if this part dies, you will have to dismantle the whole device to replace it.
it's just an engineer's trick, to mess with.
For me it's what replaces the fuse from before. unless this new motor is of lesser quality than the ones before and it's a trick to help it.
I'm going to live in an isolated place, where it would be better if it didn't break down because of this kind of hard-to-find part.
But then I put everything back in place...and 10 wires for a 220 motor that only needs two...it bothers my eyes. And an on/off button that has 4 instead of two, that also bothers me.
and I think I saw in the pdf on the internet that the circuit breakers are optional
well well well.
I managed to get it to run.
But sometimes it starts with pain, slowly, before taking its cruising speed.
and that's not good.
The rotor and stator are getting hot. is this normal?
if you remove the rotor, you can see on the picture that it rubs on the back,
how do i do it? do i sand it?
I learned something today. I will have to research that relay to see if it is just a European voltage thing. I have not seen that in any of my machines but they are much older that the one in the picture.
There should be no rubbing. it should have the same clearance all around. Something is not aligned properly. you should be able to turn it bu hand to check.
I connected the motor directly by removing this circuit which looks like a break.
I connected the motor to my on-off button.
It works, the motor turns easily with the hand.
I chose to leave it running, so that it wears itself out where it rubs.
And it seems to align itself naturally with the stator.
Anyway I start it many times a day to see if it doesn't jam.
There was a limit switch behind the stator, inside the flange.
I also disconnected it.
I put everything in English, in some time when I come to see for my other future n50, it will be necessary that I retranslate everything in French...to understand...
Translated with www.DeepL.com/Translator (free version)
it pisses me off....
I received the fat.
I tested it and it was fine.
the engine was finally running.
I put the head on, 1st ok, 2nd ok, 3rd..it turns like the 2nd..I force on the lever and it cracks strongly.
I rebuild everything.
I have to find what's sticking with all the fat in it.....
I found the 1983 hobart n50 manual to help me. the pdf on page 2 of 8.
The pinion block (63) does not go down under the pinion (35) of some millimetres. 1.5 or 2.
if i put a washer under the 35 i have to raise the (40.41.46.47) otherwise the screws rub on the 35.
if i put a washer under the (40...47) it jams everything.
the device has been heavily used and aged by the professional who had it.
Translated with www.DeepL.com/Translator (free version)
I am happy,
it's rebuilt.
It works and I only have one washer left.
usually it's a whole bunch of stuff I have left.....
in fact the inner plate of the gear shift was upside down.
(n°14 page 6 of pdf n50 1983)
there is certainly a small difference in level. which if not in the right direction rubs the screws of the pinion (40.41-46.47 page 2 of pdf n50 1983)
Hello
do you know this kind of joint?
Can I replace it with a simple brass ring?
thank you
Is that the bearing/bushing between the motor and the gear case?
The part is not that expensive from Hobart. But yes I would replace with a oil impregnated bronze bushing. specked out correctly it will out last you. I think the wicking provide 2 purposes. Keeps oil out of the motor and it lubricates the bearing.
I dropped the grinder on the stator.
it has two slightly sanded wires.
It can happen to the best of us. As a rescue operation I would try loosening or cutting that strip of tape and try and gently make a bit of space round the heavily sanded wire by moving the lower adjacent wire.
Then build up the sanded wire thickness a bit by tinning with some electrical solder and a decent soldering iron, ideally temperature controlled.
Remove flux residue with some isopropanol (rubbing alcohol) on a swab. Then you need to reinsulate the exposed wires. Transformer varnish would be good, but you are unlikely to have that, so I would suggest a 2 part clear epoxy adhesive. In the UK I would use Araldite rapid - you will have something similar, I'm sure.
Lance
I would not worry about it since they are not broke in half. wipe down with alcohol and coat with a magic marker or clear nail polish or such.
Look at the rest of the wires........nothing special.
after looking at it again I would also suggest putting epoxy over that area to keep it from vibrating in half. The problem with soldering is you have to be good at it to get enough heat and keep it isolated from the other wires.
Bonjour Paul, sachez que le stator du N50 est assez fragile (de part sa conception) comparé aux moteurs modernes. En particulier pour sa version 230V qui est plus sujette aux risques d'amorçage.
Aucun bobinage n'a été sectionné donc rien n'est perdu, mais à votre place je le montrerai à un bobineur pour qu'il en juge par lui-même : avant de repartir d'emblée sur la couteuse solution du rebobinage intégral, il pourra éventuellement travailler l'isolation des spires mutilées et/ou ré-imprégner à la résine isolante, cela ne pourra pas faire de mal.
Bravo pour votre restauration, toute l'aide nécessaire vous a été correctement apportée dans les précédents messages.
bonjour
il y a un bobineur pas très loin, J'irai lui présenter mon stator.
merci