Borrowing Mashing from Beer Brewers
In the last two weeks, I've played with "mashing" malted rye and buckwheat to produce a sweet scald for my baguettes. Mash is a term used by beer brewers when they add enzymes to their grains and keep them hot over time to break the starches down into sugars. My mash blended buckwheat flour, diastatic malted rye flour, and hot water, and kept it at 55 celcius for 20 hours. 55 celcius was the best my proofing box could do, and was also a good temperature to keep amylase enzymes active and not destroy them.
Malting Rye Kernels at Home
I made the malted rye myself by sprouting rye kernels, malting them (waiting for sprouts to grow to the length of the kernels), drying them with a dehydrator, then milling them into a flour. I also created a proofing box to maintain the 55 celcius. I used pink foam insulation, duct tape, and the dehydrator head with the heater and fan.
100g rye kernels malted (sprouted in 12hrs, malted in 36hrs)

Dehydrated malted rye kernels... I weighed them after dehydration to check that they weighed 100g again.

Preparing the Mash
Dark buckwheat flour, fresh milled rye flour, and rye malt with hot water added. The first time I used this technique, my ratio was 2:1 water to flour, which resulted in more of a slurry. The second time was 1.5:1 water to flour, which resulted in more of a porridge.

My DIY mashing box. The dehydrator top supplies hot air around its edges and has a fan in the middle that pulls air up to circulate. The little door in the front lets me see an oven thermometer inside.

After 20 hrs the malted mash was creamy and reddish.

The first time I mashed, the sweet aroma of buckwheat honey surprised me when I checked the mash at 12 hours and again after 20 hours. The consistency shifted from water, to white and creamy, to red and creamy. On my second try, I used less water and was amazed at the fluffy texture of the resulting porridge with aromas of buckwheat honey, apples and tahini, and with a similar shift in colour from white to red.
Put on the breaks: Denaturing the Enzymes in the Mash
To denature the amylase enzymes from the malted rye (and prevent a starch attack... meaning, the enzymes destroying the starch in the dough when the mash was mixed in) I heated the mash on the stove and it quickly transformed into a dark red roux-like paste. This gelatinization will also compensate for low/no gluten in the rye and buckwheat flours. Some of it caught on the bottom... but after a day in the fridge that part easily came off and tasted almost chocolatey.

Making the Dough
When making the dough, mixing the autolyse, levain and porridge was a bit of a challenge. The second time produced a fluffy kind of porridge that took quite a beating in the mixer before it pulled away from the bowl.
Here are the three pieces of the dough: autolysed AP flour, 100% hydration rye starter, and the dark rye-buckwheat mash. AP was 70%, milled rye 15%, dark buckwheat 15%.

After extensive mixing (7 mins + 15 min rest x 3 times) the dough had transformed from fluffy porridge into a stickier dough. The bowl was warm from the mixing so I cooled it with a cold pack. I put the final dough in the fridge for an overnight retarded fermentation.

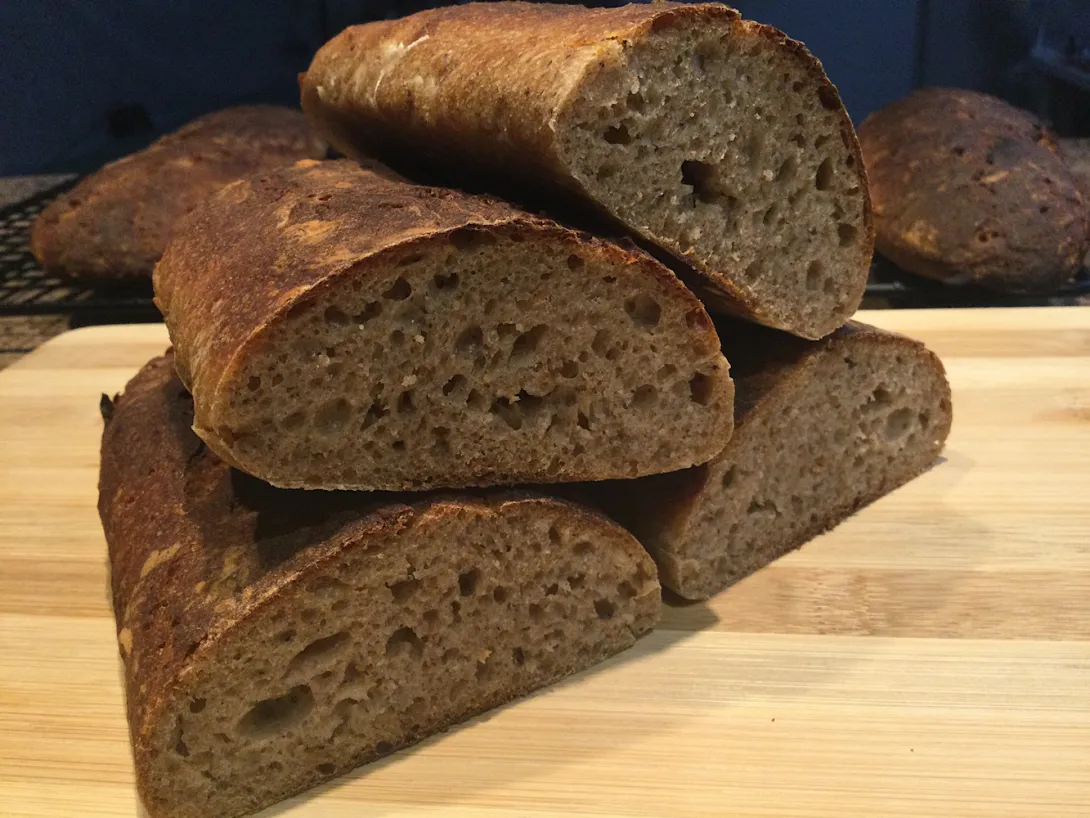
Loaves From Low to Higher
I shaped my loaves as baguettes and it was a sticky dough. My first loaves were overproofed and a bit flat. But they still had an aerated crumb and delicious depth of flavour that delighted me. Initially not long from the oven, it tasted almost sweet and spicy like gingerbread. Ugly but tasty. I lost my jar of malted rye flour in a sad kitchen mishap, but the flavour of the bread over the following week inspired me to go through the whole process of sprouting, malting, drying and milling rye kernels a second time.
Here's my first bake. The overproofing was my fault... I zoned out on the couch. I was doing the poke test periodically but with so much porridge in the dough, I don't think it works well. Yes they were reddish brown... an effect of the diastatic rye malt enzymes freeing up sugar for browning.

My second set of loaves were also ugly, but twice the volume of the first try. My second try used less water in the porridge and also bumped my levain back up from 100g to its usual 130g. I also returned to my usual proofing time.
Both sets of loaves had holes in their crust, indicating a breakdown of dough strength. Apparently sourdough acidity can protect against starch attack by amylase... (thanks calbeach!) so I will use that more deliberately next time.

Taste and Texture
DAY 2
Had it toasted... light, crispy crust, creamy soft chew, and a sweet flavour with hints of spice and apple. Wow, very cool.
Next steps... I've ordered a few more kilos of rye kernels. There is so much potential in rye... so many flavours you can get out of it. I want to increase my rye amounts and shift more of my AP into fresh-milled wheat, farro or spelt. I'd also like to try more kinds of rye preparation, as per the Rye Baker's multi-stage recipes.
DAY 3
Further tasting notes on day 3: wow. I let my half loaf defrost on the counter and by lunch it was ready. Crisp crust, soft chewy interior, very sweet with a depth of flavours I really enjoyed. Paired with homemade kidney bean hummus with a spicy zing, it was soooo tasty. Definitely want to do more with these techniques!
- happycat's Blog
- Log in or register to post comments
Well done - a good process and it produced a tasty looking bread. Your mash time does seem like quite a marathon though.
You may be interested in my post from earlier this year, very much in the same vein.
Lance
Thanks.
The short mash was sweet but still had chewy bran and was a pale colour.
The long mash processed the bran more and turned red.
It might go faster if I had better control over heat... ie boost to 65 without going over. Also my homemade diastatic malt may not be super powerful vs a commercial one.
I'll check out your links.
This is something I have to try. I love buckwheat but have never tried it with rye. I’ve tried a few mashes but found the crumb to be gummy. Is there any way to get away from that, or is that the nature of a mash bread?
My crumb isn't gummy at all. It's strong, springy and a soft chew. I slice with a blade, no serration and you can see it's a clean cut.
Gumminess could come from letting amylase go nuts and destroying all the starch and gluten. That's why you need to control the enzyme.
One way is by denaturing with heat before adding to dough.
Another way is supposedly by increasing acidity of the dough through more sourdough content.
Another way would be lowering the dough temperature. I use retarded bulk fermentation overnight in the fridge. Amylase is most active in mid 50s to 60s Celcius I believe so a cold fridge would slow it down.
Wow, that was quite the complex bake with so many different steps. One of these days I’ll need to try something like this, in the meantime I’ll learn from you David.
Benny
Yes well this weekend my wife said "It's okay to be crazy, honey" in reference to my completing this week-long top baking adventure and then planning my next one.
I'm hoping to apply these baby steps to one of those rye baker breads with the multiple stages, sours, scalds, sponges, etc :D I already started sprouting a kilo of rye kernels tonight.
Your Hokkaido milk bread was the trigger for this series of scald breads, getting me to do a tangzhong. So thanks!
I’m glad to have inspired you David, I will have to go down the rye path again at some point. However, I did find that with my last two 100% rye bakes that I tolerate that much rye very well. Anyhow, your recent baking adventures are very inspiring. Benny
Wow. Great documenting of a cool process. Well done and thank you.
f
I wonder how this recipe would work in a loaf pan instead of a freeform baguette.
I hope you give it a try and let us know. I've never done particularly well with freeform shaping and the loaf pan sure makes things easier in some ways.
You didn't say, did you remove the roots after drying and before grinding? I've been using a similar technique with commercial and home made rye malts.
Your flavor profile sounds and looks a lot like solod.
No I didn't remove the roots. I've never had commercial solod but I think I made it :)
I even used my solod in belgian waffles as a replacement for some of the flour. Delicious.