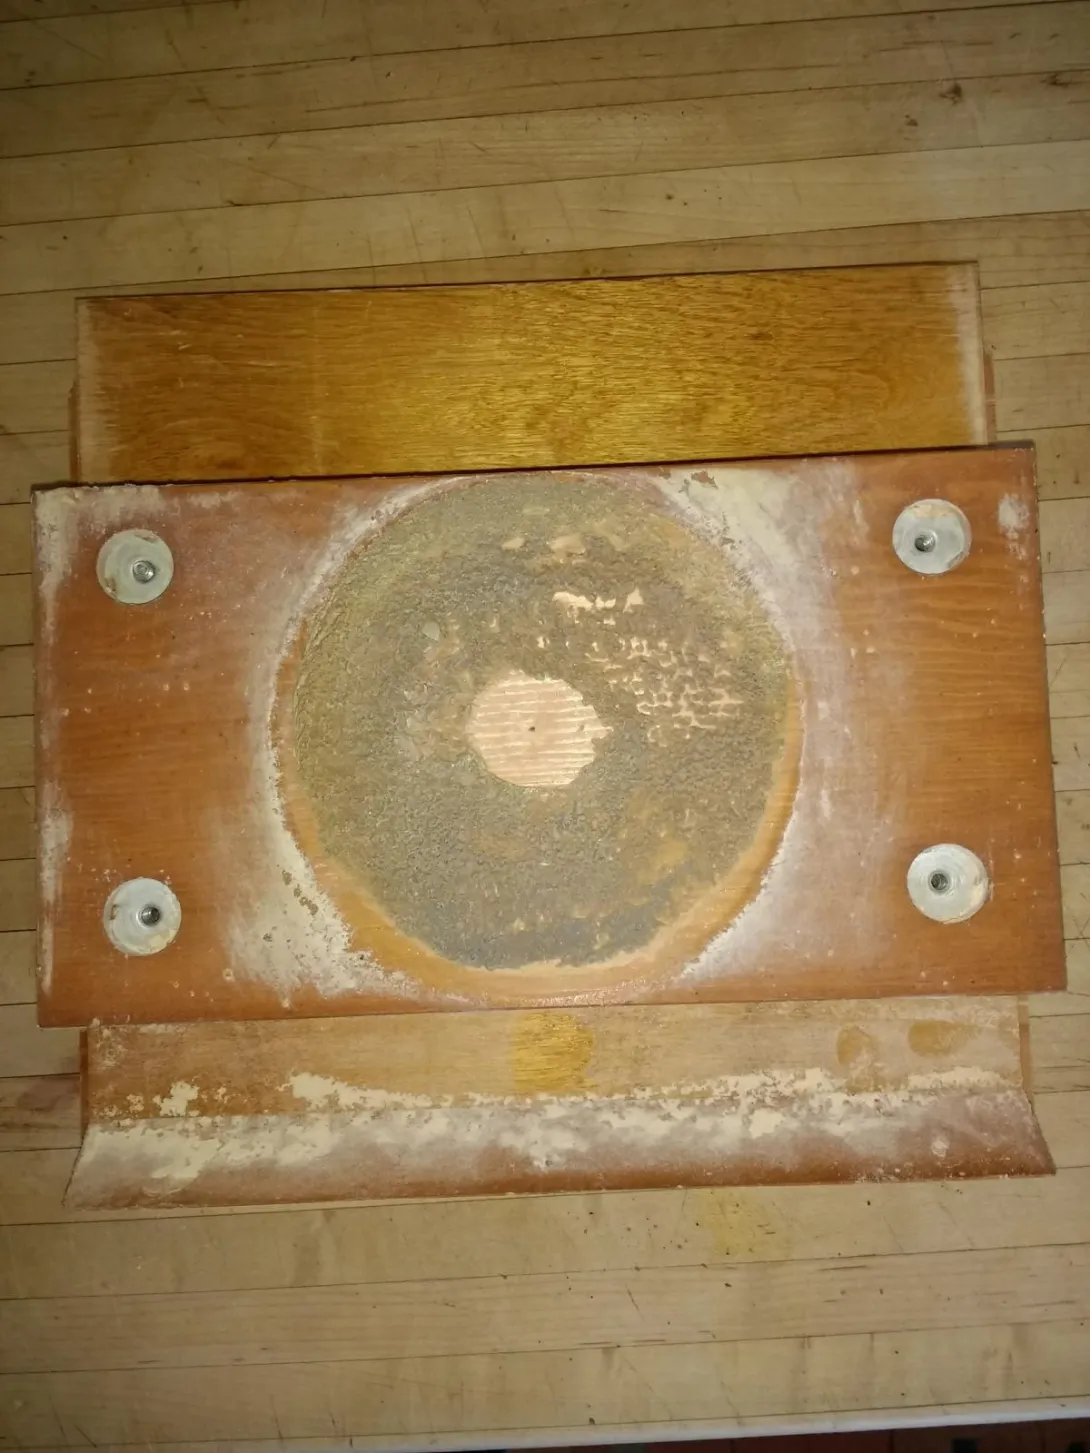
I was just given an old Magic Mill and the stationary stone has come off. Does anyone know how it should be reattached? It appears to have been glued to the wood panel (the one with the name plate), but that's hard to believe.
I just ran across this and have had this problem before, this was my fix. I was given a used Magic Mill by my MIL a decade ago for Christmas. When it came via UPS, the fixes stone with the hole in it had fallen off the board that it was mounted on. I just unscrewed to from the box, cleaned every thing real well and used a really good epoxy to glue it back on. Then I just put it back together. I just used it last night for the first time in about a decade and it worked great.”
Here is the link. The post above is at the bottom of the page.
Judy, I have never seen the Magic Mill grinder in person, but have owned similar mills,and repaired a few. I just checked a few photos on ebay , so I am familiar with the general layout of the machine. Here is a link to the original manual, which does not mention adjusting the 4 screws. http://preparedldsfamily.blogspot.com/2011/05/1976-magic-mill-owners-manual.html My guess is that is something that they would do at the factory to make sure the stones were co planar, and wouldn't expect a homeowner to adjust, since it would be difficult to get the adjustment dialed in correctly.
I would use a wire brush to get any loose glue off the stone and the board, mix up an epoxy, put it on the fixed stone, then get the fixed stone lined up with the rotating stone as best you can, then use the adjustment at the rear to press the stones together so that the moving stone will hold the fixed stone in the epoxy, then let the epoxy cure. It will probably be best doing this repair with the front face of the mill facing down. The reason you want the moving stone pressing against the fixed stone is that they both need to be in the same plane to get a fine grind, and using the moving stone to hold the fixed stone in place gives you the best chance at getting that aligned.
Hi! I just got a magic mill and it is is excellent working condition. Im looking to repaint and refurbish it. I was Wondering if anyone can tell me how to dismantle the magic mill. I particularly need to remove the motor in order to paint everything over. I’ve removed all screws that I can see including the 4 screws in the front and I still cannot access the inner portion of the stone to separate the stone and motor. Help! Thank you in advance!
On the one that shows up in that ad, it looks like the front wooden piece is held on by 2 sets of screws through each side, and if you took them off, the front piece and front stone would come off. I would advise against doing that , because you need to keep the front stone and rear stone in perfect alignment. If they are not coplanar, when you set it to the finest setting, the flour that comes out at one point on the surface of the stone will be fine, but at other points it will be much more coarse.
The magic mill that I have does not have two wooden screws on the side. It here is only one screw on each side which holds the wooden top. I’ve taken Out every single screw I can find and I still cannot remove the front panel...any other ideas? Thank you in advance!
It is possible the front was glued to the side, in which case, it will be hard to get it apart and get it back together. On the plus side, the motor looks fine in that photo. You could always try to tape off the rest of the cabinet with newspaper and painters tape and spray the motor with paint if you wanted to .
I wanted to give you guys an update regarding my refurbishing project... not to shabby for my first time with cabinet refinishing! It took me awhile to figure out how to separate the stones from the motor and from the front panel. But I eventually did and it was easy from there. I will probably write a blog entry soon about my whole project as I know there are many more Magic Mills out there that have a lot of years left that could use a good a good cleaning, a fresh coat of paint and an updated look. I’m quiite happy with how it turned out! ?
I just got a used Magic mill and saw your post. I was wondering if you would answer a few questions about your refurbish process so I can tackle mine. Not sure if I can give my email address or if I should post them here.
Let me say that you did a great job. Definitely brought an old girl back to life. Here are my questions if you would be so kind to share your knowledge. When you removed the motor by removing the four bolts, does the shaft pull right out of the spinning wheel or is something additional required? I just don't want to damage it. Wasn't sure what holds the wheel to the shaft. I'm thinking when you pull on the shaft, the wheel detaches and drops into the box? Did you encounter any alignment problems between the spinning wheel and stationary wheel when you reassembled everything? I noticed you put a handle on the front. Does this interfere with the door laying flat enough for the flour tray to be removed? I love the screw covers. Did you replace the screws that came all around the unit with new screws that work with screw covers or are these special screws? What brand/kind of paint/stain did you use and do you recall the colors? I really like this subdued look? Can't tell if you also applied any type of clear coat afterward. Also, did you spray this or use a brush or roller ? Looks great. Thank you so much.
First of all, Im assuming that you have the same exact Magic Mill that I have, correct? I know that there is another style/model out there. No, the shaft does not pull right out. You will need to detach the stone from the shaft which entails accessing the large bolt in the center of the stone. Detaching the stone from the shaft is a multi step process. First, you need to remove the stationary front stone. First start by removing the 4 front screws. The front stone Is glued onto a thick wooden panel. There is a rubber padding between the cabinet and the wooden panel holding the stone. Use a screw driver and place it in between the front cabinet and the rubber padding and gently separate, the two should separate on this plane. Be careful not to let the stone and wooden panel drop/fall unexpectedly as you are doing this. Once you get the front stone out of the way, you can access the center of the stone and remove the bolt holding the motor.
Thanks for sharing your knowledge. I wasn't sure about that but after your confirmation, I followed your recommendation and was able to get it all detached and disassembled. Looking forward to a new paint job. I'm taking pics along the way and may post complete instructions for future people wishing to do this. These things are pretty cool.
Awesome! Now, after removing the front stone, you can now access the stone that is attached to the motor. Using a socket wrench, loosen the nut that holds the stone to the motor shaft. Depending on how old your unit is, this may me tricky. It will be tight and you may need to use some force to loosen it. You may also need to purchase an appropriately sized socket wrench since the nut was pretty large. There will be a piece of felt that acts as a washer. This may need to be replaced. Once you separate the motor from the cabinet, then you can start sanding and repainting the cabinet. Will post pics soon!
Yep. I got her all taken apart and hope to paint this weekend. Filling in a few cracks and holes. Not sure if you recommend a certain type or brand of paint or stain or if you used a white primer over the original finish but I would like to be able to see the wood grain a little, otherwise it just looks like cheap melamine.
I just had the same problem on a mill we have had for some time. There is a hole in the inside of the front panel that coincides with the hold in the fixed stone. I understand I can epoxy the stone to the panel. However, I have not been able to remove the front panel. Taking out the four bolts from the front has no effect at all, which makes one wonder why they are even there. Any suggestions?
The stone is glued unto a thick piece of wood. This piece is "squeezed" onto the front cabinet by the 4 screws that are visible from the outside. After removing the 4 screws, find the space between the front cabinet panel and a piece of foam rubber. place a screw driver in-between the foam and the cabinet and gently pry to separate. Be careful not to let the stone release and drop unexpectedly. I can send pictures if needed! Good Luck!
Unfortunately I was not able to remove the front panel, by that, I mean the front portion of the actual cabinet. I was only able to detach the front stone (that was glued to another piece of thick wood).I hope I am making sense!
I saw your comment about removing the grinding stones to clean them. I want to remove the motor completely to paint the cabinet. How do you remove the spinning stone from the shaft. I tried pulling on the motor but the stone stayed attached. Any clue?
Yes it should just slide down. But my mill, being as old as it is, took a screw driver to gently pry it off the back end of the front panel. lol.. But I guess it will be easier with future cleanings.
I bought a vintage wooden-bodied Magic Mill grinder like the one in the photo. However, the lever on the back of the motor doesn't adjust the grindstone back and forth to coarse-medium-fine settings even when I rotate it from the 5 o'clock position all the way around to the 2 o'clock position. The adjustment mechanism seems loose where it goes into the back of the motor. I removed the bolts holding it to the back of the motor but there's nothing on the outside of the motor to adjust. Your suggestions and help are appreciated. Thank you~
I just jammed up the the stones on my Golden Grain Grinder while milling some clearly not sufficiently dry Rye grain (which I use for feeding my sourdough). An extensive Google search on manuals and removing the front stone after unscrewing the four front screws brought me here. So pleased to be able to read these instructions before applying force to remove that inner panel, which appears to have melded itself to the actual front panel of the casing. Many thanks for these clear instructions.
Has anyone responded to this comment or does anyone know how to fix this? I’m having the same issue. The adjustment piece is extremely loose and not moving the stone at all
David, does turning the lever move the stone back and forth like in this video, or does the lever just rotate without moving the stone https://youtu.be/jZ4oLaAlcRw?t=124
I just ran across this and have had this problem before, this was my fix. I was given a used Magic Mill by my MIL a decade ago for Christmas. When it came via UPS, the fixes stone with the hole in it had fallen off the board that it was mounted on. I just unscrewed to from the box, cleaned every thing real well and used a really good epoxy to glue it back on. Then I just put it back together. I just used it last night for the first time in about a decade and it worked great.”
Here is the link. The post above is at the bottom of the page.
http://preparedldsfamily.blogspot.ca/2009/07/wood-magic-mill-with-stone-grinder.html?m=1
So it does look look like it’s just glued on with epoxy.
It amazes me that the stone stays on. I will glue it!
Can you tell me how the 4 screws on the face are supposed to work? My guess is that they fine tune the pressure on the burrs?
Have a look at that thread, there is all kinds of good info in the posts. Maybe something in there will help.
Judy, I have never seen the Magic Mill grinder in person, but have owned similar mills,and repaired a few. I just checked a few photos on ebay , so I am familiar with the general layout of the machine. Here is a link to the original manual, which does not mention adjusting the 4 screws. http://preparedldsfamily.blogspot.com/2011/05/1976-magic-mill-owners-manual.html My guess is that is something that they would do at the factory to make sure the stones were co planar, and wouldn't expect a homeowner to adjust, since it would be difficult to get the adjustment dialed in correctly.
I would use a wire brush to get any loose glue off the stone and the board, mix up an epoxy, put it on the fixed stone, then get the fixed stone lined up with the rotating stone as best you can, then use the adjustment at the rear to press the stones together so that the moving stone will hold the fixed stone in the epoxy, then let the epoxy cure. It will probably be best doing this repair with the front face of the mill facing down. The reason you want the moving stone pressing against the fixed stone is that they both need to be in the same plane to get a fine grind, and using the moving stone to hold the fixed stone in place gives you the best chance at getting that aligned.
Hi! I just got a magic mill and it is is excellent working condition. Im looking to repaint and refurbish it. I was Wondering if anyone can tell me how to dismantle the magic mill. I particularly need to remove the motor in order to paint everything over. I’ve removed all screws that I can see including the 4 screws in the front and I still cannot access the inner portion of the stone to separate the stone and motor. Help! Thank you in advance!
I don't have one, but if you post photos of the sides back and bottom, I might be able to help. Most that i have seen, the motor is exposed and is bolted to the base with four bolts, but there would be no reason to remove it from the base.https://www.ebay.com/itm/Vintage-Magic-Mill-Wheat-Grain-Grinder-Dayton-Motor-3-4-H-P-115V-Wood-Cabinet/373150524053?hash=item56e1812295:g:wrQAAOSwPtZfOHsv
On the one that shows up in that ad, it looks like the front wooden piece is held on by 2 sets of screws through each side, and if you took them off, the front piece and front stone would come off. I would advise against doing that , because you need to keep the front stone and rear stone in perfect alignment. If they are not coplanar, when you set it to the finest setting, the flour that comes out at one point on the surface of the stone will be fine, but at other points it will be much more coarse.
It is possible the front was glued to the side, in which case, it will be hard to get it apart and get it back together. On the plus side, the motor looks fine in that photo. You could always try to tape off the rest of the cabinet with newspaper and painters tape and spray the motor with paint if you wanted to .
I wanted to give you guys an update regarding my refurbishing project... not to shabby for my first time with cabinet refinishing! It took me awhile to figure out how to separate the stones from the motor and from the front panel. But I eventually did and it was easy from there. I will probably write a blog entry soon about my whole project as I know there are many more Magic Mills out there that have a lot of years left that could use a good a good cleaning, a fresh coat of paint and an updated look. I’m quiite happy with how it turned out! ?
Looking forward to your post!
I just got a used Magic mill and saw your post. I was wondering if you would answer a few questions about your refurbish process so I can tackle mine. Not sure if I can give my email address or if I should post them here.
Bruce
you can post them here or you can start another post and ill be happy to chime in and offer advice.
First of all, Im assuming that you have the same exact Magic Mill that I have, correct? I know that there is another style/model out there. No, the shaft does not pull right out. You will need to detach the stone from the shaft which entails accessing the large bolt in the center of the stone. Detaching the stone from the shaft is a multi step process. First, you need to remove the stationary front stone. First start by removing the 4 front screws. The front stone Is glued onto a thick wooden panel. There is a rubber padding between the cabinet and the wooden panel holding the stone. Use a screw driver and place it in between the front cabinet and the rubber padding and gently separate, the two should separate on this plane. Be careful not to let the stone and wooden panel drop/fall unexpectedly as you are doing this. Once you get the front stone out of the way, you can access the center of the stone and remove the bolt holding the motor.
Thanks for sharing your knowledge. I wasn't sure about that but after your confirmation, I followed your recommendation and was able to get it all detached and disassembled. Looking forward to a new paint job. I'm taking pics along the way and may post complete instructions for future people wishing to do this. These things are pretty cool.
Awesome! Now, after removing the front stone, you can now access the stone that is attached to the motor. Using a socket wrench, loosen the nut that holds the stone to the motor shaft. Depending on how old your unit is, this may me tricky. It will be tight and you may need to use some force to loosen it. You may also need to purchase an appropriately sized socket wrench since the nut was pretty large. There will be a piece of felt that acts as a washer. This may need to be replaced. Once you separate the motor from the cabinet, then you can start sanding and repainting the cabinet. Will post pics soon!
Yep. I got her all taken apart and hope to paint this weekend. Filling in a few cracks and holes. Not sure if you recommend a certain type or brand of paint or stain or if you used a white primer over the original finish but I would like to be able to see the wood grain a little, otherwise it just looks like cheap melamine.
I just had the same problem on a mill we have had for some time. There is a hole in the inside of the front panel that coincides with the hold in the fixed stone. I understand I can epoxy the stone to the panel. However, I have not been able to remove the front panel. Taking out the four bolts from the front has no effect at all, which makes one wonder why they are even there. Any suggestions?
The stone is glued unto a thick piece of wood. This piece is "squeezed" onto the front cabinet by the 4 screws that are visible from the outside. After removing the 4 screws, find the space between the front cabinet panel and a piece of foam rubber. place a screw driver in-between the foam and the cabinet and gently pry to separate. Be careful not to let the stone release and drop unexpectedly. I can send pictures if needed! Good Luck!
Unfortunately I was not able to remove the front panel, by that, I mean the front portion of the actual cabinet. I was only able to detach the front stone (that was glued to another piece of thick wood).I hope I am making sense!
Once you remove the 4 screws push down on the stone and it will slide out the bottom. Just did this 1 hour ago to clean my stones.
Peter
I saw your comment about removing the grinding stones to clean them. I want to remove the motor completely to paint the cabinet. How do you remove the spinning stone from the shaft. I tried pulling on the motor but the stone stayed attached. Any clue?
Yes it should just slide down. But my mill, being as old as it is, took a screw driver to gently pry it off the back end of the front panel. lol.. But I guess it will be easier with future cleanings.
Hi All,
I bought a vintage wooden-bodied Magic Mill grinder like the one in the photo. However, the lever on the back of the motor doesn't adjust the grindstone back and forth to coarse-medium-fine settings even when I rotate it from the 5 o'clock position all the way around to the 2 o'clock position. The adjustment mechanism seems loose where it goes into the back of the motor. I removed the bolts holding it to the back of the motor but there's nothing on the outside of the motor to adjust. Your suggestions and help are appreciated. Thank you~
I just jammed up the the stones on my Golden Grain Grinder while milling some clearly not sufficiently dry Rye grain (which I use for feeding my sourdough). An extensive Google search on manuals and removing the front stone after unscrewing the four front screws brought me here. So pleased to be able to read these instructions before applying force to remove that inner panel, which appears to have melded itself to the actual front panel of the casing. Many thanks for these clear instructions.
Has anyone responded to this comment or does anyone know how to fix this? I’m having the same issue. The adjustment piece is extremely loose and not moving the stone at all
I am having the same Issue, have you found a resolution?
David, does turning the lever move the stone back and forth like in this video, or does the lever just rotate without moving the stone https://youtu.be/jZ4oLaAlcRw?t=124