Toasted Buckwheat Yudane Sourdough Baguette
Last weekend I made a sourdough baguette using the yudane method (20% flour from the recipe + equal weight of boiling water, left overnight). The yudane is added to the dough before bulk fermentation. I used fresh milled hard wheat for my first one.
Find that blog here https://www.thefreshloaf.com/node/69116/yudane-milled-wheat-sourdough-baguette
A yudane gelatinizes flour and traps moisture, creating a moist crumb. It also compensates for low gluten flours through gelatinization. To compensate for the water trapped in the gelatinization you can also increase hydration by adding more water as I did with this loaf. The gelatinization helps keep a high hydration dough manageable even when it is very slack.
This weekend I made a toasted buckwheat version because I have a lot on hand. I have toasted buckwheat for pancakes because I like the flavour, especially when maple syrup is added.
Once again this is a variation of Maurizio Leo's sourdough baguette recipe with low aesthetics!
Toasting Buckwheat
My dough recipe is 80% AP and 20% buckwheat. I measured the buckwheat out and toasted it in a skillet on high heat, mixing regularly until it was browned a bit. Here you can see before and after.

After toasting....

Making Yudane
After toasting I made the yudane by adding an equal weight (200g) of boiling filtered water. Note that I should have let the flour cool first. I got flash boiling of the flour in the mixing bowl because everything was too hot. This resulted in losing water to steam, which I had to replace by weighing it all out again.
I let it sit overnight. Next day I autolyzed the AP flour and filtered water for 30 mins with the yudane folded in. This was because this yudane was a bit dry (compared to the fluffy porridge I had with a milled wheat version with no flash boiling).
Mixing Dough
After autolyse I added salt and rye levain and mixed 5mins + 15 mins rest x 3.
This yudane had some bits that didn't fully integrate into the dough unlike last time.
Then overnight in fridge.


Next morning
Next morning dough had risen a lot in fridge. I scooped it out, shaped and baked.
A very slack dough. I bookfolded and coiled each portion, then did baguette shaping.

Loaves baked
Loaves were not as puffy as wheat ones. May be overfermenting / proofing. Slashing didn't work too well with slack dough. I was a little impatient and abusive in my dough handling which shows :p

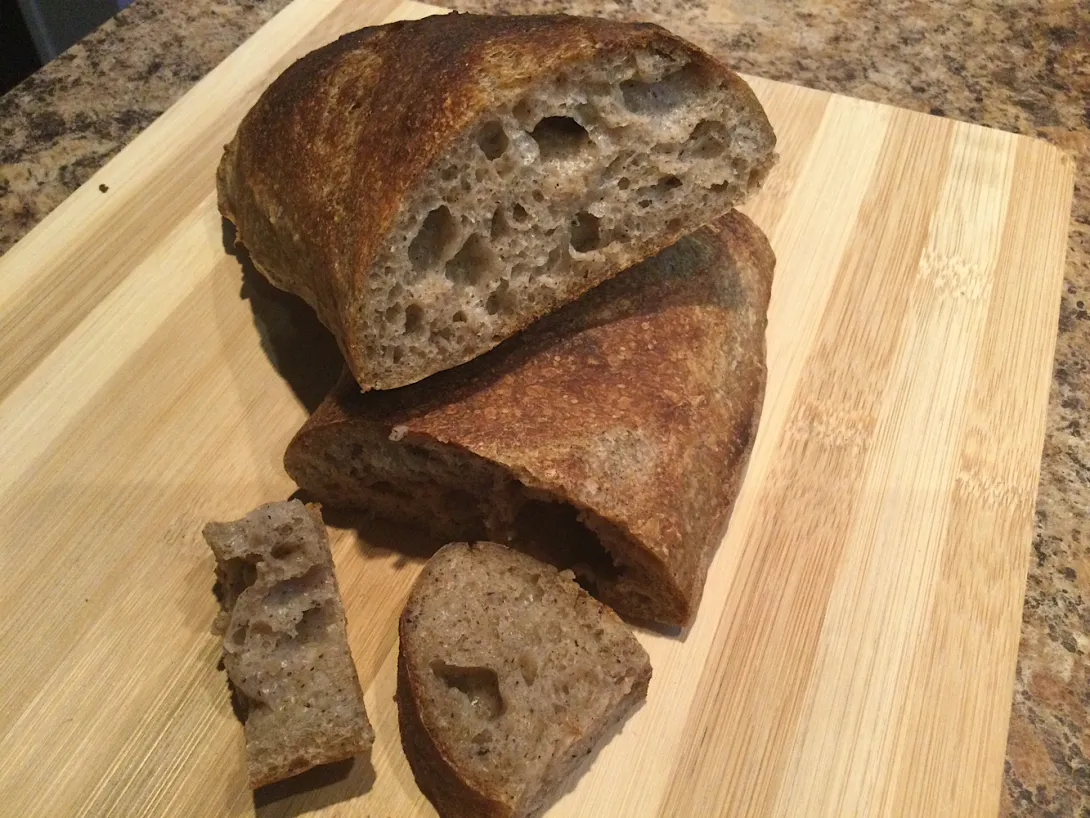
Crumb shot and taste
Here is the crumb shot. Moist texture, sourdough tangy and buckwheat flavour. I'll taste again tomorrow as toast.
EDIT: Next day, the tangyness had calmed down. It had a soft chew I liked, a light sweetness, and a pervasive mellow toasted buckwheat I really enjoyed. To me it was like eating some kind of slightly sweet, spiced breakfast bread. Liked it a lot!
EDIT: By lunch next day, amazing aroma in the bread. Toasted slices were great. Had as open faced sandwiches with homemade chicken salad. I am so pleased with the tastes and textures coming out of this process.
EDIT 2: Given the huge ballooning of the dough in retarded bulk, I think I would have a more controllable dough if I reduced its temperature before the retarded bulk. Cold water to make the dough, or ice packs around the mixer bowl. The dough gets warm from the vigorous mixing. A more controllable dough would make it easier to shape and slash for less ugly loaves. I might also have too much water in these. I think it was 87% including levain, yudane, autolyse, and added water duing mixing.
Next steps
I bought some farro (emmer probably) and sprouted spelt kernels so I will try some more milling and yudane over the next few weeks.

- happycat's Blog
- Log in or register to post comments
Very unique take on baguettes David, yudane for one but then toasted buckwheat. Such original ideas. How was the most important thing, the flavour, are you pleased with that?
Benny
Yes unique is the word.
Next day, the tangyness had calmed down. It had a crisp outside, soft inner chew I liked, a light sweetness, and a pervasive mellow toasted buckwheat I really enjoyed. To me it was like eating some kind of slightly sweet, spiced breakfast bread. Liked it a lot!
Is not easy to get just right and it takes some getting used to. I have done naturally fermented buckwheat breads with no starter. Here is the recipe:
Makes really good toast.
Lovely bake, David. You've got me craving buckwheat bread now.
That's quite an interesting process. I found 20% toasted buckwheat to pack a lot of flavour. Hard to imagine a 100% loaf. I know the rye baker uses multiple preparations of rye and then combines them so you get different flavours and textures.
Of the whole process. It is a popular way of fermenting buckwheat and you can find many examples and variations of this. The only thing I have to say is always go by feel when it comes to adding water when making the batter. Don't add it all in at once as depending on how well the groats have been drained the batter will differ.
https://breadtopia.com/gluten-free-fermented-buckwheat-bread/
I don't really follow any single recipe now. Just the method and the rest by feel - no measuring beyond however much groats I wish to use. Soak, drain, make batter adding however much water is needed, ferment till bubbly, add in whatever I like with some salt, portion out in loaf pan, final proof and bake. Simple. Can get a naturally fermented buckwheat loaf within a day with no starter.