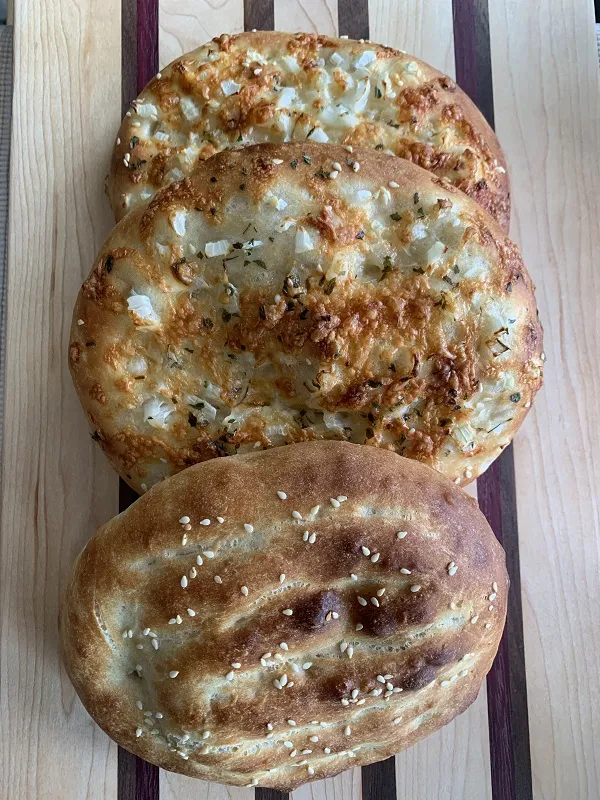
We've eaten 8 of these Barbari breads in the last 5 days. Only thing is, both times I made these, there was a rush for dinner time, so I feel that maybe they were a lil under-proofed so they got very puffy during the bakes (or maybe I didn't press the dough enough during shaping). Also, I made them with onions and cheese on top! 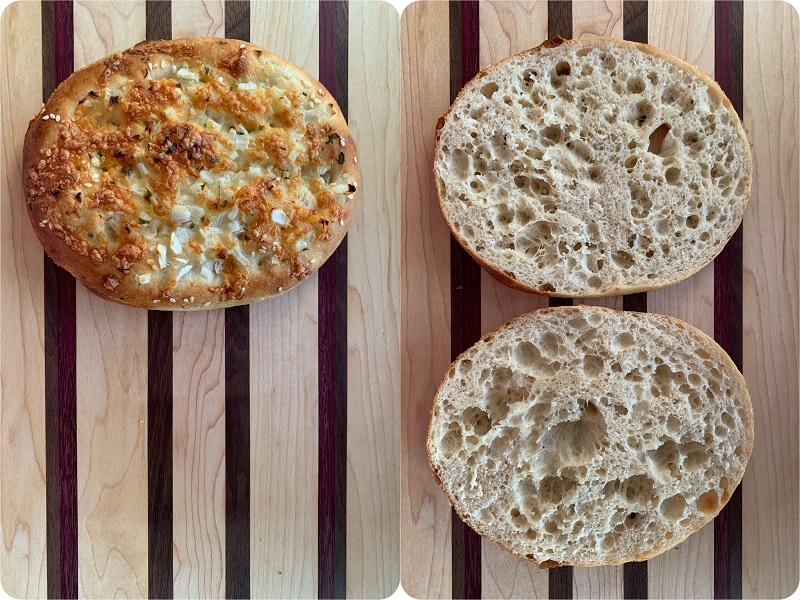
The roomal or glaze used for this bread is amazing. I'm starting to wonder if I could use it for loaf breads or other bakes even. Much like making Tangzhong, this glaze is cooked until it's thick, then brushed on the dough once it's cooled. It leaves a golden, crispy crust that I really like. There's a variation of it using baking soda, I've yet to try.
Barbari bread (Nan-e Barbari)
Adapted from
https://breadanddreams.in/nan-e-barbari/
https://www.unicornsinthekitchen.com/sourdough-barbari-recipe/
Dough
100g sourdough starter (I used barely doubled starter)
230g water
250g all purpose flour
100g atta flour
5g sugar
8g salt
2g instant yeast
15g unsalted butter / ghee
Roomal / Glaze
2 tsp all purpose flour
1/2 tsp sugar
1/2 tsp light olive oil
60g water
Topping:
Seeds like Nigella, sesame, black sesame, caraway
I used some sesame seeds, Havarti cheese and chopped Vidalia onions
Chapati / capati / phulka / roti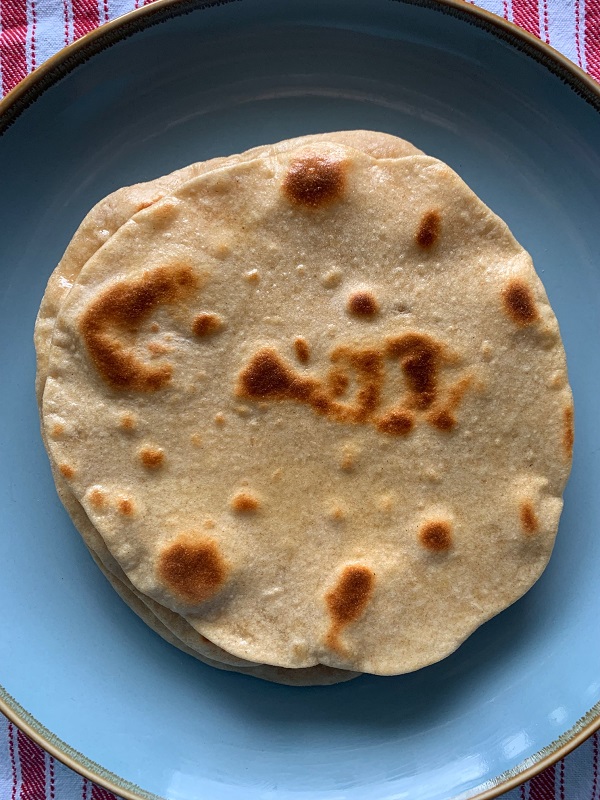
These are rotis I used to eat at our neighbour's in the late 80's (how time flies) and each time I get some atta flour, I remember them. Nothing beats freshly made, warm roti :)
Adapted https://veenaazmanov.com/indian-chapati-whole-wheat-tortilla/
Makes 4 rotis (about 6-8")
200g atta flour
1 tbsp light olive oil or ghee
3g salt*
140g water
Another batch was made using my liquid starter, these were chewier.
100g ripe sourdough starter (100% hydration)
160g atta flour
1 tbsp ghee
3g salt*
90g water
Ghee was used to brush on the hot roti, before serving.
*salt: this is a reduced amount as I'm no fan of salty roti for breakfast. Also, the Sharbati atta I'm using has a light sweet taste that shines through.
Marbled Matcha Shortbread Cookie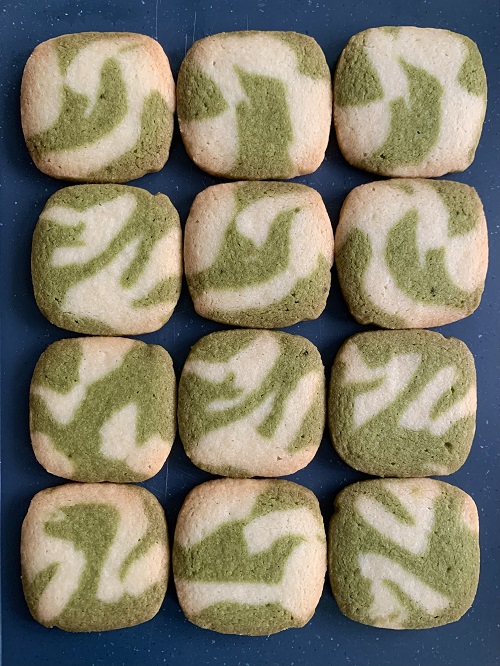
Now, here's something I've only made once this year. Why? There's at least 6g of butter per cookie; more than a teaspoon of butter each. :D
Last year I made these with a lemony twist, and baked them as a sheet before slicing them mid-bake. And most of them were given away, thankfully.
For this batch, I wanted to see swirls of matcha in the cookie (I've been making and eating matcha boba pearls too!) and to make a small batch, like enough to keep us in buttery heaven for a few days,.. or a week.
The ratios I use for my shortbread are based on butter instead of sugar. The internet tells me the ratio is 1:2:3 for sugar, butter and flour. This makes ridiculously sweet cookie if I wanted it buttery.
So, here's my ratio for buttery, mildly sweet, airy shortbread cookies:
1 butter: 1.25 flour : 0.35 superfine sugar
1 butter: 1.25 flour : 0.4 confectioner's / icing sugar
Adapted from various sites including: https://www.recipetineats.com/shortbread-cookies/ and https://www.popshopamerica.com/blog/marbled-vanilla-green-tea-cookies/
Makes 30-32 medium square cookies
240g all purpose flour
10g cornflour
3g salt
200g unsalted butter, room temperature
70g superfine sugar or 80g confectioner's sugar
Flavouring
4g matcha powder sifted into 1/2 the cookie dough
1/4 tsp vanilla extract into 1/2 the cookie dough
Sift together flours in a medium bowl. Set aside.
With a stand or hand mixer fitted with a paddle attachment, whip butter with sugar until fluffy and pale, scraping down the sides of the bowl every minute.
Add salt and continue whipping for a minute.
Fold in or mix on low, sifted flours until just combined.
Remove half the dough onto the counter.
Sift matcha powder to the half of the dough in the mixing bowl. Fold (or mix on low) until evenly combined.
Add vanilla extract to the other half. Fold until all the vanilla is absorbed.
Divide each dough into 2 pieces. Roll each piece into strips of about 15cm/6” long, then twist and fold these 4 strips together.
Shape the dough into a log. Fold the log and twist it once again.
Place the log-shaped dough on parchment paper and wrap it. Flatten the sides to shape it into a square. Wrap the a dough with cling film. To help keep the shape of the dough, I used an empty cling-wrap box. 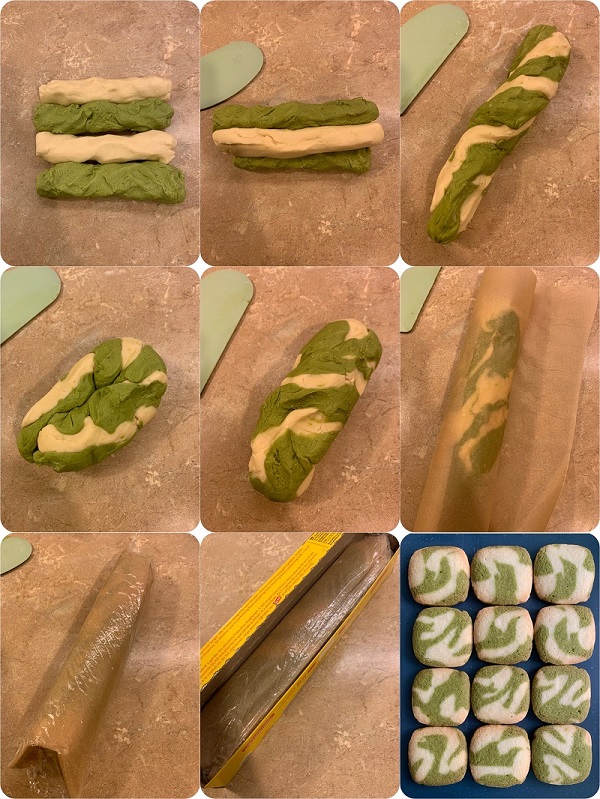
Place the dough in the fridge for at least 2 hours or overnight..
Preheat the oven to 160°C/325°F.
Slice the dough with a sharp knife into 5mm or 1/4” slices and place on a parchment lined baking sheet, keeping each cookie about 2cm or 1” apart (the cookie spreads a little due to the butter). Chill the sliced cookie for about 15 minutes, if they've begun to soften too much.
Bake the cookies 15-20 minutes, until the edges are golden brown. Let the cookies cool completely before storing in an airtight container.
Coconut Loaf bread with butterfly pea flowers and pitaya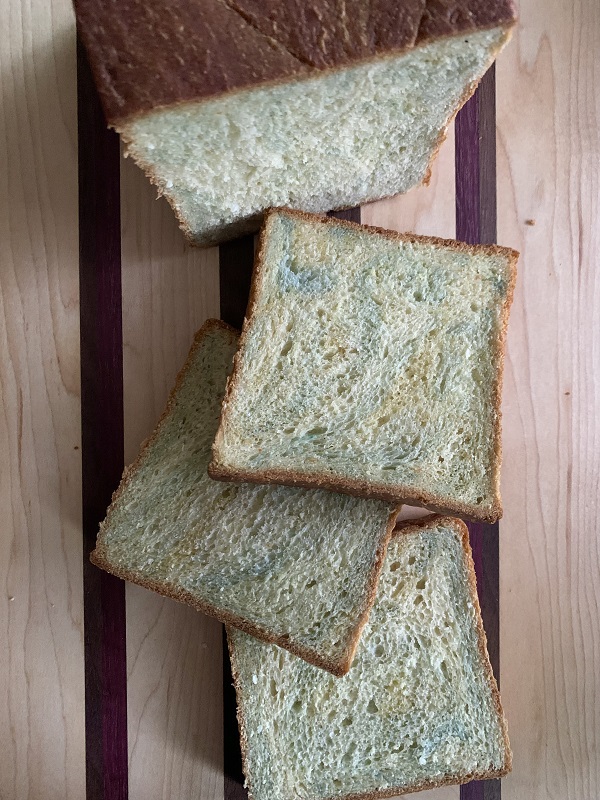
I made a variation of my coconut loaf, this time with butterfly pea flowers for blue and pitaya puree for a pink colours.
Well, my pitaya pink disappeared, and I was left with a pastel blue and faint brown streaks of pitaya pink. 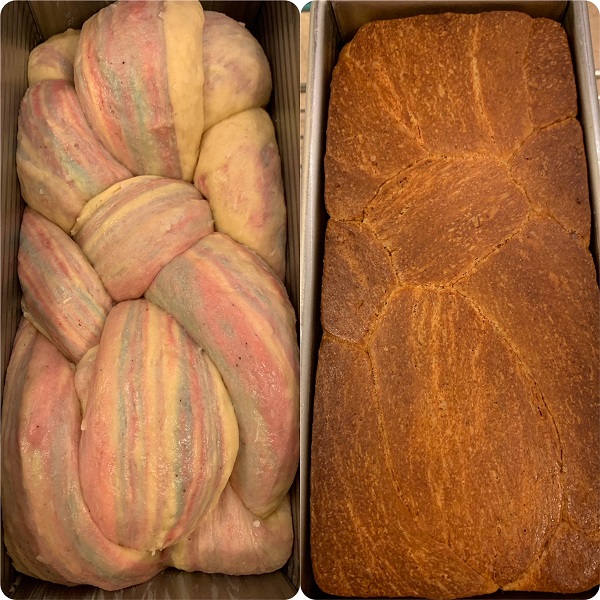
Oh, that was one scary colour combo! Good thing, it's an edible, fragrant loaf, I don't mind the missing pink hues now :D
okay, have a happy weekend!
- Christi
- Kistida's Blog
- Log in or register to post comments
More of your beautiful baking on display here Christi. Love the marbled matcha shortbread cookies, I bet they’re divine. The lovely pastels of your braided coconut loaf are pretty to behold.
Benny
They’re all gone so I made something last night with the liquid malt I received for a tiny trip this weekend.
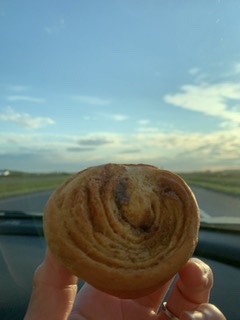
As usual the recipe was scribbled on paper, will read through again once I’m back. 🤣 laminating made sure there’s an overload of cinnamon sugar! Happy weekend!!
Wow Christi you have been busy i do like the Barbari breads they look great and i can see why you have eaten a few, and i will definitely have to have a go at these too, and i have just the flour that i think will do a good job its the Italian Stagoni Macinata a Pietra a fairly fine stone ground wholemeal that i managed to get a hold of, In fact ive made a loaf with 100% of that flour and it is waiting to go in the oven. i was going to use my cornflour paste but have actually quickly knocked up some of your Roomal glaze and applied it and its now in the oven. we shall see how it goes!
kind regards Derek
Christi now Out of the oven washed with the Roomal wash/glaze that you posted gives a similar result as the boiled cornflour paste wash.
regards Derek
Damn you all!!! I am going to have to start making barbari again now!!!
(It's a good bread.)
I was looking around for photos of my last one but all I seem to have is this mid-bake shot:
Image

d.
Bake some Barbari bread again Dan!
- Christi
Sigh . . . if I must : )
Tell me (please) - what's the benefit/difference when using such a comparatively complex roomal? I have only ever used flour and water, with the only differences being ratio and cooking time.
The things I do . . .
Image

Image

For this, I divided into three distinctly different sizes to see what would work best. The baked barbari is the middle size (~290g) and a good size for my pizza stone. The large one on the board is ~330g and was too large so was something of a disaster as it draped off the stone and I then cut it and re-shaped but obviously it was not going to rise much after that!
d
yours look amazing! Thank you for taking the time to make these.. :p Hope you had fun at least?
- Christi
I would say I had fun eating them but it was over all too soon!
My benchmark with barbari bread - right or wrong - is to be able to tear off strips along one the grooves and, in that respect, this bake succeeded. I think I may do an experiment with roomāl consistencies, however, to see how that impacts the result, as the pictured bread was quite brown and crunchy on top after a shorter time than I expected. (But the interior was good and it wasn't burnt.)
Puffy can be good, though - I have a thing for flatbread and I constantly have to remind myself that these are, predominantly, breads of antiquity, predating modern methods and equipment and ingredients. Many have been dispersed and many pre-date the borders of specific countries as we know them today. As such, diversity of style, preference, practice and recipe are inevitable. Some, of course, have been codified by law or at least convention but most of these started as (and remain) simple breads, which took the forms they did based on the ingredients and aparatuses available and the lifestyles of the people.
The point that I reinforce to myself whenever I attempt some rendition of a flatbread at home or find some version offered that is not the way I think the bread should be is that these breads had their forms dictated by the neccessities of the time and situations of their creation. They weren't planned as a certain desired 'perfect' end result that diligent bakers then sought to create, preparing batch after batch and trying flour after flour until their realised their vision. On the contrary, the finished product was an outcome of applying the resources available and the techniques known and not they other way around!
What we see as 'barbari' today is, to my way of thinking, a kind of idealisation of some 'correct' form of barbari that best expresses the properties that 'people' consider typifies this as a unique type of bread.
For all you or I know, those people who first developed what is now know as 'barbari' may well have preferred the 'puffiness' you achieved but perhaps the flour or cooking methods available to them was not ammenable to that. Who's to say?
I particularly like maneesh (substitute your own transliteration) and when I see a thick manoushe (again . . .) I catch myself exclaiming, internally: "that's not maneesh; maneesh is supposed to be thin!". At those times I have to check myself and remember that my preference does not dictate what a thing is or what it should be and a thicker manoushe is every bit as valid a preference for others and mine is for me.
All that said, my suggestion if you want a less 'puffy' result is to stretch the dough just before or as you put it in the oven. The steps for my method are:
The important part for me is that it only goes onto the baking surface right at the end. If you are using a cookie sheet or pan, don't form the barbari on it. Instead, form it (steps 5-8) on the bench/board and only when ready to go into the oven would you then pick it up and, stretching as you do so, place it onto the sheet/pan, again, stretching as you lay it down.
This final stretching is a two-part process as you are first stretching it simply as a by-product of picking it up off the bench. The second stretch, occuring just seconds later, is as you place it onto the sheet or peel or (in my case) directly onto the hot pizza stone in the oven. That second part is when you bring it to it's desired length.
As above, your preference is as valid as mine or any on else's but, with the two barbari bakers that (pre-lockdown!) I visit, and having seen videos of several bakeries, the grooves and stretching combined can sometimes result in little tears in the dough. I have no idea whether this in something to be avoided but it does indicate just how forcefully those grooves are applied and how much it is stretched out.
Personally, I prefer when that doesn't happen as those bits are a little too cripy for me but I think that's just a natural side side-effect of the level of dimpling and stretching and so part and parcel of the form, when it happens.
More barbari tomorrow, probably!
Thanks for giving me the kick.
d.
Because why not bake another 3 loaves?
This time I tried three different consistencies of roomāl glaze, roughly corresponding with 1, 2 and 3 teapsoons of flour per cup (250ml) of water. I think I liked the 3 tsp per cup best but perhaps a little lower would be good so, as that is 1 tsp per 83ml, I might do 1 tsp in 100ml and that's more than sufficient for my 3 small loaves, which were all the same size this time at ~285gm. That's a good size as it allow for further experimentation as I can stretch them relatively thin and still fit on my pizza stone, if I want.
I also mixed up the flour a little but, honestly, the flavour was a bit naff, despite it being a relatively long overnight room temp ferment.
My understanding is the barbari dough should always be fermented at room temp but I am wondering whether I might follow a similar process as I do for my baguettes, with a decent fridge retard or perhaps I will just go for a much longer room temp ferment. I'll see how I feel, I suppose.
Anyway: today's offering:
Image

Image

One a little puffier than the other - I don't think the glaze mattered but it absolutely could have as, when heated on the stove, the starch and water undergoes gelatinisation to form a gel, which then thickens and stabilises as it cools. While it is indeed stable, when subject to significantly higher temperature in the oven the water in the gell will all evaporate and the gel with therefore contract. On can imagine this putting pressure on the baking bread, keeping it from rising much. The thicker the gel, the lower the water content and the faster it would presumably evaporate and thus the sooner is would excert that contractive pressure. (Is that a thing? Is 'contractive' even a word? Eh, it is now.)
Or not - I really don't know but those are the paths it seems my mind insists on exploring.
d.
.. more! Thank you for sharing your explorative Barbari adventures Dan, what a joy to read! And I bet they were tasty too.
I will make them again (I’ve a long list of flatbreads to make) with some changes like the roomal one you mentioned. This week I made some non-Barbari things before running away to eastern Quebec (again), while going oooh and aahh at the start of changing colours in the leaves, so so beautiful. ☺️ Until then, happy weekend!
- Christi
It’s nice to get a lil “busy” making things, won’t you say? Did you like the crispy roomal effect?
happy weekend! :)
- Christi
Not sure whether it made it any crispier perhaps a little darker so showed the relief in the scoring more readily im sure it will be really good on the barbari flatter breads, it will certainly aid the seed sticking to the crust as the Cornflour paste does!