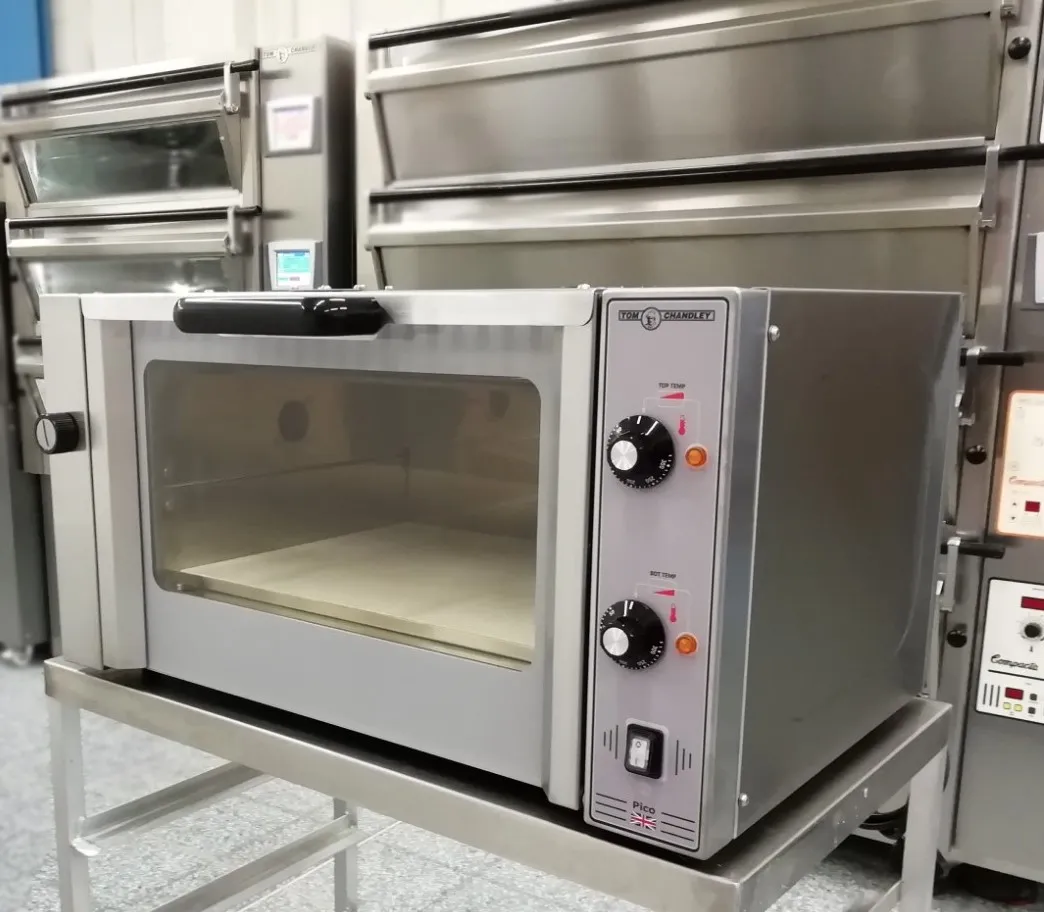
The Chandley Pico is a scaled down professional Baker’s deck oven. The case is heavy gauge stainless steel. The door clasp grips the door tightly closed and requires a firm tug on the thick door handle to open. The controls are simple, mechanical, and straight forward; no digital here. It looks like it will work for a hundred years. I use the term “professional” here on purpose. This oven is a functional tool, designed for the baker to produce perfect loaves in small batches. It is not a high-end residential specialty oven. If you look closely, the metal panels have tooling marks. Some of the edges show mechanical punch marks. This oven was not made by a robot in an automated factory. It almost feels hand-made by craftsman. If you want a kitchen showpiece, look elsewhere. If you appreciate a well-designed, functional piece of equipment that just works and works well, this oven should fit the bill.
Basics
- · Exterior: 30” Wide plus vents x 25” Deep x 16.5” High (762 x 635 x 420 mm)
- · Interior: 18.5” wide x 15” deep x 7.5” high from stone to upper heating coil
- · 240v single phase. This oven came with a U.K. plug. I swapped it with a U.S. 6-20P
- · Independent controls for the top and bottom heating coils, marked in degrees Centigrade
- · Built-in steam chamber. You need to fill it when loading the oven. Manual vent on the left side
- · Top temperature is 320°
- · No inside light.
What’s great about it
- · This oven accepts standard half-sized 18” x 13” sheet pans.
Neither the Rofco B5-B20 nor the Häussler Mono will - · The built-in steam chamber doesn’t take up any baking space
- · The controls are basic and analog. One on-off switch, two dial thermostats. There are no electronics here to get messed up and require a reboot to operate. No clock to set
- · Heats up fast
- · Reasonably priced
- · Produces great bakes
- · Arrived well packaged and undamaged
What could be improved
- · The door is two pieces of glass that are open at the top and bottom. There is no easy way to disassemble for cleaning between the two
- · The door is spring loaded and when open on my oven is a bit higher than the baking stone. At counter height, the hot edge of the door can easily touch your forearms when loading and unloading and cause a burn. Wear long mitts or long heavy sleeves or be extra careful
- · The included flask to pour water into the steam chamber has a rounded bottom so you can’t set it down when it is full of water. I put the flask into a cup to hold it up
- · It’s a little tricky to fill pour the water from the flask into the steam chamber
- · Some of the protective plastic covering was under the screws, so I needed to loosen the screws to remove the plastic. Not a big deal
- · Maybe a high-temp pizza option.
Why did I choose the Chandley
Here in the U.S. it is hard to find a reasonably priced bread oven. I was seriously considering the Rofco B5 or B10 but was put off by the 6” baking height and lack of steam. Adding steam meant subtracting baking area which is already at a premium in a small oven. The next size up was a Häussler Mono which I felt was a bit pricey for the size. Any counter top bread oven actually made in the USA was well over $3000. Someone on TFL mentioned the Chandly so I started researching that. It had more internal height, built-in steam, and, when I was shopping was 750 GBP or about 1000 USD. It seemed a bargain. Unfortunately, shipping from the U.K. to the U.S. almost doubled the price. But I believe Brook Bake LLC will be importing them to the U.S. which should help bring the cost down a bit. You can email andy@brookbake.com for more info on that. If you do order one, I highly recommend you get one or two of the optional baking trays. They are heavy aluminum and fit perfectly inside the oven. You can also use them as a peel to load. I’m very pleased with this purchase. I’ll try to add some pictures later.
Cheers,
Red
Thank you for the write up and review. I’ve had a few time conflicts when proofing took longer than expected and the oven was needed for baking my loaf and making dinner. I’ve just started tossing around options. Might have to look closer at this.
Thanks for the review. So it doesn't have steam injection, you just add it to a vessel - similar to a cast iron pan with rocks or other thermal mass? Does it seem well sealed so it keeps in the steam? IIRC, the Rofco has a vent to allow steam to escape in the later stage of baking, does this oven have that as well?
The oven is not connected to a water supply and it is not steam injection. This video shows the process:
https://www.youtube.com/watch?v=6XngxuFgCFw&t=6s
Note the video has an older model, but is functionally the same. The steam pan is under the stone and you can't really get to it without disassembling the oven. I haven't noticed any leaks. It seems to work well. There is a vent on the left side of the oven that you can open and close. When the vent is closed, you can see some steam escaping. When the vent is open, the steam escapes faster. BTW: I use distilled water so there should be no buildup of anything.
Thank you Red, for your detailed and well written review of the oven. It looks like a great bit of kit and I know a lot of UK bakers are buying them. Now if I could just find a little bit more space.....
Do you have any pictures of loaves baked in the oven?
Lance
Red , thanks for the link, it also showed the water bottle, that makes sense that they tell you how much water to use per bake.
Great job on your assessment of the Chandley oven and its pro's and con's. Like Lance, I am very interested to see and hear how your baking goes. Prior to doing an oven mod I was seriously looking at the Chandley oven and still have interest. Keep us posted on your results
Red, how thick is the stone.
I wonder if 1 or 2 lights could be installed. I do lots of in-oven video.
Did you get the stand? If so, how do you like it.
you said that some of the steam leaks out. Where is it leaking? From the door?
WOW! I emailed Andy and the cost including shipping for the small Pico and a stand is $2530. (About $2000 without the stand). That is expensive for an oven with little history of performance. It’s the $410 shipping fee that runs the price too high, IMO. Rofcos ship for free from PHG.
I plan to wait and watch...
International shipping costs don't get down to reasonable levels until the manufacturer ships a full container-load of the product. Hence, distributors.
Dave, Brooks Bake is the US distributor. Much like PHG is the Rofco distributor for the US. Wished Brooks shipped free... I like what I see in the oven. But need more accounts of baking by experienced bakers. Too bake Geremy didn’t get one of these. He’d gives us the low down.
Hey, I'm not trying to sell these. There's nothing in it for me. Just sharing my experience with the TFL community.
But are you comparing oranges to tangerines? You asked for a price with stand, does the Rofco come with a stand? Did you add in the Rofco steam tray? Chandley has been around for 77 years, Rofco 25. I paid $750 for shipping from the UK, so $410 seems like a big improvement.What's great is, at the end of the day, you get to purchase whatever you feel is the best value for you, or not purchase anything at all. Having more options is better for everyone.
Cheers,
Red
The stone looks about 1/2" thick. If you want more stone, you could always put another on top, but it seems sufficient.
I did not get the stand. I put mine in a 36" wide x 24" deep wire shelf rack.
Some steam comes out of the steam vent on the left whether it is open or closed. Just more comes out when it is open. If you really wanted to seal that off you could probably get a 2" steel pipe cap from a hardware store and put it over the vent. So far, this hasn't been a problem for me.
Installing lights are on you. I'm sure you could do it.
Cheers,
Red
See subject line.
Red, your pic is there. Thumbs are tricky. Just don't select the "thumb" version when you go to insert it in the post/comment.
If the stone sits flush against the walls, you may get some of the effects that user KendalM had with his pizza oven, repurposed for bread. See his blog or track page at: https://www.thefreshloaf.com/user/kendalm
His challenge was/is that because there is no airflow from _below the stone_ to _above the stone_, the air above the stone stays below desired temp, while the stone surface stays at or above its desired temp.
Yet, if he turned on the upper element, the radiant heat from the upper element would over-cook the top of the bread. Even when turning off the upper element at the time of loading the dough, the upper element and shiny roof surface still remained hot enough to radiate excess heat downwards. It would set/harden the upper crust before full dough expansion took place.
It took a lot of experimentation on his part to determine how soon before loading the dough he had to turn off the upper element.
Since your baking chamber is taller than his, that extra distance from upper element to the upper surface of the dough may lessen the effect of residual heat radiating downward (radiant heat varies inversely to square of distance) and over-darkening the tops of your loaves.
He then further experimented with using the upper element towards the end of the bake, in order to get the correct degree of browning.
--
User barryvabeach also uses a pizza oven to bake bread, and has advised others on the use of "top heat" when baking bread in countertop ovens.
I realize that your's is not a "pizza oven" per se, but there are similarities in having a stone over the lower heating element, while also having an "unshielded" upper element.
If your stone sits flush against the walls that would be another point in common with KendalM's oven.
Net: I'm just pointing to those two users as possible helpers/consultants should you need advice in "dialing in" the details of when and how much to use the upper element.
Hope this helps a bit.
Bon chance et bon appétit, amigo.
There is a small gap between the stone and the walls, Not enough for air circulation. Seems to bake just fine though. I do anticipate years of experimentation with different top and bottom temp settings.
Cheers,
Red
Surely that's how a big deck oven is set up anyway? And they work just fine!
And, (slightly off topic), there's this big thing with home ovens that you shouldn't have direct top heat in the early stage of the bake - which I agree with incidentally.
Yet with deck ovens, not that I know much, but I never hear of bakers turning off the top element - if anything, the top temp is normally set higher than the bottom throughout the bake.
What gives?
Red, how did you set the thermostats for the bakes?
Lance
Lance, I thought commercial "deck ovens" (proper) have a 2nd stone, below the upper heating element, above the bread. Hence, the bread does not get direct radiant heat from the upper element (which is red hot, and over 1000•F), only re-radiated (lesser) heat from the upper stone.
Someone please correct me if I'm wrong.
I used to think this too, Dave, but FueledByCoffee put me right in this old thread
It's surprisingly difficult to see pictures of the insides of deck ovens (OK, I know, I'm sad!), but here's the video - have a look yourself.
Lance
Ah so. The bare upper elements were visible in video. Thanks.
I think I'll start a new thread/post to explore that..... Why pizza ovens, home ovens, and consumer-grade countertop ovens burn the bread when using the top heating element, but commercial deck ovens don't.
Let's hope some deck oven users will chime in.
Lance
Sour Dough: Top Heat 250, Bottom heat 210* (degrees C)
* For SourDough and Artisan products both temperatures may be increased.
This is a bit embarrassing, but when I went from single-loaf baking in a cast iron combo pot and a 400°F mini-oven once a week to two loaf baking in the Chandley, coupled with Covid, I've only done three bakes since installing the oven. I just can't go through that much bread that fast by myself.
The upper picture is a 70% whole wheat from the Butte Mill Flour Company Colorado coarse ground, grown by hippies, hard red winter wheat. I've found that adding 80% hot water to this wheat and soaking overnight softens it up enough for a good loaf. I preheated the bottom at 300°C, top at 250°. On loading and adding the water for steam I reduced the bottom to 230° for the entire bake.
The bottom is a Tartine style using Central Milling ABC flour, bottom at 230°C, top at 250°
I love the mortar board hats on the bottom two and the others look good for 70% WW!
Lance
Great looking loaves Red! Looks like the Chandley is working well.
Hi Lance. I'm wondering if you could elaborate as to why you shouldn't have direct top heat early into a bake, and if that is still true if your loaf is in a dutch oven versus on a stone. Very curious to know more about this.
The theory is that when you put the loaf into a hot oven, you want to get the maximum oven spring before the dough skins over as part of crust formation. Obviously this will stop the crust expanding so you need to delay it.
The direct heat from the top element is the main factor responsible for the skinning over, with the element itself at a temperature of maybe 1000F; so the idea is to switch off the top element for, say, the first twenty minutes while the loaf is expanding. During this phase, heat will come from the bottom element and the stored heat in the oven metalwork and bakestone.
With a dutch oven, I don't think the inside top will get sufficiently hot to cause an issue; the top will have a shielding effect from the direct heat of the top element.
Lance
As mentioned above and summarized really well, it took many bakes to really tune the protocol for baking bread in my very similar Chinese oven. What I do now monitor the temp until it hits (internally using an internal thermometer) about 540F. From here I turn off the upper and wait 10 minutes. The temp will be around 510F at this point. I load the dough and then add about 5-6 oz of room temp water to a rofco steamer. By the time the door is shut and the steam has been captured we are looking at internal of about 460F which will continue to drop to about 440F over the next 5 minutes until the rise has completed. Around 6 minutes I crack the door a half inch or so and let the steam evacuated. 2-minutes later I shut the door and then fire the upper again for 2-3 minutes and then shut it off. If I don't hit the upper, the temp will drop to under 400F and will have very pale loaf. Hitting the upper for 2 minutes gives a good boost and doesn't affect the rise because that all finished by this point. What I think is really cool about this oven is the steaming system and I think it's a good price considering I dropped 1500 for something I had to modify and hope doesn't explode. Personally I am happy with this size oven because as you all know - long baguettes is my thing. Now, from here I keep thinking about the next step, and what I would absolutely love is something bigger and deeper so that I don't have to load sideways. I got some mileage to go before we get there but for me, a rofco is just too dang small. This oven is really exciting !
https://chandleyovens.co.uk/product-category/artisan-bakery-equipment/
The Pico Plus is double the size and takes a full baking tray. It does cost more, but not twice as much.
Cheers,
Red
Hi Red, a big "thank you" for your timely and detailed review. My hobbyist baking obsession's gradually destroying my domestic oven so I've been considering the addition of a small bread oven. The Chandley looks really interesting - volume, temperature, steam all look just what I need. My kitchen doesn't have much room though so I plan to store whatever oven I get on a wheeled trolley in an adjacent room (same level) and wheel it into the kitchen when needed. Does that sound like a viable option, does the Chandley look as if it might handle a mobile life?
Thank you for sharing, and I hope you beat that darned Covid bug and get back to baking often again soon.
I have mine on a 36" x 24" wire shelf. You can get these shelves with lower uprights and wheels. I put some ceramic floor tiles under each corner to keep the feet from pressing through the wire gaps. As long as the base is sturdy, you shouldn't have any problems wheeling it around. Or maybe the Chandley base has a wheel option. You can check with Brook Bake.
Cheers,
Red
hey Red, thanks so much for writing up this review! I did go ahead and purchase two ovens (w/ base) and am waiting on a September arrival. 🤞🏻
an electrician is coming this week to put in 220v in my garage that I'm converting to a cottage-law bakery (subscription bread service) – could you tell me the type of connection/plug it has? the company's PDF says POWER 220V – 2.47kW, 11.23amps (50 or 60Hz) but doesn't give anything else. with refrigerator spec sheets they give you lots more info...
Voltage 115/60/1
HACR Breaker 15.0 Amps
Connection 5-15P
Voltage Range 104-126
Amperage 8
Consumption 3.47
thanks in advance!
all my best,
yam
Moontower Bakery, LLCYam Tolan
moontowerbakery.com | @yamtolan
I ordered my over direct from Chandley and it had a UK plug on the power cord.I just swapped the plug for an appropriate sized US NEMA plug. Your electrician should be able to do that in a few minutes. If you get your oven from a distributor they may have already put the correct plug on. Just check with the vendor.
Cheers,
Red
thanks!
Hi Yam,
I ordered my Pico+ from Brook Bake. I just got it setup yesterday (about to do my first bake... wish me luck). The unit arrived very well packed, and without a plug. There's a 6 foot 'naked' cable coming out of the lower right corner of the rear panel. The electrician who installed the necessary 220v outlet put on the plug in a couple of minutes. No big deal! He also added a 20 amp breaker to my fuse box.
The Brook Bake page for the Pico has slightly more info on the electric requirements:
"Recommended: 6-20P Plug - NEMA Straight Blade 20 Amp, 250V Power Cord Plug (Rated for 10A / 250v. Mates with a 6-20R receptacle)"
Hope this helps!
yes, Andy Bray from Brook Bake just sent me this info:
---Full electrical spec: 220/240v (230v) - sgl phase - 60Hz - 2.47Kw - 11.23 ampsRecommended: 6-20P Plug - NEMA Straight Blade 20 Amp, 250V Power Cord Plug. Mates with a 6-20R receptacle)
We strongly recommend you wait until you receive the ovens to determine best place to site in relation to outlets required.---along w/ a manual: Pico + Pico Plus Manual.pdf
and let us know how the first bake goes!! fingers crossed for you!
Happy with this! Used 250 upper / 230 lower (as I think @redpentalceb mentioned he did). Came out great. I've never gotten such a satisfying shade of deep-brown/caramel, and the blistering is really superb... I don't know how it's possible, but the steam seems to get trapped even more thoroughly than with the dutch oven method I've been using for the last year+??
The lighter loaf is the one I pulled out 10 minutes before the other ones (because why not experiment a bit). The darker ones were in there for 43 mins total (first 20 with the damper closed). Definitely need a better peel for extraction; currently I'm using an 18'x29' square-edged wooden peel for loading, which is perfect since that's very nearly the exact size of the deck... but it was a little tricky to get them out with that same peel. Thinking I'll get a longer handled aluminum one to unload, maybe.
Looks like a magazine cover.
For a peel, I bought one of these. Perfect fit.
https://www.webstaurantstore.com/gi-metal-a-45rf-60-azzurra-18-anodized-aluminum-square-perforated-pizza-peel-with-23-1-2-handle/212A45RF60.html
-Red
Ha! I was eyeing something more along these lines… ;)
https://www.webstaurantstore.com/american-metalcraft-3512-12-x-14-aluminum-pizza-peel-with-21-5-wood-handle/1243512.html
And, in fact, this afternoon an ancient BBQ spatula with a long handle did ok… definitely not stylish, and only semi-functional, but $0 is a pretty competitive price!
Hi Red,
I’m just about to pull the trigger on the Chandley Pico (ordering from BrookBake), I was just wondering a bit more about your experience with it? I’m a home baker and looking to modestly scale up, at the moment I’m baking in a challenger bread pan and can only bake 1 loaf per hour (roughly)… I bake 3 loaves per week usually, so just the time savings seems like it’d be worth it. I don’t plan on baking more than 6-12 loaves at a time for the foreseeable future. I bake almost exclusively batards around 800-1000gm each, do you think the Pico could handle 3-4 at a time?
Also, the folks at BrookBake are really pushing the cart they make for it, which is like $670 extra… The oven is gonna live in my garage and I have access to wire shelving as well as steel or wood work benches which will be substantially cheaper. What are your thoughts about that?
Thanks!
Zach
The cart depends on your needs/usage. I have mine on a 24" x 36" wire shelf and I put some old ceramic tiles under the feet to distribute the weight. You can see my setup in the picture with the mixer and pots. If you want to move it around, a cart would be good.
I recommend getting one or two of the Chandley trays.
The baking surface is 15" deep by 18" wide. Do some measuring and see how many loaves you can fit. I have found for 1000g-1100g batards, two fit well with space around them. Three that size would be tight, they might expand and touch each other. But I don't have great loading skills.
Cheers,
Red
Thanks for the quick response! I think my biggest concern was the pressure they were putting on to get their cart, as though it was a safety more than a convenience issue. I’m getting the feeling though that I’ll be able to operate it easily enough without having to spend $600+ for a stand.
What are the trays used for? Baking on or just loading?
Both. Can load and bake. They are fairly thick and fit perfectly. Until I got a peel I used the tray to load. But they are handy for scones, pastries, etc.
Awesome, thanks again! This has been really helpful
Hey RedapentacleB
Thanks for sharing your experience with the Pico. I’ve been hunting all over the internet to find some good video/photo footage of the bakes. One thing I’ve seen fairly consistently is the colour is quite uneven - either there’s not much blistering, some really significant dark spots rather than an even browning and the sides curving to the base being very pale In comparison.
Im starting to think it could partly be steam issue, do you think the included tray produced enough steam or are you adding ice cubes/quick water spray before loading? Any updates on your temp and time schedule?
I’m nearly sold enough to pull the trigger on the Pico Plus (shipping to Australia) but would love your thoughts now you’ve had it for a few months.
Cheers
Attached is a picture of this morning’s bake. Dough was a bit under-proofed. Top was set to 250°C, bottom 230°. I lowered the temps to 200°C after 20 minutes and baked it for an additional 30 minutes. Pretty even all over. This is 50% course whole wheat, 50% Central Milling ABC flour, 10% Honey, 20% 9-grain soaker, about 80% water. I love this oven. Based on my research here in the U.S.A. there is nothing better for the price.
I classify myself as a beginner, so I don’t have the experience and distinctions to be able to say how the oven settings actually effect the final product. I do know that everything effects everything else. From the flour, to the water, to the leavening, to the ambient temperature and humidity, how you mix/knead, how long you mix/knead, folds, oven temps, etc. Maybe after a few thousand bakes I’ll have something more useful to say. What I can say is you need to experiment A LOT to figure out what works best for you. Maybe keep notes with pictures.
Regarding steam, you add water to the reservoir when you load the oven. If you think you need more steam, just add more water.
Cheers,
Red
Hi folks, I have noticed temperature variations across the stone - some 15-20C from left to right and 20-25 from front to back of a pico plus (long base). It's causing burns to some loaves in strange spots at the bottom. Just wondering if anyone has similar experience ? Cheers, Alex
Hello,
Do you know if that email still working?
I already sent an email to andy@brookbake.com about a month ago, never got any reply back!