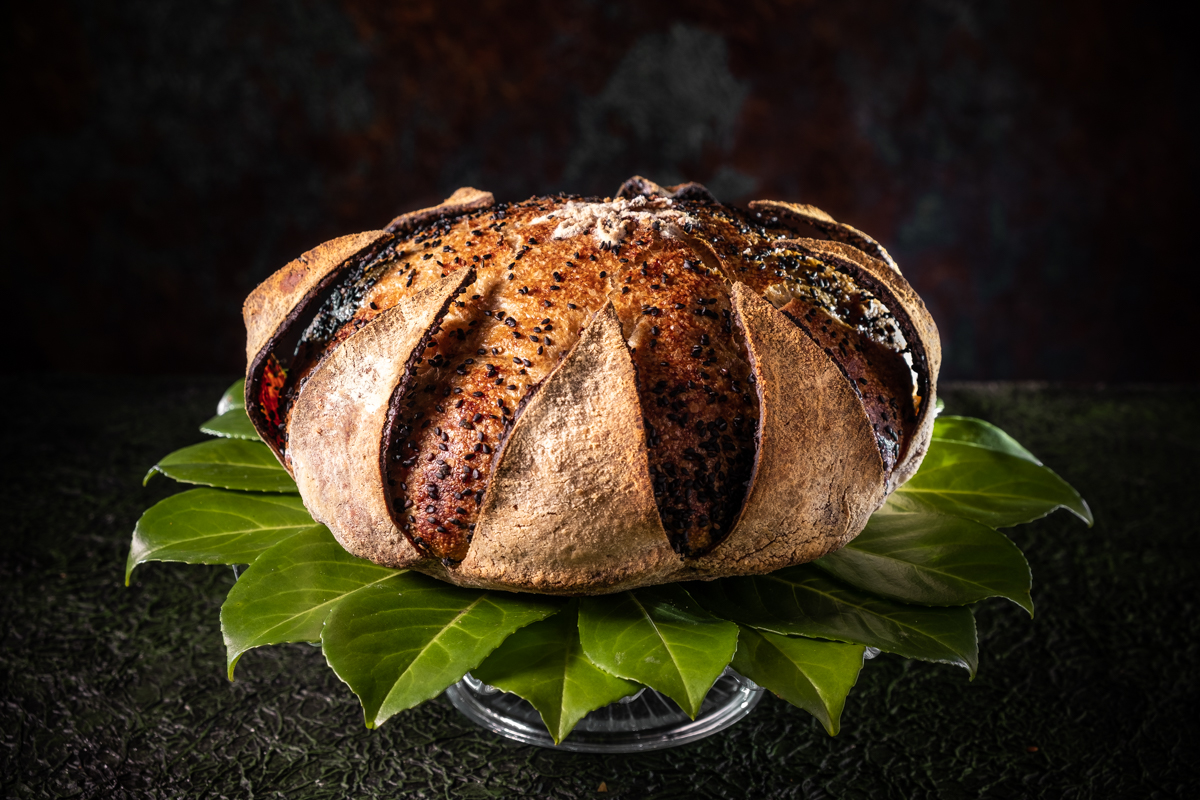
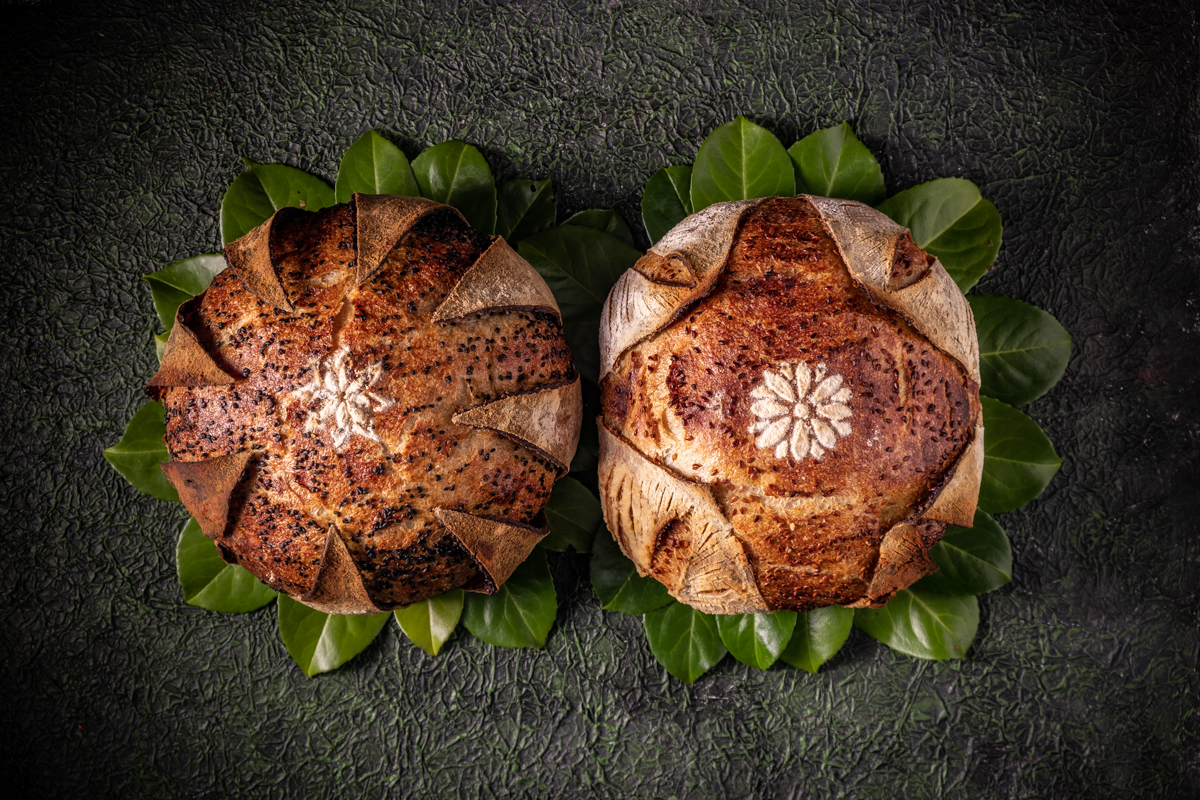
I had some fun with this bread although I have to recognise that it was more tricky to do it than expected.
I did it 4 times to get it in the best shape I could with little changes here and there:
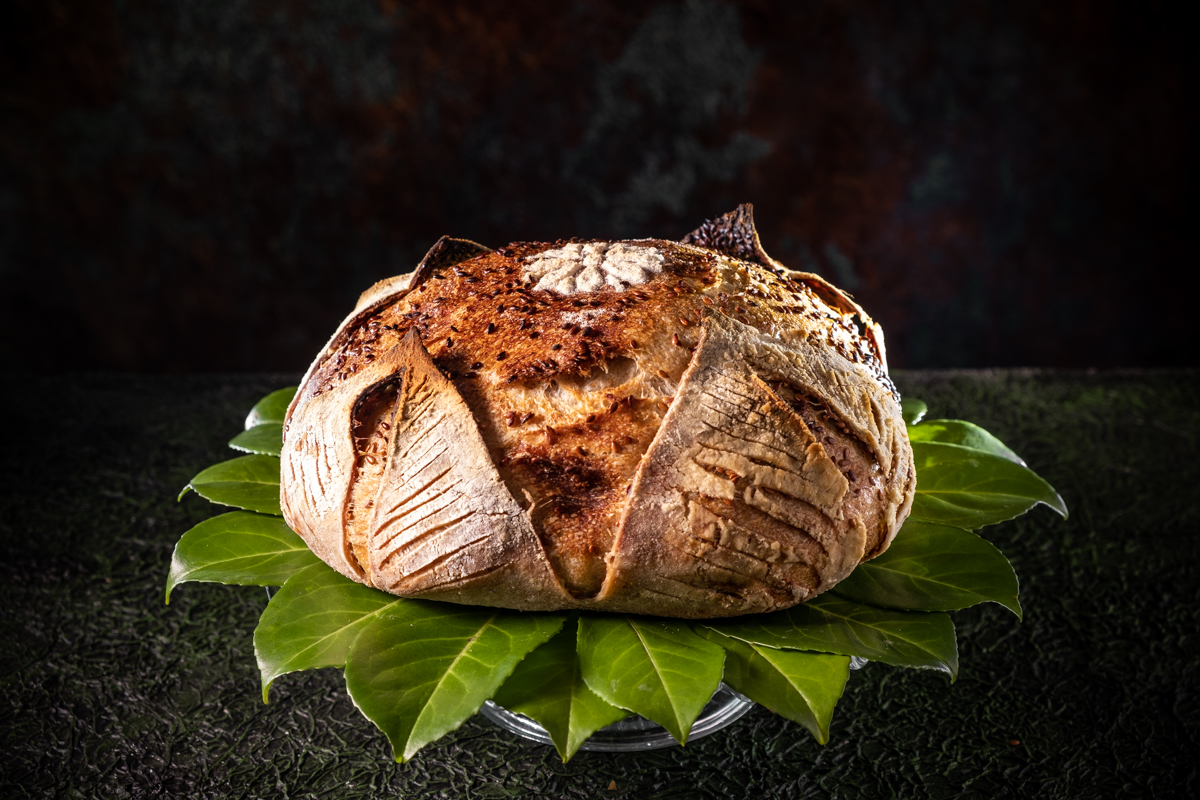
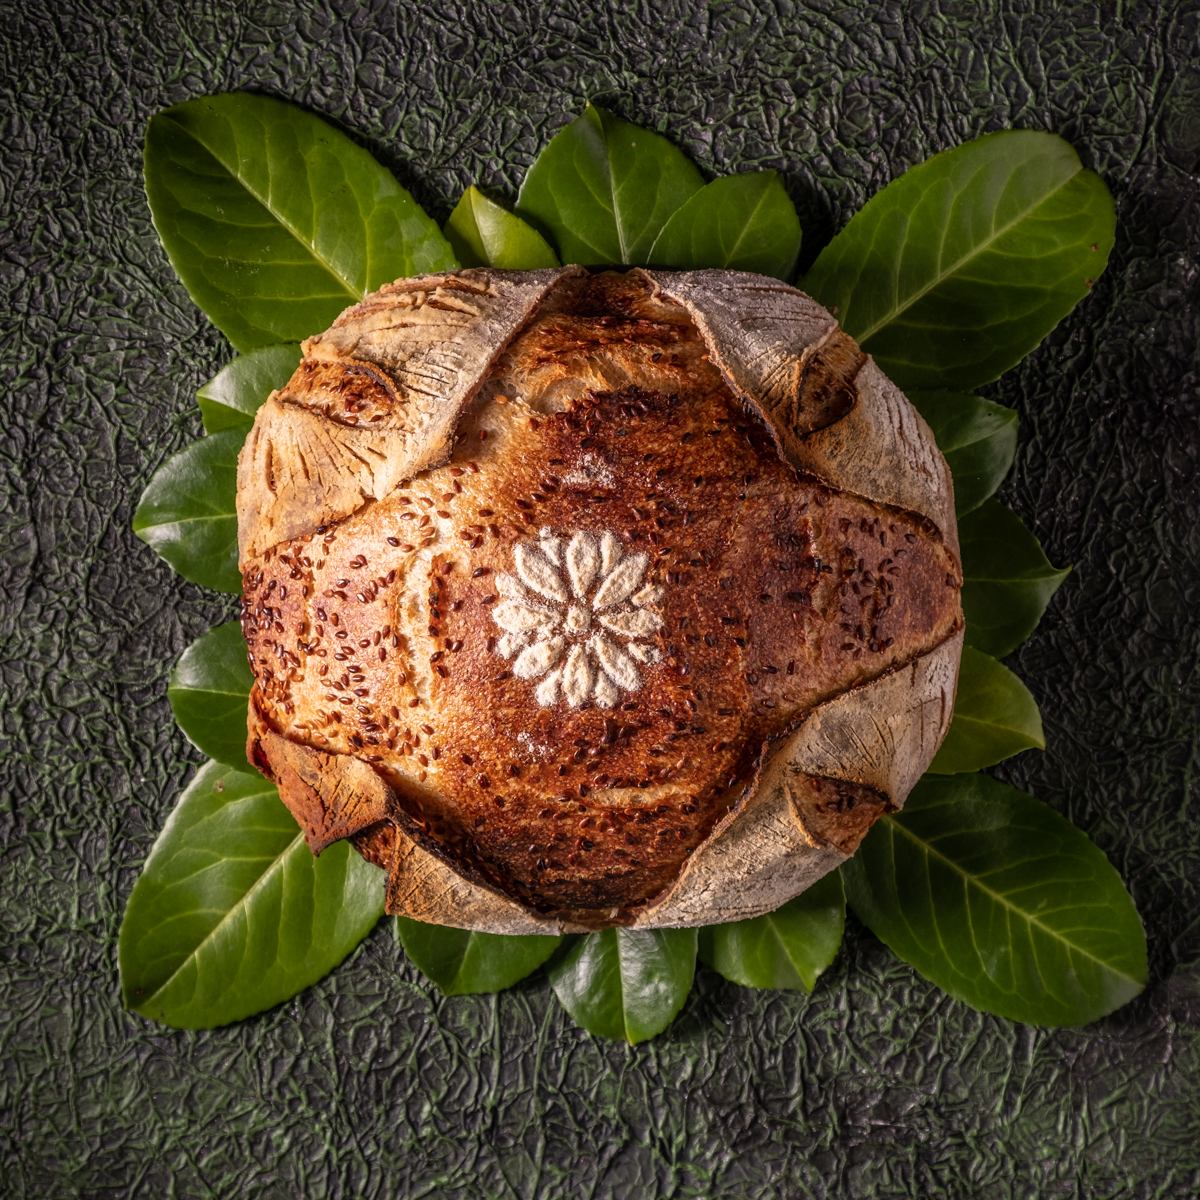
1. With the first trial, I was aiming for the right hydration. I started at 78% hydration and experienced a bit more flat version than this one. I baked it in a DO and got more brown on the top with my typical bread baking temperature (260ºC + 220ºC)
2. With the second trial, I went down to the 70% hydration, almost good but I put too little oil between the layers of dough and petal were more closed and the bread got a slight star shape.
3. With the third trial I changed the baking mode. I was very curious about how the bread is expanding in the oven so I tried to bake it on the stone. I simply wanted to understand how the petals were detaching in the first 15 minutes. It was a beautiful experience to see it. Because of the long cuts bread expanded on the sides instead of going up. Strangely, it got a bit darker on the top than when I baked it in the DO. Oil was browning so fast, the seeds were almost burned.
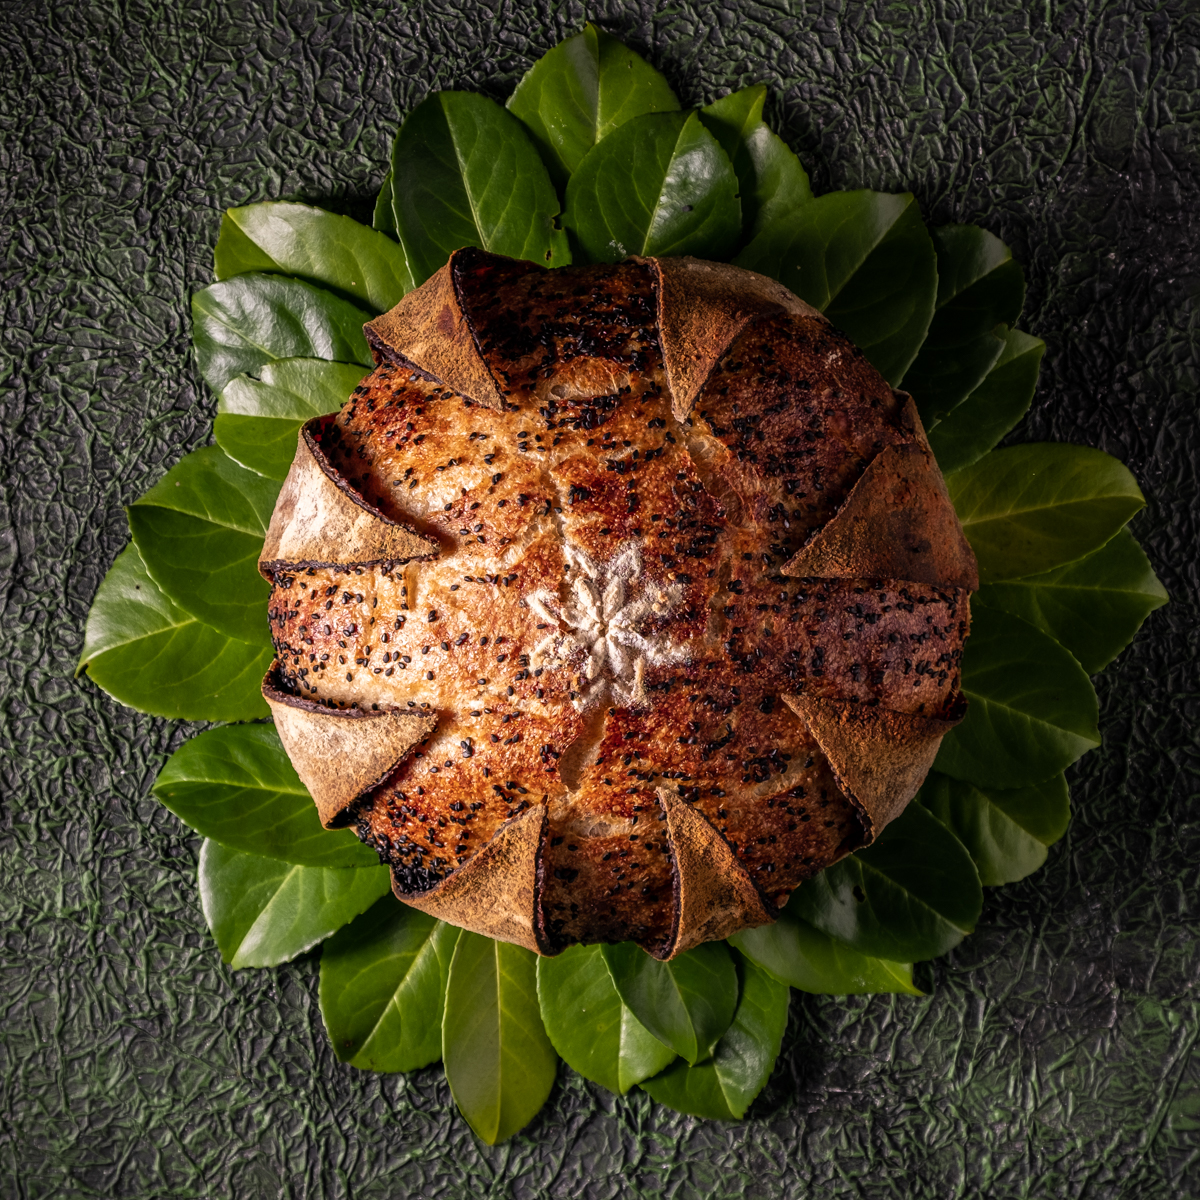
So, basically, this is what I learned and did to get the 4th attempt like this:
- hydration should stay low, I made it at 68.7% and it could be better even lower
- oil is essential to separate the layers, so I put a more generous oil layer
- to prevent the petals to stick to the main dough I unwrapped the petals and brushed them again with oil at the scoring phase.
- before scoring, I put the dough in the freezer for 30 minutes because the time spent on scoring was long
- clearly, baking in a DO rather than on the stone has more advantages to have a higher dough and to sustain the petals from the sides
- when baking, I went to 230ºC and I still think that after removing the lid I should have lowered to 220ºC
Overall I am happy with this 4th version but I am sure it can be even more improved.
Ingredients for 2 loaves:
250g sourdough starter (100% hydration)
- 940g strong wheat flour
- 100g whole wheat flour
- 675g water
- 20g salt
- olive oil (for brushing ~35g))
- black sesame seeds (~40g)
- flaxseeds (~40g)
Totals for 2 loaves:
Dough weight: 2100g
Flour: 1165g (125g from the starter)
Water: 800g (125g from the starter)
Salt: 20g (1.7%)
Dough hydration: 68.7%
For the method, I made a video. It is much easier to see than explain in words the techniques for this bread:
Did you try this type of bread?
Denisa.
Gorgeous loaves, Denisa.
Paul
Thank you so much, Paul! Very much appreciated!
Once again stunning bread and photography. It looks more like art than bread. Well done Denisa.
Benny
Bread is feeding our body but its look is feeding our soul. Together, they make a perfect match. Thank you so much Benny for your appreciation.
How different and pretty! The little hands breaking off the crunchy petals were adorable... but I wish one of them was mine! Excellent video, too. Thank you.
–AG
AG, with your bread experience, this is a piece of cake and then you have all the petals for yourself.
Thank you so much for your feedback!
This is just so cool.
Thank you so much!
I shared it in a Dutch sourdough bread facebook group and the reactions are the same like mine here b
You are a sourdough bread rockstar.
Thank you so much for your beautiful comment! Although I do not feel like a rockstar, I feel like I have so much to learn in the bread baking and this motivates me every single day. I think this life is not enough to learn so many tricks and to experiment with each and be creative all the time.
Denisa
Your bread is so beautiful and the process is fascinating! I watched your video and it was very clear and inspired me to try to bake this interesting loaf. I will post my results in a separate string.
Charlotte
Thank you, Charlotte! We all learn here one from each other.
I made this bread and it was successful and interesting as well. I followed the recipe and and did the final cook (i.e. with the dutch oven lid off) at 425F (218C). As primarily a pizza maker, I am very familiar with pre-fermenting the dough, but I had never tried it with sourdough bread making before. And, in thinking about it, it really was no more more to mix the dough/water/salt and let sit overnight than it was to make it the next day. Afterall, one's in the kitchen anyways making the leaven. The final bread did have a more integrated flavor and a definitely softer texture which some of my testers said they preferred so I'll have to do an A/B comparison in the future (or maybe you've done this already?). One other learning was to be generous in oiling up the surface area of the dough leaves. I don't mean putting gobs of oil on the leaves (but still be generous), but instead going further out to where the 2 doughs contact each other. I had a small bit of difficulty unfolding the leaves and re-oiling during the scoring process. But, of course, the star of the show is how the final product looks, and sitting on my Italian platter the pane-incamiciato was the center of attention.