
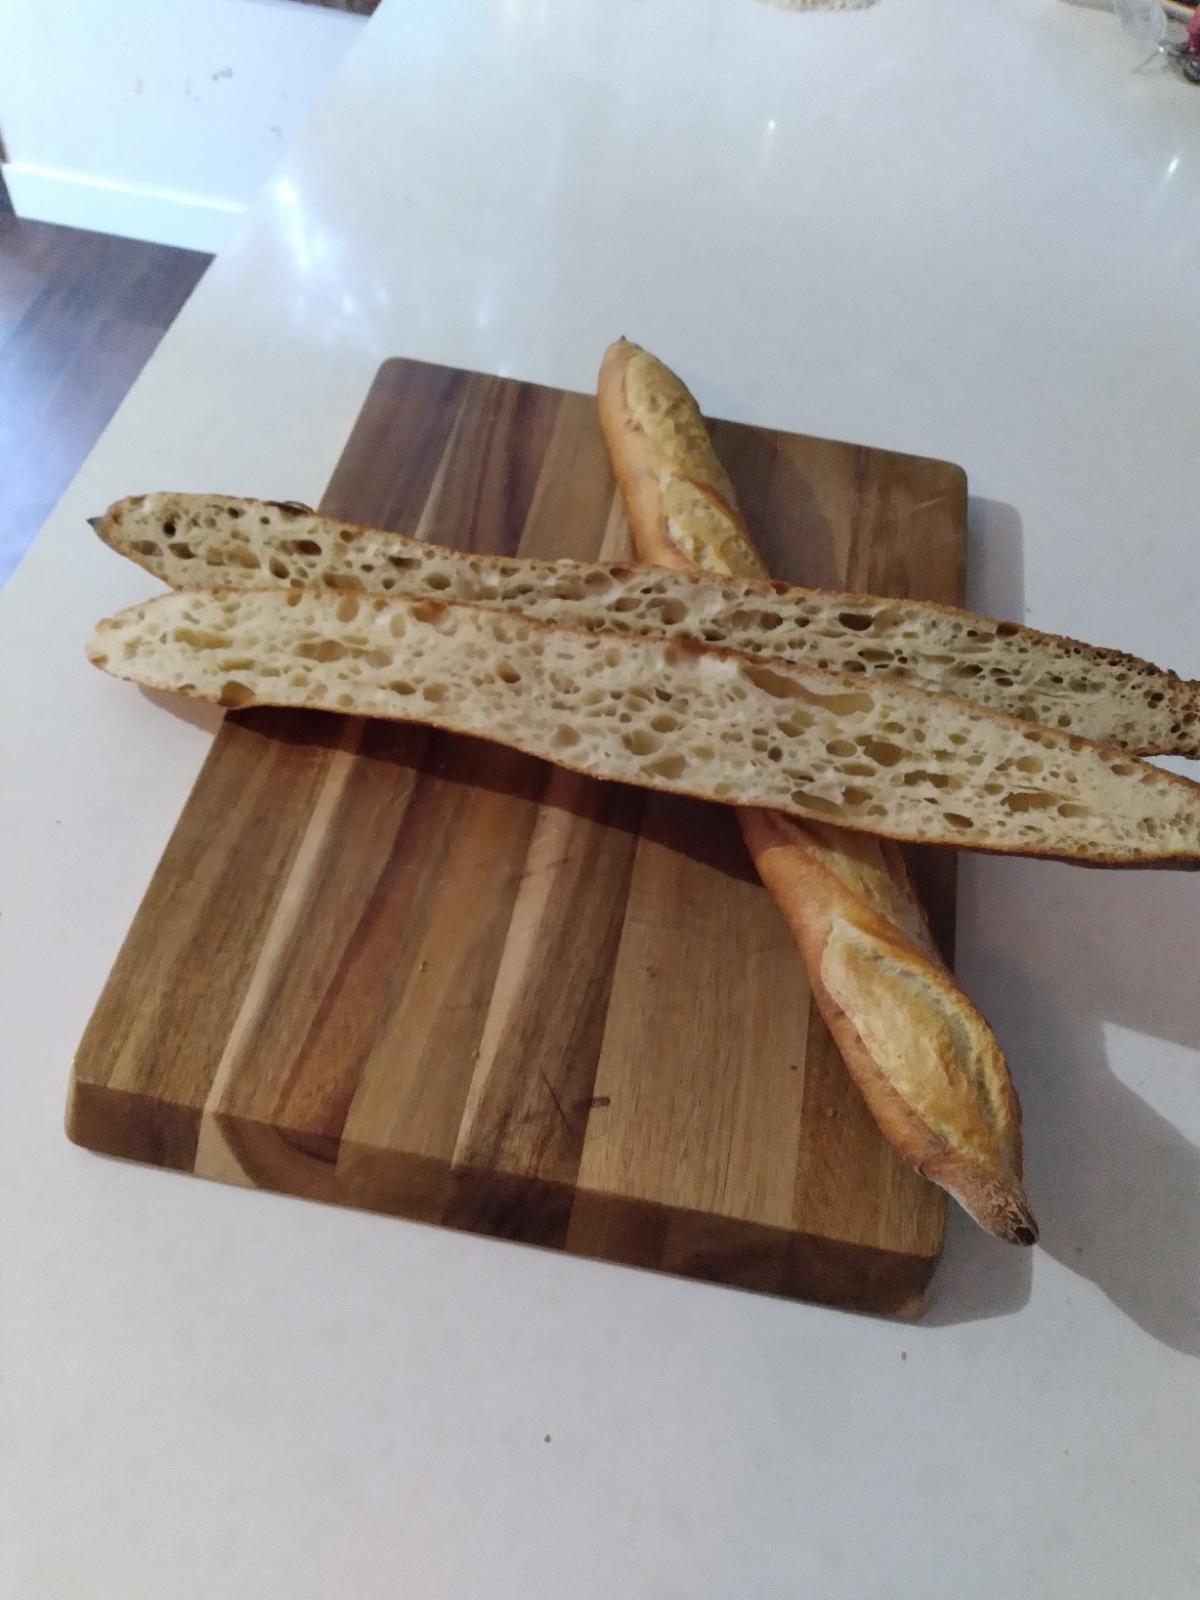
Getting some improvent by bumping Temps a bit and taking the stone out for a few minutes before baking. It seems with my element setup that reaching an ambient of 450F gets the stone up to 550F which will scorch the underside of my loaves. Today I jacked the top element a bit more and then just removed the stone for a few minutes to allow it to drop down to around 450F. Results look better yeah ?
- kendalm's Blog
- Log in or register to post comments
I can’t tell that they look better Geremy, but they do look amazing. You are unequalled in producing open crumb full length baguettes, perfection inside and out.
Benny
There were two pics and this is the second. Heres the first (if it works). For the record, I fantasize that I can equal your perfect crumb duder -
...those baguettes are freaking amazing.
One of the things about your oven that makes it different is the lack of air circulation between under-the-stone and above-the-stone.
This is based on what looked like an all-the-way-around ledge upon which the stone sits.
I keep wondering if there is a way to jury rig a way to safely lift up the stone maybe 1/8 to 1/4" above that lip/ledge so air can circulate from below the stone to above the stone.
I'm thinking of...
1) some kind of shims resting on the ledge, two on each side and front/back, 8 in total. The stone would then sit on the shims.
Or..., 2) some kind of ceramic posts or columns sitting on the metal floor of the oven, upon which the stone sits, raising the stone so that it leaves 1/4" air space over the "ledge" thereby allowing air flow.
Or..., 3) use a second thinner stone on top of the main stone, using some method to keep them separated by 1/8 to 1/4". This will help to keep the upper stone closer to ambient temp, rather than the temp of the lower stone.
--
Big box stores often have "travertine tile" which is cheap, oven safe, and supposedly food safe. about $5/sq ft. in 18"x18" or 12"x18" pieces. This might be a cheap experiment for option #3 for a 2nd stone above the main stone.
If you have an angle grinder and a masonry-cutting wheel (grinder is $10 at Harbor Freight, and good masonry cutting wheel $20 at Lowes) you can also get cheap small 6"x3" travertine tiles and cut them into 2"x1.5" pieces and make stacks to lift the main stone as in option #2.
As far as I know, you don't want to use any porcelain or glazed tiles as they can out-gas. _Unglazed_quarry_ tiles and _travertine_ tiles are supposedly both oven safe and food safe.
(Granite that has absolutely no "fills" or "epoxy fills" is also oven safe and food safe.)
Good luck, amigo.
You could purchase a single sheet of 1”x1” or 2”x2” ceramic tiles, the kind that are mounted on a plastic grid. Peel them off the plastic and stack them up to elevate the stone to the desired height. Simple, no power tools needed.
Paul
Some convection. Btw I did jack up with some bricks at one point during early experiments and may try that again. One issue I noticed and you can see this in the oic showing the uncut loaves...the left end which is near the Rofco steam tray always gets less spring and I think it has to do with the water cooling the trays and causing lower tems on the left side of the oven. Of course I could position the tray at the rear but it seems some convection would be good. So Dave seems on the money here ;)
When I was doing research on baking stones, mostly back in 2018, I contacted one of the tile manufacturers and was told that ceramic tile, even unglazed, was not food-safe due to out-gassing.
Oven brick, such as for WFOs, "unglazed quarry" tile, "travertine" tile, and natural granite (without fillers) seem to be the only generally accepted non-metallic material.
I realize that the shims/supports we propose for Geremy's oven would not be in contact with food. And perhaps there is a point where the ceramic tile would "run out of gas" and stop out-gassing. It's just that that one email from the manufacturer put the fear-of-God in me. Granted, they may have been more absolute than necessary, wanting to avoid nuance for liability reasons.
--
Side note: I did pick up a pristine piece of black granite floor tile, polished on one side, 1' x 2', at a big-box flooring store, under $5. cheaper than what they had at Lowes or Home Depot. I have yet to trim it to fit the oven.
I think I'll cut a 2" strip off each end, line up the smooth edges (though not glued), and make a 3-piece surface 14" x 20" (less the "kerf").
I browsed, but did not buy anything, at a mom and pop granite store. 15" x 20" are almost scrap to them, and can be had cheap, but must be scrupulously inspected for epoxy fills.
but it’s hard to imagine there'd be much off-gassing at oven temperatures when the tile has already experienced kiln temperatures. The big issue with tiles, particularly if they make direct contact with foods, is whether the glazes contain lead that could leach into the food. If the perceived risk is high enough, the same approach could be taken with natural stone that has been ground flat so that the shims won’t wobble.
Sounds like you got a sweet deal on the granite tile. Have fun with the saw! The stone fabricator from whom we purchased our countertops usually has scraps (off-cuts, sink cutouts, etc.) for sale. I’m content with a ceramic baking stone, so I haven’t gone the slab route.
Paul
"but it’s hard to imagine there'd be much off-gassing at oven temperatures when the tile has already experienced kiln temperatures. "
That's what I first thought too. But that's more a reason why the oven is safe for the tile and glaze, not a reason why the tile and glaze are safe for the oven/food. The fact that the tile and glaze have solidified and cured may not dictate that there would be no further outgassing at high temps.
I had similar ideas and got as far as inquiring at the stone yard that furnished my original bassault stones. I am really glad to hear some similar thoughts and now think I may just pull the trigger on the idea. Its a bit frustrating that I am not quite able to get the temps where I want them and extra frustrating that my gas setup would get some amazing spring ... until I killed it / blew it up (literally)
than I think what you typically aim for. And these have all the hallmarks of a kendalm bake - shaping scoring and especially the crumb.
An advantage to my conventional oven is that the steam trays sit on a lower shelf and the steam naturally circulates evenly around the loaves. But as with every other challenge to learning how to make this oven perform to your needs, the steam component will eventually be corrected by trial and error.
[slapping forehead]
If you already have a pizza stone, that can be used to test the concept. This oven has a large foot-print, right? [Update: I found the post/comment where you said internal dimensions were 18"x25"x8".] So I imagine your pizza stone will fit, and leave plenty of gap between the stone and the wall, and with plenty of room to spare.
Take out the stone that came with the oven. All you then need is some way to support the pizza stone at the same height as the OEM stone was at.
As long as there is 1.5" or more clearance to the walls, there should be plenty of air circulation.
It would be hard to improve the tops or the crumb because they look as good as it gets. If my bottoms are getting too dark before the top is browned I finish them on a rack above the stone. You could use a cooling rack on the stone in your oven to allow airflow and prevent the bottoms from turning black. Just sayin' dude Nice work