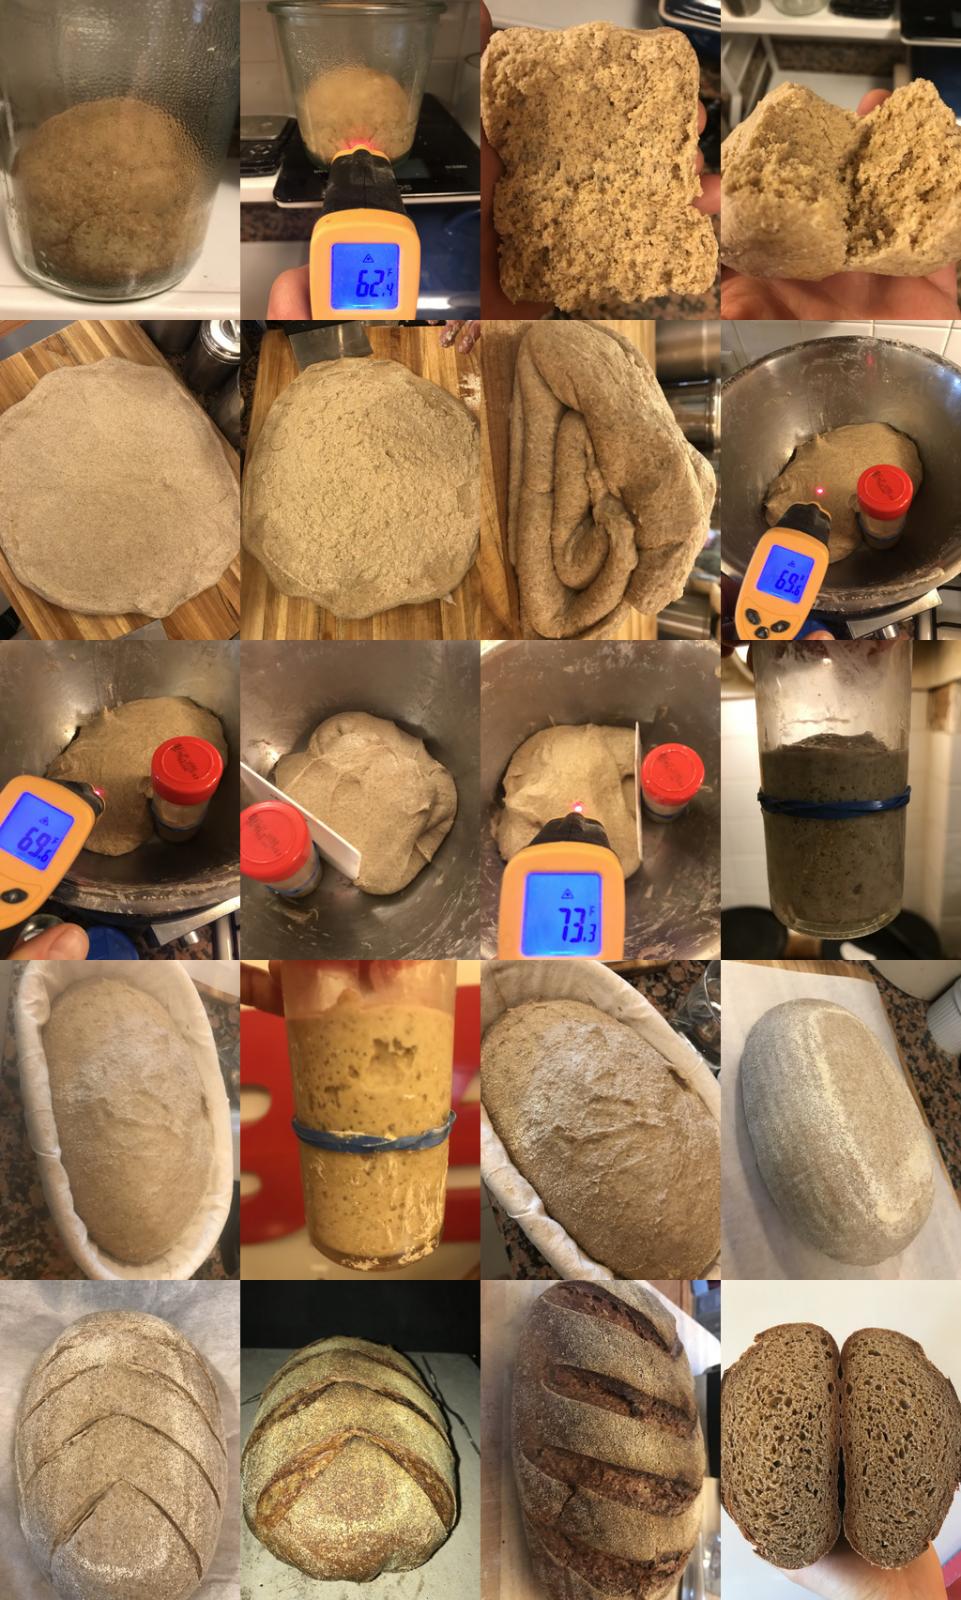
I've been wanting to learn some rye baking, and the latest community bake seems like a good way to start. I plan to begin with one of the recommended deli style ryes, with less than 40% rye, where gluten development is still feasible, and then try one of the denser European rye loaves I've been looking at in Daniel Leaders Living Bread (Josef Hinkel's Roggenmischteig/Mehrkornbrot, or Schwarzbrot (both require a stale rye bread soaker)), that range from 60-100% rye. The latter seem to behave more like a thick batter than a dough.
Background:
http://www.thefreshloaf.com/node/66523/community-bake-ny-jewish-bakerydeli-style-rye-breads
Of the three loaves posted, I plan to try the version adapted by David Snyder.
The CB post mentions a 3 stage rye sour build in the description:
David Snyder uses a Rye Sour. Built in three stages.
[UPDATE: David Snyder provided a link to an updated version of the recipe (now on the CB page) that spells out the rye sour build in great detail, which answers the initial questions I had regarding the initial version of the recipe.]
From my initial read the recipe is somewhat vague about this:
If you have a rye sour, build it up to a volume of 4 cups or so the day before mixing the dough. If you do not have a rye sour but do have a wheat-based sourdough starter, you can easily convert it to a white rye starter by feeding it 2-3 times with rye flour over 2-3 days.
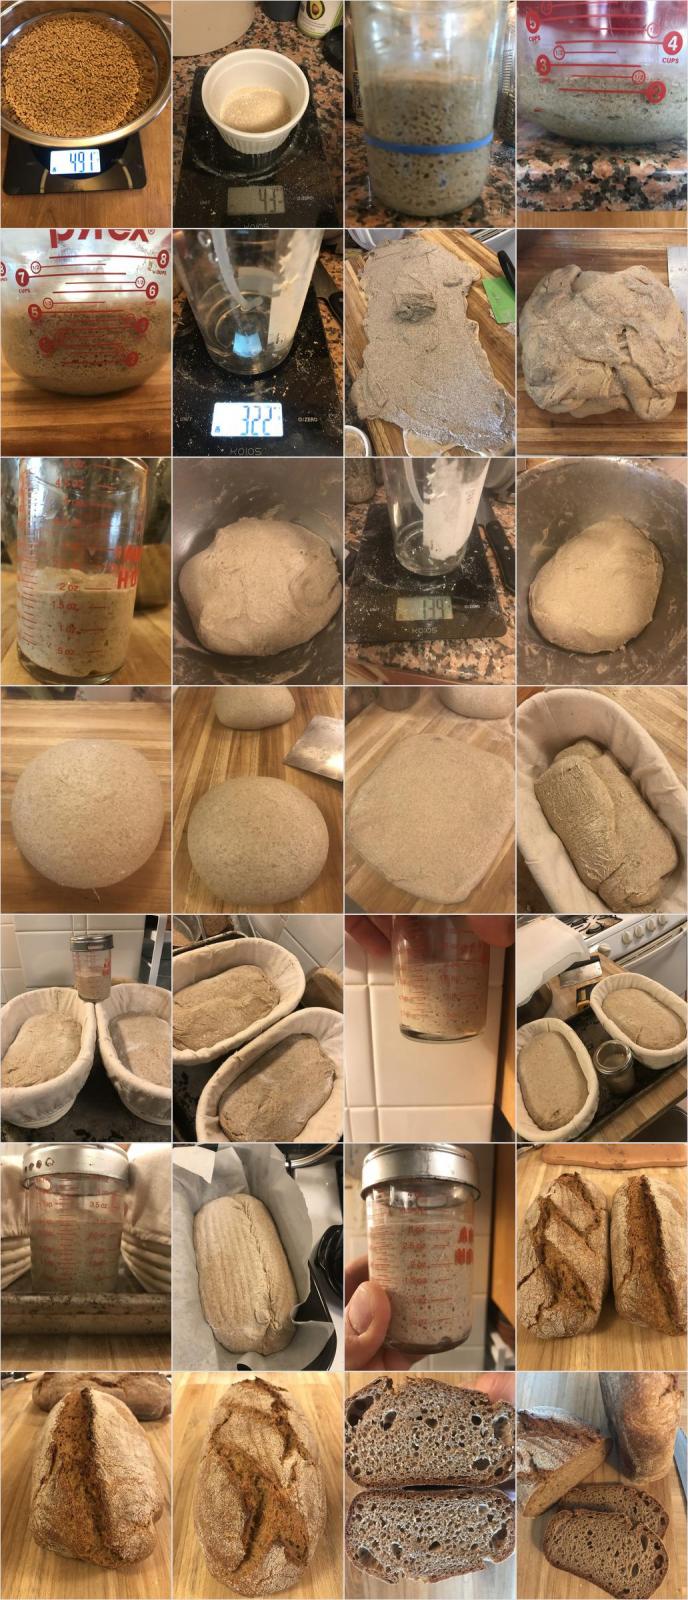
The recipe calls for 750 g of 100% hydration rye sour, so I presume we simply build it in 3 stages exponentially to hit the target. My plan is to use Alfonso's 90 F shortcut to expedite things:f
- convert my WW desem starter to rye with 100% hydration in a small jar (30 g) and let sit for 12 hours at 75 F
- feed 120 g rye + 120 g water (until double)
- feed 240 g rye + 240 g water (until double)
I'm filling in the gaps for the rye sour build, so any pointers or suggestions are welcome here.
[UPDATE: After clarification from Alfanso and the updated recipe from David Snyder (below), the WW-to-rye conversion should really be achieved over a period of 2-3 few days before the accelerated 6 hour multi-stage build.]
I will follow the recipe fairly closely, but will be using home milled rye and hard white winter wheat berries in place of the bread flour, and will rely on the rye starter for leavening in place of the IDY, so I will extend the final proof. I'm using hard white winter wheat berries to avoid competing with the rye flavor. I am using two stage coarse-to-fine (stones ticking) milling with refrigerated berries to help keep temperature below 110 F. To mitigate the impact of bran on the home milled flour, I will add an extended refrigerated autolyse period for the hard white winter wheat. I expect the home milled flour will call for a slightly higher hydration, so I will use all 240 g of water to autolyse the 480 g of wheat flour at 50% hydration, and will introduce some additional water in the final mix with the rye flour.
UPDATE
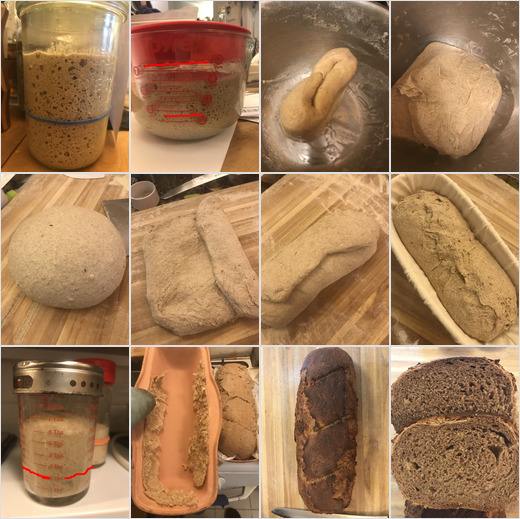
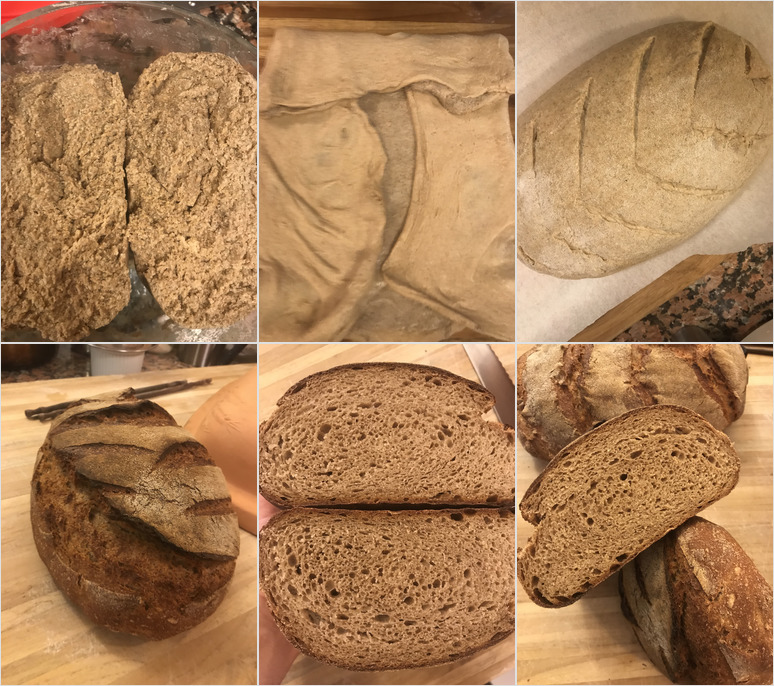
It went pretty well until a last minute decision to use a (slightly undersized) oblong cloche in lieu of setting up oven steam. I realized I forgot the horizontal scores (it was a long day and a late bake) and tried to sneak them in a few minutes into the bake only to find the loaf was stuck to the top of the cloche. I had to peel it off along with much of the skin forming on the top of the loaf, which made for a battle scarred appearance and likely impacted oven spring.
All in all I was surprised how well the dough came together. This is a really nice intro-to-rye loaf. I was able to handle it more or less like my usual 100% wheat hearth loaf: stretch and folds, batard shaping, banneton, etc. The dough didn't feel sticky to me at all as some others reported. The use of thirsty home milled whole grains with the same formula probably produces dough that feels lower hydration, which may have something to do with this. The 50% hydration extended autolyse flour mix was really stiff! I added 60 g of water during the final mix, but it was still a challenge to mix it. I like the lamination mixing suggested in the main thread, and will aim for a more supple higher hydration autolyse to support this next time. I think I can make the final mix easier next time by reallocating ingredients somewhat. I can sift the HWWW flour and reallocate the thirsty bran to the rye sour, which should help to: (1) further soften it; (2) increase the relative hydration of the autolyse for the remaining bran-less flour and (3) support a shorter and softer room temperature autolyse. In addition, I'll probably further increase the added hydration next time from 60 g to 120 g or so.
The dough seemed fairly strong, so I went with a standard pre-bake process: pre-shape to a boule, rest, dust, flip, stretch, fold sides, roll, and stitch. I dusted a long banneton with a blend of durum and rice flour for proofing a large single loaf and had no issues with sticking. The BF went really quickly. I can't imagine what it would be like with IDY. I was eating dinner at the time and the aliquot jar sample (started post-mix) had nearly doubled before I had a chance to warm up the stove. It nearly tripled by the time I started the bake, although I'm guessing the shaped loaf was somewhat degassed and had probably risen somewhere between 2x and 2.5x from the time it was shaped. I'll be more attentive next time and may try retarding in the fridge to slow it down and potentially help with scoring and oven spring. Despite the cloche mishap, the final loaf was not too bad. I did notice the crumb was slightly denser around the edges, which I think may be due to the combined effect of the unintended extra proofing during the oven warmup and the removal of the top skin ad loss of steam during the cloche debacle in the initial phase of the bake. Further increasing hydration for the whole grains should help open the crumb a little. The crust was very crispy and the rye flavor and caraway seeds really remind me of "transitional" rye bread I have had in the past. I'll either bake it as two loaves with the cloche next time, or a single free standing loaf with steam.
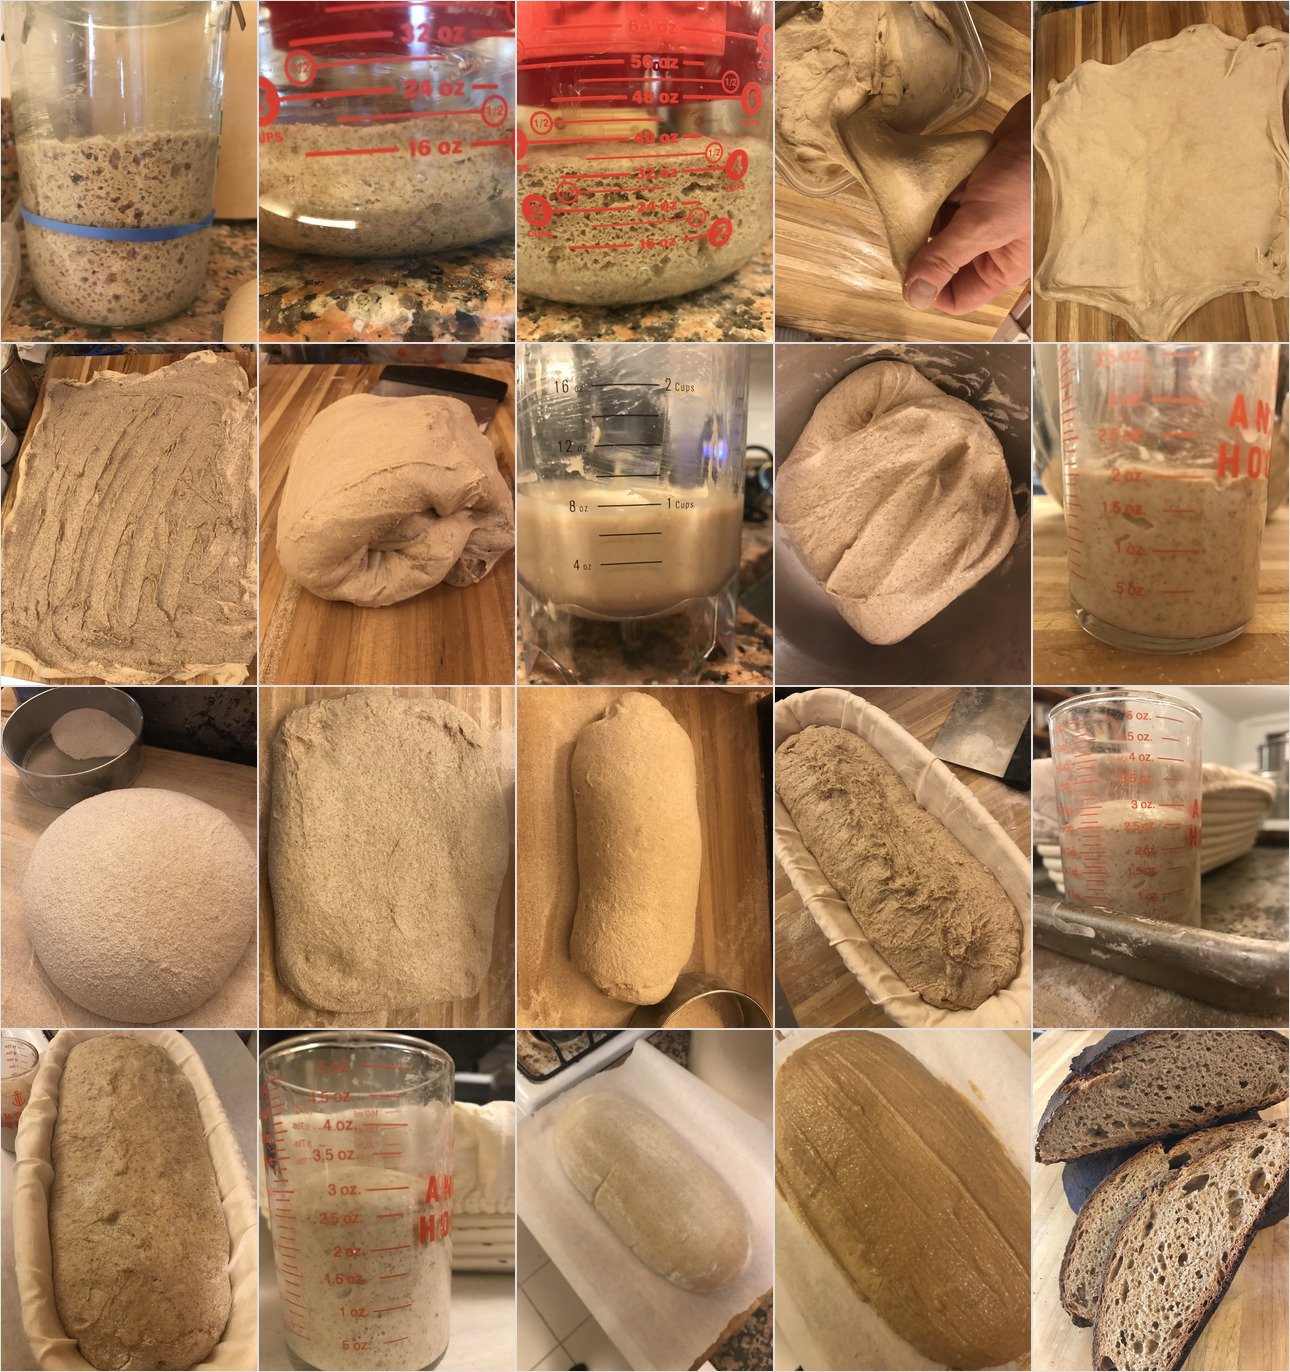
# Second attempt
## Changes
* sifted 478 g HWWW w/ #40 (13 g) and #60 (145 g), soaked it overnight next to the autolyse, and then mixed all the bran uniformly with the last two rye sour builds to soften it up -- this is a lot of preferment and it may be better to swap an equal portion of rye from the sour into the final mix, although that might interfere with gluten development
* overnight autolyse of remaining 478-13-145=320 g -- Peter Reinhart's comments about extended autolyse replacing kneading are really apparent, the gluten was extremely well developed with very little effort (especially after sifting the bran)
* i used the 240 g in the initial autolyse this time and the increased hydration of the HWWW sans bran made the mixing much easier than the first attempt -- even so, I did use a spray bottle to help with the rye sour + autolyse mix by feel
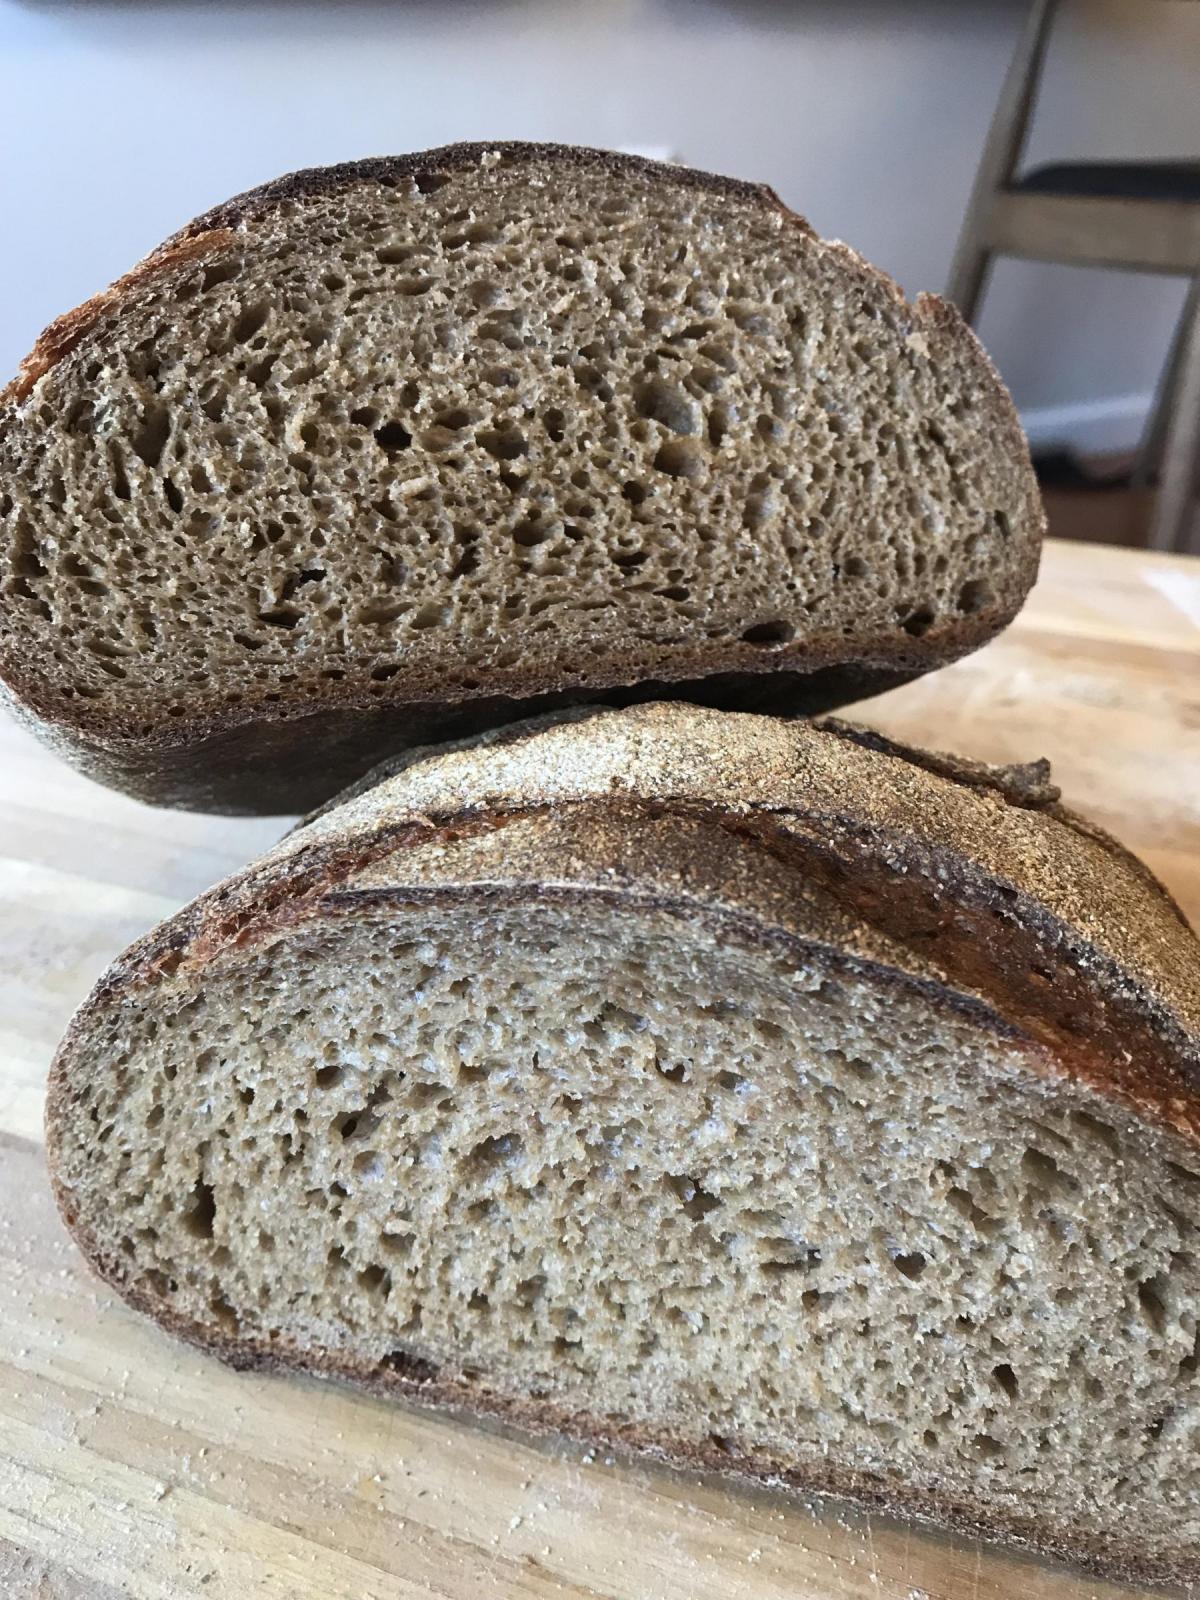
* the dough still handled well and the changes produced a more open crumb, although I attempted a free standing loaf on my new baking stone, so the loaf flattened considerably relative to the previous cloche bake
* with the above changes I can probably lower the overall hydration for a taller loaf and/or make two loaves and bake in cloches, I can also aim for 480 g of flour (post sifting) and use the bran in my porridge
Summary:
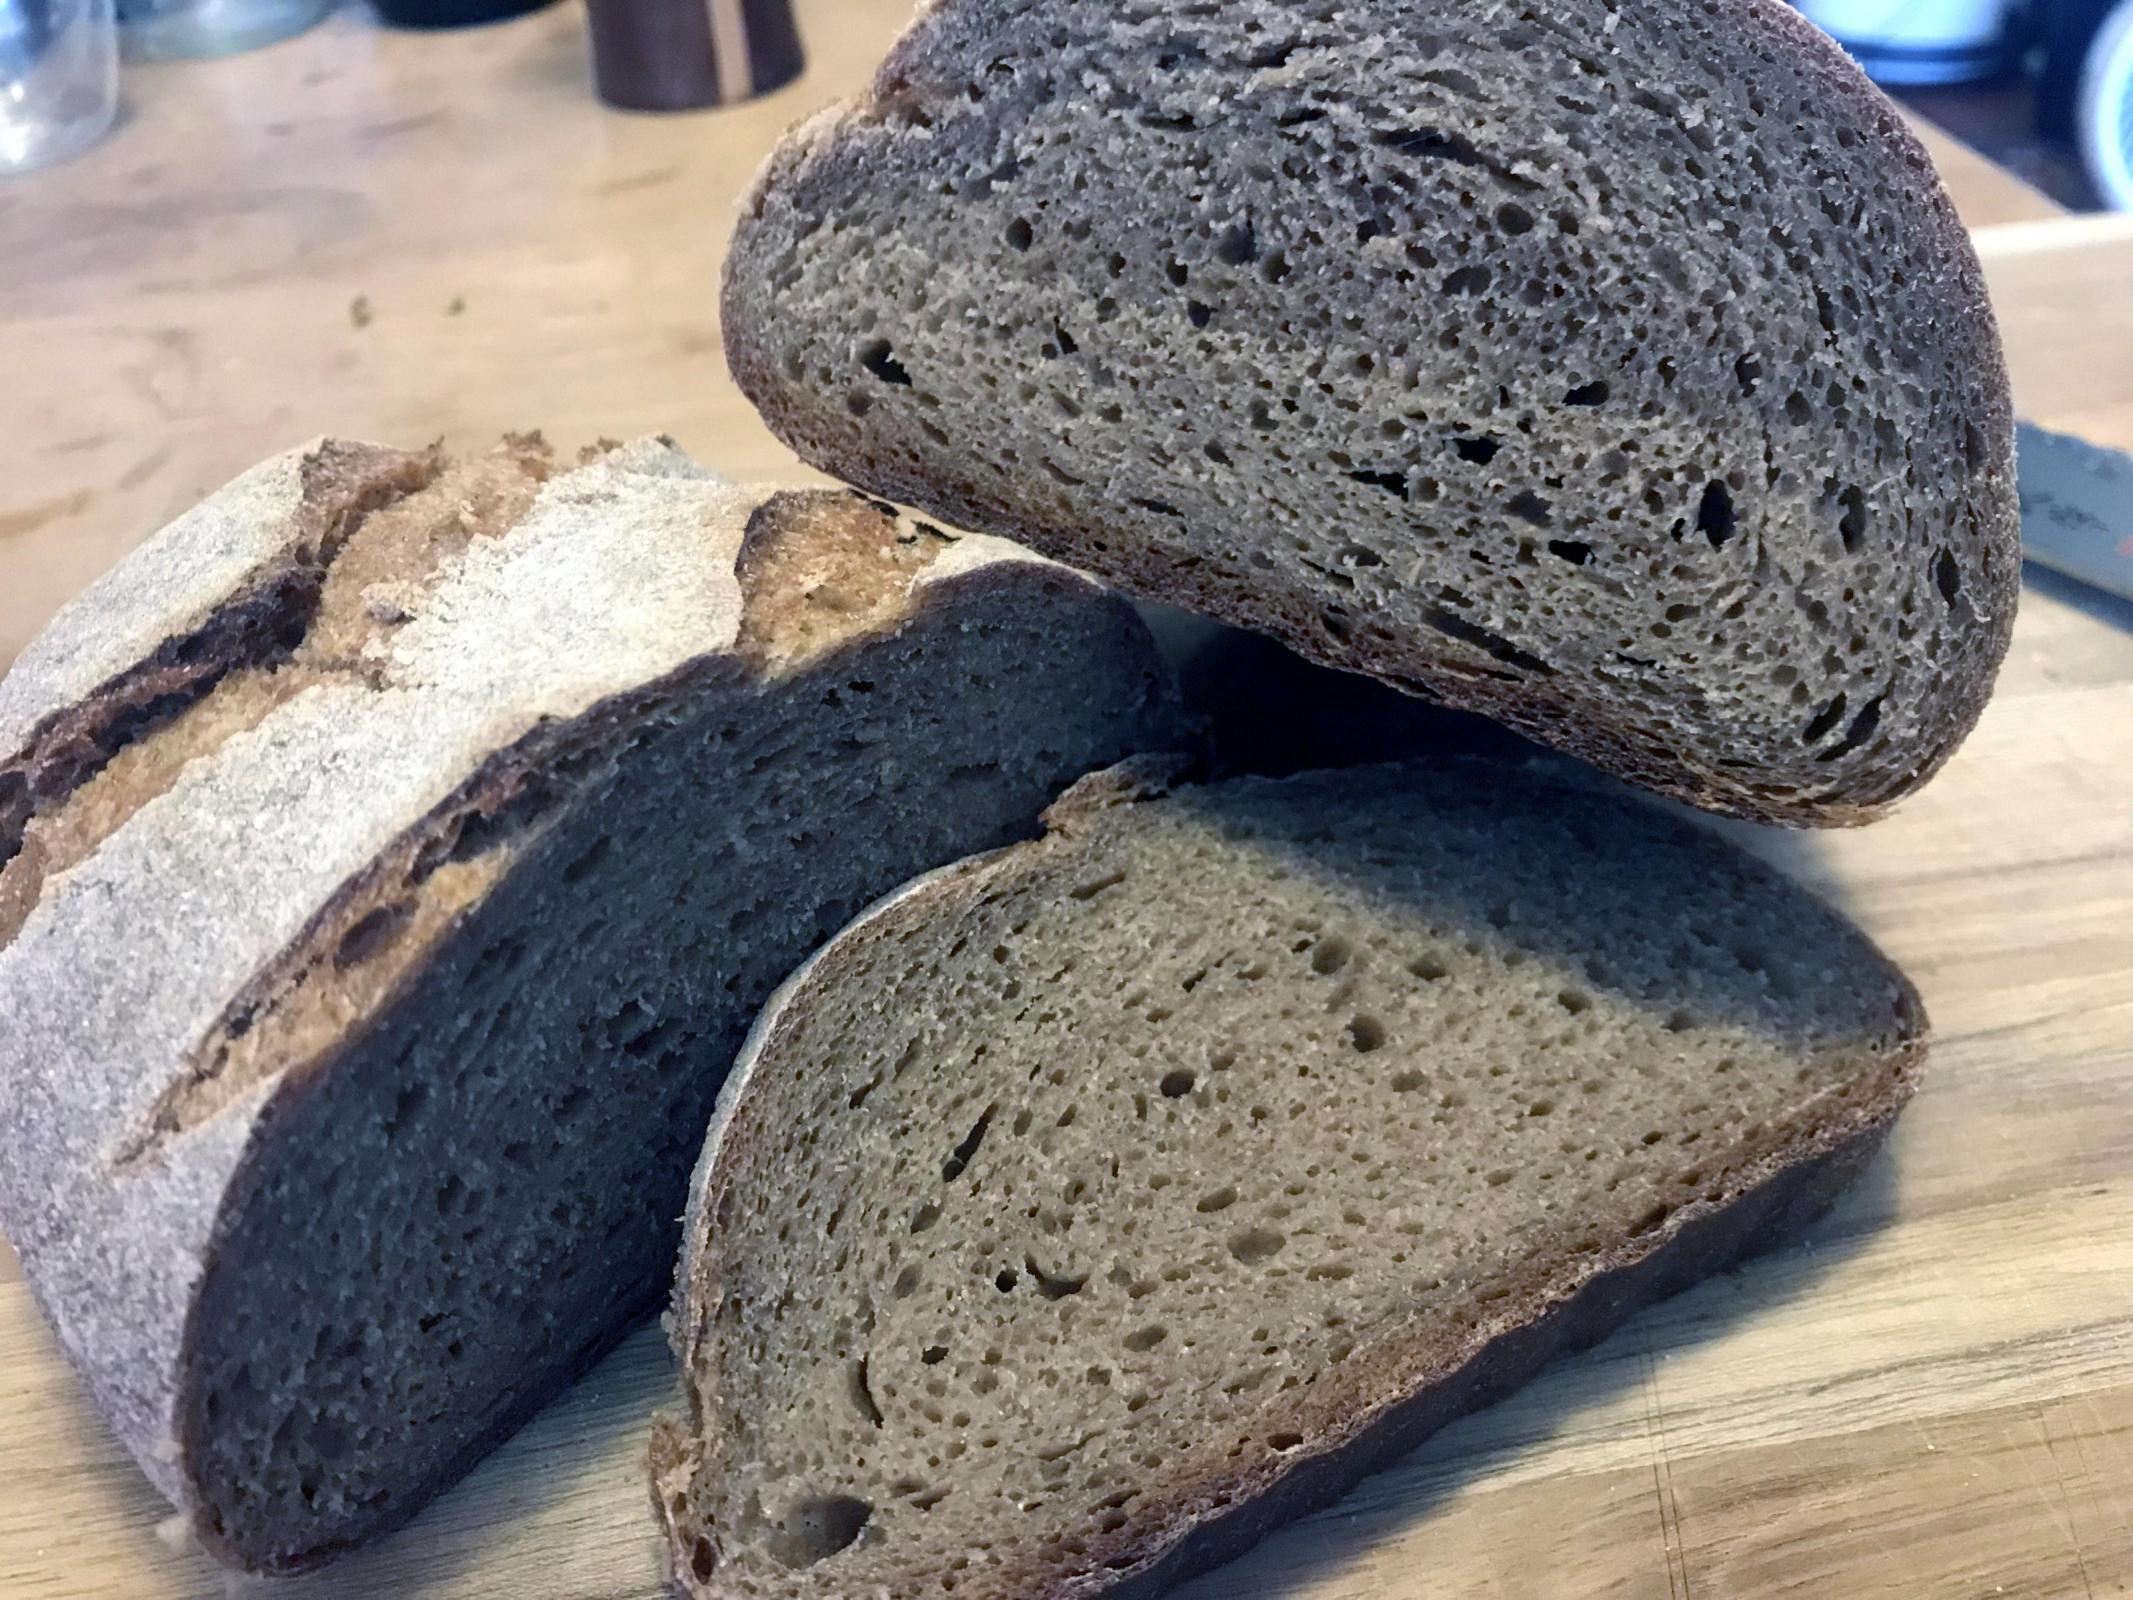
# 3rd attempt (w/ cloche)
* same combination of fresh milled HWWW and rye w/ a slightly coarser grind
* sifted with #40 instead of #60 and distributed 43 g of bran (instead of 168 g from last attempt) uniformly in rye sour builds
* overnight autolyse of remaining HWWW in fridge was much denser and harder to mix due to the net increase of 125 g bran (relative to #60 sifting in last session) w/ 240 water and I spent a very long time mixing, using an additional 190 g from the spray bottle to mix in the dense gluten strands (it is easier to hydrate up front to avoid the dense strands) -- this autolyse should aim for hydration of previous attempt either through additional bran sifting, reallocating water from the rye sour, or increasing total water up front (rather than at the mixing stage)
* since dough was fragile during shaping in the last session, I reduced fermentation in final rye sour build, shaped after a very short BF, and aimed for 50% growth in aliquot jar sample during final proof -- the loaves were easier to shape w/ no taring
* due to the extra hydration during mixing, the dough was fairly slack and I shaped two loaves and baked them in separate clay bakers to produce a more utilitarian shape
* skipped glaze on this session to streamline things while I try to adjust the recipe for whole grains
* waited 12 hours before slicing the first loaf -- will be interesting to observe difference in crumb when slicing second loaf 24 hours later
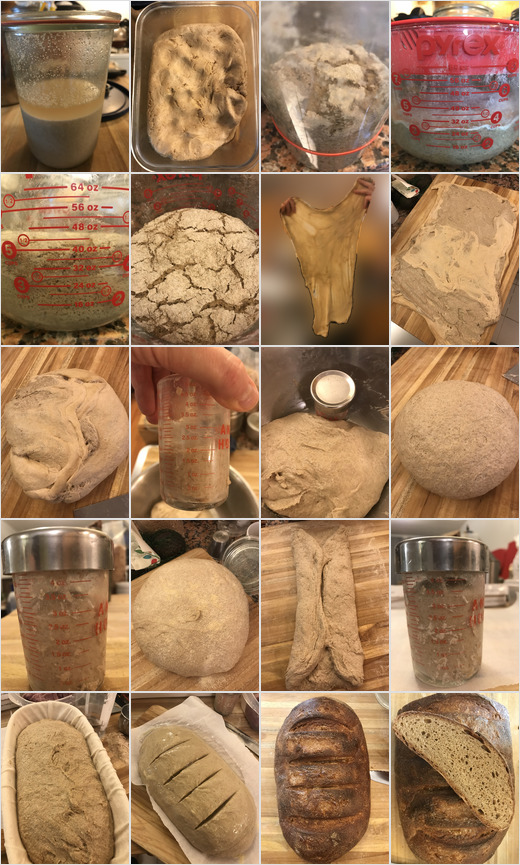
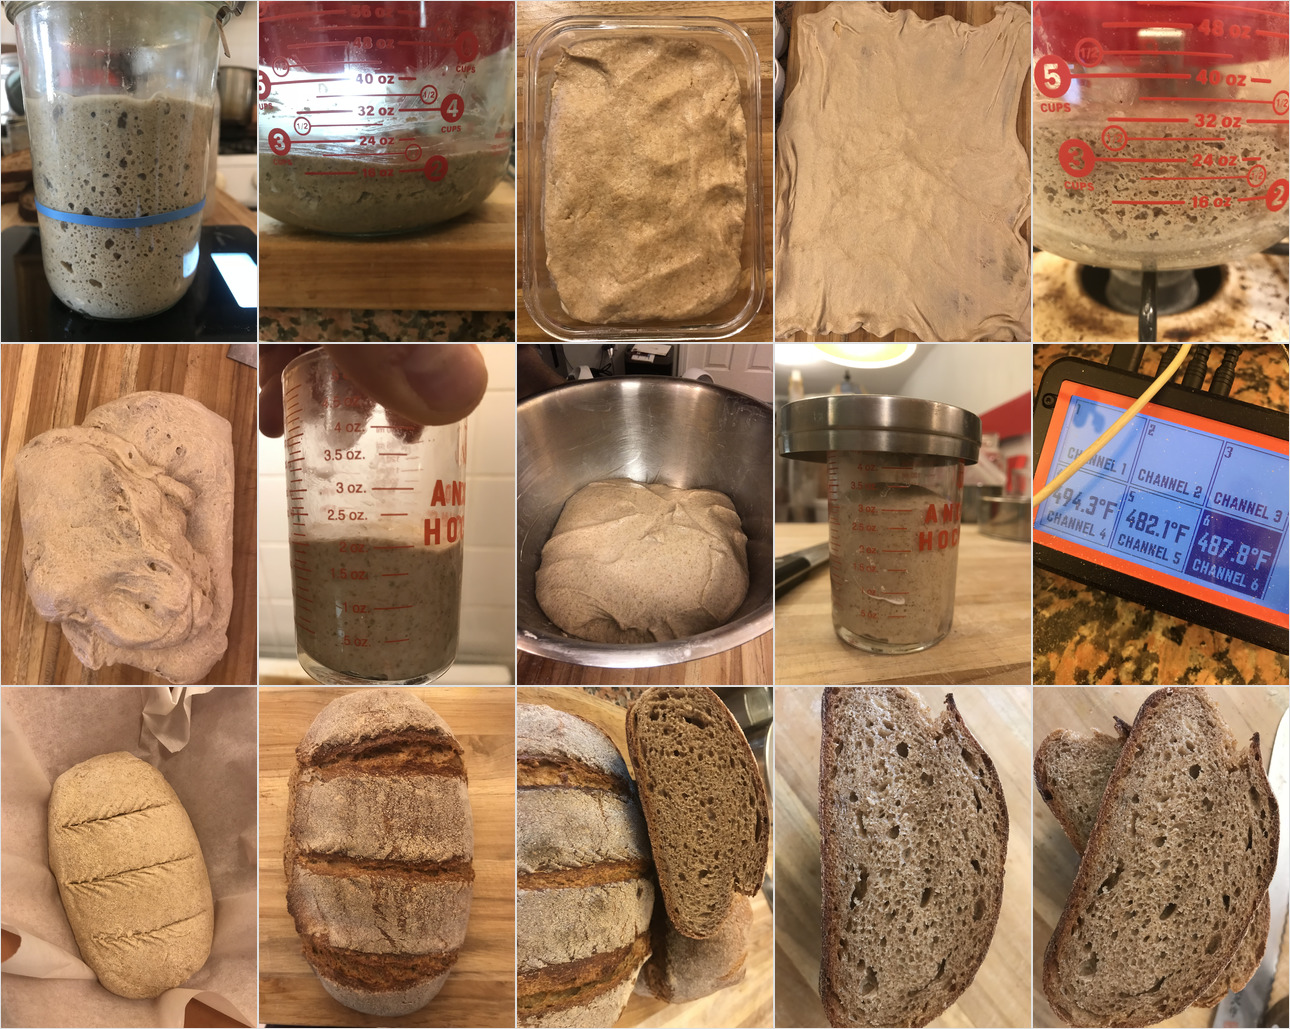
# 4th attempt: ny jewish deli "blackened" platypus rye
This was my second attempt at baking a large free standing loaf from dmsnyder's formula on my new baking stone. I tried a few things to lower the overall hydration in an attempt to reduce spread after removing it from the long banneton. I've relied on using a baking cloche for good oven spring in my whole grain loaves to date, so I don't have much experience baking with the stone in the open oven. This time I sifted the HWWW and autolysed the remaining flour at 75%. That seems to be much more reasonable than 50% for this whole grain flour and makes the final mix with the rye sour much easier. In the end it actually reduces the total water required as there aren't lots of dense gluten beads that need to be broken up in the final mix, and I relied a lot less on the sprayer this time (40 g of water total, mostly for the bench). I was attempting a taller loaf with this effort and tried to accomplish this by: (1) lowering the hydration to that of the original recipe (despite the use of whole grains); (2) tighter shaping; (3) more aggressive kneading via two rounds of slap and folds at 7 and 5 minutes each followed by a few stretch and folds at short intervals before shaping (in addition to the overnight autolyse gluten development); (4) reallocating the #40 sifted bran to the glaze after softening overnight with miso (don't do this); (5) keep a close on on ryse sour builds (2x) and a total BF + final proof goal of 1.5x as monitored via a 2 oz sample in my aliquot jar.
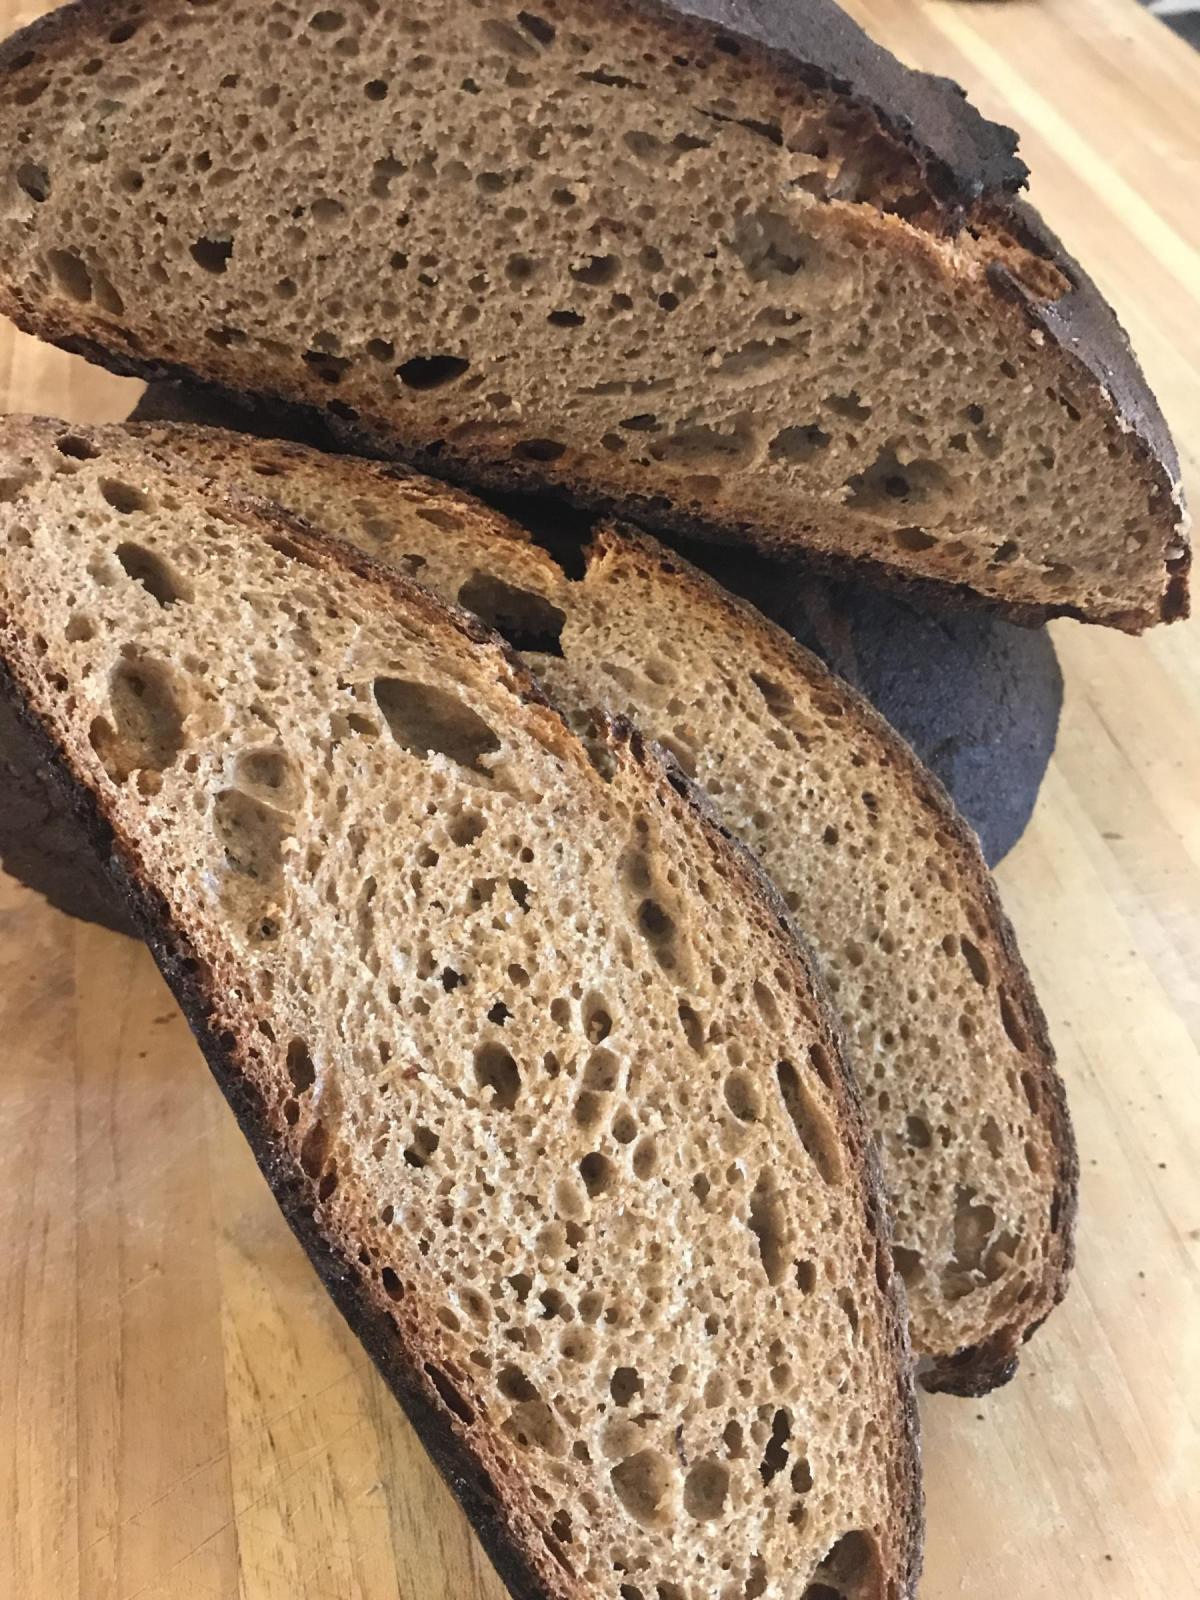
In the previous version, I distributed the sifted HWWW in the rye sour builds, which was incorporated in the final mix. (I really need to organize side by side bakes to observe the effects of single variable changes like this, which ends up getting obscured in per bake variations.) I have seen some people put the bran on the crust at the end, however, that doesn't seem to be appealing and is likely harder to digest. As a compromise, I thought about using the bran in the glaze. I love the mild sweet taste of miso overnight oats, and tried to apply this concept to break down the bran before incorporating it in the glaze (missing some important points about glaze chemistry). I scalded the bran, and after it cooled I mixed in a couple teaspoons or so of mild chickpea miso and let it sit overnight in my makeshift incubator at 90 F. The next day it had the same mild sweetness from my overnight miso porridge, and I was looking forward to see if this could be observed in the final bake. I blended this in my mixer jar at high speed to make a past and combined it with a couple tablespoons of arrow root powder for the starch prior to mixing it with the simmering water. This didn't gel as well as the pure arrow root powder + water solution, and it lead to blackening of the the crust early on, which I think was due to the extra sugar released by the miso fermentation. This made the bake a harder to monitor and I ended up over-baking it slightly in our windowless oven, although the crumb on this one may be may favorite of all attempts so far.
Notes:
* skip the overnight miso bran glaze!
* 1.5x rise may be too much for whole grains with a such a large PPF, try reducing to 1.25x with possible cold proof
- higher gluten bread flour recipe calls for 2x rise
- Peter Reinhart's closest whole grain equivalent calls for 1.5x
- Can we "trust in oven spring" for rye?
- Will cutting bulk fermentation shorter produce more robust dough to allow for tighter shaping?
* Will smaller loaves produce a taller height (relatively)?
* try stretching more during the roll-up step in the final shape to achieve tension rather than tightly rolling
# 5th bake (preserve hydration of original recipe, use larger batard clay baker)
# 6th try, basic 40% rye bread 60% HWWW w/ desem style (stiff cool) starter
* bake a simple mid-week control loaf w/ 40% rye + 60 % HWWW
* take a break from rye build and make a simple 40% rye whole grain bread as a mid-week control
* just blend 300 g HWWW and 200 g rye coarse-to-fine w/o any sifting, etc
* use 100 g for cool (< 65 F) low hydration (50 %) starter as w/ desem and the rest for the dough
* use extended cold saltolyse instead of autolyse ... seems to hold its shape better
* add flour, water, and starter to target 75% hydration and a bit extra from sprayer
* bulk ferment cool (72 F or so) until 1.5x, then overnight proof in the fridge
* bake directly out of the fridge in wide cloche as a nearly free standing loaf
* it is probably better to mill rye and wheat separately, use 100% rye in the starter and reserve all the wheat/gluten for the mix ... next time!
# 7th try basic 40% rye bread 60% HWWW w/ desem style (stiff cool) rye starter
* similar to previous -- desem style rye starter w/ minimal wheat now
* after two rounds of slap and folds and some stretch and folds I had to finish BF in the fridge overnight before bed -- gluten was strong with minimal development
* removed from fridge to wam up and shape, then placed back in fridge while starting to warp up the oven (it ferments very quickly after warming up)
# 8th bakes basic 37.5% rye bread 62.5% HWWW w/ desem style (stiff cool) rye starter
- home milled 600 g WW saltolyse
- 400 g rye in sour
- 66 g WW from 100 g desem starter @ 50% hydration
- overnight cold saltolyse in fridge
- similar to previous w/ rye desem style starter (fed w/ small WW starter)
- did room temperature BF a short proof in the fridge after shaping
- pushed hydration a little further
- 78% hydration (estimated from final weight)
- headupinclouds's Blog
- Log in or register to post comments
I'll add a link from the CB to here for others to reference, as well as yourself, useful to track an individual's own bakes and progress.
The first stage of the three you have outlined is merely to convert your existing starter to a rye starter. In order to follow David's path you still have three stages ahead of you with the amounts laid out in (ex.) my blog. Of course, you are free to build the rye sour as you wish, but at least for a first time out of the gate, I suggest you follow the path set by David, copied by me. However, the old "we don't need no stinkin' badges" applies here too, and you can follow your own star.
My suggestion is to make at least twice as much base rye starter as you will use as input to your first stage rye sour. This way on a subsequent bake you will not have to recreate the wheel. And do this each time. It's also "important" to use about 25g of the rye to sprinkle on top of the goop at each stage. Not only will it give some protection from the developing stage drying out on the surface, but is also an excellent indicator of when to proceed to the next stage or when done. Stages 1 & 2 will not display quite the "continent drift" that the end of stage three does, but you will easily see the progress for that stage.
With a disclaimer! Bakers beware! I'm a "pandemic baker" without any rye experience to boot.
Thanks for the tips. I'm including a link to your blog with formatted rye sour table here and will update the original post to clarify. It seems I'm just compressing the WW to rye conversion into a single 12 hour feed, which should really be spread across 2-3 days to allow cultures to adapt before following with back-to-back-to-back accelerated builds at the warmer 90 F (or thereabouts). I might go ahead and bake with this not-quite-rye-sour hybrid starter, as I'm not sure I'll have a chance to bake for another few days. It will give me something to compare a more mature rye sour with. The rye sour seems happy enough at this temperature -- it expanded by 2.5x in just over 3 hours. For someone who isn't used to rye, the smell is fantastic. That's almost enough reason to keep one going.
I see the dusted rye sour "continental divide" approach in your table. Is this tradition, or do you think there is a practical difference between using this and the canonical volumetric jar + rubber-band approach used with sourdough starters? Perhaps the former lends itself more to larger volume baking (at least) where volumetric assessment is harder. I'll try to find some background discussion on this approach.
Is there any reason not to build this into the last rye sour build? I'm probably reading your comment too literally, but want to make sure you aren't drawing a distinction between the initial rye starter and subsequent rye sour builds that I'm missing. They are both 100% hydration, so the only thing I can think of would be temperature and perhaps longer fermentation periods for the base rye starter.
at stage three as long as you attempt to have the whole thang come out at 100% hydration. That's a good idea too, because you'll have a very robust rye sour as your stater for the next trip down Snyder Road...
Until last weekend I first, and only twice, made this bread 5 1/2 years ago based on David's formula and his rye sour instructions. As long as I have that guideline, I feel comfortable that I'm doing it correctly. Another way? Sure. There are probably a dozen other right and wrong ways to do it as well. I use a bowl so that as the sour grows there is ample room or the continents to spread apart.
I just noticed the most updated version of my recipe was not provided. Here is a better version: http://www.thefreshloaf.com/node/57389/jewish-sour-rye-update
David
in the "companion" blog entry.
Thanks for the correction -- it felt like I was missing something. That's spells things out nicely and covers the multi-stage rye sour build in detail.
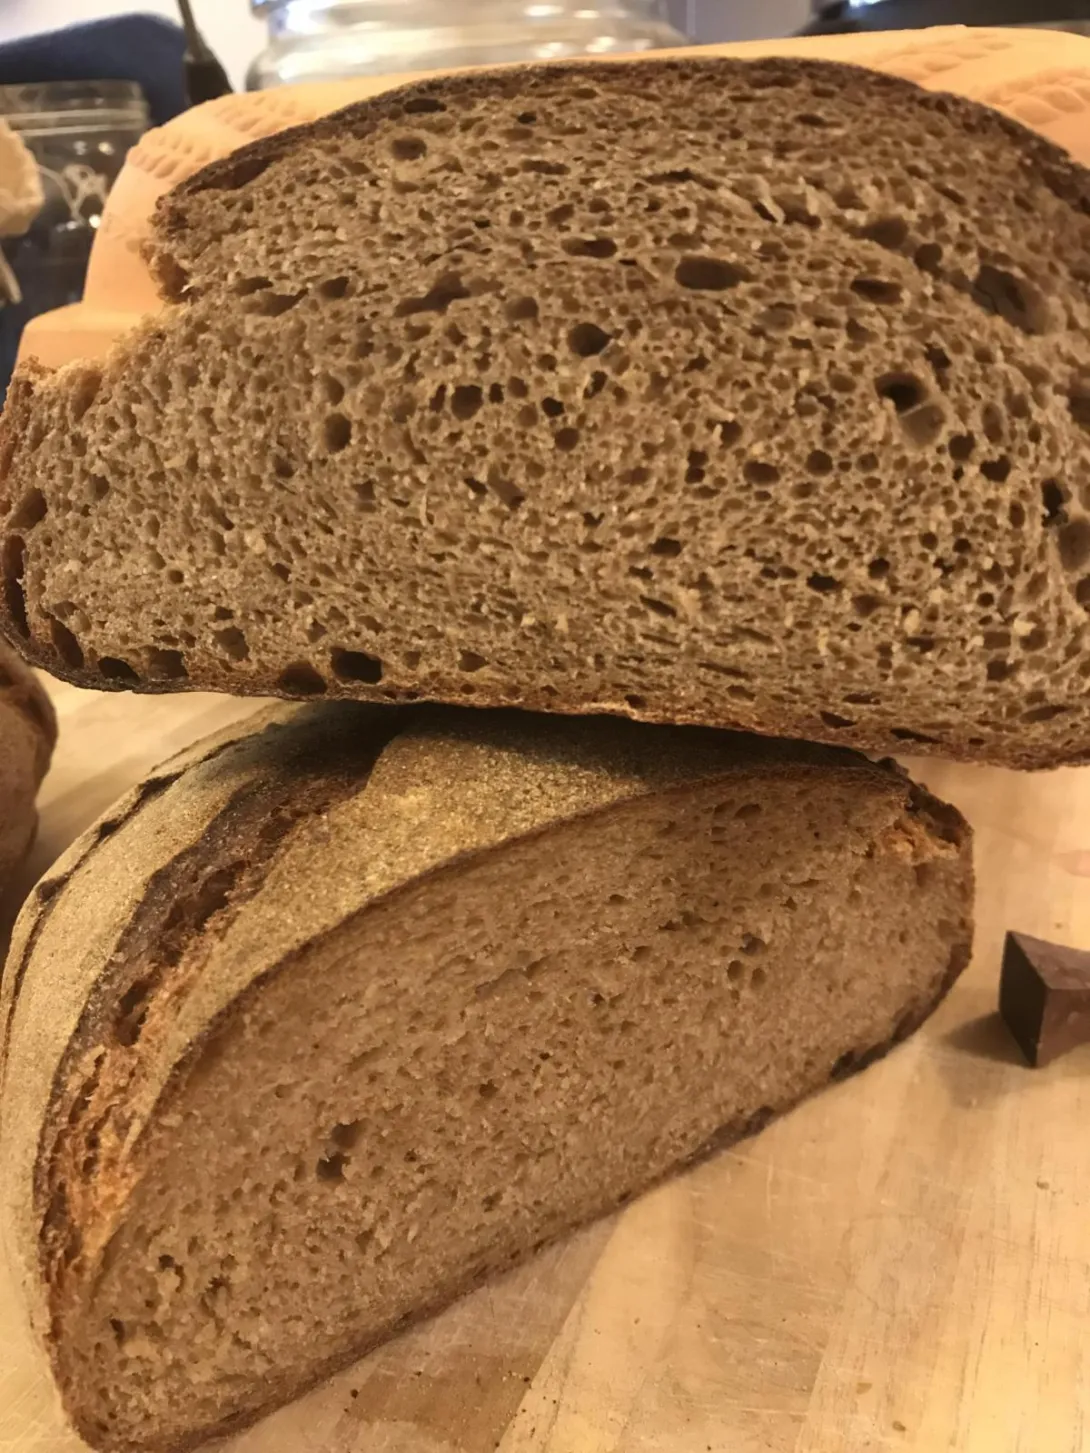
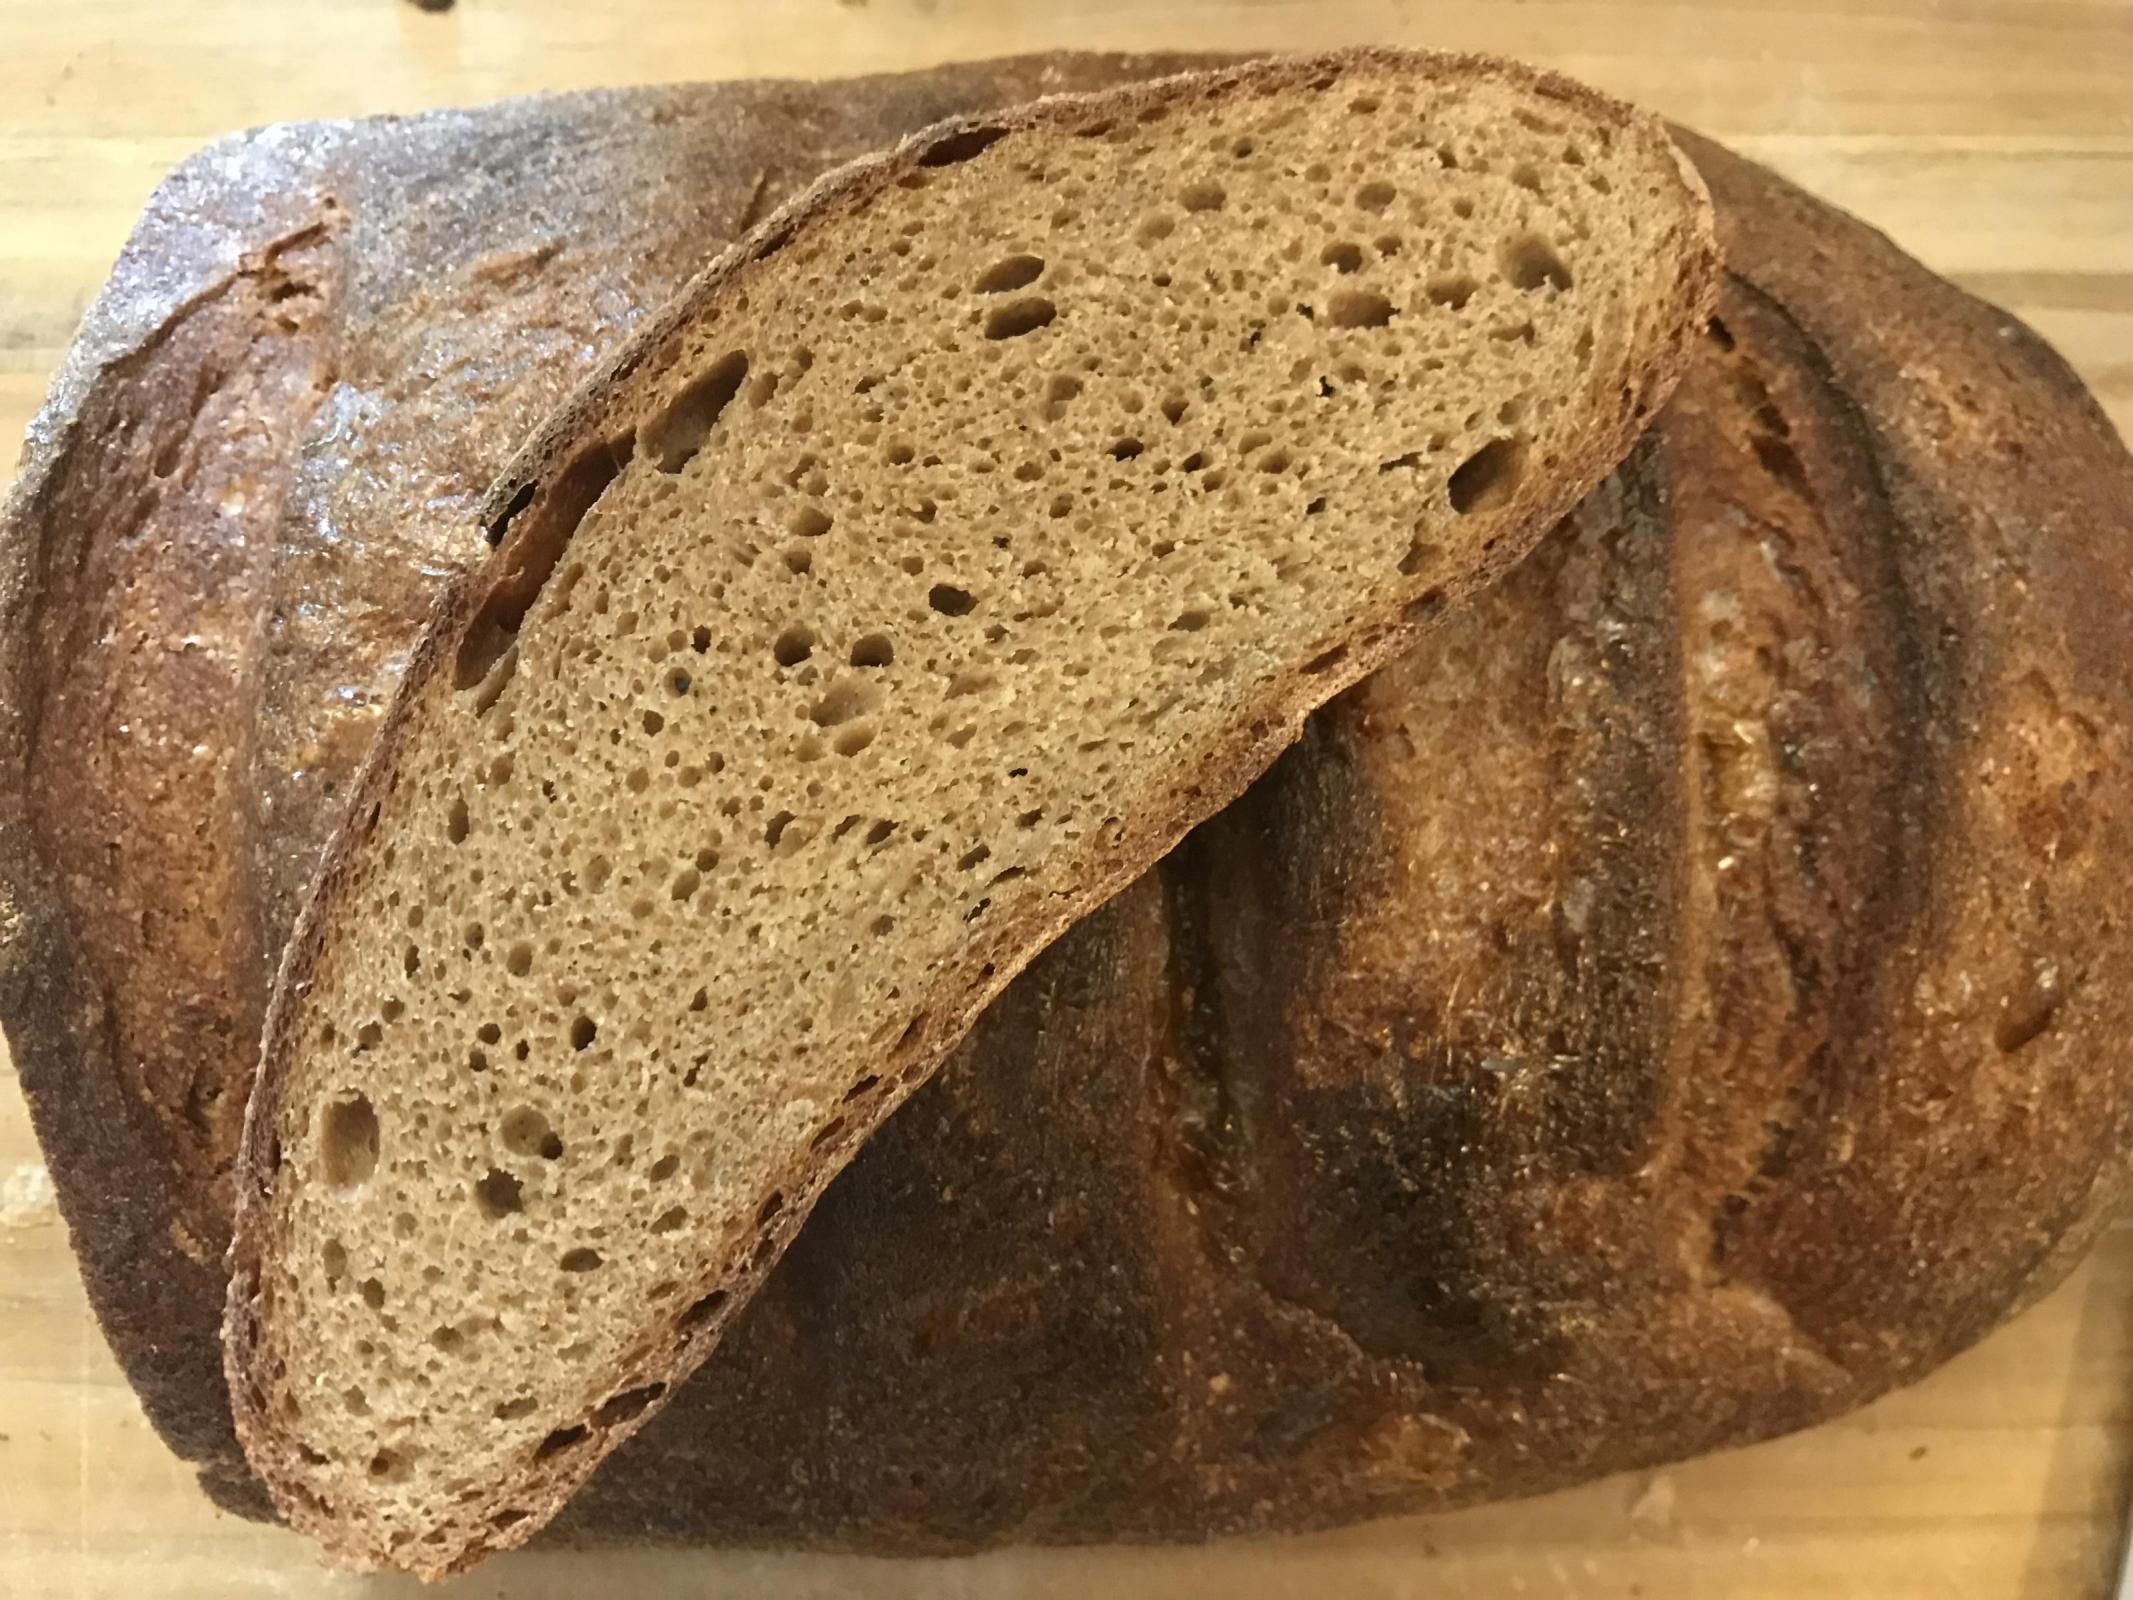
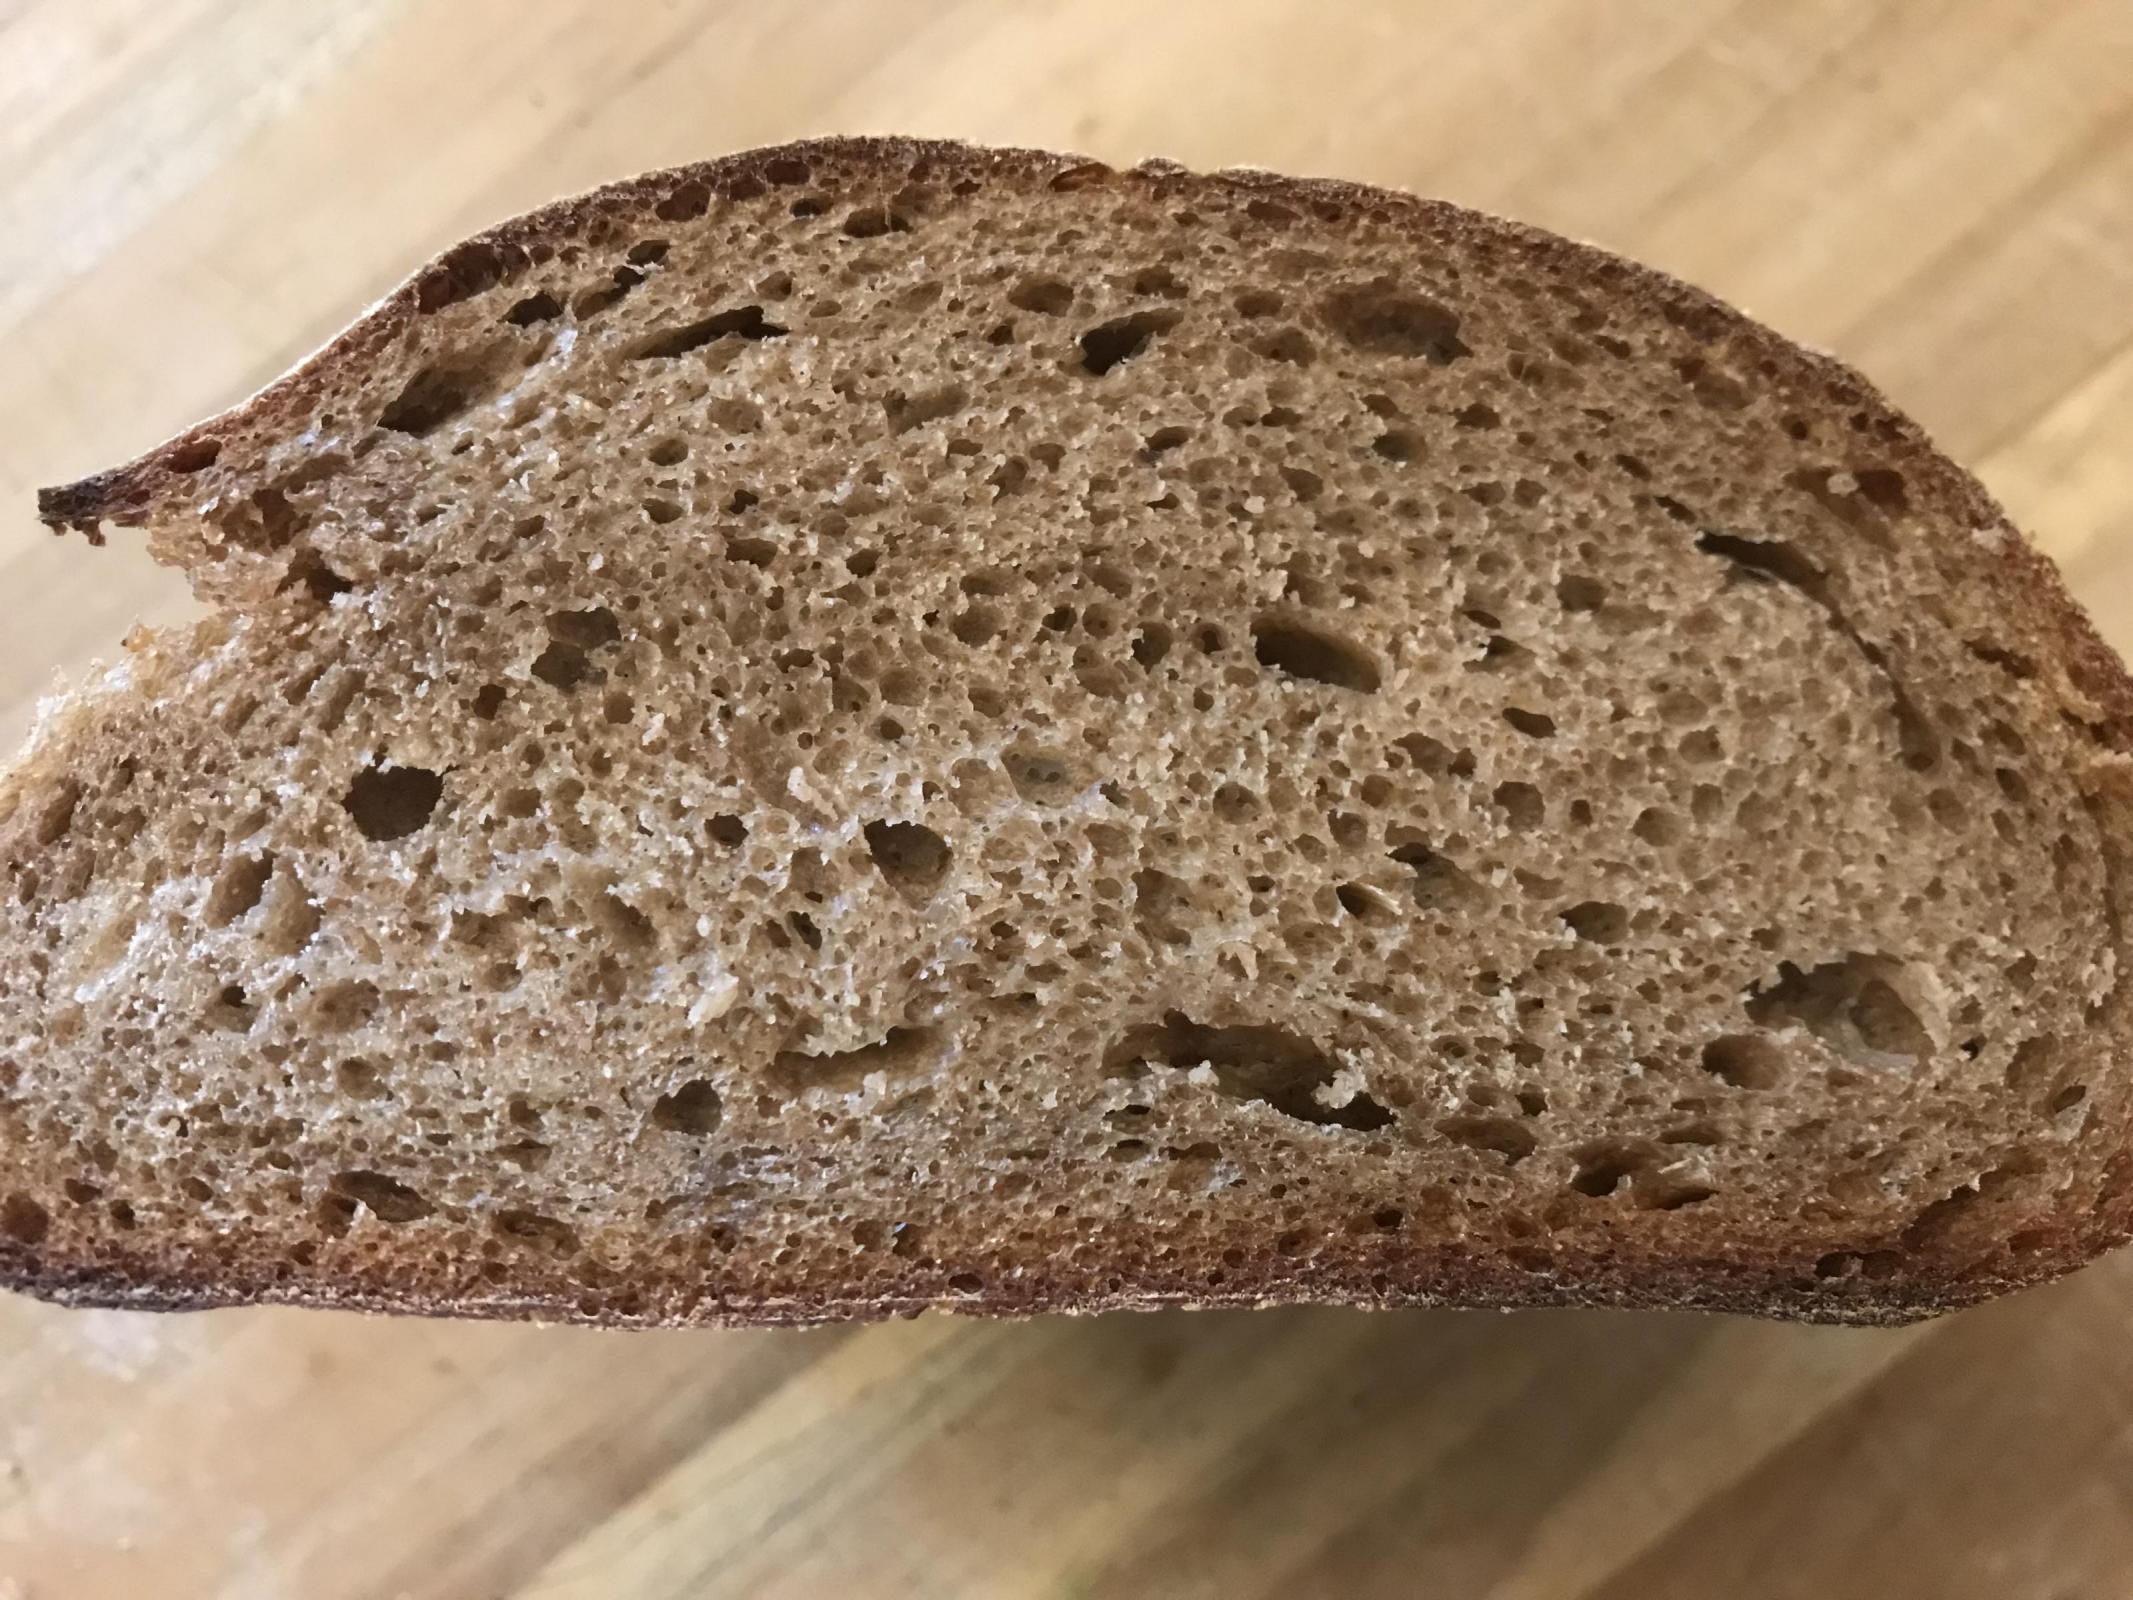
I liked the bread better on this attempt. The HWWW bran was sifted and dumped in the rye sour builds. The rye flavor is noticeable but not overpowering and it seems to contribute to a moister crumb. I like the caraway seeds, but left them out of this bake for a more versatile flavor. It is surprising that things are so manageable at 40% rye with the whole grain. This has been a nice exercise, and I'll be using rye frequently in my bakes from now on. The next goal is to fuse more of the crumb from this bake with the height and structure from the first attempt.
home milled HWWW + rye using clay bakers (details in first post)
See notes in top post.
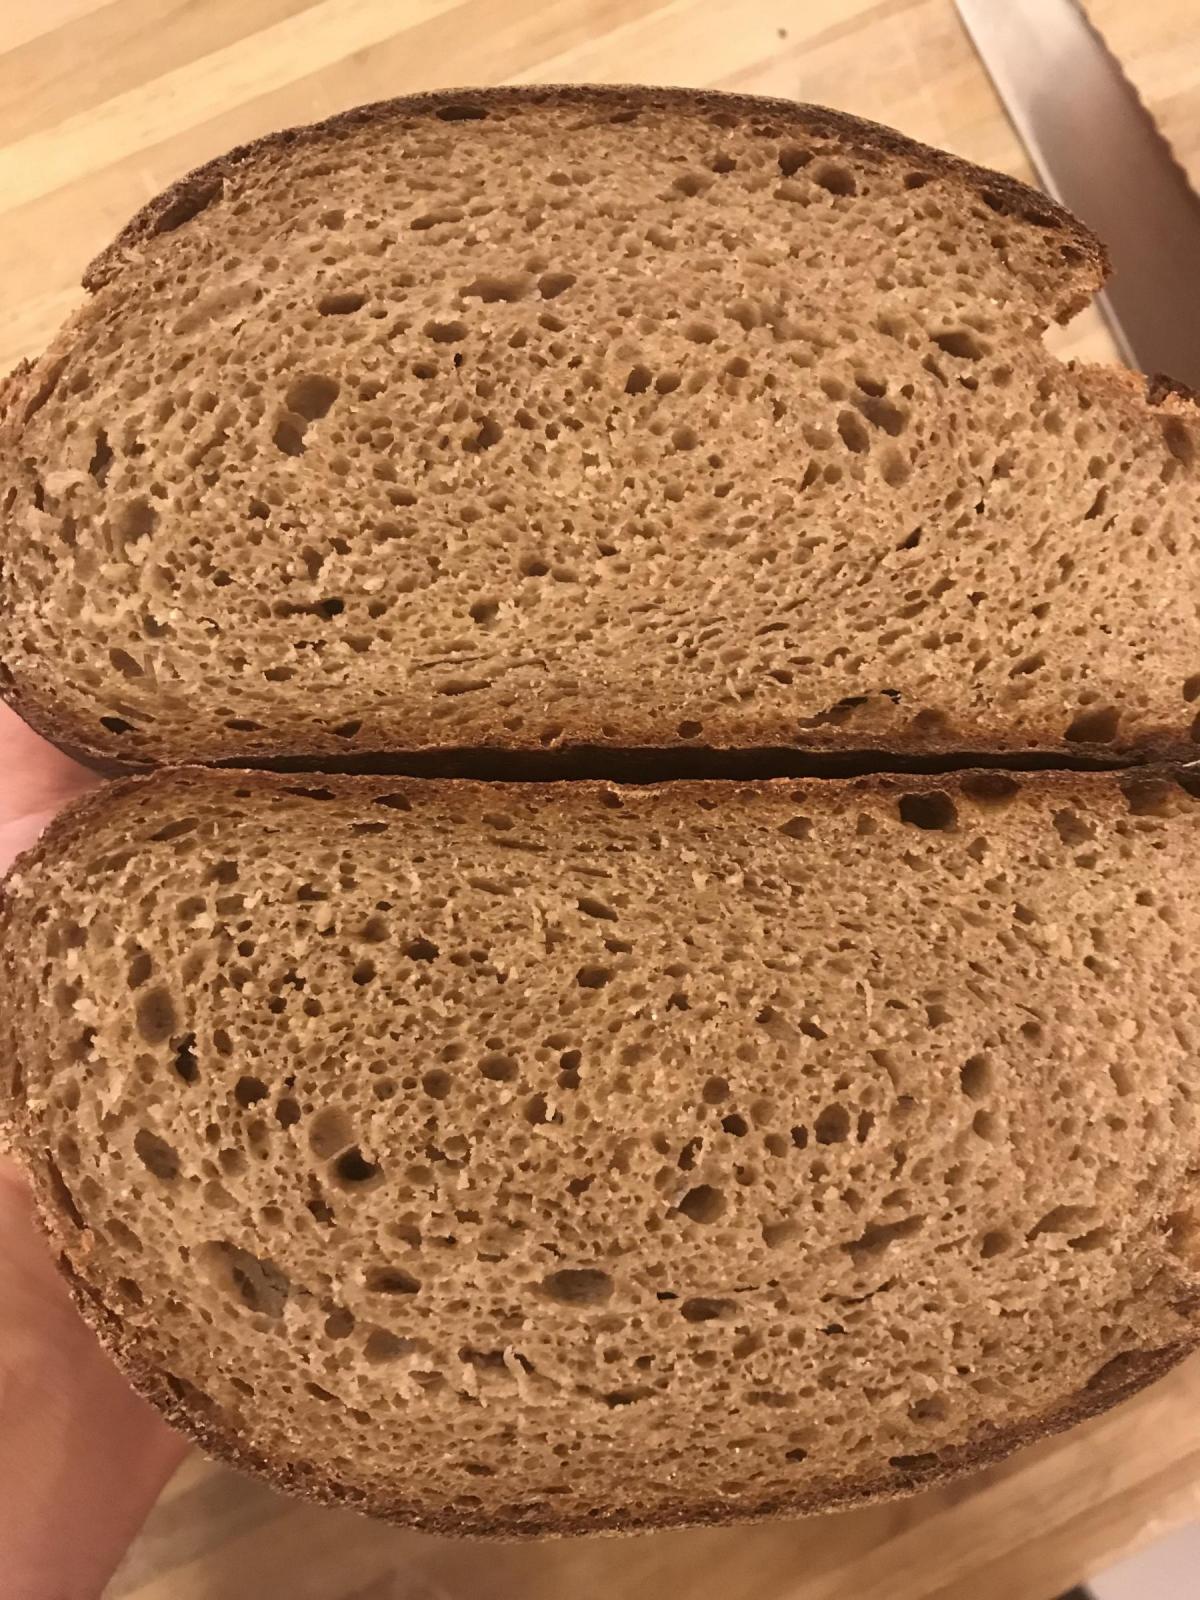
What a really nice crumb.
Note: if you don't add this, at least as a comment, in the CB post, no one but the very few on this distribution will likely see these posts in your blog. Just point them back to this comment.
Alan
I haven't done any rye baking and wanted to practice a little to get a feel for things before posting questions. I'm just about to mix for another bake and have just followed up in the main thread with a question related to improving loaf height in this whole grain adaptation.
* shaped two smaller loaves to see if smaller size supports taller shaping (refrigerated second loaf during bake, which varied proofing times)
* lowered hydration to that of original formula w/ some extra from spray bottle during slap and folds
* baked small loaves in wider clay baker for better steam (almost free standing)
Lovely crumb and oven spring you've achieved here, good looking loaf.
Benny
Thanks, it is slowly going in the right direction. I think the relative height was achieved in part by shaping two small loaves instead of a single large one. This also allows me to use my clay cloche, which seems to give more reliable bakes. I'd like to achieve the height with a single larger loaf and will try a few more things:
The 40% rye doesn't seem to have the same extensibility for the intense stretching you demonstrate, and attempts to pull laterally with much tension just moves the dough across the counter. I'm trying to hold the end with one hand and pull + roll with the other.
I’m glad some of my videos were helpful to you!
# 6th try, basic 40% rye bread 60% WW w/ desem style (stiff cool) starter
* bake a simple mid-week control loaf w/ 40% rye + 60 % WW
* take a break from rye build and make a simple 40% rye whole grain bread as a mid-week control
* just blend 300 g HWWW and 200 g rye coarse-to-fine w/o any sifting, etc
* use 100 g (from 500 g total) for cool (< 65 F) low hydration (50 %) starter as w/ desem and the rest for the dough
* use extended cold saltolyse instead of autolyse ... seems to hold its shape better
* add flour, water, and starter to target 75% hydration and a bit extra from sprayer
* bulk ferment cool (72 F or so) until 1.5x, then overnight proof in the fridge
* bake directly out of the fridge in wide cloche as a nearly free standing loaf
* it is probably better to mill rye and wheat separately, use 100% rye in the starter and reserve all the wheat/gluten for the mix ... next time!
These are some lovely looking breads, and the crumb on these last two have been just so right. Thanks for participating, and the CBs are proof that we can all improve our skills through collaboration and a concentrated focus.
Thanks for the kind words. I set a low bar with the first attempt ;) You've posted some nice bakes. It has been a great learning experience with good direction from TFL comments. Thanks for setting it up. I'm pretty pleased how well things are working out with home milled grains at 40% rye, although it is probably a few steps away from what most would recognize as a NY Jewish Deli Rye. I should try comparing the original 3 stage rye sour build with the whole grain friendly desem style rye starter (both with a saltolyse). I need to find more time for this kind of A/B experiment.
Looks really good, nice crumb and crust! I love to see others using a saltolyse as I often do with my overnight levains for other breads.
Benny
Thanks. I've enjoyed seeing your posts and videos. The saltolyse does seem to be the way to go with the fresh milled whole grains (at least). I recall Peter Reinhart's comment that it is easier to replace kneading with time. The main drawbacks I see are that it requires a little extra scheduling and that it makes mixing more challenging. As Abe mentioned in a recent post, I think I have been weakening my dough in some cases with the unsalted autolyse (and by overheating during milling). I've really been able to shape more tightly after the saltolyse (and possibly cooler milling), including some good pointers from your videos. I've been using a lamination approach for mixing, as mentioned by Ilya, with liberal use of the sprayer. Peter Reinhart chops the starter and dough into 12 pieces and then mixes. I think there is probably some sweet spot for water allocation, where enough water is used in the saltolyse to keep the dough pliable enough so that you can break it up completely by hand, yet enough water is reserved for the final mix to temporarily "dissolve" the gluten before bringing it all back together again, all while keeping everything under your target hydration or feel. In the case of rye sour builds I've had to lower the hydration of the starter to accomplish this. I'm curious how other people address mixing in the case of pre-developed gluten, and how tolerant the gluten is to being formed and "dissolved" with hydration. How do you approach this? There are lots of warning about tearing gluten during kneading, yet it seems some of this is inevitable at some scale, even when attempting to "dissolve" it carefully. I think a little more patience after hydrating the final mix might pay off for me.
7th bake: 40% rye 60 % HWWW w/ desem style rye starter
* froze grains before milling
* similar to previous bake but had to finish BF in the fridge overnight before bed
* removed from fridge to warm up and shape, returned to fridge while oven warmed up (it moves very quickly)
* baked in clay cloche as before
# 8th bake: basic 37.5% rye 62.5% HWWW w/ desem style (stiff cool) rye starter
Your rye breads are all turning out so well. The crumb is perfect for me.
Benny