This is for all of the new bakers who want to tackle a Tartine recipe and get a sense of what to expect and look for during the various stages.
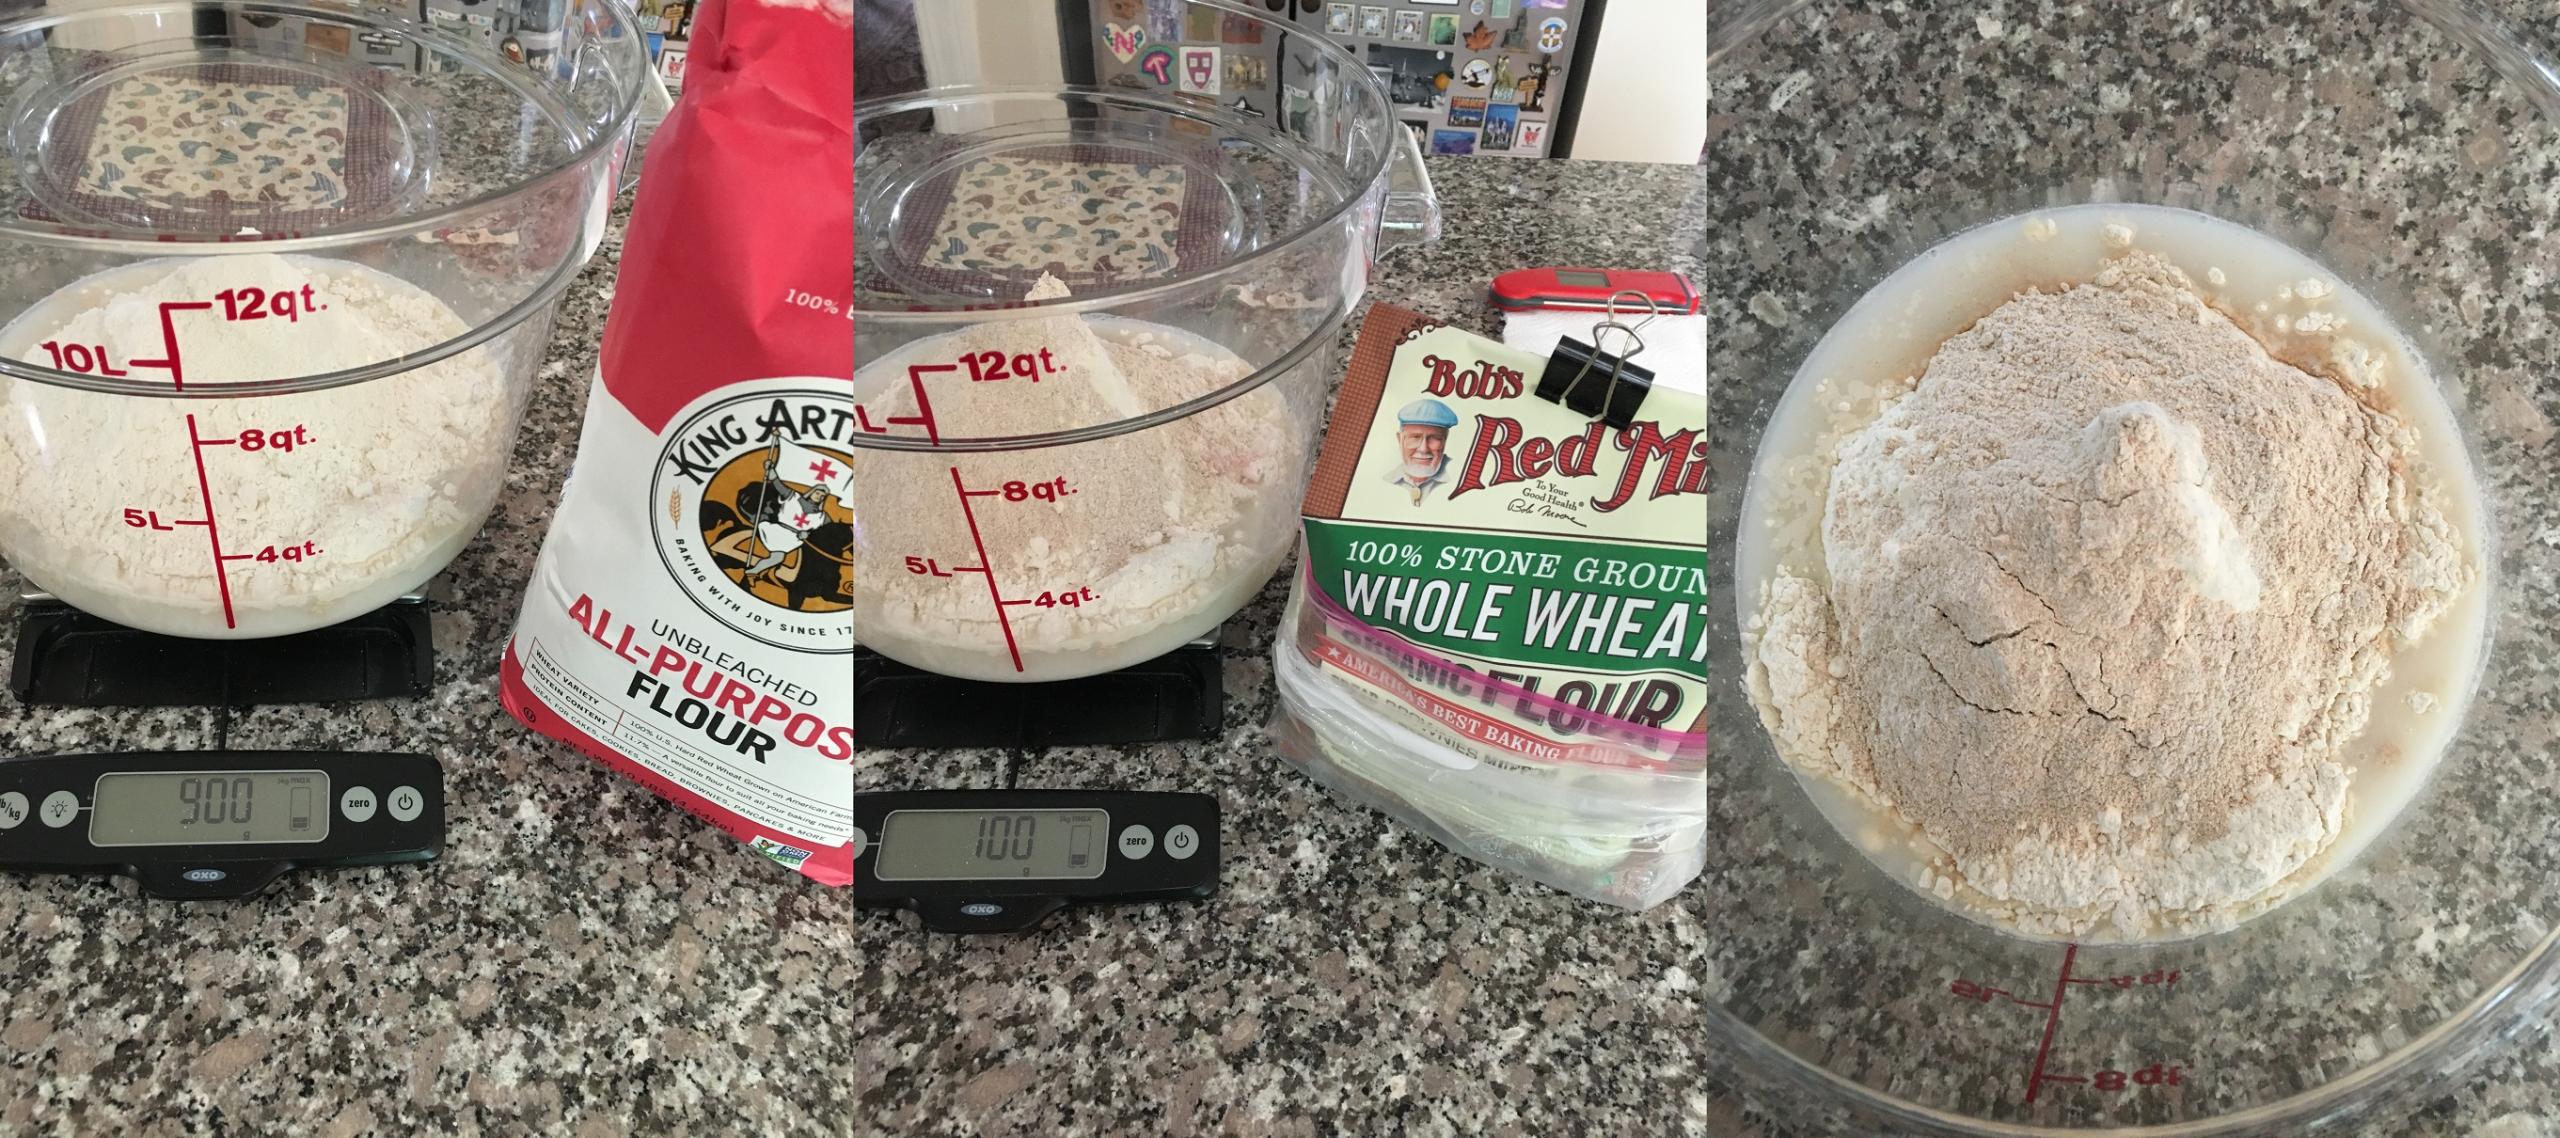
The Tartine Bread book begins with the Basic Country Bread, which is 90% all-purpose flour and 10% whole wheat flour. With a 75% hydration, this can be a challenge for those who have not handled much dough, but the recipe is manageable, and making this bread will give you experience in recognizing the signs for when to move on from step-to-step (and when to be patient too).
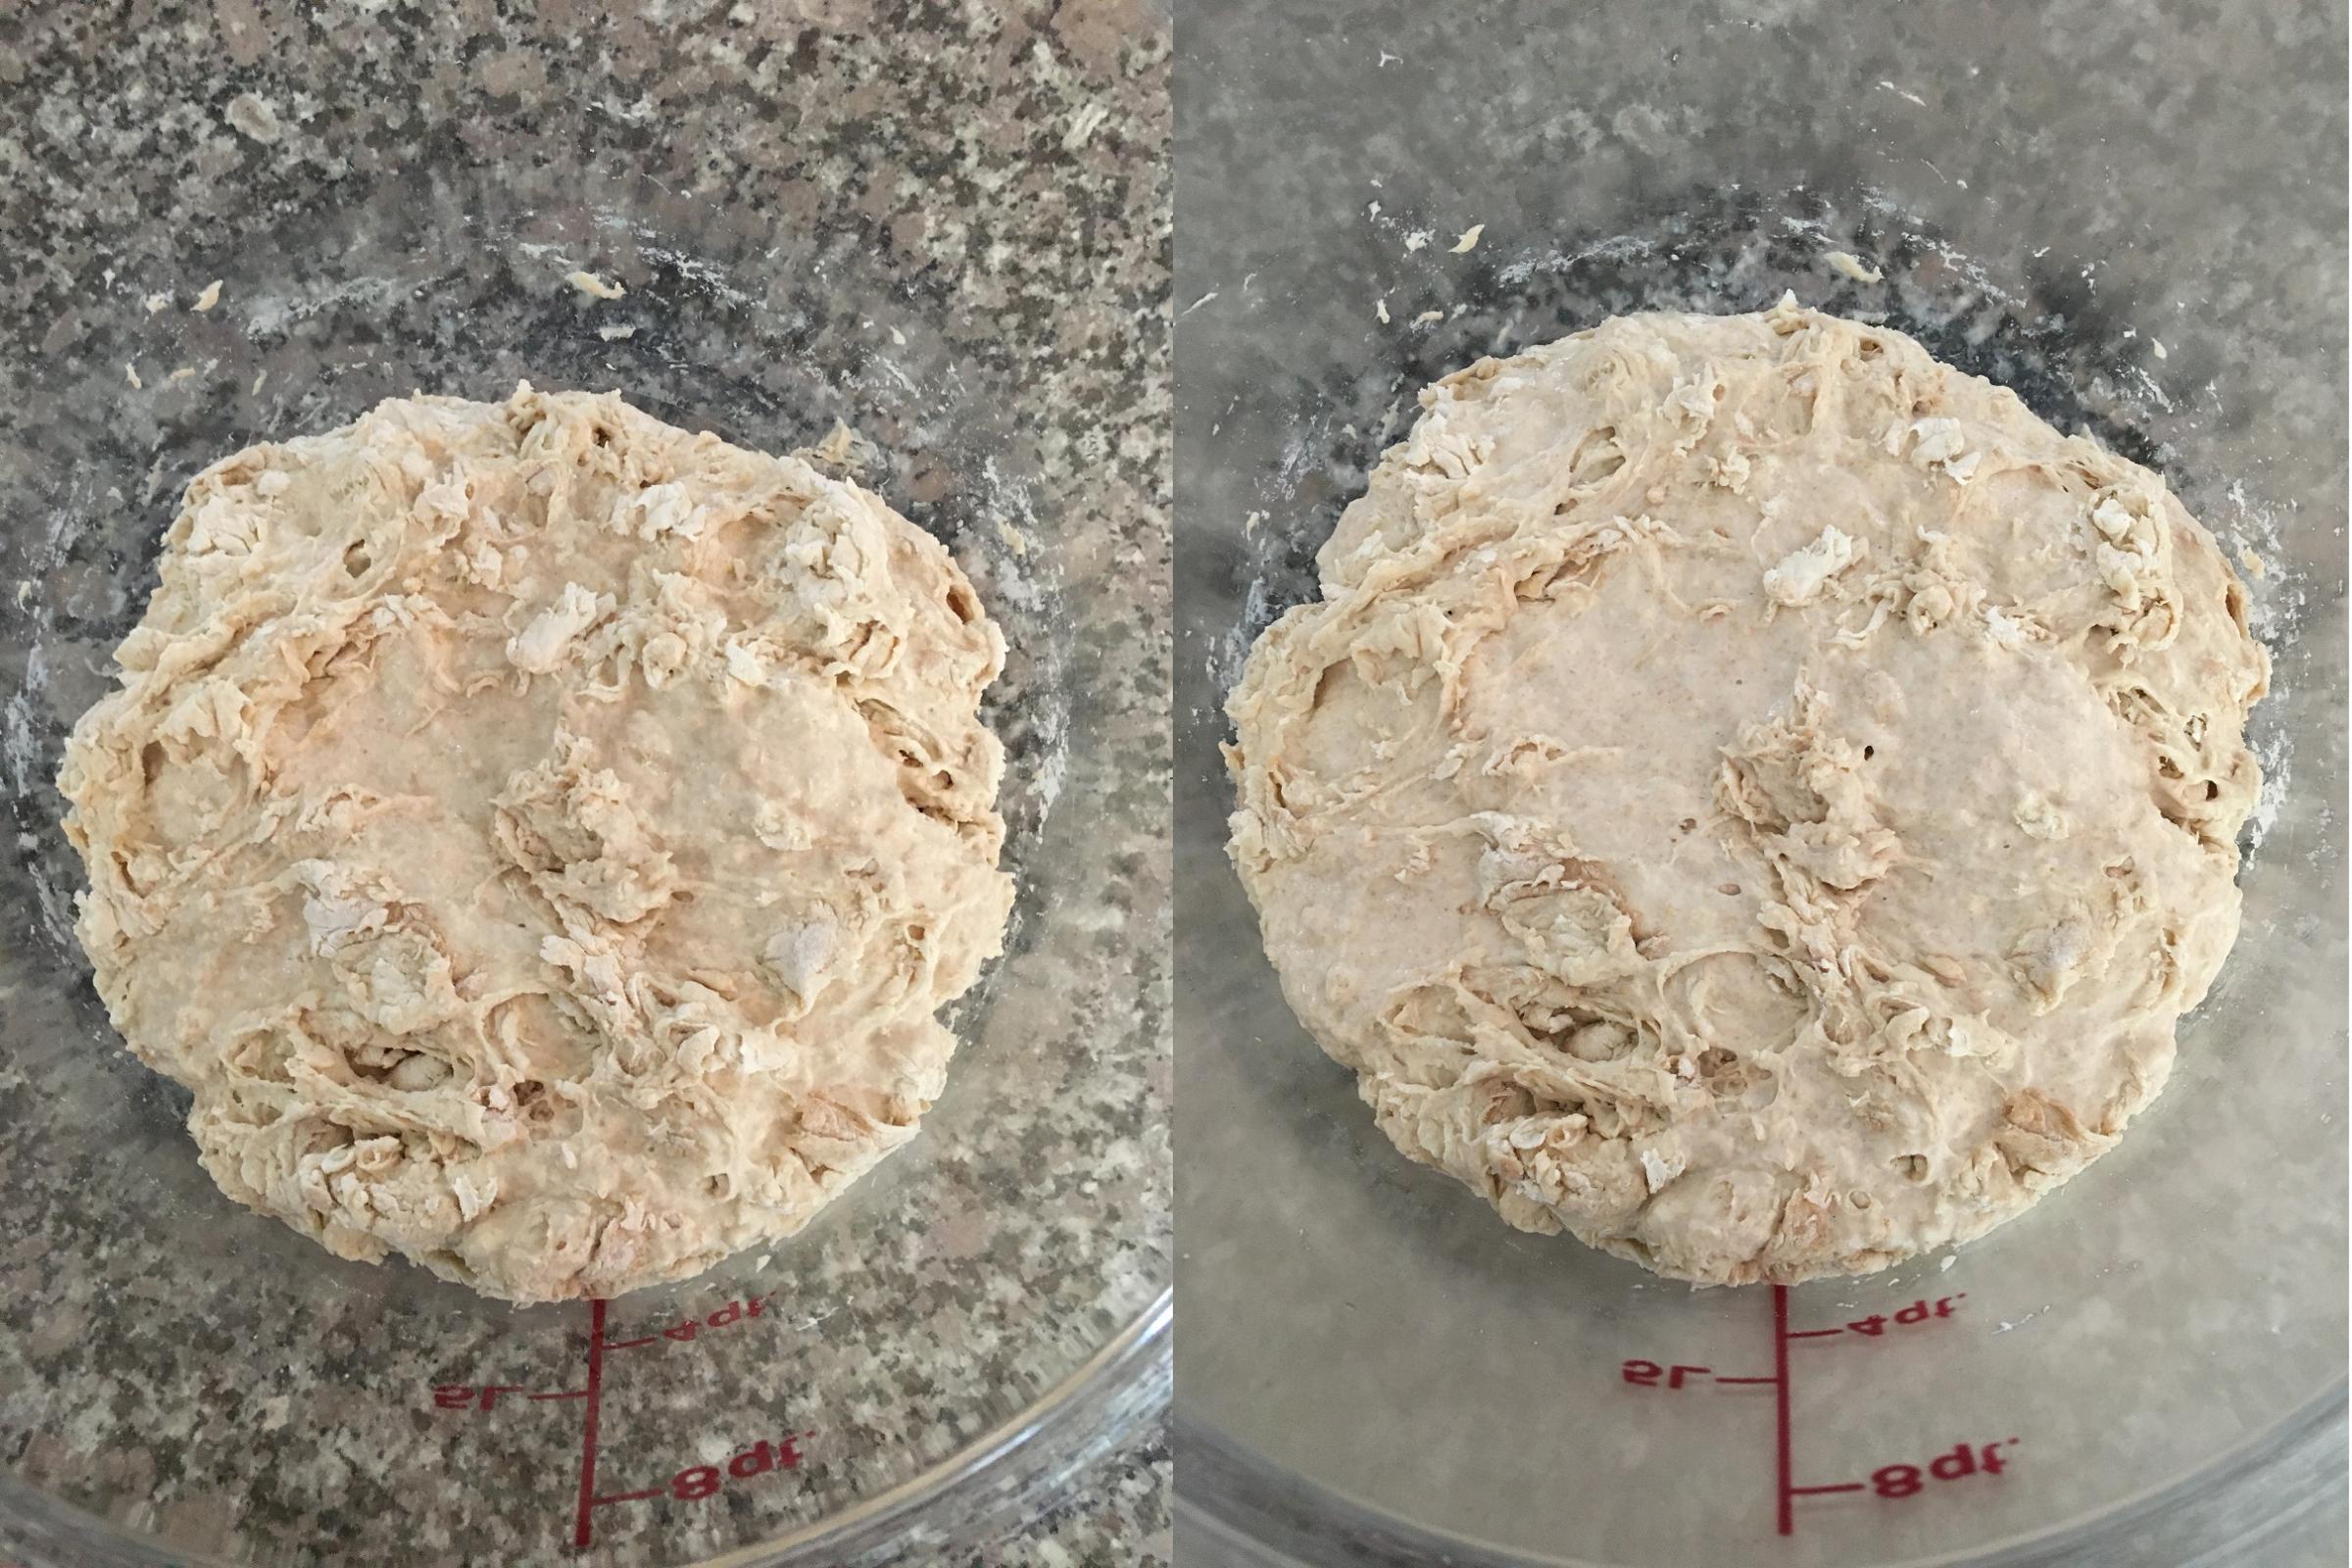
The night before, I mixed 20 grams of starter with 100 grams of 50/50 all-purpose/whole wheat flour and 100 grams of water. It is amazing that all of the lift is provided by this little amount of starter. After all, 20 grams is less than three-quarters of an ounce, and there will be over two pounds of flour in the dough.
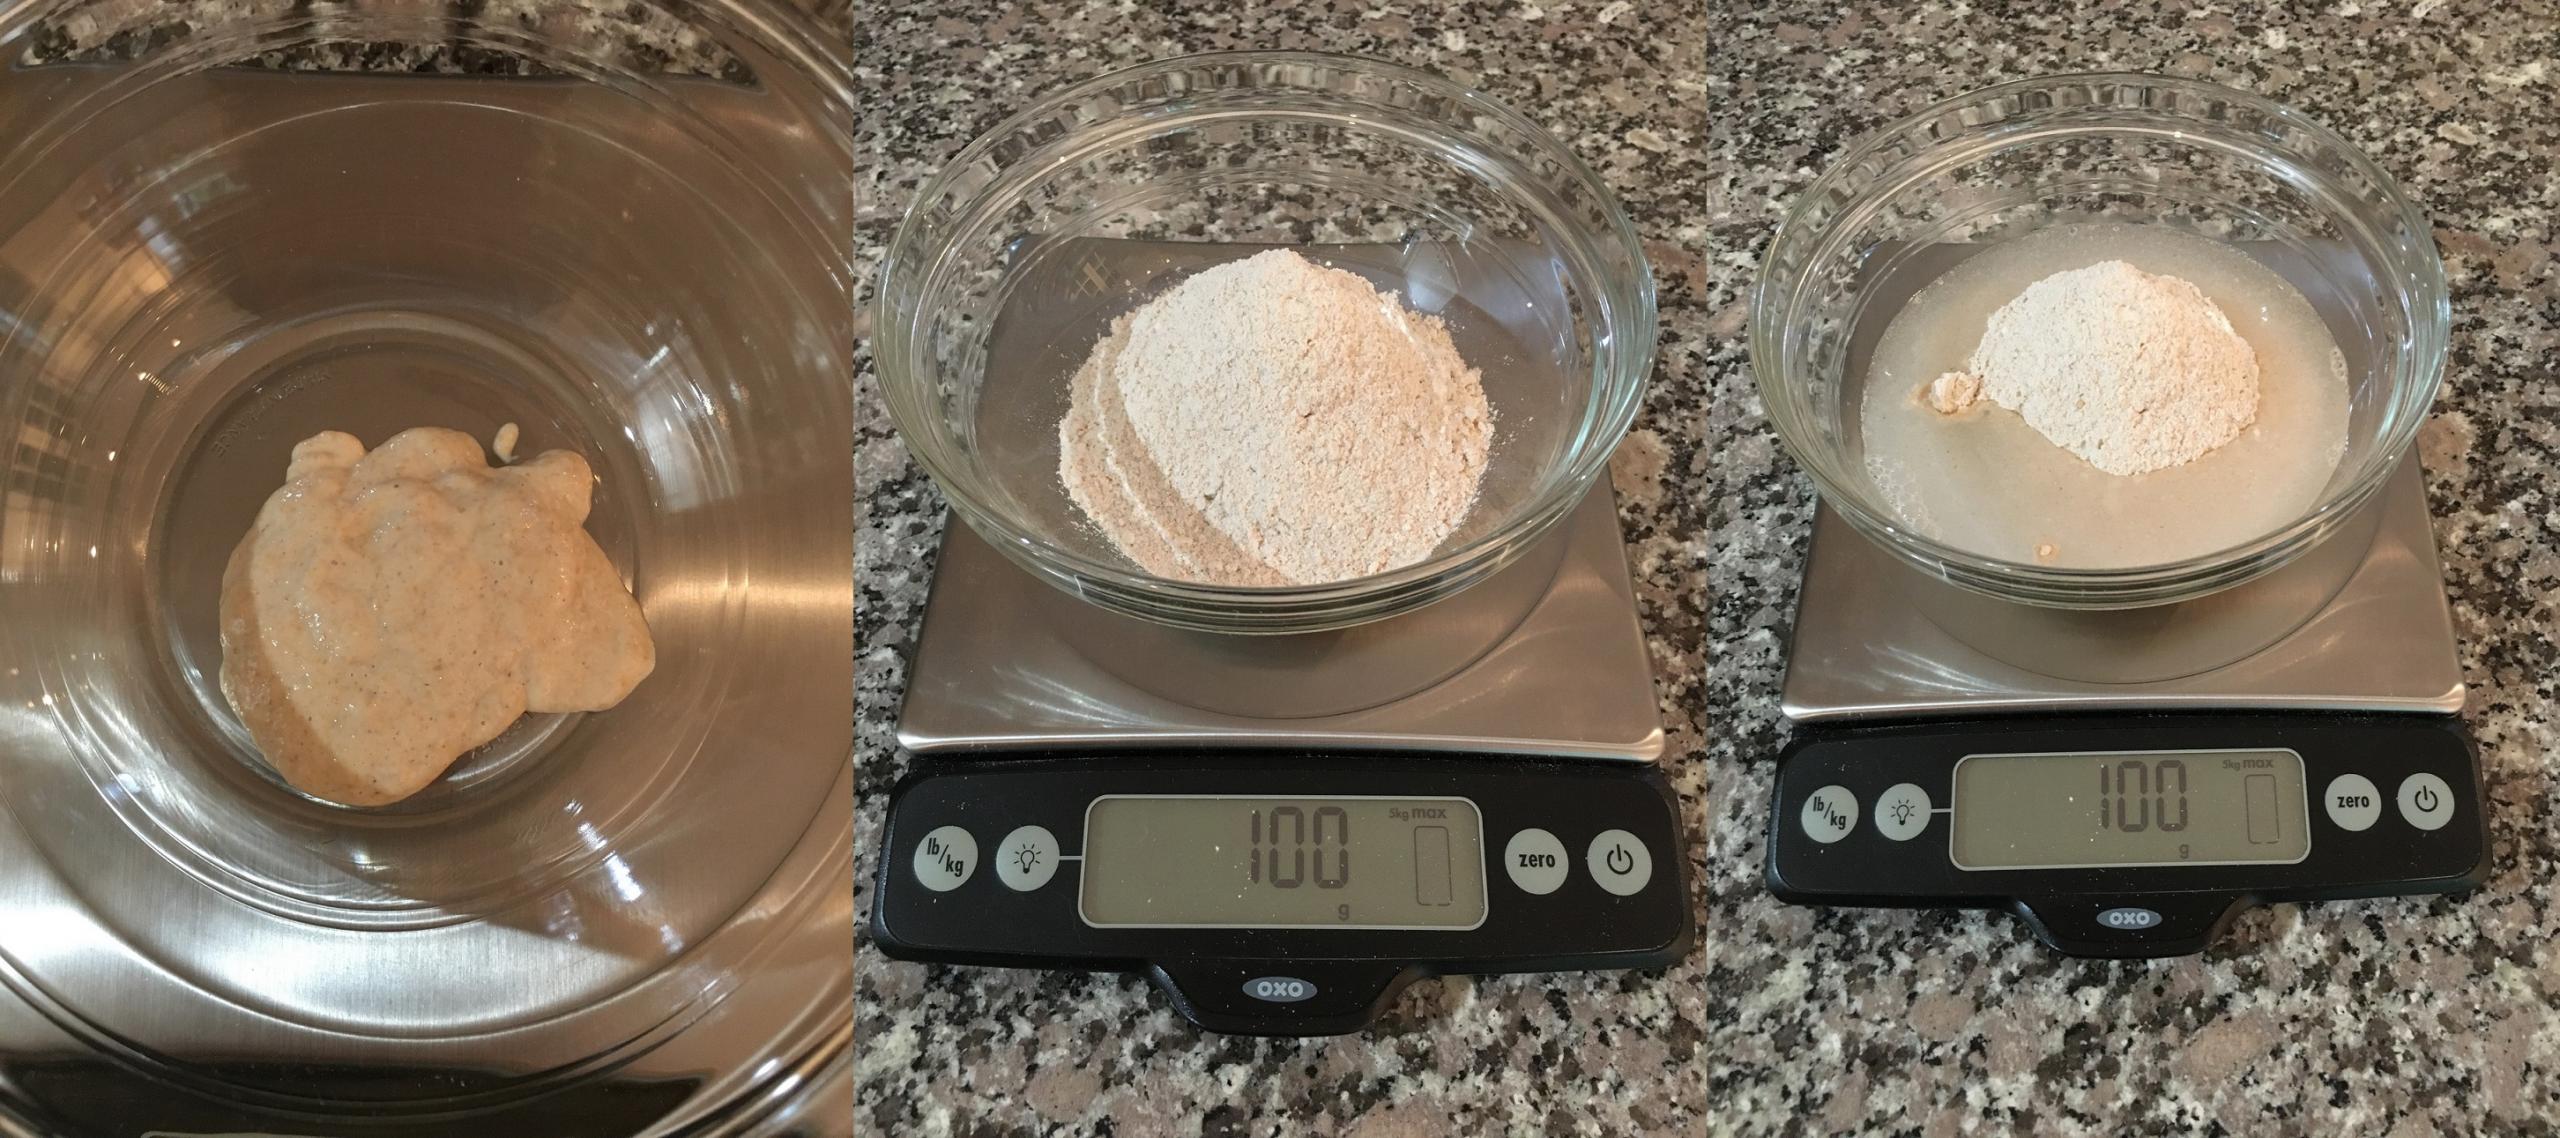
These ingredients were stirred until thoroughly mixed and then the container was covered for the overnight period. By the next morning the leaven had expanded nicely.

On the left are top and side views of the leaven just after being mixed, and on the right are similar views from the next morning. Note the bubbles on the surface and side of the container. This is a healthy, vigorous starter.
Tartine calls for mixing the water and leaven before adding the flours. There is 700 grams of water (my kitchen was a bit chilly, so I used pretty warm water) and 200 grams of leaven. After adding the leaven to the water (I let it drop out of the container into the water while I watched the scale and used a spatula near the end to get the amount right), I stirred the leaven into the water, which helped distribute it before any flour was added.
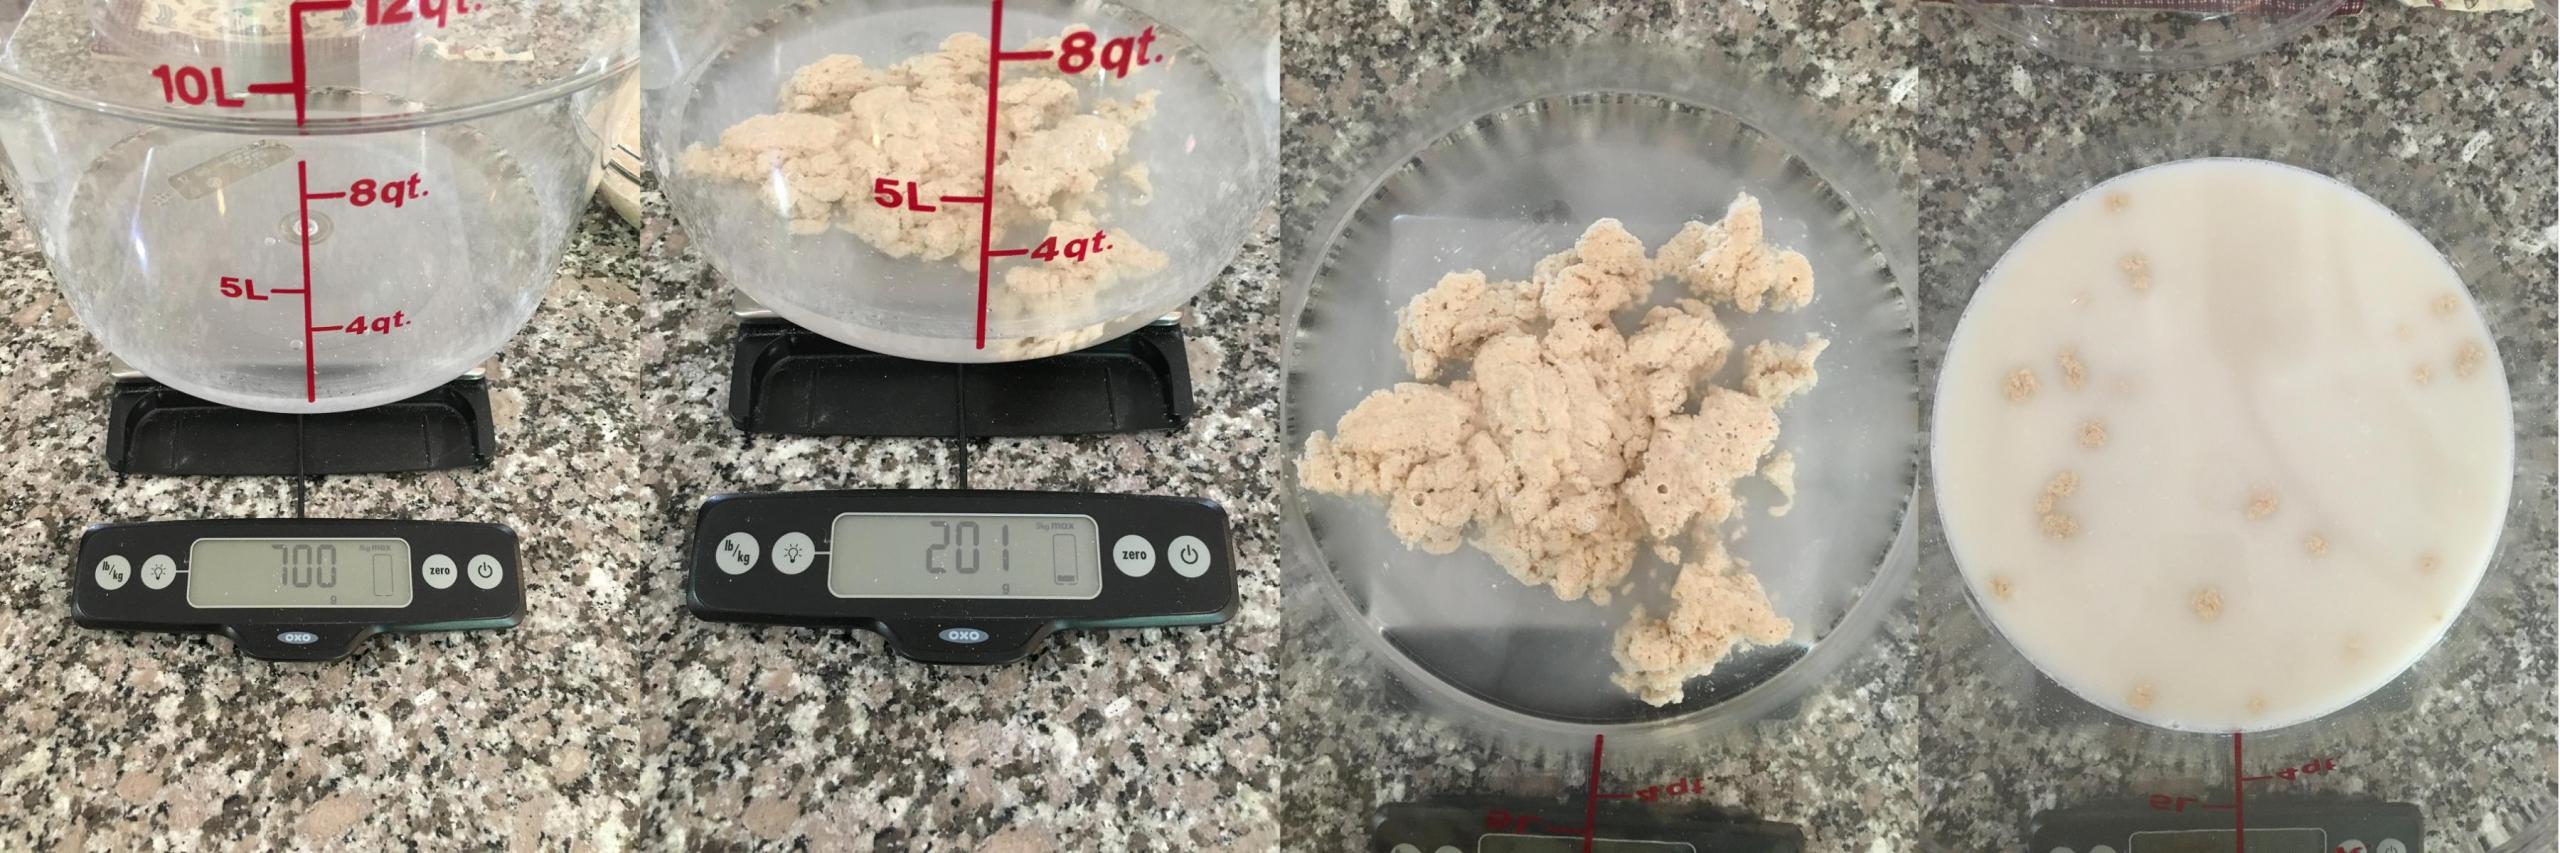
Next the flour went in, and the mixing was about to start.
The goal now was simply to make sure that there was no dry flour. I used a dough scraper (which I will point out in one of the photos that follow below) to help integrate the water and flours, and eventually I used my hand to move the dough around enough to get everything moist. Then the container was covered for the autolyse session, which lasted forty minutes.
As you can see, from outward appearances not much happened during the forty minutes, but in fact there was the beginning of gluten development. With the autolyse completed, it was time to add the salt and some water to help dissolve the salt. First I sprinkled the salt around to distribute it, and then I sprinkled the water around. Now the fun began.
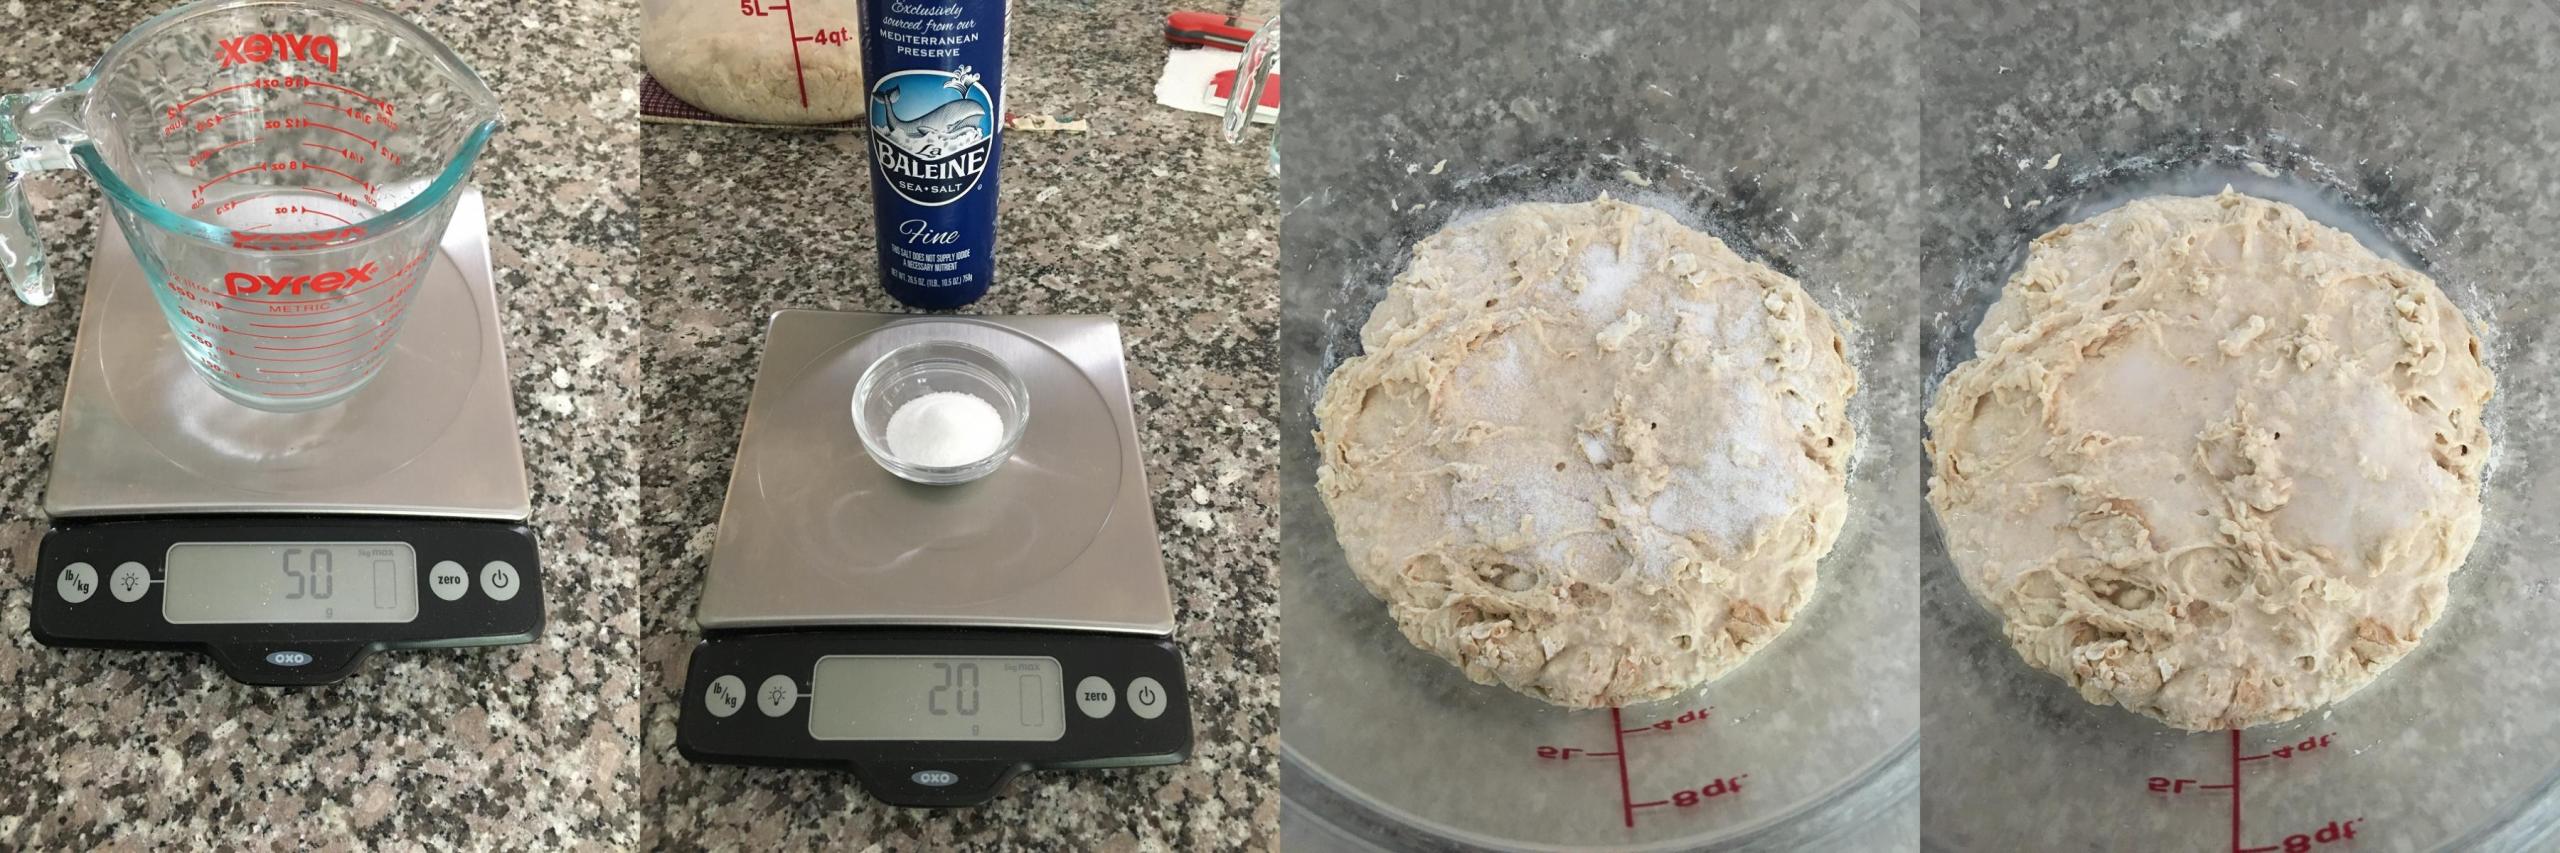
Still working with the dough in the Cambro container, I moved it around to absorb the additional water (essentially massaging the dough and turning it to expose any dryer portions) and mix in the salt. When the water had been absorbed (perhaps five minutes), I dumped the mass of dough onto our granite countertop.
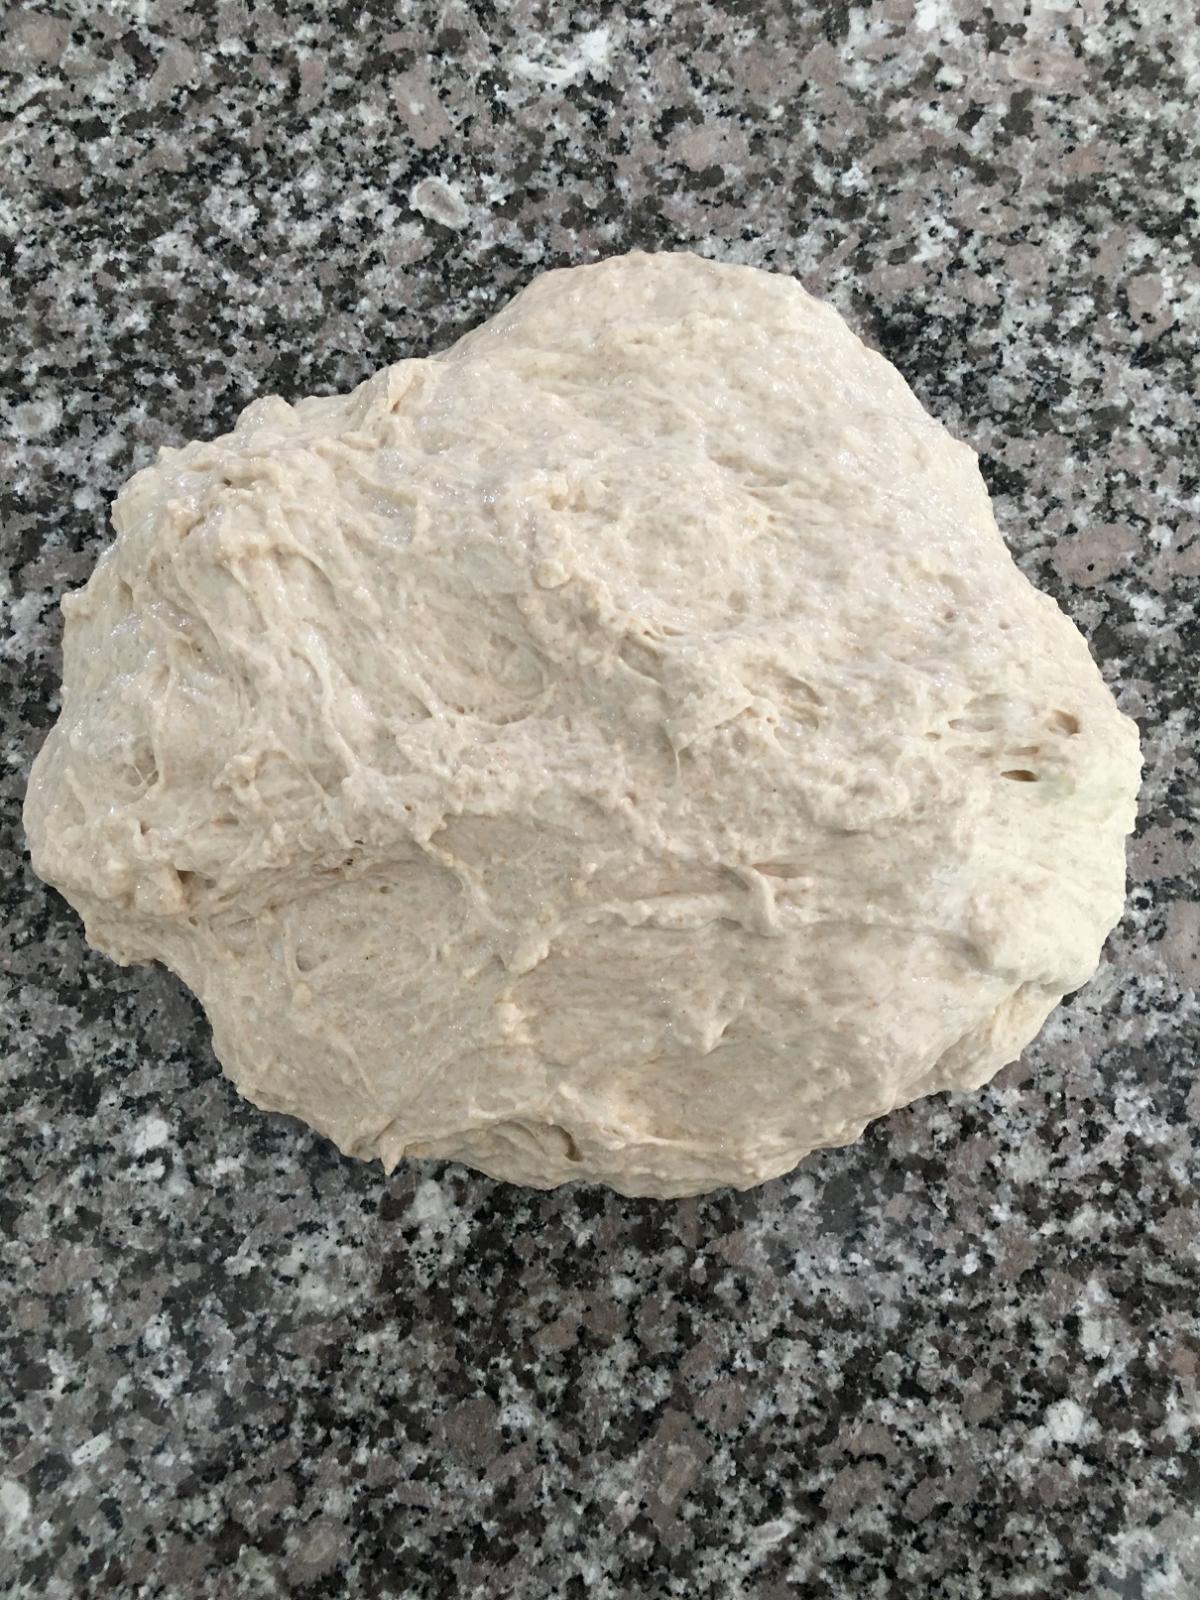
In the past I have typically continued to work the dough by hand in the Cambro tub, and that produces fine results, but this time I decided to do some slap-and-folds (aka French folds) for the initial mixing. If you prefer to mix the dough in your container, I heartily recommend the videos of Trevor J. Wilson on his Breadwerx site, where he demonstrates a simple way to create nice doughs. It took me awhile to include French folds in my set of techniques, so do not feel any need to venture there yet, especially if you are new to bread making.
After five hundred French folds, I had a dough mass with some great gluten development and a smooth surface. (By contrast, I recently baked a Jeff Hamelman bread that uses bread flour and has a 65% hydration, and the dough came together fairly quickly and required many fewer French folds, but that illustrates a difference between all-purpose and bread flours and 75% v. 65% hydration.) I always check the temperature of my dough at the end of the inital mixing because that gives me a sense of what to expect during the bulk fermentation. (Also, note the red dough scraper -- mentioned above -- in the background.)
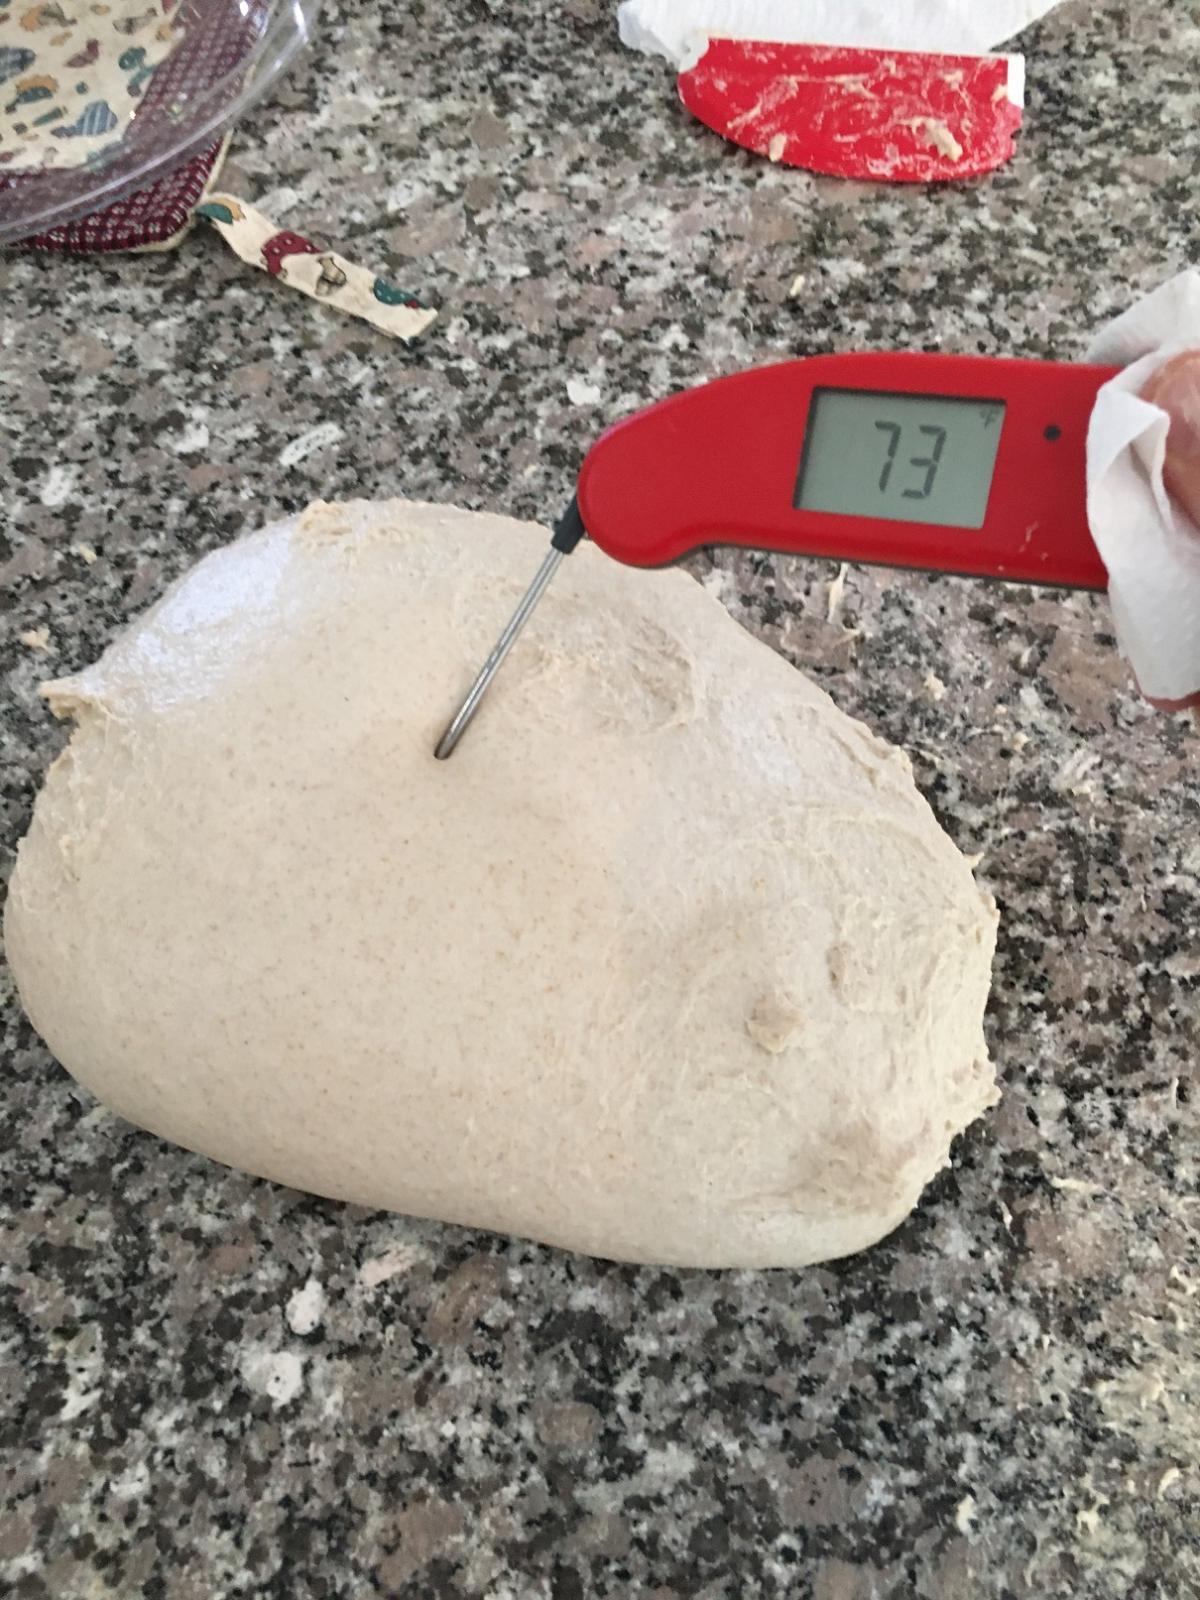
The 73F temperature told me that the dough was going to take a little longer for bulk fermentation than if the target temperature of 78-82F as described in Tartine Bread had been reached. That was fine, because good bread takes patience, and the reward is good flavor.
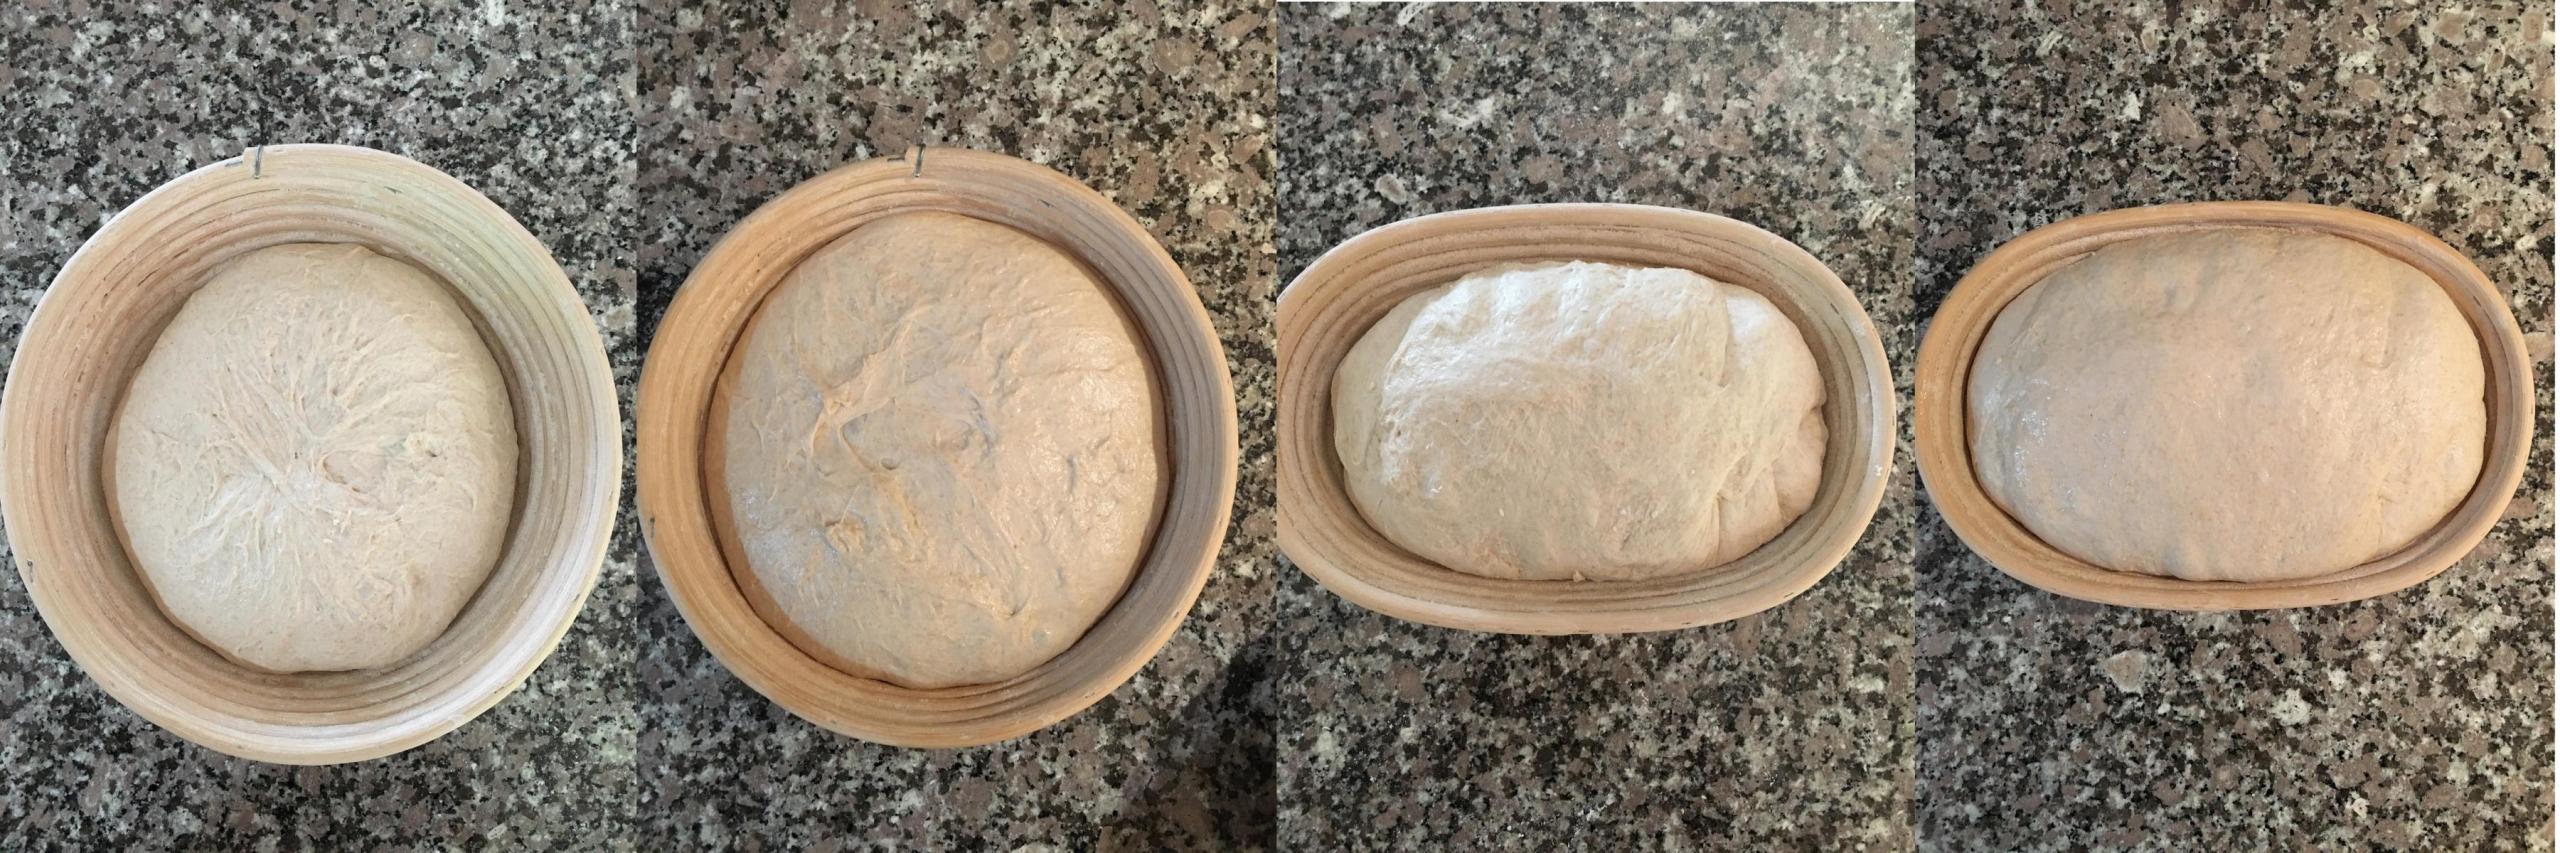
The recipe calls for four stretch-and-fold sessions spaced thirty minutes apart beginning thirty minutes after the initial mixing. Thereafter the Tartine Bread book says to monitor the dough and give a stretch-and-fold as needed until the bulk fermentation stage ends. I did the four S&F sessions and then another an hour after the fourth. This composite photo shows the dough just before each of those five S&F sessions and then at the end of the bulk fermentation.
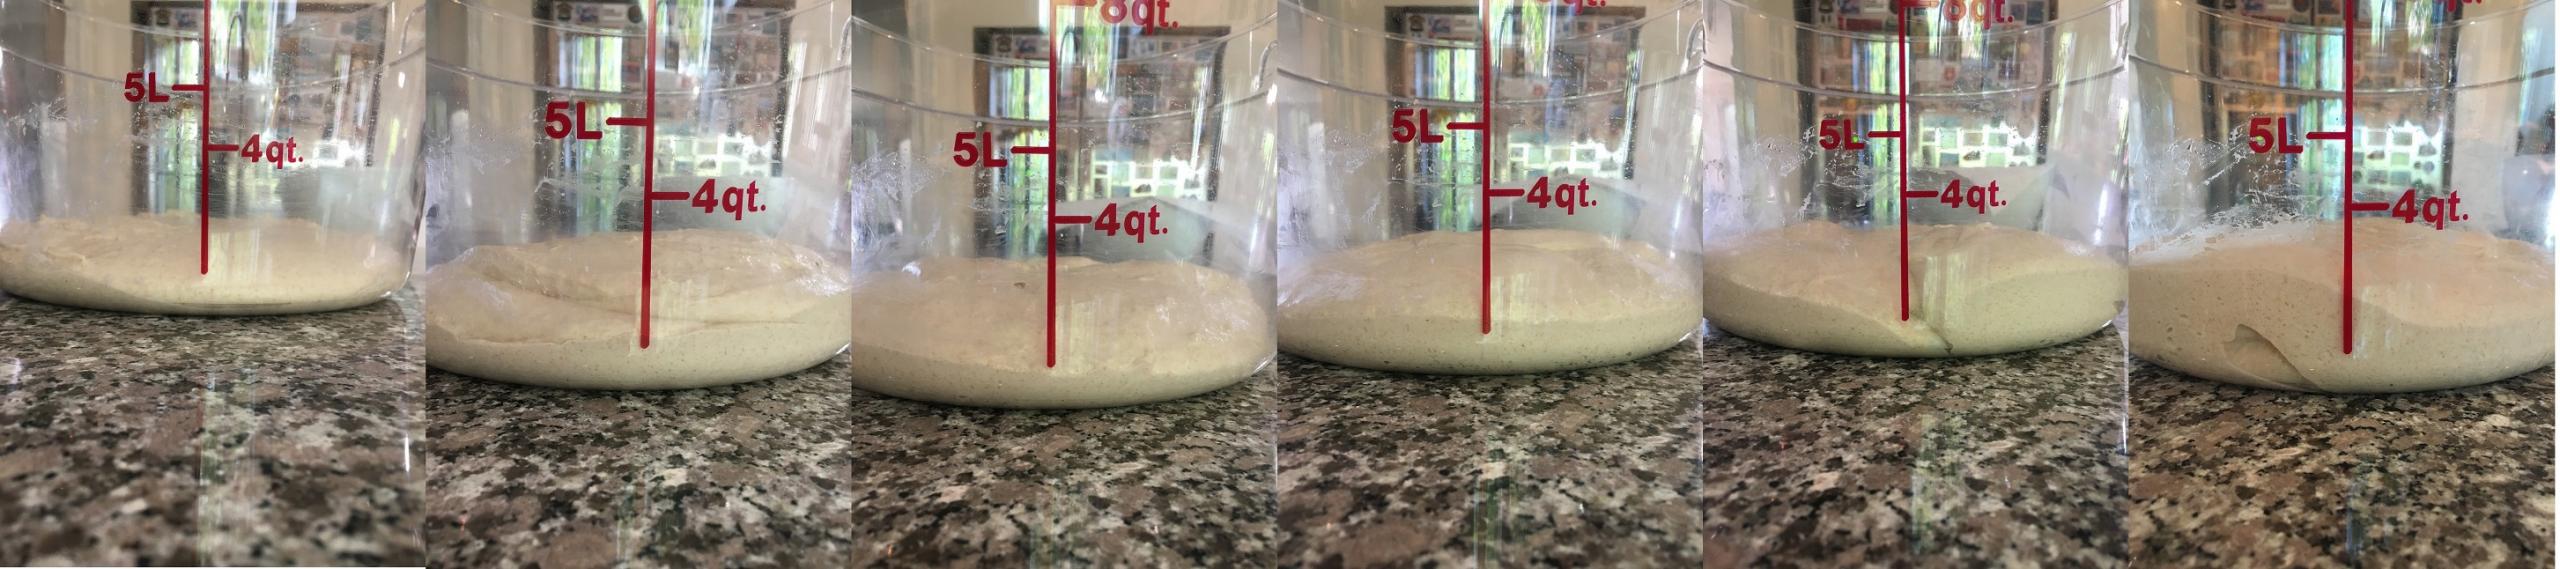
My Cambro tub holds 12 quarts, so the dough sits near the bottom as it spreads to the sides, but a discernible expansion occurred, especially in the final two photos. Another way to monitor the bulk fermentation is to note changes from the top, and the following composite photo shows the state of the dough just before each of the five S&F sessions.
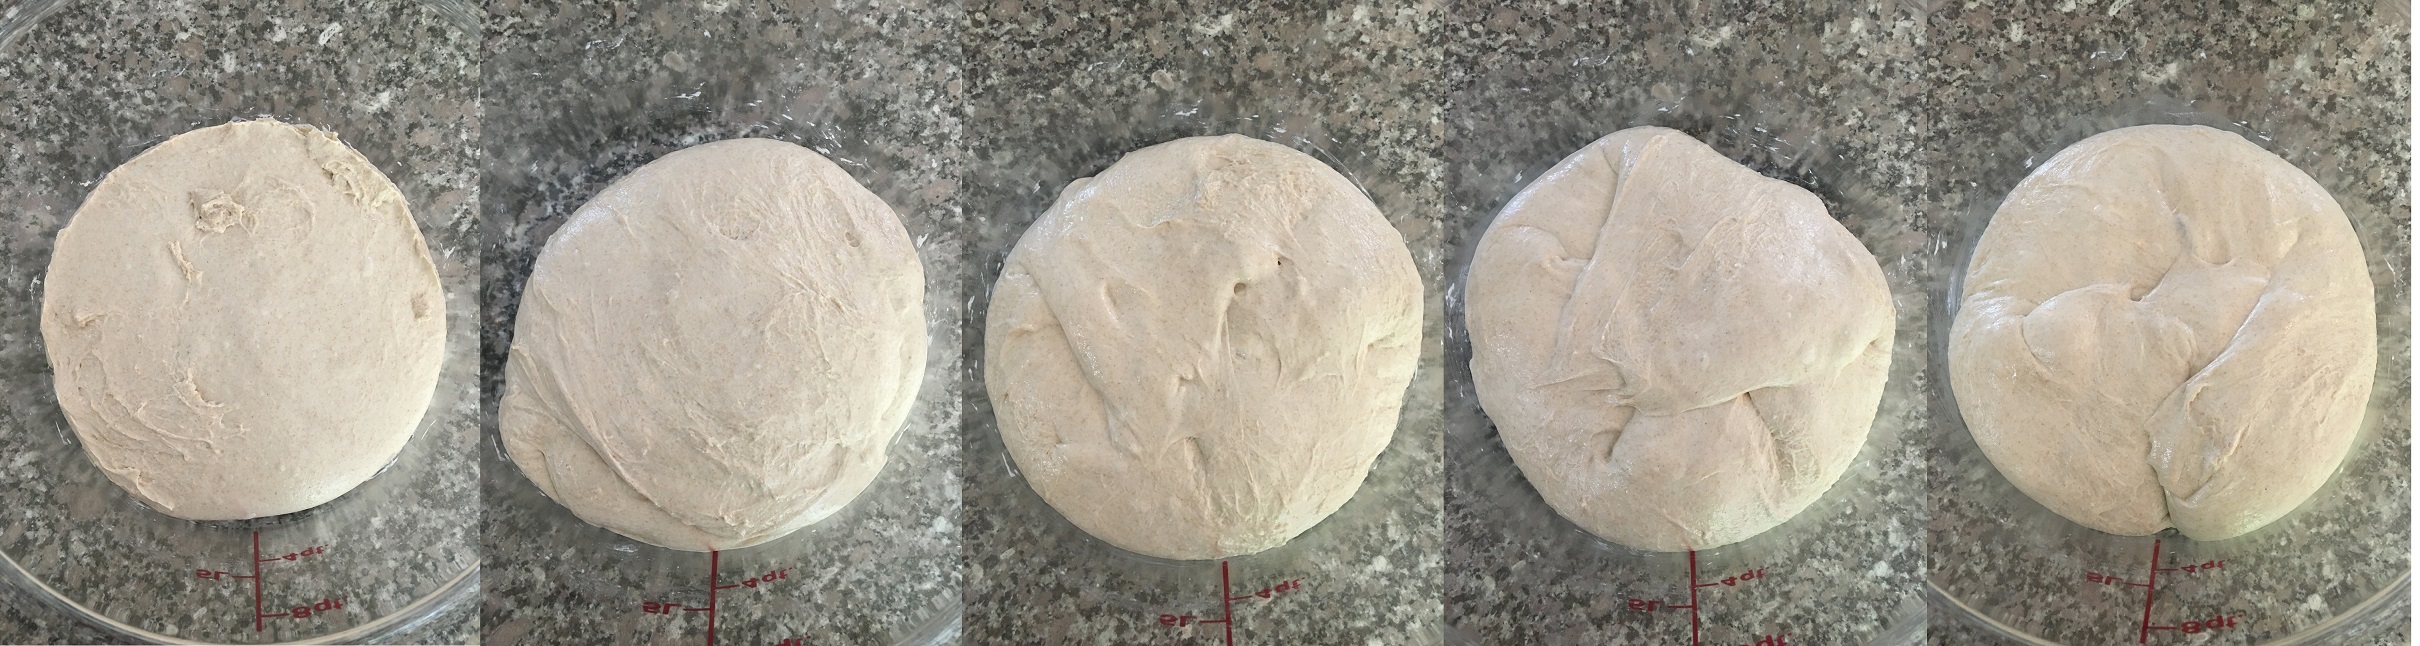
Note that as the bulk fermentation progresses, the dough tends to retain the shape from its previous S&F, which is a sign of growing strength. Similarly, as the dough does gain strength, it spreads less and also shows that strength during the S&F (when I could feel the dough gaining in resistance). The following composite photo shows the state of the dough just after each of the five S&F sessions.
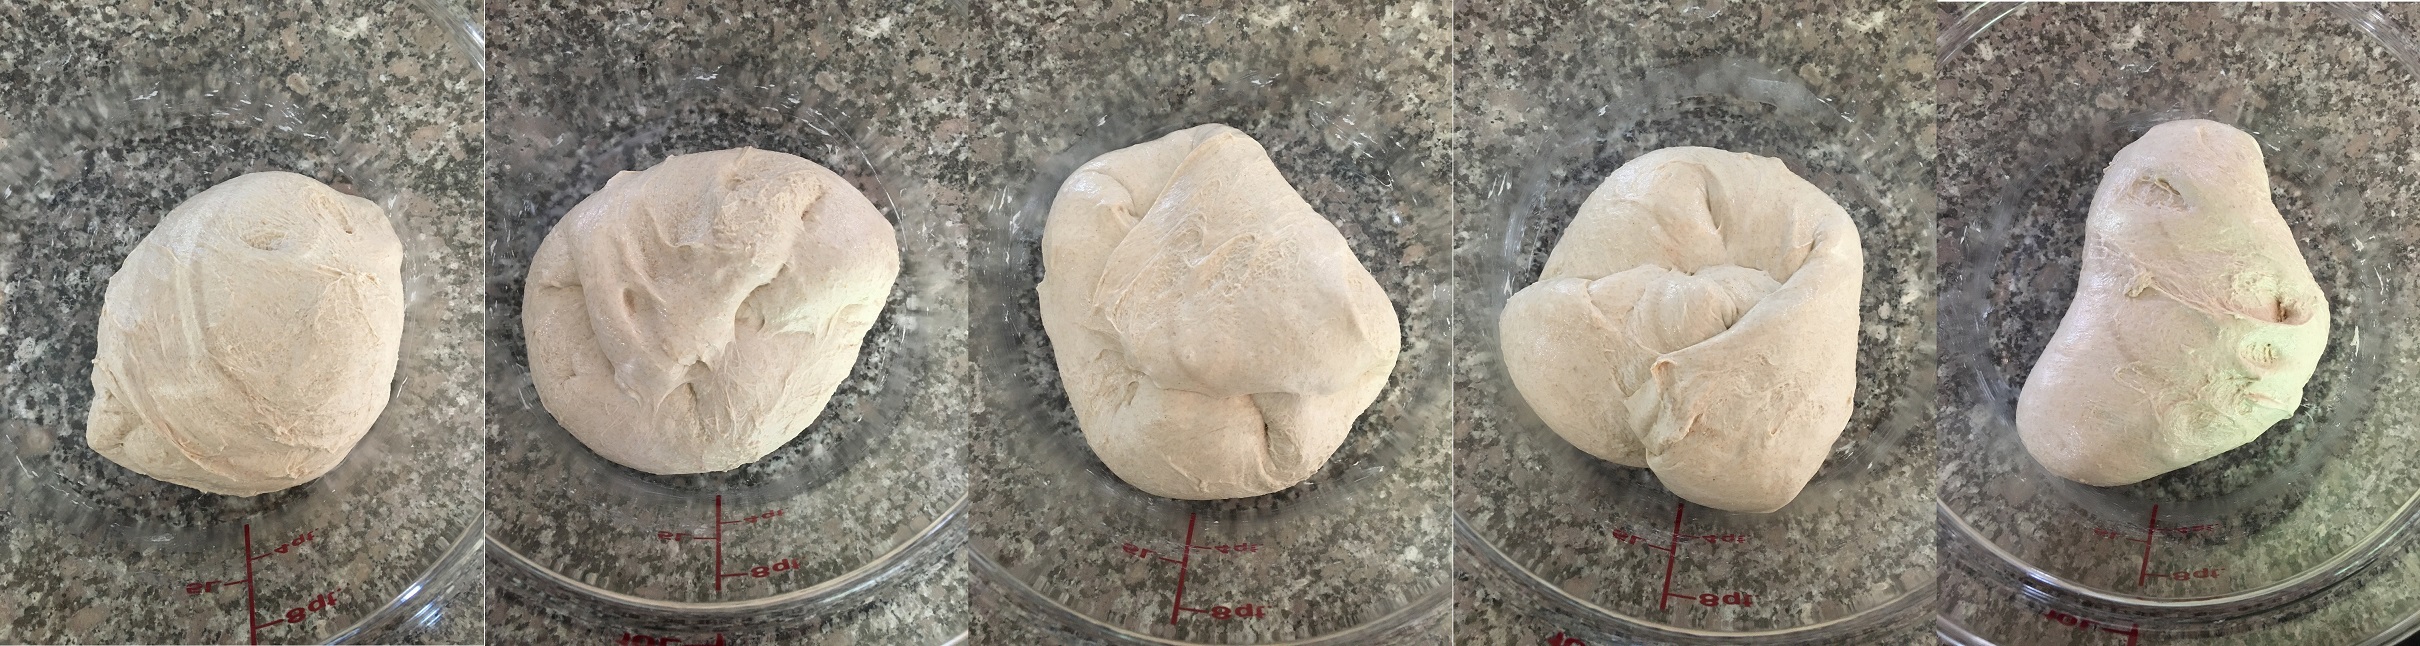
Note how it is possible to bring the dough together much better as the bulk fermentation goes along. (Also, I should add that each S&F is done a bit more gently than the preceding one so as not to deflate or damage the dough.) Sometimes I end up doing another S&F before the bulk fermentation stage concludes, but in this case I saw that the dough was ready to be divided. This photo shows the dough just before being dumped onto the countertop.
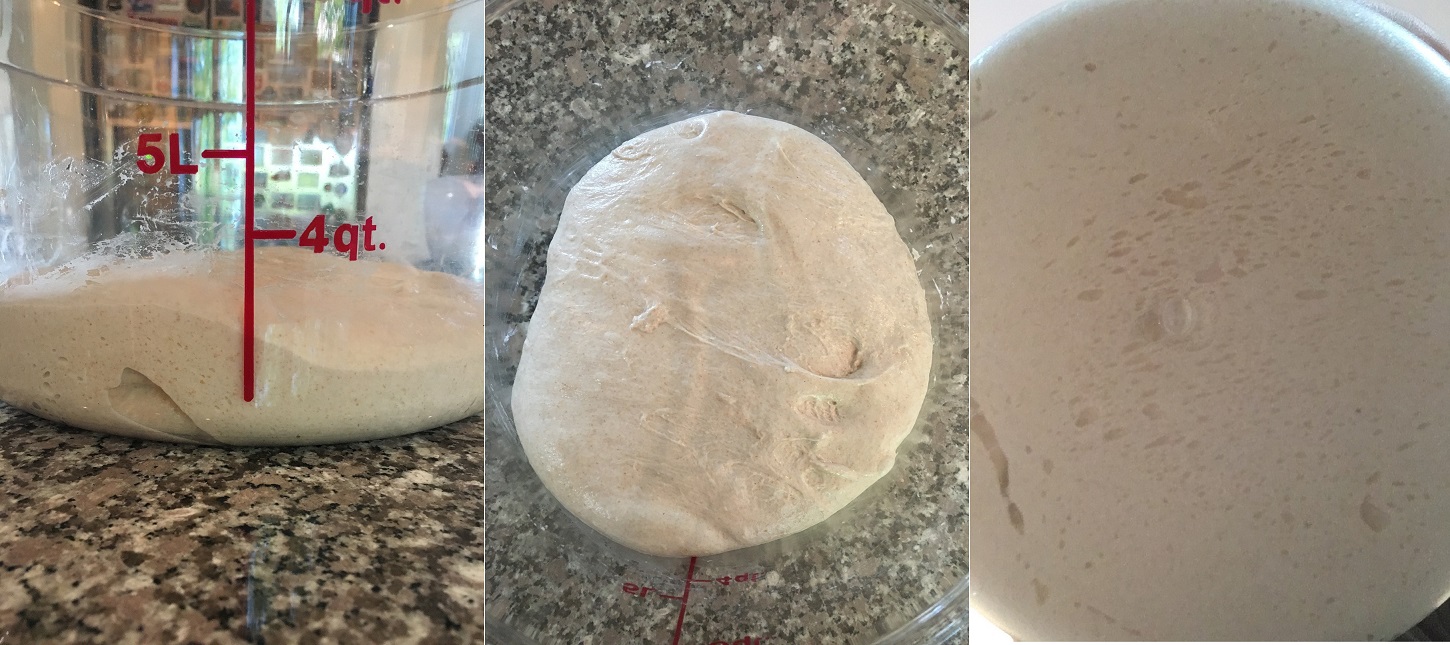
My experience with this dough in particular and doughs in general led me to note several factors, and I point these out mainly for those who are new and want some clues and signs to watch for. The dough had billowed, which showed up in the expanded volume, but also in the feel during the final S&F. There were numerous bubbles on the side and bottom of the container. (I often lift the Cambro tub and look at the underside, and if there are no bubbles I know that the bulk fermentation stage needs to continue, whereas here it was ready to end.) During the last S&F session the dough did not cling to the side as much, indicating the further development of gluten and the transformation of the dough into a unified mass. When I lightly jiggled the container, the dough wiggled gently back-and-forth a bit.
The next step was to get the dough onto the counter, divide the dough, and do the pre-shape. Then came the bench rest, which was thirty minutes. This composite photo shows the dough just out of the tub and the two portions just before and just after the bench rest.
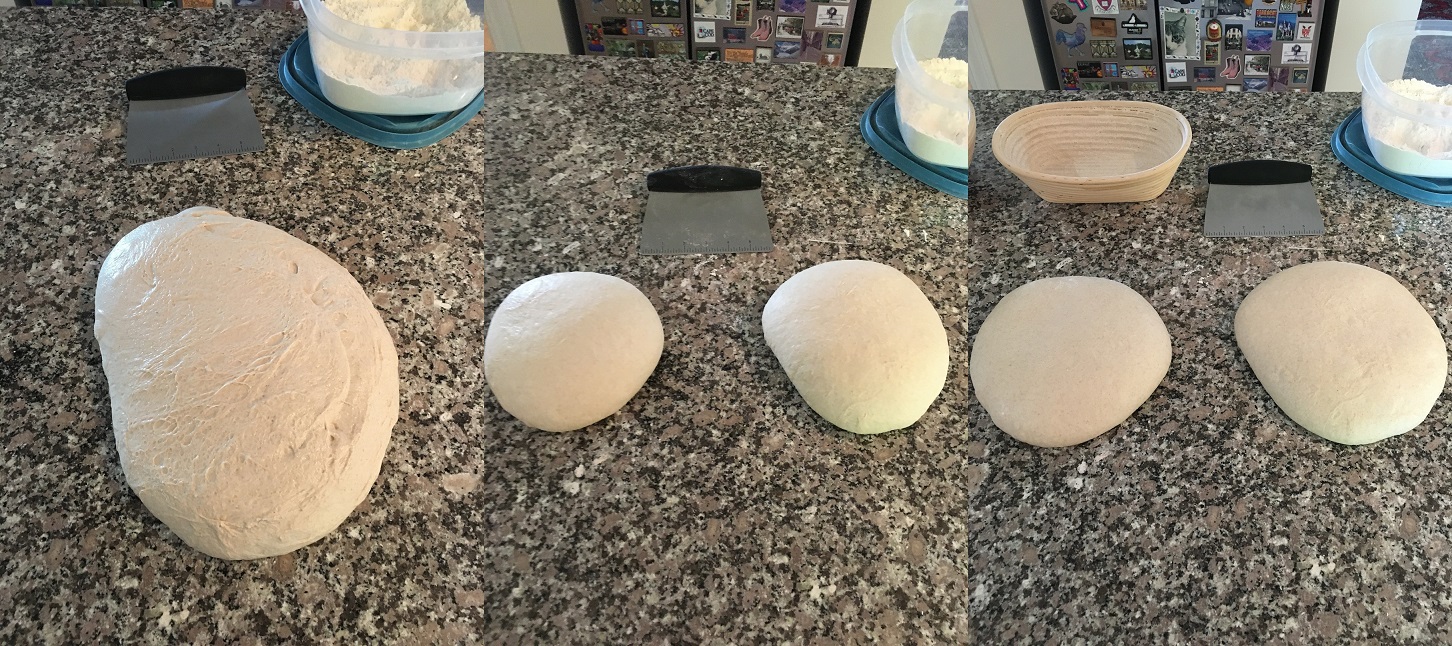
Note the bench scraper and container of flour in the background. Once the mass of dough was on the counter, I sprinkled some flour on top and lightly spread it around with my hand across the top surface to cover any sticky areas. Then I used the bench scraper to divide the dough into two portions. This was not a sawing action, but rather a cut straight down and then a short slide to one side to separate the cut. I usually do that three times to divide a mass of dough this size. Then I slid the bench scraper under a dough portion around its perimeter to make sure it was not sticking somewhere onto the counter. Then I flipped each portion over so that the floured side was now on the counter. I used a stitching process to pull sides of the dough up and toward the center and then pressed down gently to adhere the part pulled up. This created some surface tension on the part that was now the underside. After I pulled from all directions toward the center, I used the bench scraper to flip the portion back over. Using the bench scraper along the side of the portion and my hand as a guide, I slid the portion on the dry countertop and created further surface tension. (King Arthur as well as the San Francisco Baking Institute have excellent videos on pre-shaping and shaping dough, and I recommend watching those.) During the bench rest I lightly draped a tea towel over the dough. As you can see, the dough had enough strength to retain its general shape during the thirty minutes, but enough extensibility to spread a bit too.
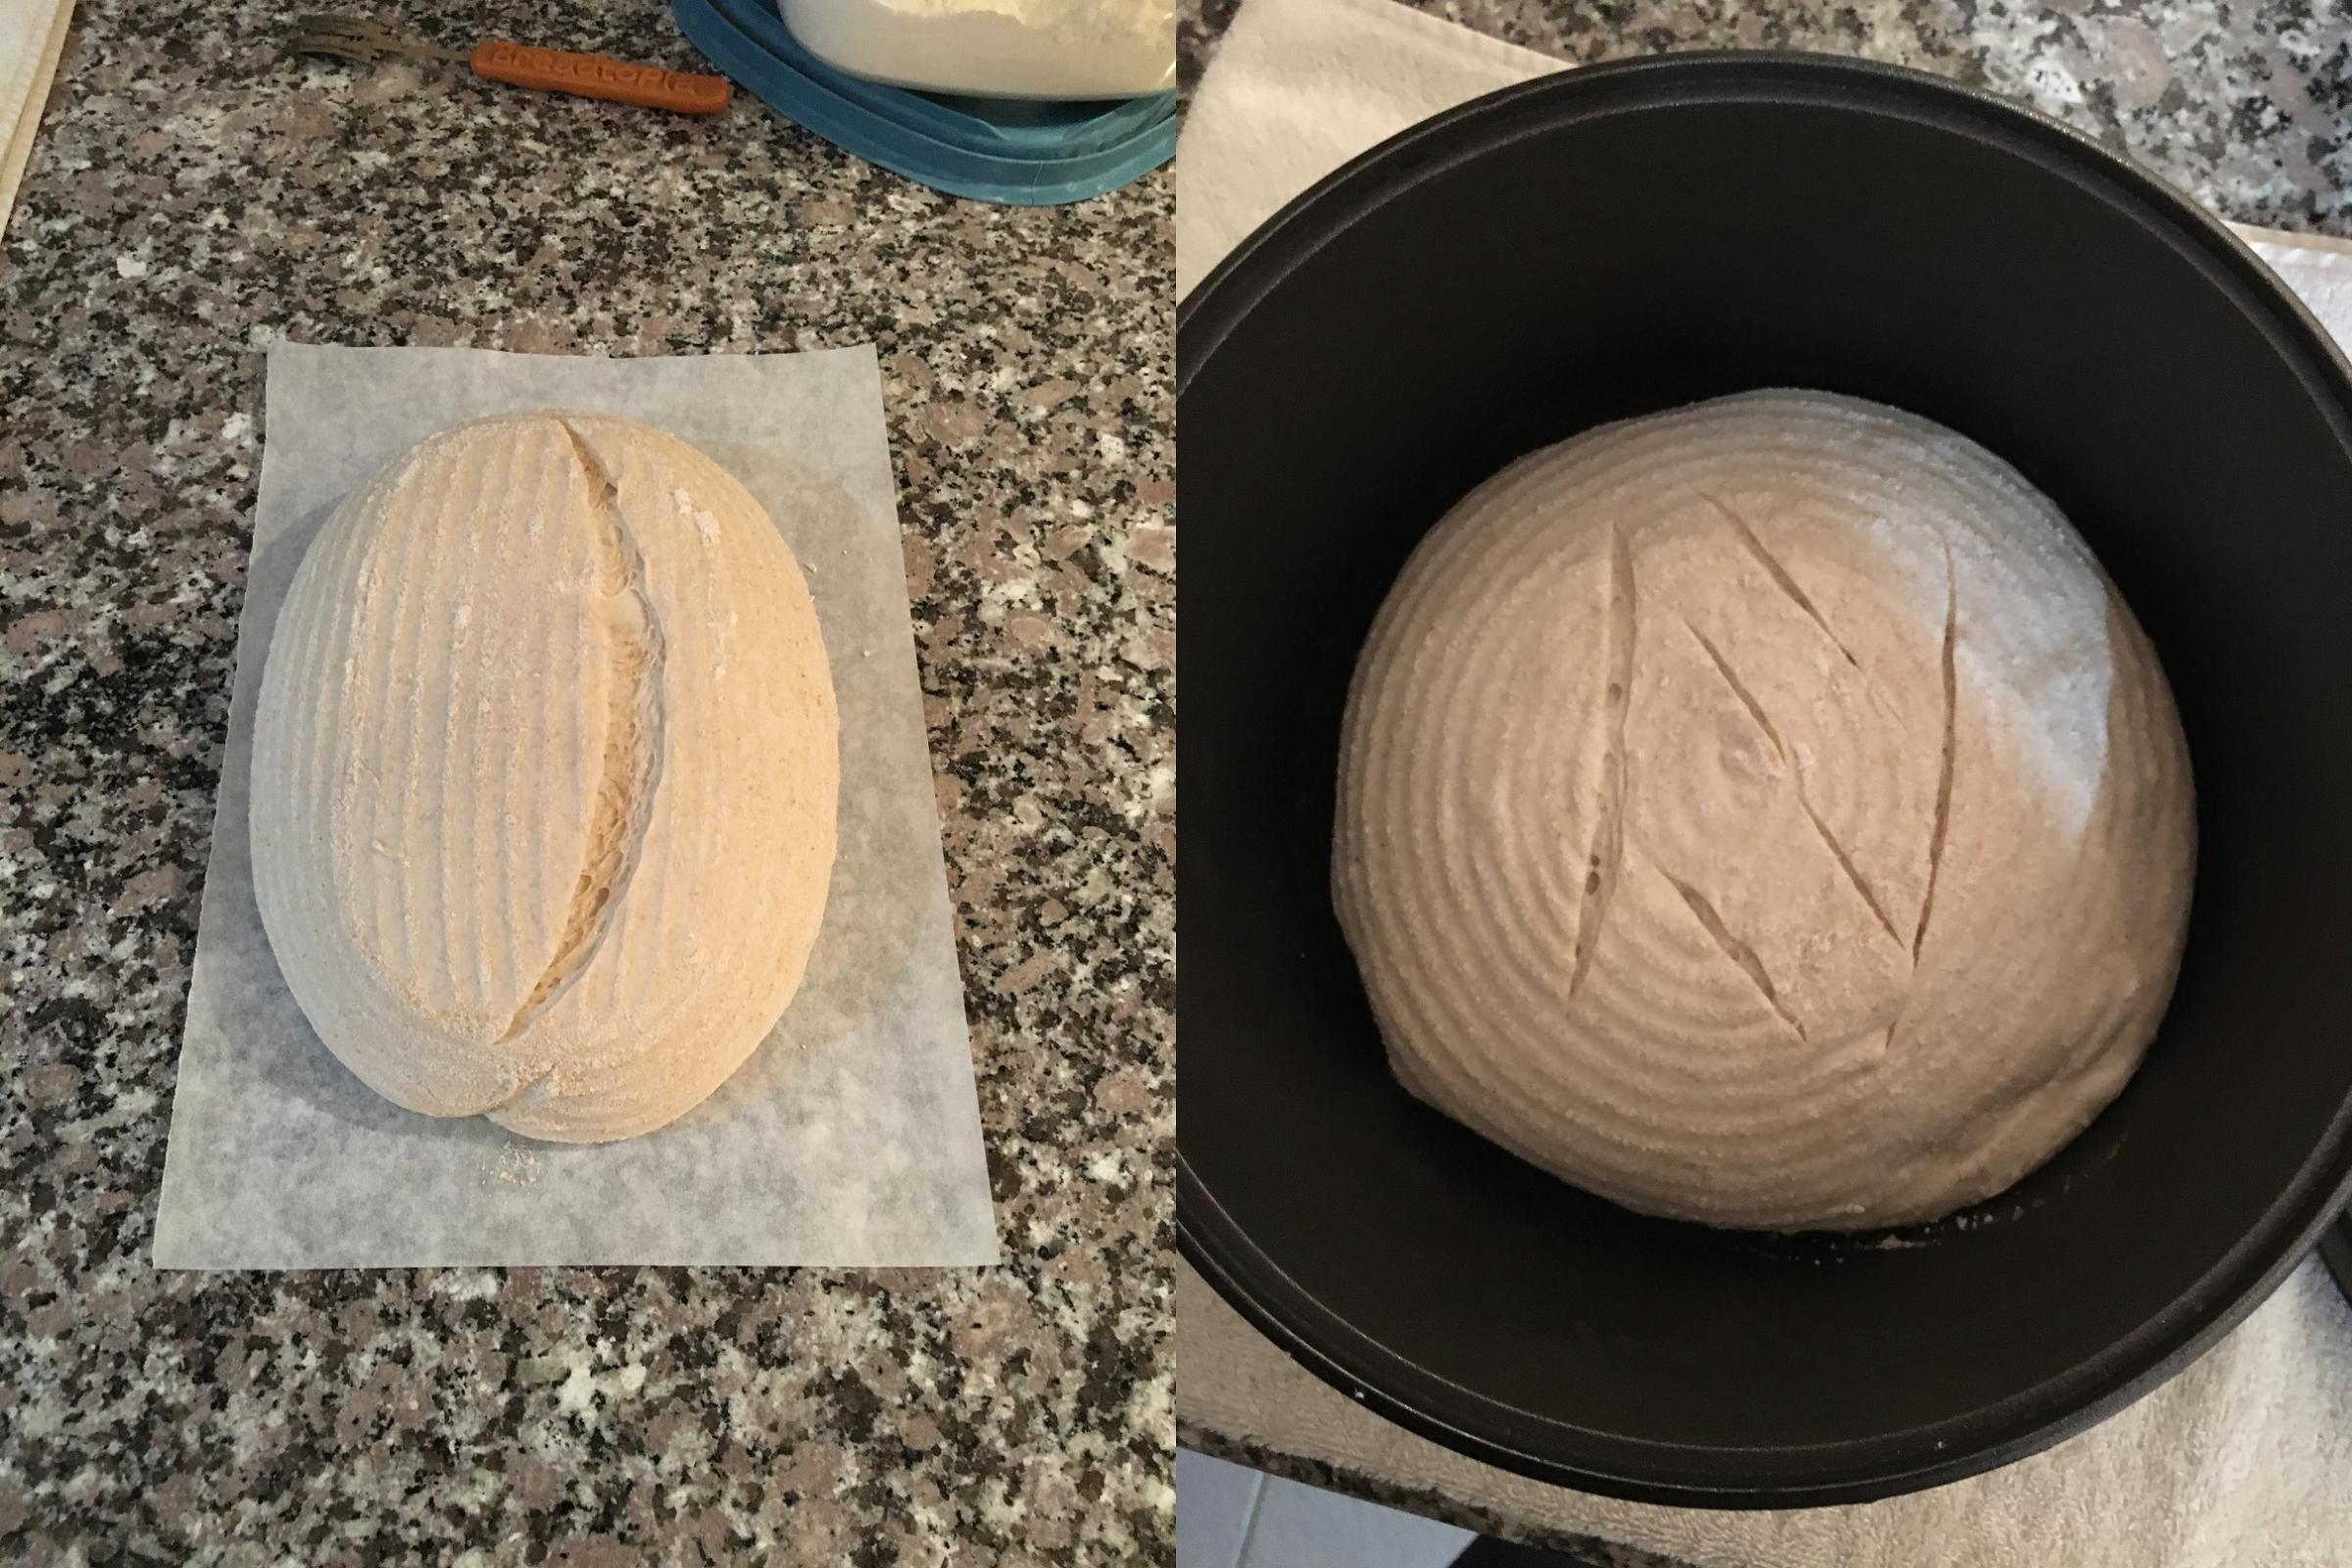
Next came the final shaping, and I opted for a boule and a batard. My original plan had been to keep the bannetons in the refrigerator overnight, but during the final shaping I sensed that this dough had moved along, and I would be wise to monitor it. Dough that enters the fridge does not immediately drop to 37F and instead takes awhile to reach that temperature. During that time the fermentation continues. This dough ended up spending a bit over six hours in the refrigerator before being put into the oven. This composite photo shows the two loaves just before going into and just after coming out of the refrigerator.
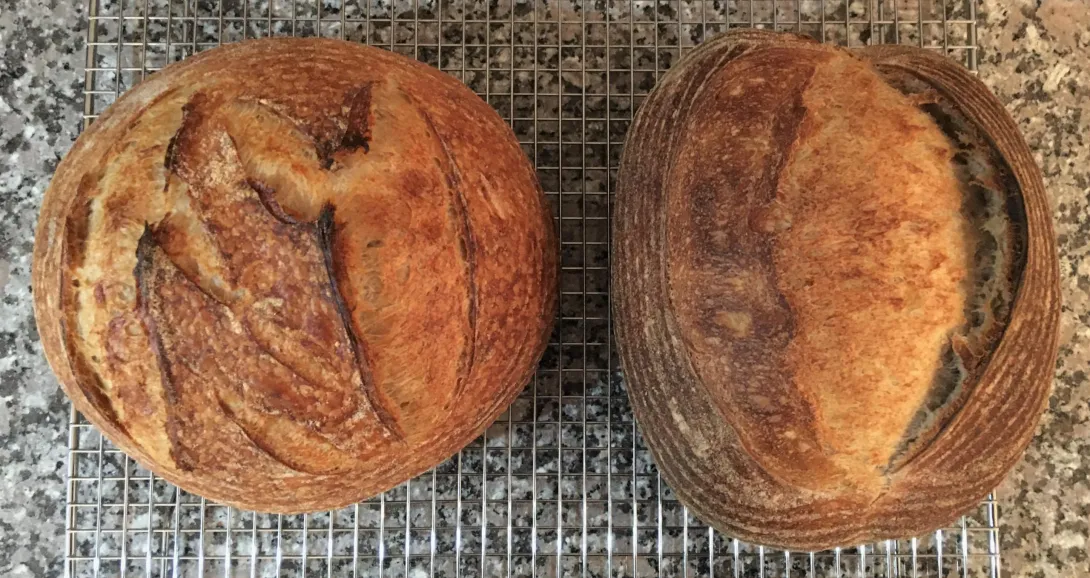
I scored the two loaves before they went into the oven (the boule in a Dutch oven and the batard on a baking stone).
Here are the finished loaves from an angle.
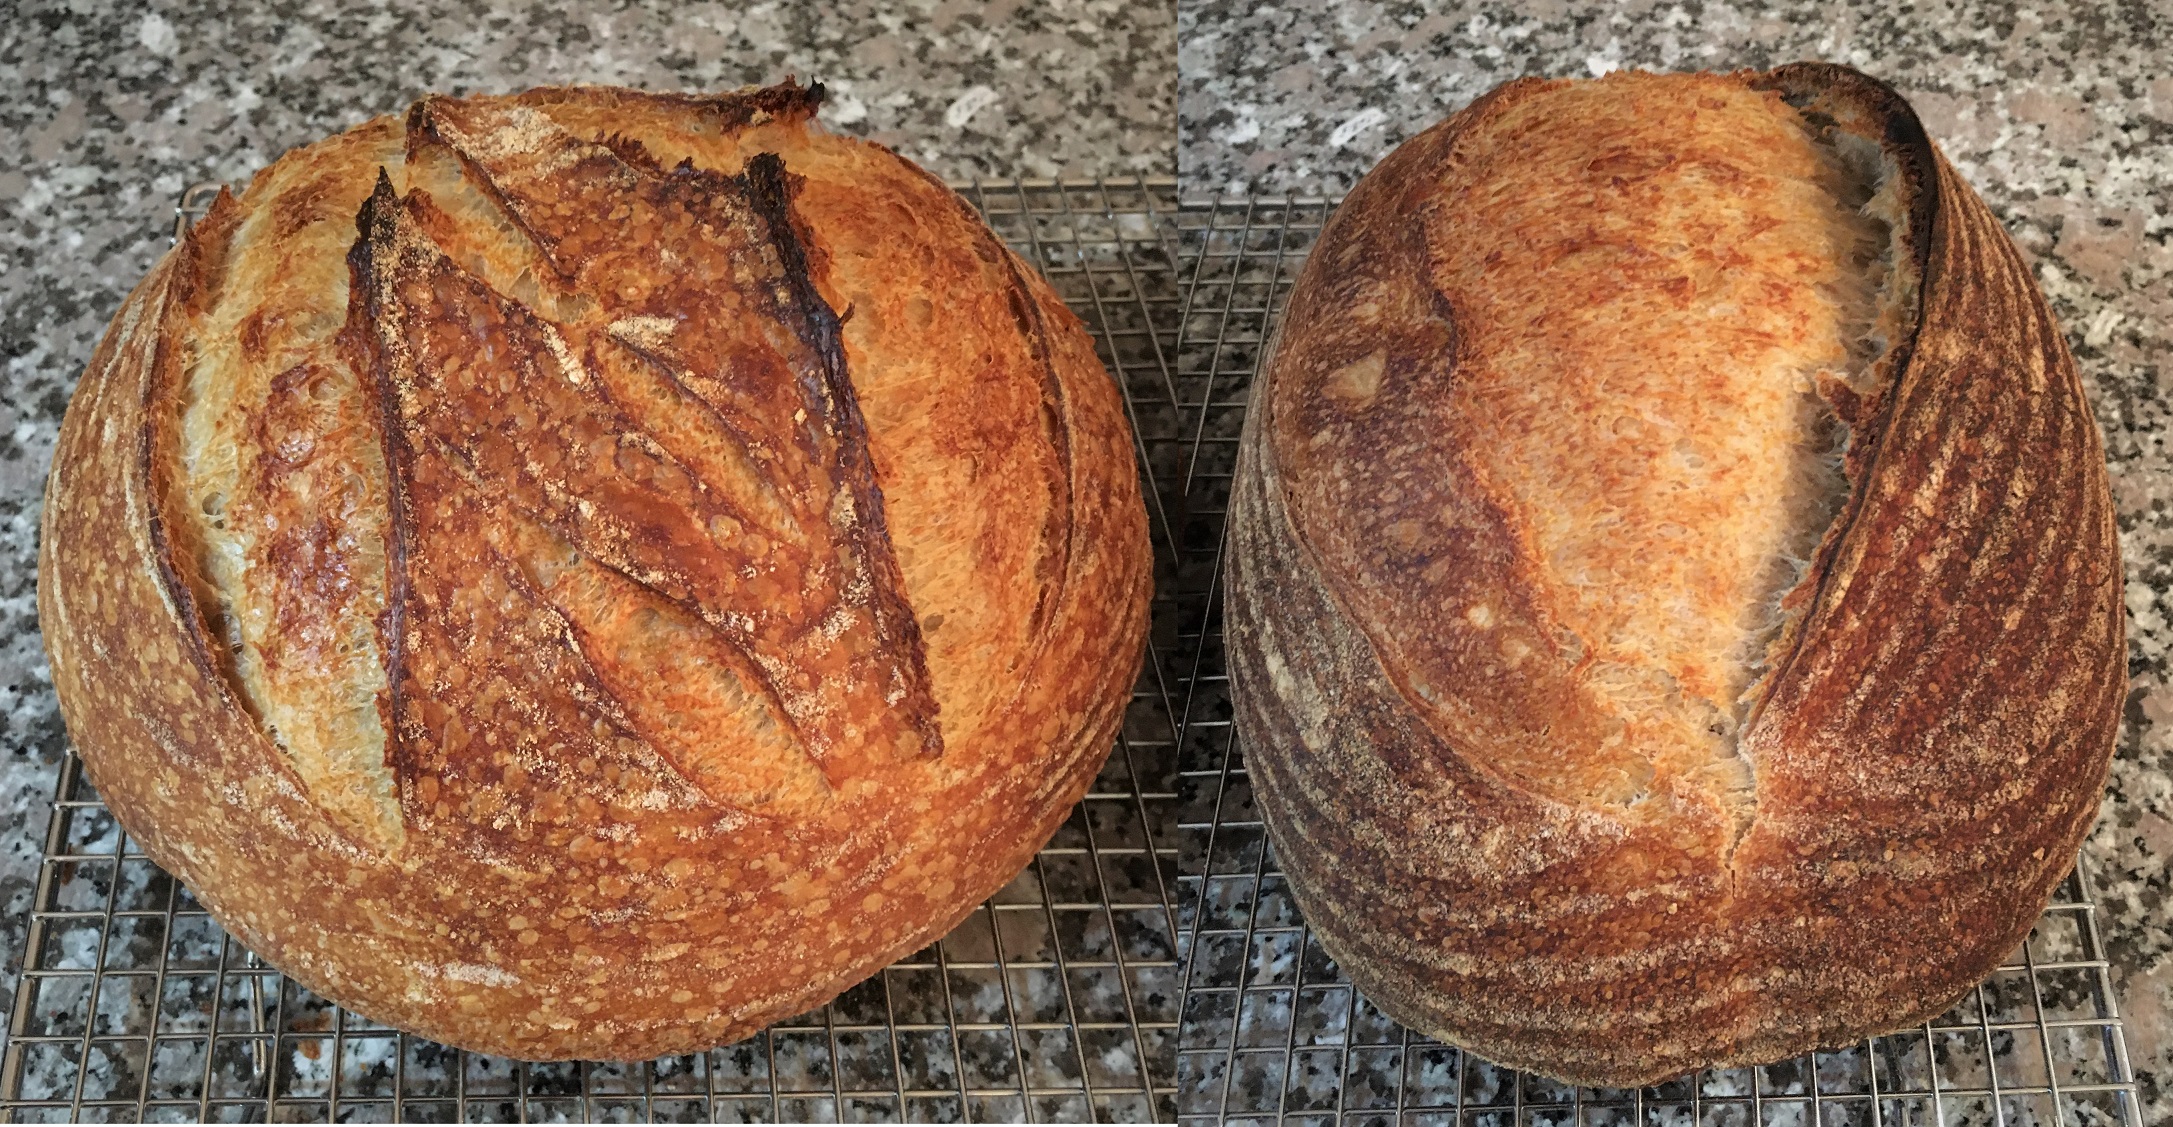
The batard baked for 42 minutes and the boule for 47 minutes at 450F. (I typically find that the loaf on the baking stone needs less time than the one in the Dutch oven, and I check the internal temperature with my Thermapen to make sure it is at least 208F.) The decision to pull the loaf from the oven essentially comes down to crust coloration, and I prefer a dark bake to enhance the flavor of the crust.
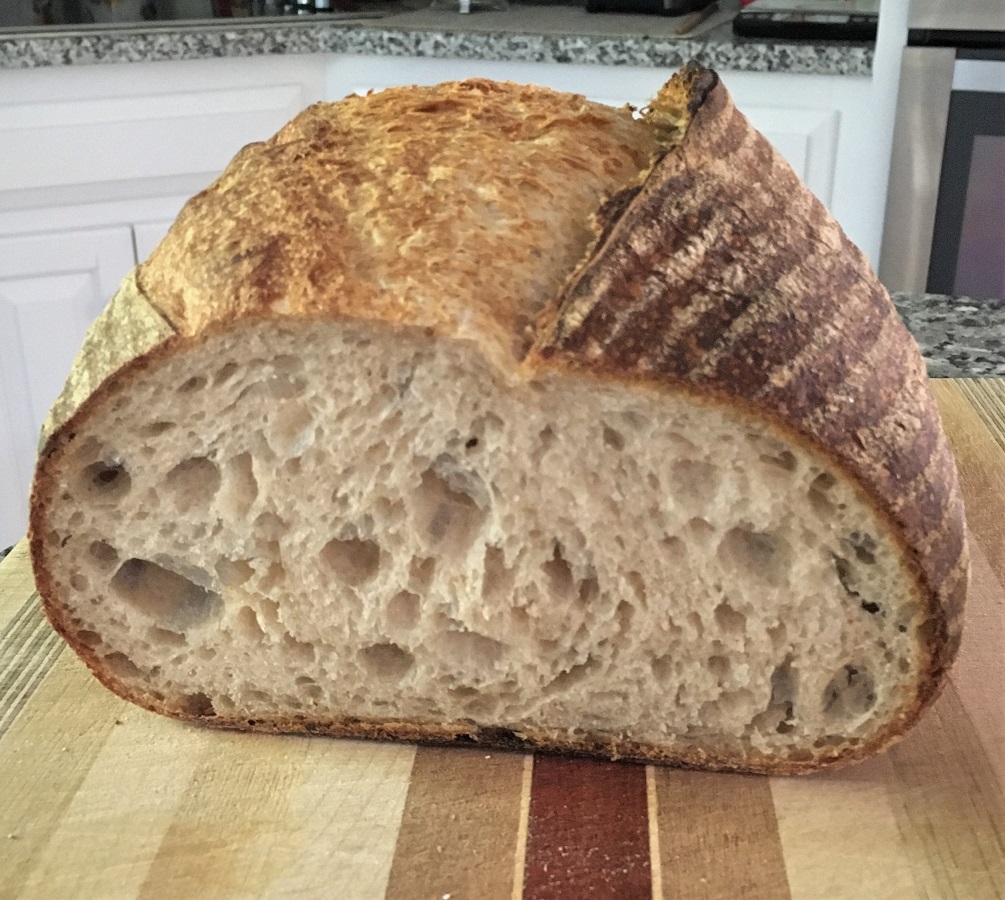
One of the loaves was a gift for a neighbor, but here is the crumb from the one we kept.
Thank you for reading this far, and I hope that you benefited from the details and photos.
- WatertownNewbie's Blog
- Log in or register to post comments
Wow, what a wonderful detailed explanation of your methods. This is super helpful to everyone new to sourdough. Thanks for taking the time posting this.
Benny
Many thanks Benny for posting a comment and confirming that someone has at least read this post. I hope that more than a couple have benefited.
Happy baking -- and stay safe and stay healthy.
Ted
What a helpful post! And looks like some nice bread.
Thanks Sara for indicating that someone has benefited from this blog post. I hope others did too, but I thank you again for letting me know that it helped you.
Happy baking -- and stay safe and stay healthy.
Ted
Great post. Thank you.
I am having following issues with my Tartine dough. I have followed recipe weights to exact measures. My dough pre-bulk seemed wetter than yours. I was only able to achieve 77.6 deg dough temp even after 4+ hrs of fermentation at 81-92 deg oven temp. I did extensive folding pre bulk a la TJ Wilson then 4 s&f in first two hrs. At end of bulk dough was very loose and never developed gluten tightness I expected. Dough spread out on surface and difficult to shape. Lots of bubbles in dough. Now in proofing. We'll see when bake after overnight in fridge.
First, thanks for your comment. I am happy that you benefited from my posting.
Don't worry about 77.6 degrees. That is plenty fine. In the winter I often have a dough temperature of 71-73F after the initial mixing, and that is fine. It just means that the bulk fermentation will take a bit longer ("Watch the dough, not the clock").
Four hours at 81-92 degrees is way too long. Your dough over-fermented, which is why it became a bit of a slurry. The next time, do what you did through the initial mixing, and then let the bulk fermentation occur at room temperature. Chad Robertson comments in Tartine Bread about the effect of ambient temperature on the length of the bulk fermentation. It is important to learn how to judge the progress of the bulk fermentation, which is why I included a set of signs that I look for in the dough that indicate whether it is time to move on and divide the dough.
Do not be surprised if you have trouble removing the dough from the bannetons and if it then spreads. Over-fermentation breaks down the structure.
Thanks again for your reply.
Happy baking -- and stay safe and stay healthy.
Ted
Thanks Ted, your comments are helpful. The bulk fermentation process is still a work in progress for me. I was trying to compensate for previous efforts that resulted in fairly closed crumb and weak oven spring. I also needed to go out to a local BLM demonstration which resulted in longer than planned bulk time.
What an informative post. Thank you! Your breads look beautiful. Question about In the initial mixing, his book was very brief for this part, so for a beginner "keep mixing" not sure how the mixing was performed and how long he did it. Your post was so detailed and so helpful. But for this part, you used slap and folds, so how the initial mixing was conducted is still a mystery to me. I have arthritis in my hands. My arms can't handle five hundred French folds. if this initial mixing is important and long, do you think a stand mixer should be used instead?
my dough is in the last hour of bulk fermentation, and the dough looks so wet nothing like your picture, I used the same brands of flour as yours and I weight the ingredients. do you have any idea what causes it?
what do you cover the dough after it is finally shaped dough before resting in the fridge? Do they need to be tightly covered in the fridge?
did you bake the bâtard and boul at the same time? did you use a pot of hot water for bâtard?
Thank you!!
Thank you for your comments and compliments. It is always heartwarming when someone else benefits from this post.
There are two stages to the initial mixing, so I will address both. Arthritis certainly might limit how much effort you can put into working the dough, and it probably would make sense to use a stand mixer (I have a KitchenAid Artisan and use it for ciabatta dough, but not for most of my sourdough breads). For the initial mixing, the primary idea is simply to get all of the flour wet before the autolyse. For that stage I would put the water into the bowl, add the preferment, and stir it thoroughly with a spatula or wooden spoon until dissolved. Then add the flour and run the mixer on medium-low (4 on my KA mixer) with the dough hook until you no longer see any dry flour. After the autolyse, add the salt and held-back water for the second stage of mixing and run the mixer on medium (6) or medium-high (8) until the dough no longer sticks to the side of the bowl (but still sticks to the bottom). My guess is that this will be a few minutes, but not a lot (perhaps 6-8 minutes, but watch the dough and see how it is behaving).
Your wet dough as it nears the end of the bulk fermentation could be because it lacks enough of a gluten network. That goes back to the initial mixing. The appearance of my dough changed when I did a better job of mixing initially. If you are able to find a video or two by Trevor J. Wilson on mixing dough, you will see that he does not use a lot of effort, but what he does is effective and efficient in developing the gluten structure. It is possible to overmix dough in a stand mixer (and I have read several places that it is not possible to do so by hand), and if Trevor's method could work for you given your arthritis, then maybe it is worth a try. Otherwise, the stand mixer approach could be a nice experiment.
Once my dough is ready for the bannetons, I have a couple of food-safe plastic bags and clips ready. If you look at the King Arthur website (this is not a plug for them but rather simply to provide a picture of what I use), you will see advertised somewhere the plastic bags. Most garbage bags are not food-safe, so get something that is food-safe. I put a banneton inside a bag, gather the end in a way that traps enough air so that the plastic is away from the surface of the dough, and then put the clip on the end of the bag to seal it. A fair amount of moisture can collect on the inside of the bag by the time I remove the banneton the next morning, and a totally exposed batch of dough in a refrigerator would certainly dry out a bit.
Although the two loaves were baked at the same time, that is because we have a double oven. The Dutch oven is in one oven and the baking stone in the other. Hence the two loaves are baked at the same time (which means they have the same amount of time in the refrigerator) but not together in the same oven. For steam I have two aluminum pie pans filled with lava rocks in the oven with the baking stone. First I open the oven door and pour a bit over a cup of hot water (heated in my tea kettle) into one of the pie pans. Then, after closing the oven door, I slide a peel under the dough (resting on a piece of parchment paper) and quickly open the door, slide the dough onto the baking stone, and close the door. Lastly I open the door again and pour another cup or so of hot water into the other pie pan and close the door. When pouring the water, I am extremely careful not to let any of the water splash onto the inside of the oven door (there have been persons whose oven doors shattered from the thermal shock of relatively cooler water hitting a very hot glass door). There are various ways to create steam in an oven, and you can search that topic separately on this site.
Let me know if you have more questions. Thanks again for taking the time to read the blog post.
Happy baking.
Ted