Hello friends,
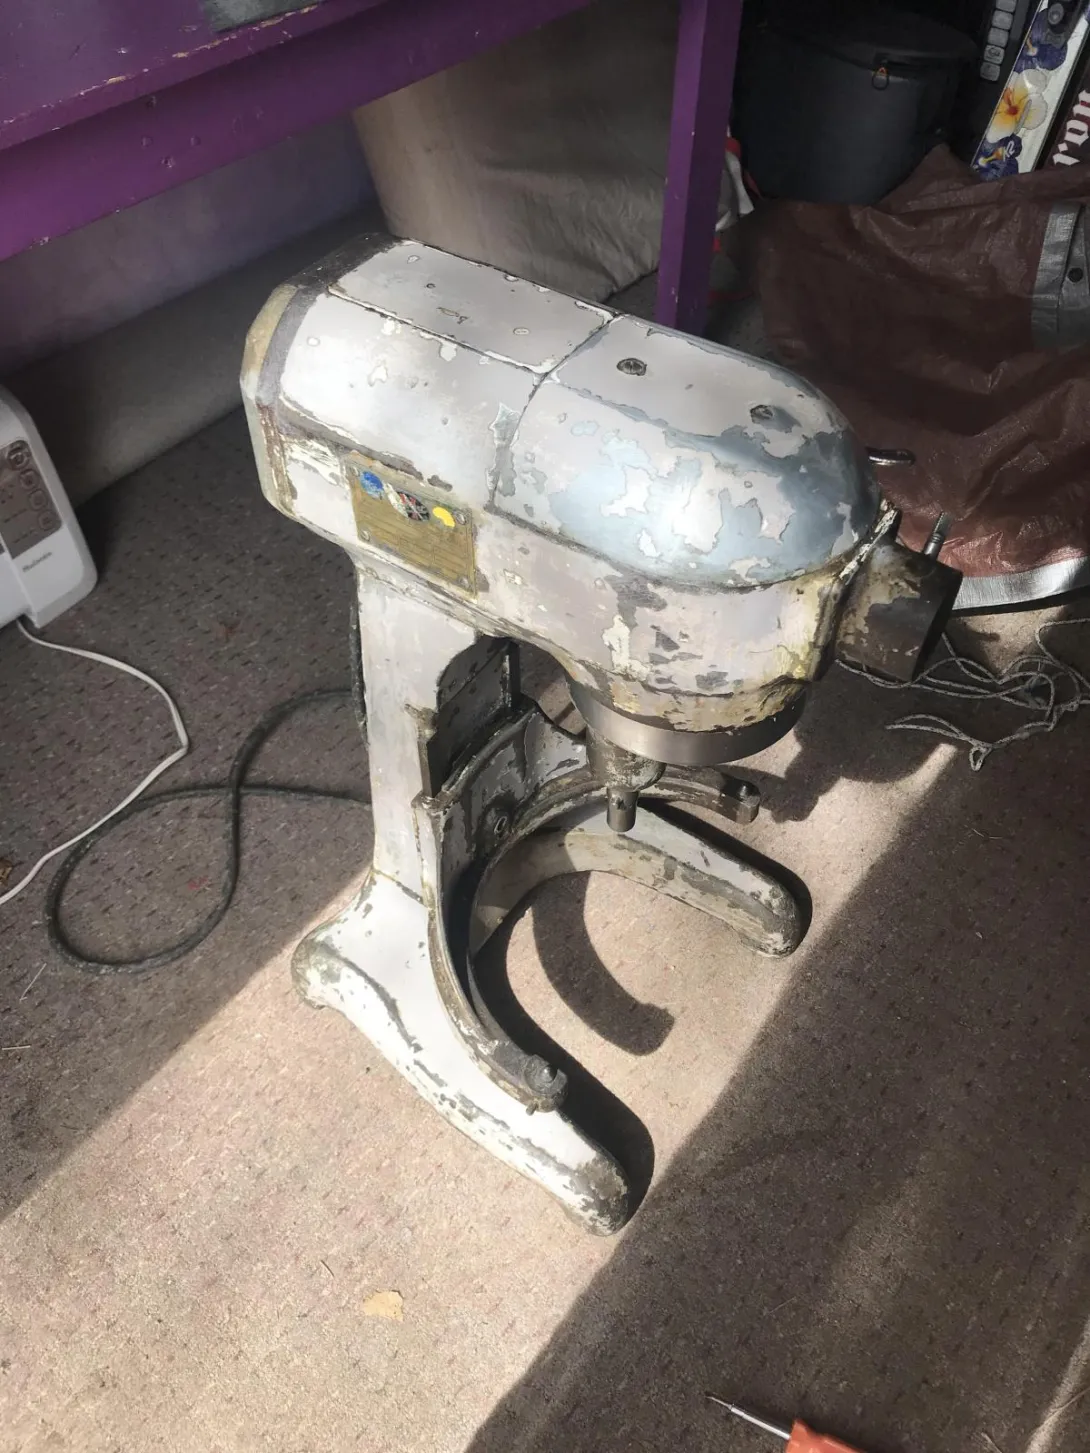
I got an old Hobart A200 this week which will be used for my farmer's market bagel stand this summer. It was in working shape but I wanted to replace a the seals, inspect the gearbox, give her new grease and a fresh coat of paint.
It has been fun getting to know this ancient (1965) and incredibly built machine. So far everything inside looks great. Will be prepping and painting this week.
Does anyone know how much grease an A200 takes? Different grease for the planetary? Any recommendations for grease?
Thanks and bon appetit
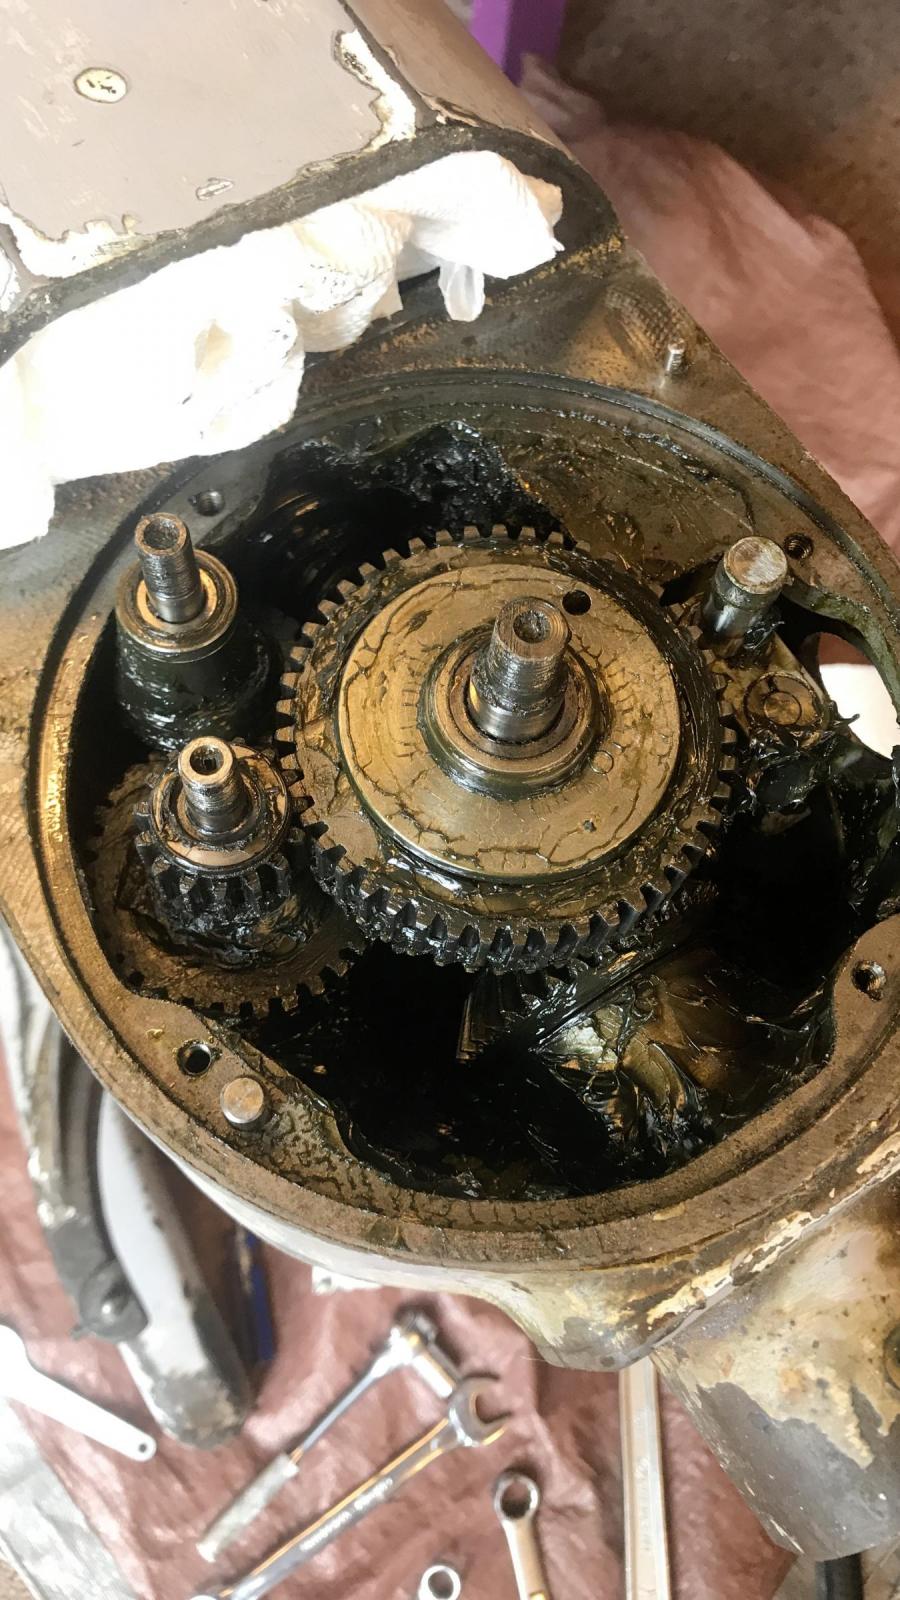
As you say, the internals look as good as new. Built to last!
Great to see this machine getting a new lease of life and a bit thumbs up from me :)
Mixer progress, going well! Currently waiting for the cast painted parts to come back from the powder coating shop. Here are some things I've been working on:
NOTE: Highly highly recommend labeling every part you pull off as you go. Even better, take a video of you pulling the thing apart. For SURE take as many photos as possible, and label any screws, caps, bearings, wiring, etc. I like to use old muffin tins as dividers. Old cans, glass jars, take out containers work great for soaking parts and for labeling/organization purposes.
I've pulled the entire mixer apart. I soaked the gears and bearings in diesel and then cleaned them all with compressed air. I decided to replace all the bearings as some of them needed it, I figured why not since I've gotten this far. Recommend grabbing some calipers and purchase identical bearings that are sealed if you decide to replace. Also purchased new oil seals and replacing those. I put heat shrink tubing over all the wired connections as some of the cloth wire protectors were very brittle and had worn in places. I'm using food grade 'Super Lube' available on Amazon to repack the transmission when I get to that point. I will link some resources at the bottom of this post for folks that decide to do this themselves one day.
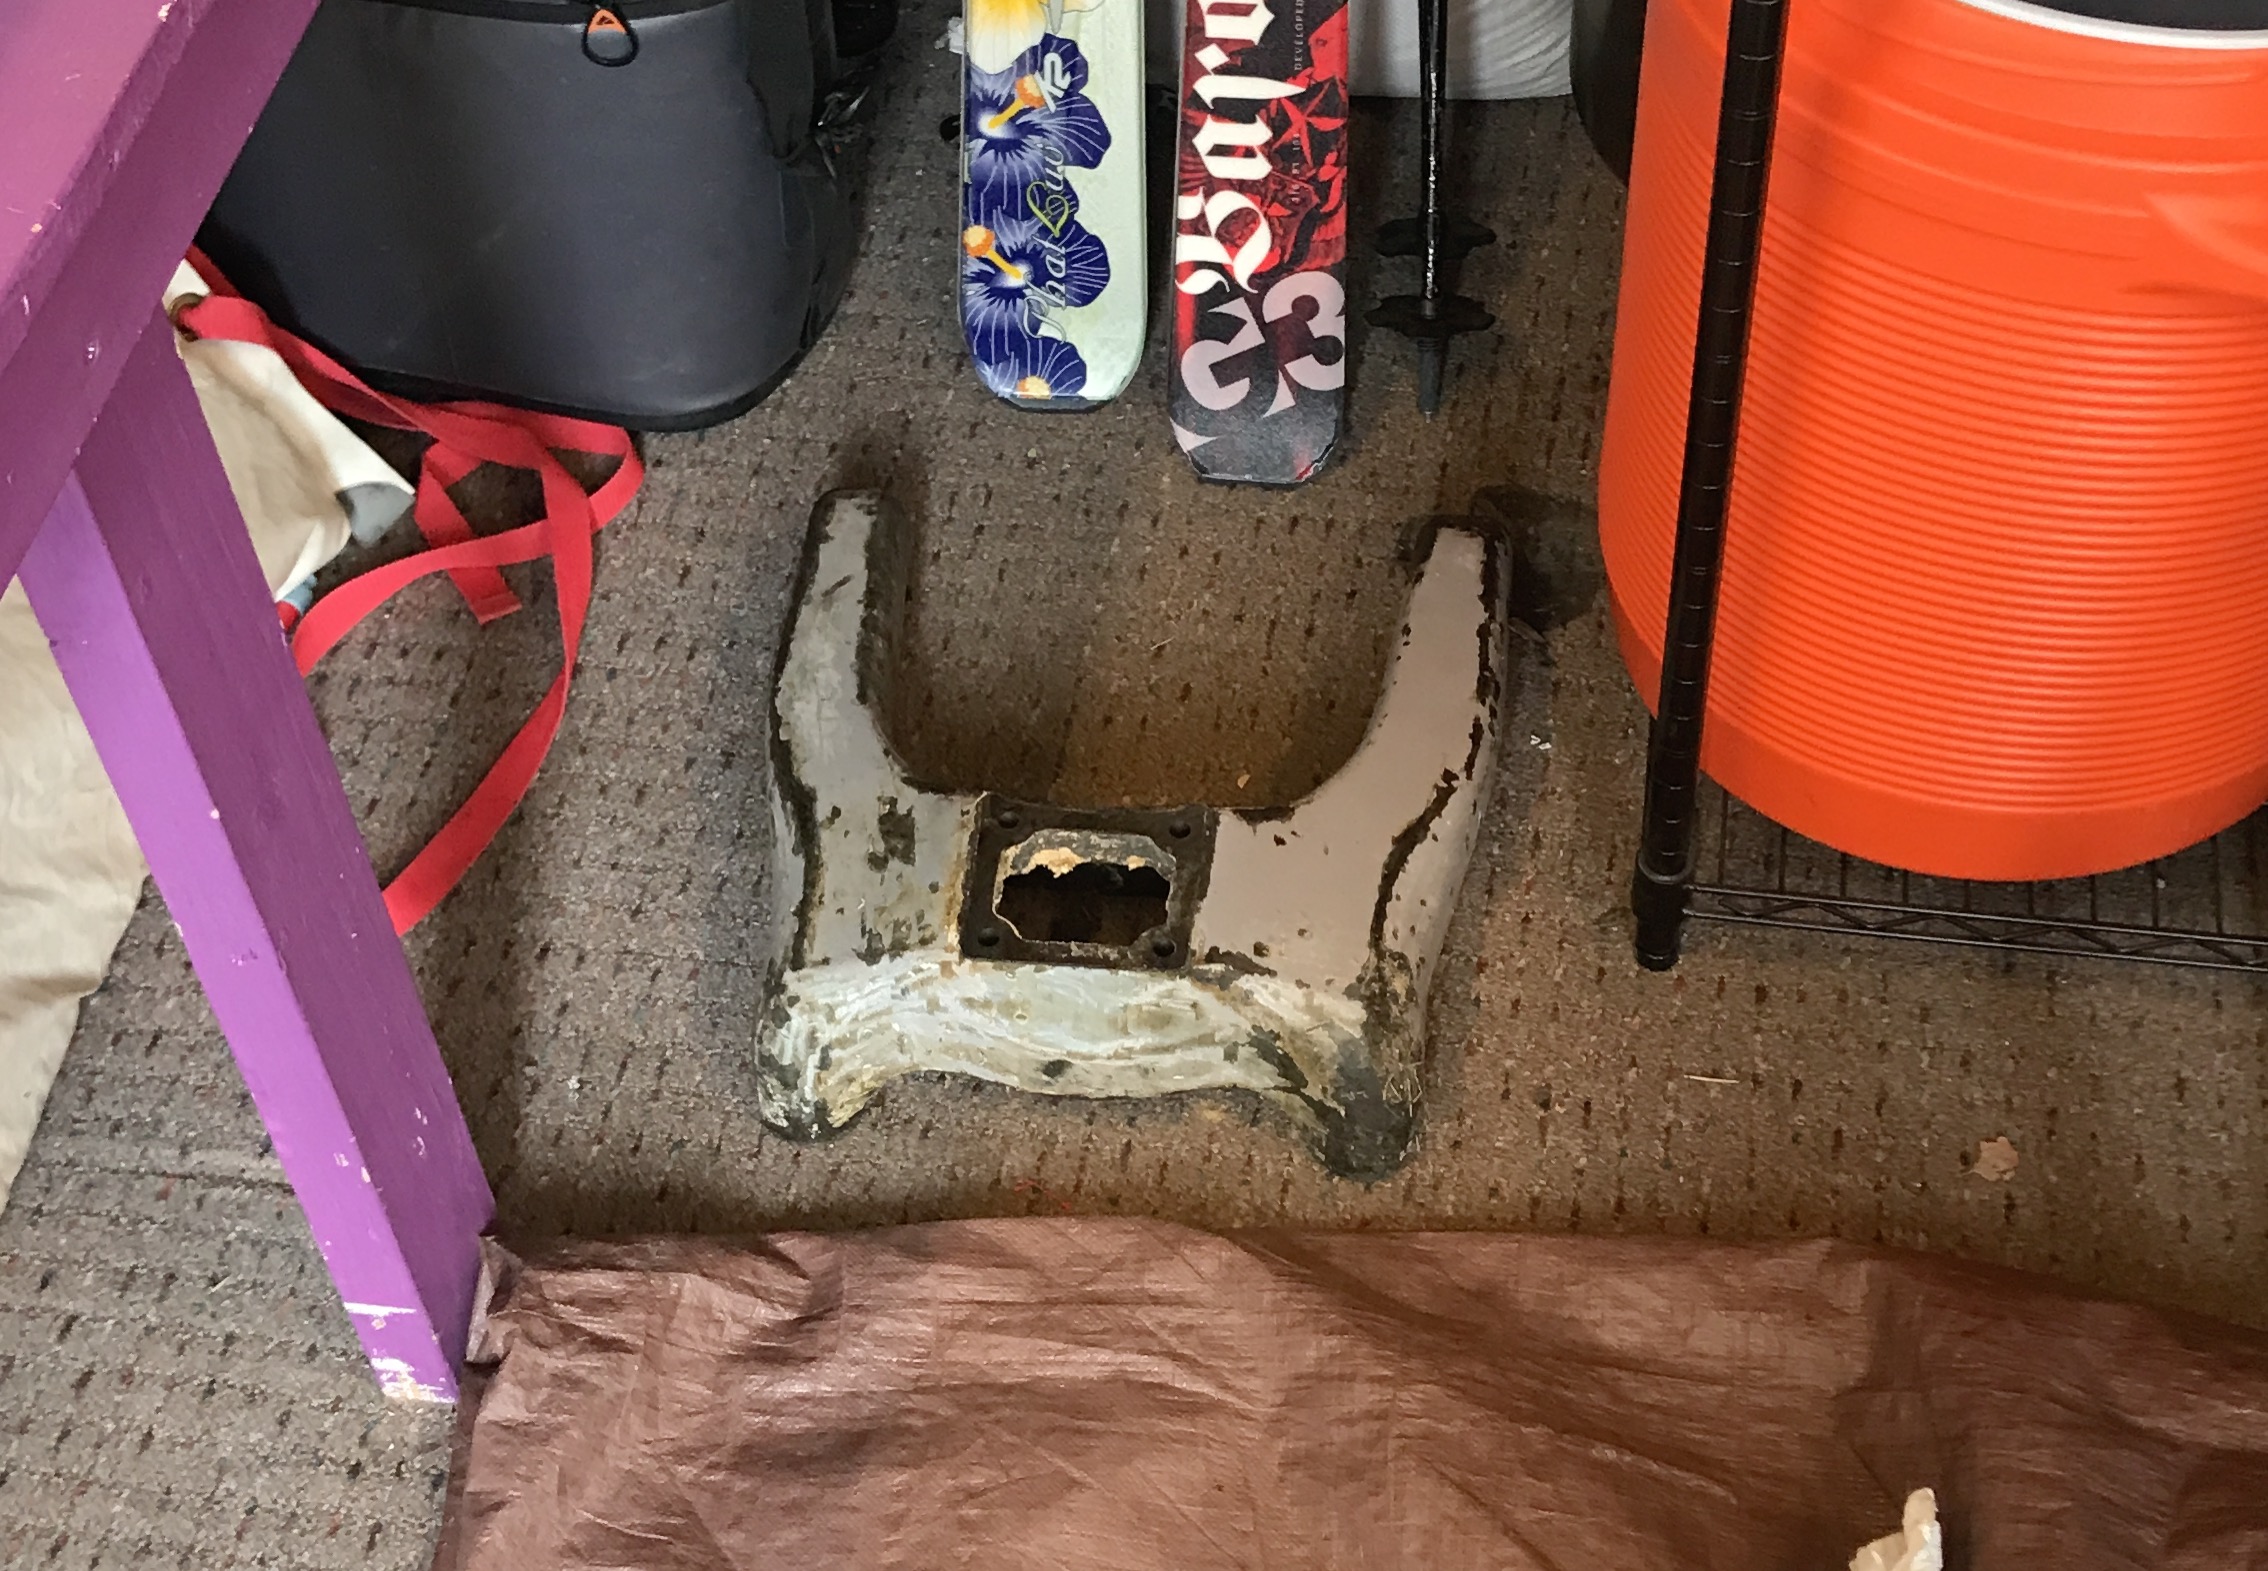
I soaked all the heavy cast painted parts in dawn dish soap and hot water overnight, which did wonders at helping me get old grime and grease off of them! Highly recommend doing that. I soaked them in a 55 gal trash can and used some scotch brite the following day to scrub off all the gunk. At this point I was planning to sand, primer and paint all those parts, but was convinced by some friends to send it to a local powder coating shop.
The stator did not want to come out of the head and it took some filing and coaxing to work it free. When I pulled the nut off the end of the motor that holds the worm gear on, I noticed the threads were stripped and had to do some machining to fix the problem, see next post for details.
Here are some photos:
www.motionindustries.com - for bearings
https://www.amazon.com/Super-Lube-41150-Synthetic-Cartridge/dp/B0042FG74W/ref=sr_1_5 - lube, you probably don't need food grade lube for the transmission case but I went with it anyway. Mobil 222 would work for the trans, something food grade for the planetary
this place is great and the owner is super helpful: https://www.onesharpstore.com/home.html
check out partstown.com for hobart parts
Some great videos and blogs that are helpful:
http://www.thefreshloaf.com/node/44442/hobart-a120-restoration
https://youtu.be/ceQE8PEYPPI
https://1949hobarta200spec3943overhaul.weebly.com/blog/october-19th-2012
http://hobarta200overhaul.blogspot.com/
I would say if you are mechanically inclined that you shouldn't have too much trouble pulling one of these apart if you organize and label your parts and pay attention to the service manuals available online. The one challenging part I have come across is the busted threads I encountered when pulling the worm gear locknut off the motor shaft.
I work in a metal fabrication shop with access to machining tools, so solving this issue was not the end of the world. However, if you have limited experience and resources, I recommend possibly leaving this solid machine be and sticking to replacing grease and a good solid cleaning. A full tear down is not for the faint of heart!
Instead of trying to rethread the end of the shaft, I drilled and tapped a small 1/4"-20 thread hole and will use a button head machine screw to keep all of the worm gear components in place.
I got the parts back from the powder coat shop about a week ago and first put the base back together. The parts manual called out shims for the bowl arm rail slide and I didn't understand what those were for until I bolted the parts back on and the bowl arms would not move! I made shims from paper shim stock, it took two pieces per side. I think if you found some shim stock that was .003"-.005" thick that would work. The parts are also available on partstown, but it's easy enough to make some yourself. The rest of the base is straightforward. I would install the bowl arms on the neck before bolting the legs back on...it is nice to have that access to the bottom of the neck when tooling around with the lifting rod & the cam at the top.
The last piece was putting the motor, transmission and planetary back together. The motor shaft end that holds the worm is loaded by a very stout spring, which required making a little fixture to compress enough to get the nut back on. I put all new leads on all the wires and reattached the switch and circuit board leads.
The first time I powered on the unit I blew the breaker because the wires that lead to the switch were in the way of the motor fan and caused a short when it spun up! Pretty scary. I zip tied all of the wires close to the motor and made sure there was plenty of clearance.
I recommend checking out that video with the British guy talking when you put the transmission case back together. Nothing too difficult just good to follow his order of operations. When I was putting the planetary shaft back into place I stupidly ended up jamming it into the spacer and had a very difficult time getting it back out. Had to call over a friend for help. Needless to say, had to order some more 1/8" key stock to replace it.
I'd say 3 tubes of grease (14 oz tubes) is about right. Some guy I talked to said I would need 6...that was way off. If you got 4 you'd have enough for the trans case and the planetary (which doesn't need much) and a lifetime of lubing the bowl arm rails.
I realize all my posts are full of technical details but I provide these to hopefully help someone's future project down the road. Enough mechanical work, time to make bagels!
Me jamming the key:
The mangled key:
Reassembling:
WOW!!!! Looks like you gave it a new lease on life!! Looks brand spanking new now!!
Nice work, and the powder coating was a good idea. Love the photos and the details, especially since someone in the future will be rehabbing another one and will certainly find this helpful.
I did the same thing to my 1986 A200. In 1988 I acquired this beast after it was in an industrial fire. I tore it down and kept the gears in a bucket for 23 years. In 2011 I began piecing everything back and replacing those gears and bearings that needed replacing. It took me about two to three months. I wanted to powder coat the machine but went with Red Rustoleum Spray paint instead. Looks good, though. Yours looks fantastic!
Thanks man! It has been churning out bagels consistently this summer for my local farmers market
Absolute beauty of a restoration. I'm about to start on a couple of my own. Can I ask:
- How did you know it was from 1965? I'm trying to find out more about my specific machine but information is scarce and Hobart isn't very helpful (here in Australia). There're some manuals floating around but nothing that matches the exact spec.
- Did you go with Superlube for both gearbox and planetary? How did you find whether it was suitable?
- Did you try to find original Hobart parts or did you just get equivalent bearings? Bearings appear standard sizes but I'm having issues sourcing the oil seal locally.
Hey curator,
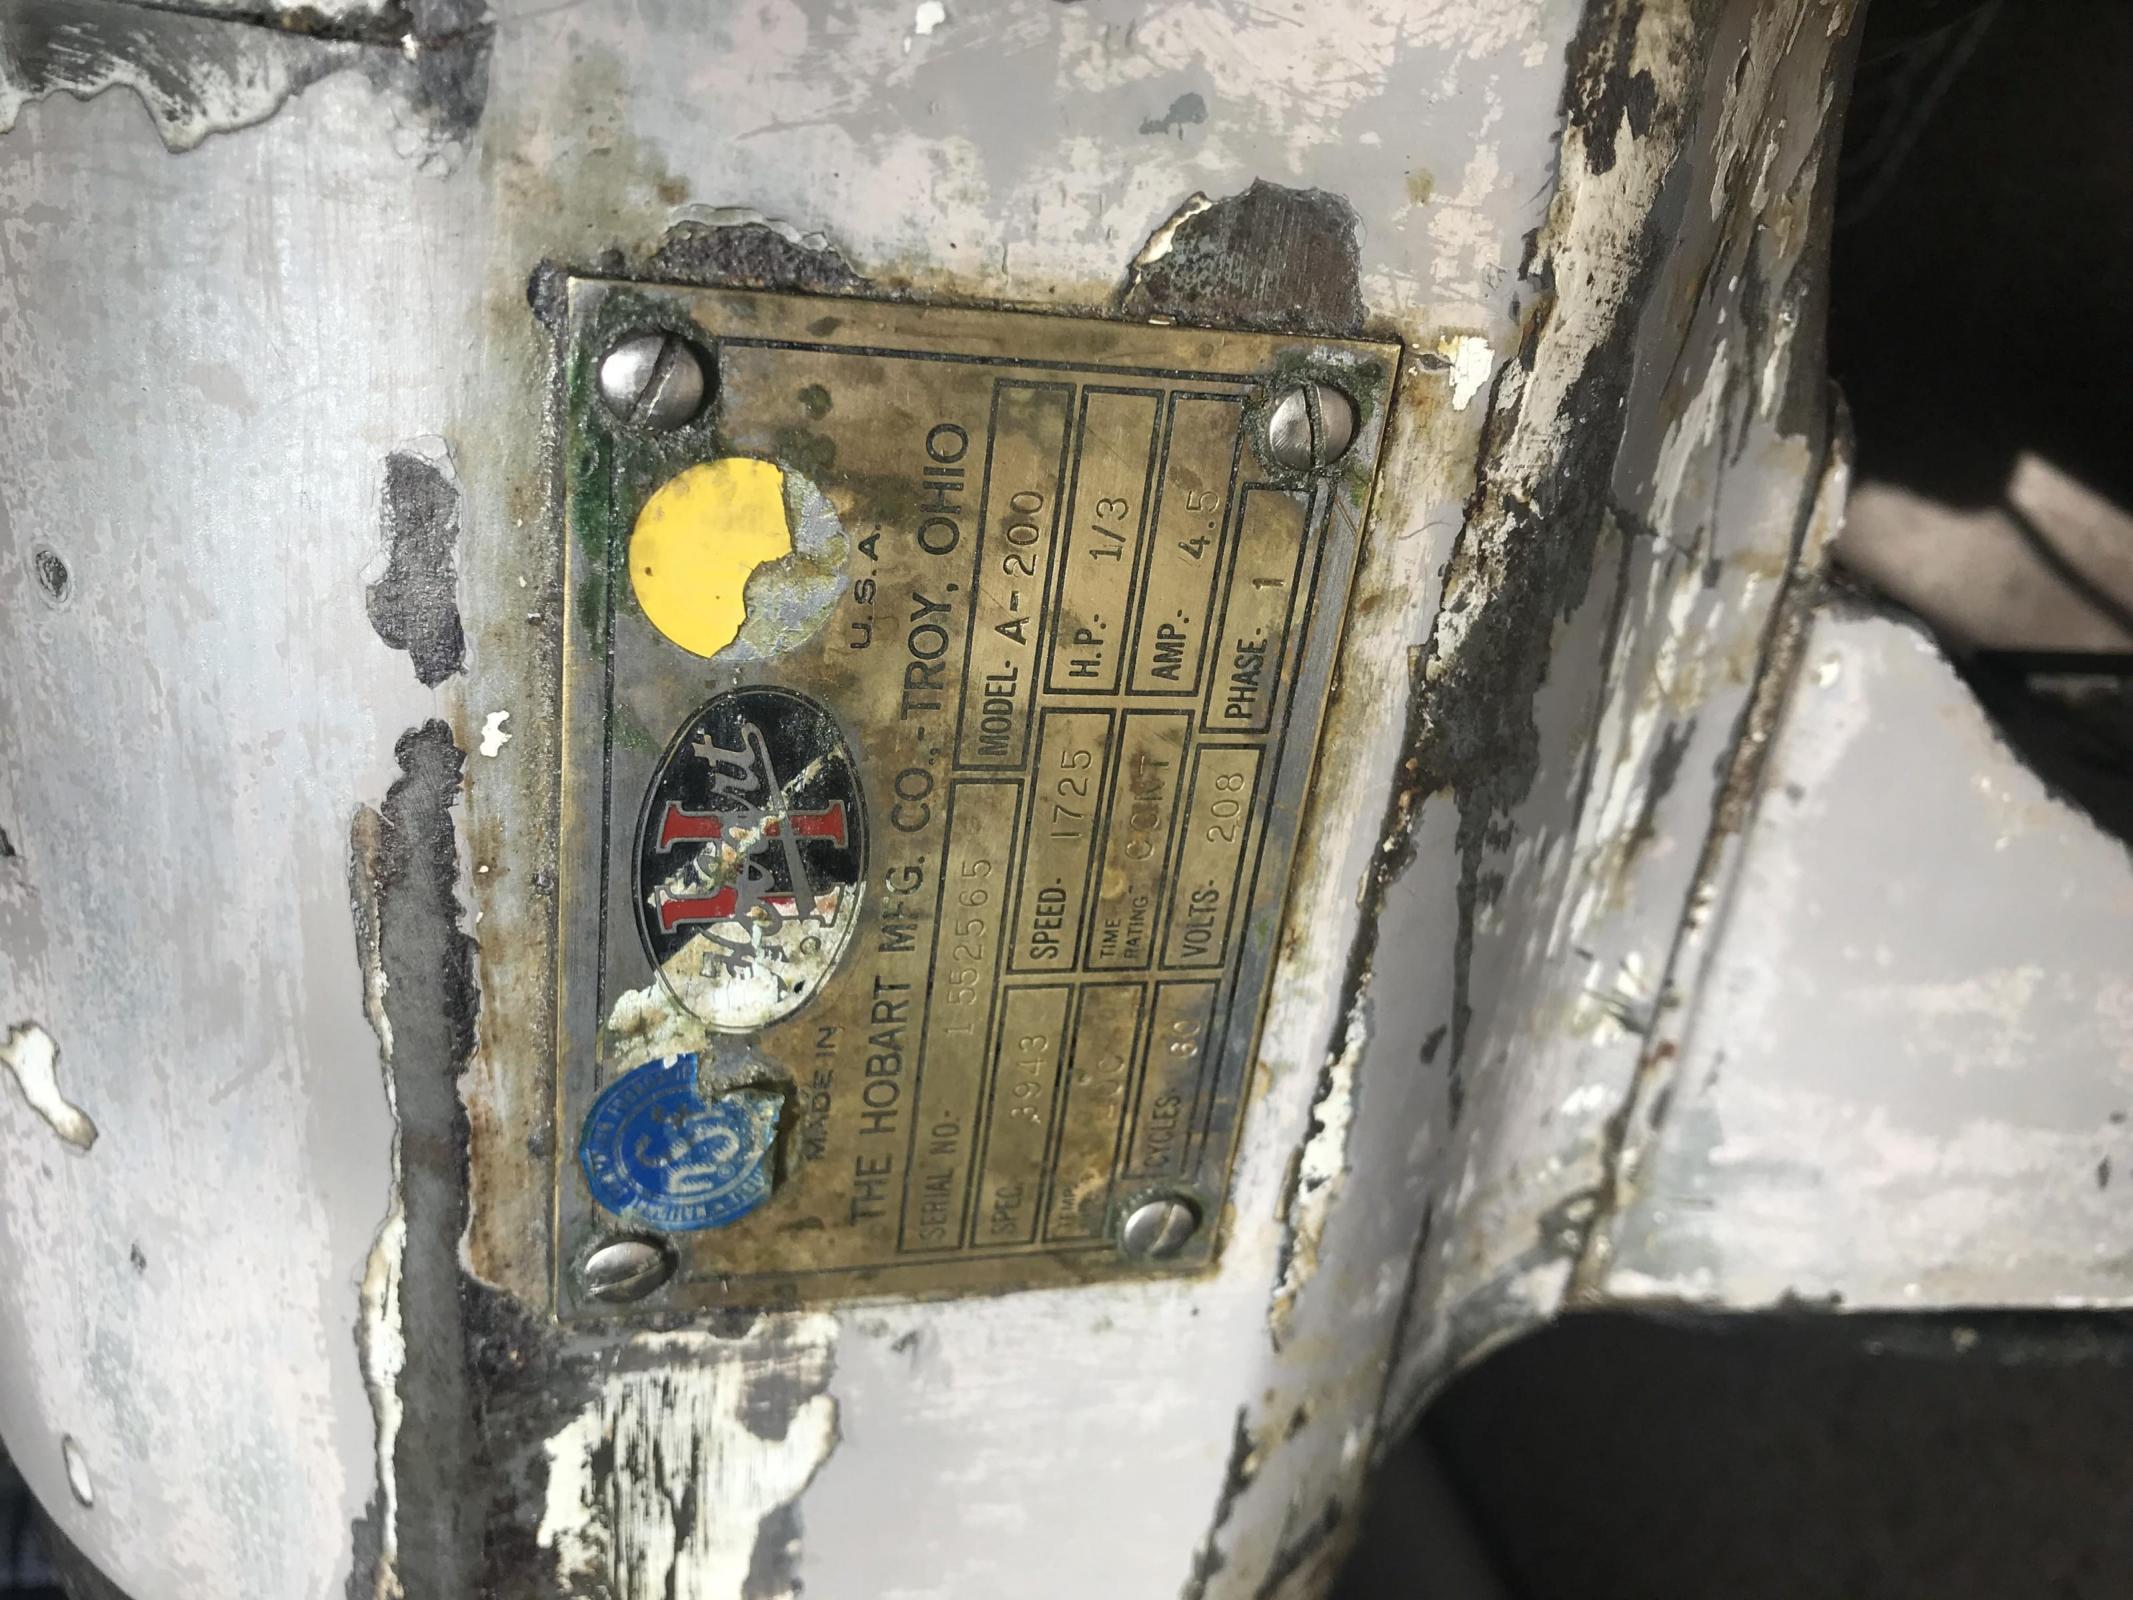
I called Hobart here in the US with the serial number. At first the lady said she couldn't find it and that I had provided too few numbers, but then she called me back and said it was from '65. Maybe try pestering them, or checking the various manuals out there to try to match up your model with a time frame.
I did go with superlube for both. This was overkill probably. I heard from everyone that Mobil 222 or equivalent would be just fine for the gearbox, but that a food grade grease was recommended for the planetary. You don't need very much at all for the planetary...
I found equivalent bearings. Don't stress too much about this, just figure out the size (all measured in mm) and order some sealed bearings. They don't have to be super expensive.
Best of luck!
Ah, mine's made in the UK and they don't seem to want to reply to their emails. Not a big issue, I just hope I don't break anything that isn't a standard fitting.
Thanks for the info. Your work is inspirational!
Try a direct call to the Barnstaple's factory.
Anyway, there a few variations between the early US and EU A-200 productions : the main major differences are related to the motor parts and electrical devices + some cosmetic changes in the pedestal and bowl yoke design.
Take also in mind that you will have to deal with both imperial and metric fastenings on the same machine (unless this is a distinctive feature of all models made by the Ivry-sur-Seine plant).
If you share a picture of your mixer's nameplate, maybe I will have the exploded views suitable to your model. Is it a AE-200 (formally stamped in the nameplate) ?
Regards
Hi Flormont. I have two, one is a 5 digit and one a 7 digit serial. Both made in the UK. I can't even find a manual for them. Sent you a PM.
Got it.
"The first time I powered on the unit I blew the breaker because the wires that lead to the switch were in the way of the motor fan and caused a short when it spun up! Pretty scary!"
I did the exact same thing with mine. After I assembled the motor, I turned it on for a half-second just to see if it worked, and it did. I turned it off and about a half second later, there were sparks. Not enough to trip the breaker though. It was scary only due to the immediate thought I might have damaged the motor. However, even before I looked, it was obvious since the sparks came after I turned it off, it was only the mains that were damaged.
My mixer looked very similar to the condition of yours originally. I had to replace the agitator shaft as it was worn a bit at the oil seal by having been run for a long time with the planetary dry.
I got parts from oldhobartmixerparts.com and, other than the motor, the assembly is just getting started. I need to figure out how I'm going to handle the new oil seals. They're about half as thick as the old leather ones, making the bearings loose. I might make a spacer between the seals and the bearings, or I might buy another set of seals so I can double-up on them.
My unit does not have a spec plate. The serial number was stamped directly on the case under a screw-on Hobart label.
I think my Hobart A200 is the same generation as yours. Recently, I've been trying to take it apart to change out the grease and the oil seals because I wasn't sure when the last owner gave it maintenance. When I removed the central shaft I found that there was a damaged o-ring sandwiched between the lower spacer right before you get to the planetary and I believe the bearings for the central shaft. The Hobart manual for the A200 shows that there should be 2 o-rings located around that area but it seems like that manual is for slightly newer versions and I was wondering what your experience was with rebuilding that area. Did you replace the o-rings as well and if you didn't, have you noticed any leakage? It would be great if you could describe in what order the pieces situated there are in because the Hobart manual is quite jumbled up on the details.
Hi
I disassembled my a200
I can not seem to figure out how this key fits
Hobart 00-117116 Control BlockI’m currently disassembling my A200 and I can’t seem to get the planetary to just slide off like the videos seem to show. Am I missing something, or is the lack of maintenance over the years just holding it up there.
thanks