
Well today I made a simple 1:2:3 loaf with some wholewheat (17%) and spelt (8%). my objective - test baking in my new BBQ instead of in the oven over summer. Just a standard 123 with a little extra water, 4 sets of coil folds.
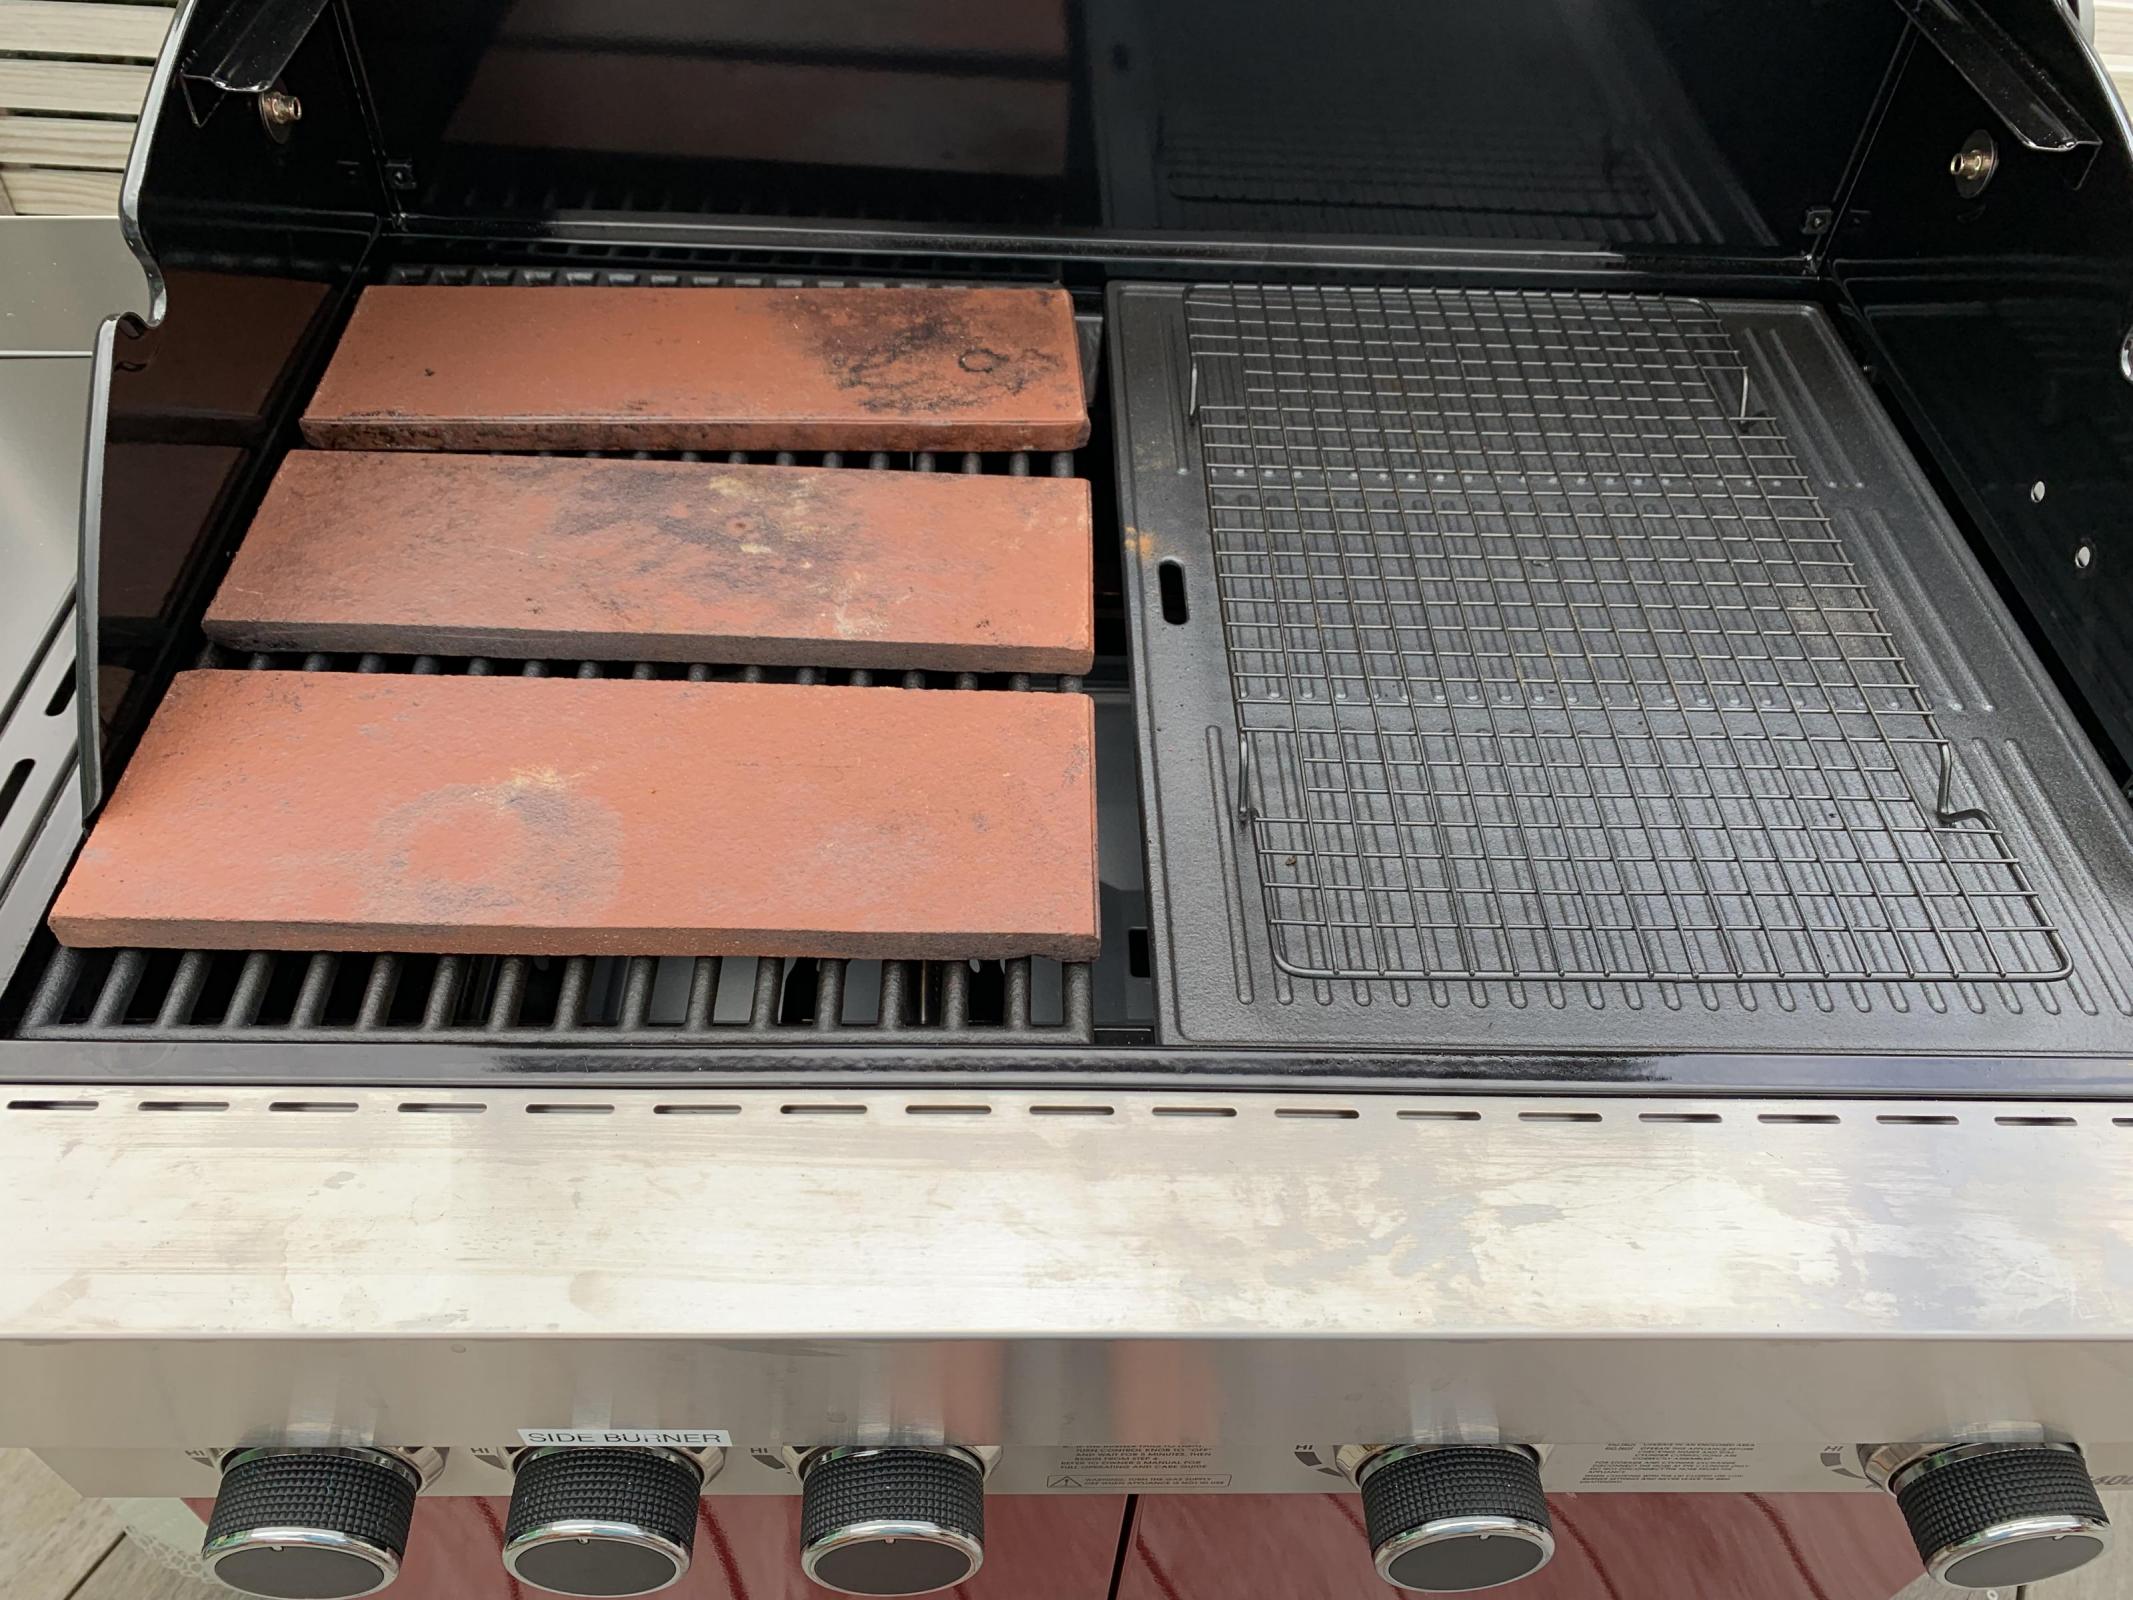
here is my set up
I read up on how to do this, so the BBQ got to 475°F in 10 minutes so I reduced heat and put my 2 DOs in for another 15 minutes and watched temperature gauge, turning off thr 2 centre burners. Popped the slashed loaves into the DOs spritzed them and returned to BBQ. watching the temperature fall, when it got to 375°F or 180°c I opened lid briefly and turned the middle burners on again. Turned them off once the temperature returned to 200°C. after 15 minutes removed DO lids and baked another 15 minutes. After about 5 minutes I checked the bottom of the loaves only to find them burnt. I removed them from DO and propped them up against each other and continued the bake. the loaves didn’t brown as much as I usually get in my electric oven but after an extra 7 minutes internal temperature was 209°c plus so I took them out. 

Interestingly, my enamelled steel roaster over the cast iron plate but on a rack, burnt more than the enamelled cast iron roaster on the clay tiles over the open grid.
will see later tonight how the crumb is.
Question: yes it worked BUT I don’t want burnt bread so how do I modify my method to stop this? yes I fiddled with the burners, turning them on briefly to keep temperature up but would it have been better to just let temperature drop and bake for longer?
HELP - all ideas welcome, I am an absolute newby in BBQ cooking, so all ideas very welcome.
Leslie
- leslieruf's Blog
- Log in or register to post comments
I had similar results in October when our power was off for a couple of days. I put my stone just above the burners, about 2” below the cooking grate, and the D. O.s on top of the grate. Got burned bottoms and pale tops. Next time I’ll try adding a large tile on the grate below the D. O.s, to insulate the bottoms more. And maybe I can somehow achieve a small air space between the D. O.s and the tile, not sure just how yet.... And maybe crank up the temperature higher too.
Happy Baking,
Tom
Maybe I need to heat the BBQ longer. and not keep boosting the temperature during the bake... but I am guessing.
Leslie
Reasonably happy but need to get bake process sorted!
Here's what's happening: (I think) Your grill thermometer is towards the top of the enclosure, correct? Yet, your tiles and cast iron is so close to the edges of the enclosure, they are trapping the heat UNDER the cast iron plate and tiles. The tiles and plate themselves are likely 100 to 200 degrees F, or more, hotter than the air temp just outside the top of the DOs.
If you have an IR thermo gun, maybe you could check this.
I have also read instructions for baking steels and baking stones, used in conventional ovens, and how to make your own, that you need at least 1.75" clearance between the baking steel/stone, and the walls of your oven, all around all four sides, to allow for heat circulation.
So.... your loaves are baking at maybe 575-675 F on the botton, and 475 degrees F at the top.
--
To get the temp at the bottom of the DO equal to the temp at the top of the DO, you need to do two things: 1) Improve air and heat circulation (natural convection) within the closed grill. 2) Raise the DOs up as high as you can get them, away from the burners.
1) will reduce the temp difference between upper and lower spaces. 2) will get the DOs away from the hot flames. _Both_ will need to be done.
Next it may be beneficial to do a couple more things: 3) build some thermal mass, and 4) (conveniently/cheaply) insulate the cover from the outside so the upper portion of the baking space does not lose heat.
(To establish a common terminology, let's look at your first picture. The tiles are in what is called "landscape orientation", longer side to side. And the cast iron is in "portrait orientation.")
Primary Suggestions:
Primary #1: Remove the cast iron plate. Move the three tiles to the center, leaving them in landscape orientation, spaced as they currently are. Put the metal wire rack on them, then place the cast iron plate, in _landscape orientation_ on the wire rack. You may have to adjust so that the wire rack's feet keep that 1" space between the tiles and the cast iron, maybe invert it. If the wire rack won't support the weight of the cast iron, rig something else to create a 1" air space.
THis does 3 things: leaves plenty of space around the tiles and plate for natural air circulation and convection of heat, blocks most of the plate from direct flame heat/radiation, gets the iron plate 1" higher.
Primary #2: Next: rig some kind of device to lift the dutch ovens as far off (above) the cast iron plate as possible. Based on the sides of the grill that are seen in the first pic, this means that you want the DOs towards the back. This rig needs to be like a wire rack, or some open device because you don't want direct conduction (touching) between the cast iron plate and the DO. You mainly want "air heat" (convection) heating the DO, and any radiant heat it gets you want reduced to normal baking temp. .At least 3 inches, or what can be done safely given the internal cooking space available.
Note: The cast iron plate, when it gets hot, will also _radiate_ heat too. So... you want the cast iron away from the flame so it doesn't get too hot (but you do want it in there for thermal mass), and you want the DOs away from the iron plate, just like you don't put a DO too near the radiating bottom element in an electric oven. It's that _excess_ radiant heat coming from below (and NOT from above) that burned the bottoms of the loaves before the tops got done.
Primary #3: Insulate the inner bottom of the DOs. Sprinkle in 1/4 tsp of corn meal, put in a layer of parchment paper cut to size, then add another 1/4 tsp of cornmeal on top of the parchment paper.
Primary #4: Once the grill is up to temp, you need to find the burner settings that will maintain that temp. Remember, raising the temp at the thermometer location from 375 F back up to 425-450 F means you are heating the tiles and cast iron to well over 600 F again. In other words, find that "sweet spot" of a _low_ burner setting that _maintains_ the right temp.
--
I think the one loaf burned badly because the cast iron plate blocked air circulation (worse than the more open tiles) and got super hot, and then gave off _radiant_ heat to the bottom of the DO. The cast iron plate became, in effect, like a "burner" in a conventional electric oven. And the DO over it was only 3/4 to 1" away from this "burner".
Secondary suggestions:
Secondary #1: You can turn your grill into a "smoker" or like a Kamado cooker with a welder's blanket thrown over the top to insulate it. This will _tend_ to keep the upper internal air space hotter, and reduce the temp differential between the lower and upper internal air space of the grill, so that the top of the loaf will bake a bit more evenly with the bottom of the loaf. Google this: welder's blanket grill
With enough use, the welder's blanket may pay for itself in fuel savings.
Here's an example of a guy who did that with a smoker: https://www.youtube.com/watch?v=-8jDWfl7Ejk
Also, check to see if your grill manufacturer makes a custom insulating cover that is designed to cover the grill lid _when in use_. Though I bet a welder's blanket will be much cheaper, but not as good looking.
This is important: when the lid gets hot, it radiates some heat back to the top of what's cooking. Insulating the lid, lets it radiate back more/longer, without burning so much gas which overheats the lower portion. This is one of the concepts which makes Kamado or ceramic-shelled grills so good. It also is what happens, to a degree, in a conventional kitchen oven, whenthe walls and roof of the oven get to temp, they can _radiate_ some heat back to what's cooking.
Secondary #2: Add a bit more "thermal mass", which helps in _maintaining_ the desired temp after it has been reached. As long as you keep 1.75" space between the tiles and the sides of the grill body, maybe add two more similar tiles, in _portrait_ orientation, one on each side of the group of 3. Also keep some open spaces _between_ all the tiles too, at least a little, so there is plenty of air circulation.
Every time you open the lid, you lose all the hot air that had built up in the upper internal space of the grill. So extra thermal mass, and the insulation on the outside of the lid which keeps the lid hotter, will both _help_ keep the top of the loaf baking more evenly with the bottom.
Good luck, and bon apettit.
in this. I will use my little oven thermometer to check out the temperatures, but what you say makes much sense. I just need to figure how to do some changes.
thank you so much....
Leslie
I just noticed that the cast iron plate is custom fitted, and is not sitting upon the grating. hence, I just realized that it came as part of the BBQ. So hopefully, when you take it out, you can move the grates from the left side to a middle position, or you have another set of grates to put there.
that plate on the right is fine for cooking foods that are cooked on a griddle. But the way it blocks air ciculation is bad-bad/very-bad for _baking_ in a BBQ grill where you must have circulation for proper convection of heat around a dutch oven.
your photo of the grill doesn't have anything inside it that I can reference to estimate dimensions. So I don't know how high off the iron plate (after it is re-configred) you will be able to place the dutch ovens.
I tried to get another grate but didn’t find one. I will look further. I didnt think about moving the grate to the middle - that would help I think.
I will look at BBQ dimensions and DO dimensions and see what is do-able.
thank you
Leslie
Maybe this will help. Place silicone baking mold (like cake mold) inside the DO. Or, rack and silicone baking mat. Giving some space between the bottom of DO and the dough, so that it won't burnt.
I have a couple of silicon baking mats so will give this a try too!
thank you
Leslie
@bottleny:
The blackening of the bottom of the loaves leads me to suspect that the undersides of the dutch ovens are getting well over 500 F, maybe up to 600, which is well over the max temp for silicone moulds and mats.
A temperature probe or an IR thermo gun could confirm. In the absence of those, it would be cheaper to use parchment paper on the inside bottom of the DO, and see if it chars, which will happen around 450 F. (A quick glance at a couple products on Amazon shows max temp for silicone baking moulds and mats was 450-480 F.)
BBQ grills are designed to get very hot near the grate, in order to sear the meat. That radiant heat dissipates the higher up inside the cooking chamber you go, according to an inverse square equation, ie, 2 times as far, 1/4 the radiation.
When baking stones, tiles, or griddles are used, they too give off radiant heat when they get hot. So the trick is to use them to block the radiant heat of the gas flames, (flames are well over 2,000 F) but not get the stones/tiles/griddles themselves over, say, 600, in order that the dutch ovens get heated mostly by naturally circulating hot air (convection).
So the 3 things needed to alter a BBQ from a "searing grill" into a "baking chamber" are: 1) block line-of-sight radiation between the flames and the baking vessels. 2) put as much distance as possible between the baking vessel and the objects* that are blocking the flames. and 3) allow plenty of natural internal air circulation.
*Objects-that-block-the-flames will also give off excess radiation-heat and burn things if they get too hot themselves. That's why the loaf that was 1" above Leslie's cast iron griddle still burned on the bottom. If she can raise it to 3" away, it will get only 1/9th the radiation-heat as before.
Granted, it's tricky. The chef needs to have a mental picture of the three ways how the heat is moving: radiation, convection, and, if things are touching, conduction. And you have to keep in mind that the temp reading on that thermometer poking through the hood is definitely not the temperature of various objects between it and the grating.
Then, with the correct mental pictures of "before" and "after," the chef needs to construct or jury-rig various objects to convert the "searing" nature of the grill into a proper "baking chamber."
(Propane and natural gas, when mixed with air, burn with a flame temperature of 1960 C / 3560 F. See: https://www.engineeringtoolbox.com/flame-temperatures-gases-d_422.html )
so once it arrives I can try another bake. Very helpful in understanding how the bbq heat is distributed so I will try some things out and see how I go.
thank you
Leslie
Good idea. using just the one grate, shifted to the middle, could be unstable as you build up a vertical rig on it.
please post more pics when you get to experimenting.
Sorry if I got too engineering-geek in my comments. I tend to over-explain. I try to write for a general audience, people who just lurk, and not just write for the original person asking questions in the post.
and made me think about the whole process in a way I hadn’t before. I may not have understood absolutely evrything or even be able to do it all, but I definitely get the ideas so will slowly try some options.
thanks
Leslie
the crust is much crisper rather than chewy even though I am cutting off the burnt bit!