I baked some lovely loaves in my oven the other day, and as I slid that smoky, crusty bread out and onto cooling racks, I couldn't help thinking of those old European bakers, who've been baking with fire for hundreds of years. The limited size of my oven, however, has led me to adopt some measures that may or may not be part of that tradition. They work for me, and they might work for you too.
To make it simple, I’ll break it down.
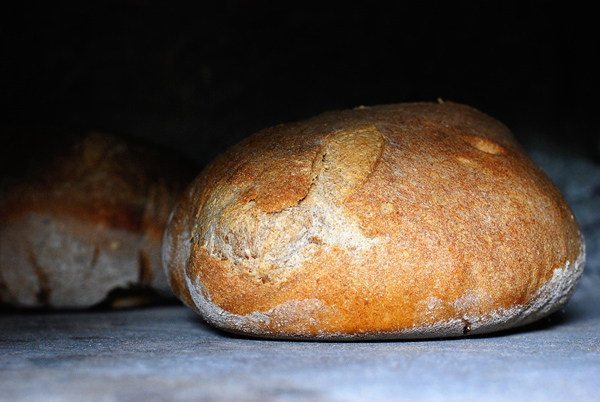
Overview: To bake 4 loaves in a 40” diameter woodfired oven, you'll need about 7 pounds of dough. The free-standing loaves will bake in a semi-circle around a hot but barely flaming mound of coals pushed to the back. Key to success in this kind of baking is to have the floor evenly heated before the loaves go in. I have a loose-fitting metal door for my oven, which acts as a damper and which I close when the loaves are baking.
The Dough: Unless you have a complicated steam-injection system as some French bakers have for their brick ovens, you won’t be able to get enough steam into your oven to make much of a difference in the bloom. Either the masonry will absorb the humidity almost at once, or you will be splashing on water, which can crack the hot base. Instead, in order to get a big round loaf, a good crust and a soft, well-textured crumb, you need to create a dough that is wetter than we Americans think is normal.
I’ve been working with wet doughs in the 65-70% range for longer than I’ve had a WFO, ever since I saw a Roman baker literally throw the dough out of a bucket and onto a long wooden peel at Forno in the Campo dei Fiori. While I don’t recommend a dough quite that wet (it had to be 80-85%), I do recommend bumping up the hydration a bit for woodfired baking.
Joe Ortiz in his book The Village Baker has some excellent tips (page 55) on how to do this. Making a sponge, letting the dough sit overnight, and using less yeast are all good advice. I would add to this letting the dough hydrate for an hour before kneading and having a good dough scraper handy for bench work. For one recipe that follows this technique, see Lago di Como Bread.
Slow Rising: Once you’ve made a wet dough, you need to let it rise for an ample time. I’m being deliberately vague, because temperature and time become fluid at this stage. With less yeast or a starter, at 50° the first doubling can take 5 hours or more. I let this part happen in its good time, and then slowly warm the dough for the next phase, because once the dough is active, it’s very important to have the oven heated to the right temperature at the right time.
Gradually raise the dough temperature to 70° in the second rise, giving the dough a fold after an hour or so. Now is the time to get your oven hot. In another hour, once the dough is showing springiness and a few big bubbles, you can make the loaves.
The Loaves: Bannetons are lovely to work with but are expensive. Instead, I use plastic bread baskets lined with cloth napkins or dish cloths, with a coating of coarse flour rubbed into the fabric. These work beautifully as proofing baskets for my finished loaves.
Once the dough has nearly doubled in size again, turn it out onto a floured surface. Deflate about half of the gas out of it and cut it into 4 pieces. The perfect weight for me based on oven size is 27 ounces per loaf, which allows some leftover dough for another day. Form your loaves and put them into the cloth-lined baskets to rise. At 70° this will take 45 minutes.
When ready to bake, turn the loaves out onto floured peels. Shape lightly, tucking edges under without deflating the dough and slash a design with a lame if desired.
The Fire: There are so many variables inherent in making a fire in a woodfired oven that I’m loath to give specific directions. Atmospheric conditions, the length of time since your oven was last fired, the type of wood you’re using and how it was cured all play a role. If your oven is outdoors, as most are, you’ll want to baby it when the weather is cold. See Moderating Heat in a Woodfired Oven for more on this.
Generally speaking, though, your fire should be at least 2 hours old with a good base of coals by the time you put in the bread. In the last hour, push the fire around from side to side to make sure the base of the oven gets heated evenly, adding small branches and an occasional wrist-thick log as necessary to keep a good fire going. During this time, using a set of bellows to fan the flames is optimal.
The Oven: As the fire pulses and flames, you should be paying attention to the oven walls, floor and door. I check the heat of the door handle, the amount of flame, the amount of whitening ash on the ceiling and walls and the floor temperature about every 10 minutes after the fire is going full force.
In the first hour, if the fire is raging and throwing flame on the oven ceiling, I slow it down by closing the door all but 2” to stop it ‘overfiring’. Otherwise, I leave the door off as the fire matures, and put it in place cocked about 4” open toward the end of the first hour. By then, the door handle should be warm to the touch but not hot, there should be a small amount of whitening on the ceiling, and near the doorway the floor of the oven should be warm to the touch.
In the second hour, move the fire side to side so that the floor heats evenly. Toward the end, the door handle should be quite hot, the ceiling of the oven should be half white and the floor of the oven near the doorway should be too hot to touch for more than a second. Now you’re ready to bake.
Push the mature coals to the back center of the oven, near the wall, and brush the ashes off of the floor. There should be 6 to 8 fist-sized chunks of glowing hardwood coal and a good bed of embers, but little or no flame when the loaves go in.
The Baking Procedure: Make sure each finished loaf can ‘slip’ on its peel. Slip each loaf into the oven to have a long side parallel to and 10” from the coals. Close the door. Use this rough timeline for baking:
- After 20 minutes, turn loaves so the other side faces the fire.
- After 20 minutes, turn loaves so one end faces the fire.
- After 10 minutes, turn loaves so the other end faces the fire.
- After 15 minutes, remove loaves to a rack to cool.
Trouble-shooting: Besides the obvious problem of getting the oven and the dough ready at the same time, I’ve encountered two main difficulties in baking perfect loaves in my woodfired oven: a stubborn fire and a cold floor. Often they coincide.
When the atmosphere is damp and heavy, the fire is stubborn as a result. I counter this by keeping some ultra-dry wood on hand inside my house, adding it to give my fire the extra boost it needs. Even then, under certain conditions, it can be a real challenge to maintain a good fire.
The other is when the oven hasn’t been used in a while and the floor is slow to heat. In dry conditions, you can usually overcome this with a bit of extra time. However, if this happens when you’re dealing with a slow fire as well, the floor may not get hot enough to put a firm base on your bread. Be very careful when turning your loaves in this condition. To counter, warm some quarry tiles or a pizza stone to 450° in your indoor oven to finish off the loaves for 10 minutes after WFO baking. It may not be the ‘purist’ thing to do, but it works!
Suggested reading:
The Village Baker by Joe Ortiz, Copyright 1993 by Ten Speed Press, Berkeley
The Italian Baker by Carol Field, Copyright 1985 by Harper Collins
Also see www.woodfiredkitchen.com for more tips, techniques and recipes. Flame On!
- sortachef's Blog
- Log in or register to post comments
Hey, thanks for all the great info. Your site looks good too! My WFO is in process, so I'm learning and gathering more information! Thanks for putting it all down! :) Your bread looks yummy! :)
Faith
Inspired by this post, after banging out some delicous pizza with a naturally leavened dough, I will bake 2 breads I had on standby.. Nervous and excited all at once. But this post gave me the confidence to not waste the hot hearth and get cracking to it! Thank you!
i want to say how thrilled I am to find this post. My uncle lives on the family farm and in one of the sheds is a brick oven from the 1800’s. While we still use this for all our turkeys for holidays, my one attempt at bread a few years ago was a disaster!! I am excited to try again!
Thanks for the great post.
Just leaving a note here in case it's helpful for someone.
Should the fire die down, too much, as you say bellows can be used . However the ancient method was to use a pipe and blow down it onto the fire. When I say ancient I mean as in thousands of years and it is still used by bush peoples and old cultures. I use a copper pipe with the fire end crimped shut just a little. It caused quite a stir when I went into the plumbing merchant and asked for off cuts of different diameters to try blowing through, to get the diameter that worked for me. They were very helpful when I explained!
Method two - In dire straights - A hot air gun! I'm not proud.
Adding: Watching Italian wood fired oven videos I came across a trick. Place some logs, that you are going to need later, in the oven away from the fire. Then add them as needed. They will be hot and a lot of moisture will have been driven out of them by the time they are needed. When added to the fire they take really quickly. Also not to dump them on top of the embers so as not to crush them down and spoil the burning.
As for steam. The well known method of a small baking tray with volcanic rocks and adding boiling water as needed works. Another way is a metal bowl with water. Having said that Fire makes water vapour. Combustion creates CO2 and H2O. So there is quite a bit of water vapour in the oven anyway. Fires are not dry heat.
And, the good old sassafras dome, Dutch oven and Henri Baguette crocks work a treat at these high temps. I preheat them in the oven first.
I hope this adds a little ... I am not quite a newbie at this, but I have much more experience yet to get .
I am yet to bake bread in earnest in my WFO, but my understanding is that you should get the oven up to temperature and then fully rake out the coals before putting the bread in to bake.
Perhaps this only works with a modern, well insulated oven, though?
Lance
Hi Lance
Well, not really, but those who can might.
As the link below says the coals can be pushed to the side, but they should be glowing coals rather than a fire with yellow flames and smoke. However for Pizza most Italian professionals say that there must be live flame in the oven and they use that to finish the edge of the crust by holding the pizza close to the flame.
https://www.thestonebakeovencompany.co.uk/cooking-techniques/
Sorry if this is a long reply. It represents my brains journey of what oven to choose and how to make it work. Much will be irrelevant to your post. Forgive me please.
As we know not all Wood Fired Ovens work the same. To a great degree it's about how much ballast the oven has. For ballast here read the mass of the heat retentive material.
I watched a video of the building of a big wood fired oven in London. Expert builders were brought over from Italy for the job. If I remember correctly after the core of the oven was built they packed 50 tons (yes, tons) of ballast around it. They said that every time they have had to let it cool for maintenance it took three months to get it up to temperature again, but once there it didn't take too much fuel to keep it there and the huge ballast gave it a high level of temperature stability.
Compare that with the typical small fire brick oven we might have in the back garden. We need our oven to come up to heat fairly quickly and for it to stay there just long enough for say the Pizza, bread, meat cooking sequence as it cools. With good insulation it will still be cooking through the night.
Throughout most cultures, post invention of wood fired ovens (as oppose to fire pits) ovens were a community thing. Perhaps because by the time they were hot it was easy to keep them hot and everyone could bake. Historically the cost of building an oven was beyond the means of all but the rich.
The old community ovens in England in the middle ages had a lot of ballast and they would be fired up for the communities 'baking day'. The traditional Tandoor in the Middle East and India were buried in the ground and again had a high ballast (obviously). In ancient times (and sometimes to this day) these too tended to be community ovens. They took time to come up to temperature, but the cooking times were short. So individual ovens didn't make sense and again there was the issue of cost as well.
The Greeks did invent individual sized ovens a century or two BCE, some of these were even portable with very low ballast, but they were for the rich. (Worth Googling - they are seriously beautiful.) So it's not so much about modern vs ancient but the structure and purpose. How long does it take to heat and how much fuel and how what heat up - cool down profile is needed.
Now enter the sort of oven I have. A light weight double stainless steel walled with a fire brick cooking floor.
https://www.igneuswoodfiredovens.com/wp-content/uploads/2018/05/export-0015.jpg
This oven comes up to temperature in about 15 minutes with very little fuel. The walls are well insulated and never get too hot to touch on the outside, but they have very little ballast just the thickness of the inner steel wall and the 1" thick firebrick tiles on the floor. Such an oven has the convenience of heating rapidly, but it cools rapidly compared to a higher ballast oven. There are two ways to make this work as a bread oven.
1 Starting at a high temperature 300 deg C (572 deg F) and allowing the temperature to fall as it bakes. No fire needed in the oven during baking.
2 Taking the temperature up to about 250 deg C (482 deg F) and keeping the coals in the oven to slow the cooling down.
I generally go for number two as I can fire it up again to do other things like par baking pitta breads for the freezer and so forth.
Method two makes for wet heat, but I still have a metal bowl with boiling water in the oven to ensure steam.
As long as the fire isn't smoking I have found that there is no need to remove the coals from the oven before baking. If the oven is cooling too quickly I add charcoal and not wood to the fire so as not to 'smoke' the bread. Having said that the bread sometimes 'smokes' ever so slightly and that gives a fantastic flavour to the crust.
When it comes down to it I expect we all just do what works for our oven.
Here's a fun thing about someone's committent to wood fired ovens. I watched a Youtube video of an Italian guy who lived in a very small apartment on something like the 20th floor with great views of the bay and the rooftops of his old town. His video showed an oven, like the one I use, situated on the small balcony with a dog leg flue to get the smoke clear. Bravo!
Best to you
Kevin
I realize this post is old, but I’ve been troubleshooting why my Sourdough loaves bake In an odd shape in my WFO though beautiful in a Dutch oven. I was thinking I had maybe built my arch too high as the bottoms were cooking well before the tops. I’ll try to leave coals in the oven in the hope that helps to retain heat. I always thought I needed to rake and wash the whole oven, but maybe I don’t! I’m excited to try this week. Thanks for your content!