I decided the time had come for a little experiment to try and shed some light on the dark art of bulk fermentation and the influence different percentage volume increases might have on the final loaf.
I started with a pretty standard dough recipe as follows:
Initial mix
10% wholegrain emmer flour
10% emmer flour sifted #40
80% bread flour
7.7% prefermented flour @ 56% hydration
0.15% diastatic malt
75% hydration (69% + 6% bassinage)
1.8% salt
Process
20 mins autolyse + 10 mins fermentolyse
Add salt, then malt
Mix 2 mins LS, 2 mins HS (Famag)
Add bassinage on lowest speed
Bulk ferment at 25C (see below)
Preshape to 2 x 900g, BR 20 mins
Shape to 2 batards
Overnight retard in fridge
Morning bake at 230C with steam for around 30 mins.
Bulk Ferment Details
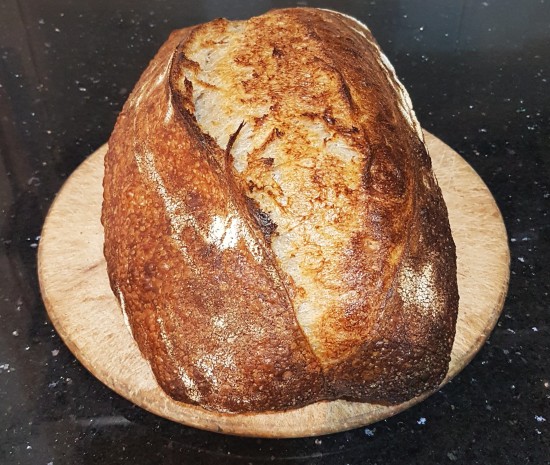
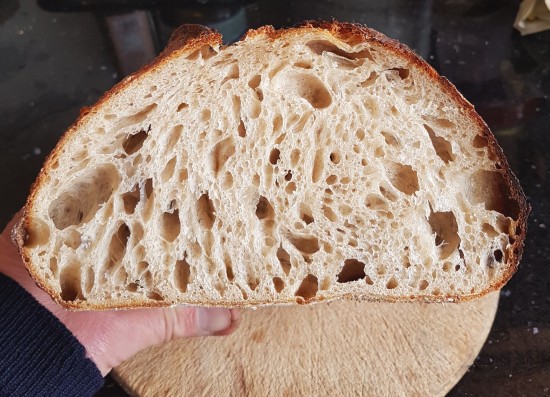
1st bake:
Coil folds at 1hr & 2hr
Duration: 5hrs 05min
Volume increase: 71%
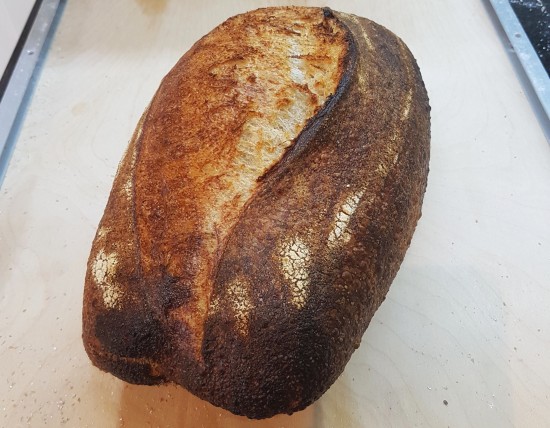
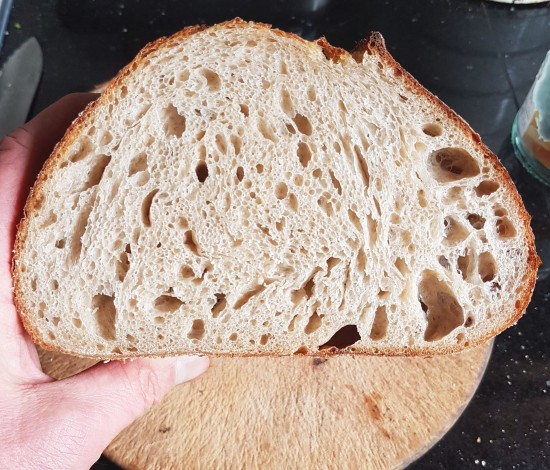
2nd bake:
I had to go out during most of bulk time, so I was only able to do one coil fold at 20 mins, so I increased HS mix time to 2mins 30secs
Duration: 3hr 55min
Volume increase: 40%
Differences
Both bakes produced good loaves, but with some differences:
1st bake
more spread on the peel
less loft
less oven spring
more open crumb
2nd bake
kept its shape better on the peel
more loft
more oven spring
slightly less open crumb
browned quicker in the oven
took slightly longer to cook
First bake:
Second bake:
Summary
It appears that there is flexibility in bulk volume increase, as you would imagine, but you can expect differences in the final loaves. These differences will no doubt become more pronounced if higher percentage volume increases are allowed to happen.
Lance
- albacore's Blog
- Log in or register to post comments
since the gluten would be more developed in the second loaf from your increased mixing.
I accept that it was a somewhat flawed experiment. However the extra mixing time was done deliberately to compensate for the lack of folds during bulk.
In my eyes, the main difference was in the bulk rise percentage volume increases.
Lance
and I am also very envious of your mixer! I just posted an IG post from a baker who mixed dough with beautiful layers but no folds...would this be possible to try in a FAMAG, I was wondering? I don't have the space but would love to buy a mixer sooner or later... Kat
I thought you were going down the wooden trough route, Kat ;)
Lance
had a butcher block top at counter height so it can cover the dough for BF and proofing and is multi functional for cutting etc with handles at each end for a towel rack and a little shelf at each end, the depth of the handle, to put spices in since it slopes in at all 4 sides. Don't know if Lucy will ever build it though. She is sort of semi retired now and not interested in doing much woodwork and I'm certainly not gong to build it:-)
The wooden trough does look very tempting but I am not sure whether my arms and back are up for it with higher volume..also if you go to the mixing IG with my link you will see that Benjamin responded to someone else and he really manages to cut out bulk and achieve that amazing structure via mixing...I was pondering on this and think he must have some rest period in the mixing bowl and very curious...so the other baker personality in me is now longing very much for a mixer! We shall see and no hurry...just like the dough!
However, I messaged with a micro-bakery baker in UK and she was thinking to replace the tray type of plastic boxes with stackable wooden boxes to avoid using too much plastic. Now...I thought that was a great idea to consider and still could have the mixer! I have a friend who works with wood and might ask him how feasible....
Lovely idea about the wooden bulk container in the kitchen dab...I could see here a friend with four legs using is to chew on...he loves his sticks and we always have an assortment in the house.. Kat
nice to know that you can vary the mixing to suit your time allowed for folds and still come up with a great looking bread inside and out. Experimenting is how you learn what you mess with to get whit you want at the end depending on your schedule. Both breads turned out great but bread 2 is better looking in cross section even thought he crumb isn't as open but i bet #1 was better tasting and mire sour though.
Happy baking
Yes, I preferred #1. Difficult to say that it tasted better, but I liked the crumb more. Just had to be careful what you put on the toast - no runny honey!
My SD seldom tastes sour, unless I have a lot of wholegrain. I keep saying I will perfect non-sour and then move onto sour; trouble is I might never get there!
Lance
Lance, you peaked my curiousity when you said the first dough increased 71%. Not 70 or 75, but 71%. Was the 71 an estimate, or were you more scientific with your measurements?
Both breads looked great!
Did both doughs proof under the same conditions and for the same length of time?
Dan
“inquiring minds want to know...”
A good question from your enquiring mind, Dan!
I do my bulk ferment in a very "bowl shaped" bowl, so volume measurement is difficult. I thought back to my Brewing days, when the most accurate measure of volume is (or was) done with the simple aid of a dipstick. The dipstick is a long straight rod with a shoulder and inch or cm markings. The shoulder is rested on a designated horizontal place on the vessel and the wet line on the dipstick showing the height of the wort or beer in the vessel is recorded. By looking up that dip measurement in the calibration table for that FV, the volume can be read off with great accuracy - this before the days of flowmeters, ultrasonics, lasers, microwaves, etc. In fact none of them are as accurate and the dip stick is still used in petrol (gas) stations for fuel volume measurement in the tanks.
Anyway, I digress! So I measured in known weights of water into the bowl and recorded the dip down to the water surface until the bowl was nearly full. Then with the dough I could just record the start dip and final dip and so record the % volume increase by comparing to the water volumes. Of course the doming makes life a bit difficult but you can do a few dips at various places and average out the readings.
I did try a laser measurer, but it couldn't cope with the low distances!
Are we bakers OR are we mad scientist?
Here is another idea, from someone who uses a pipette to add water to my starter :-D
A clear container works best, and straight-ish (scientific word) sides are optimal.
Obsessive, I know. But you seem like the “mad scientist kind of guy”. <LOL>
I hope the explanation was clear. If not, and you are interested, let me know.
Danny
I did think of pouring water on top of the dough to get a flat level before dipping, but thought it might get messy if the water started to mix with the dough!
Maybe use some bromine and look for the brown gas layer ;)
I need bromine or a really good alternative.