The Ultimate Fast Sourdough by Jim Lahey
My notes:
100% of the credit for this recipe goes to Jim Lahey.
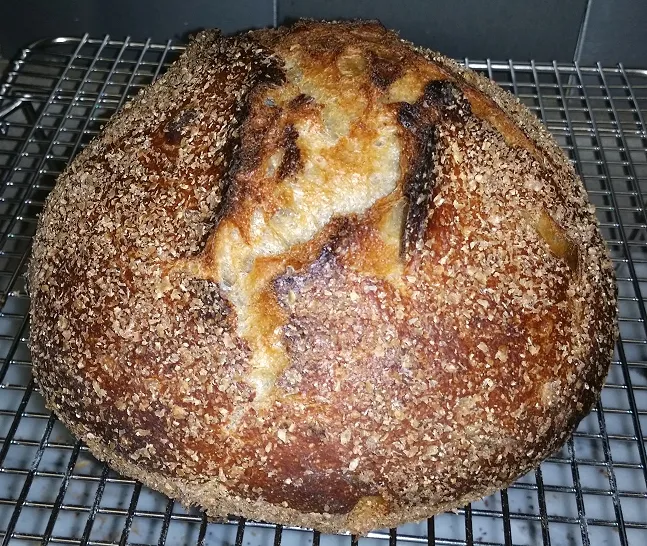
I used a three quart cast iron dutch oven which fit this loaf perfectly.
After the first initial 30 minute rest period, which I used a tea towel to cover the dough with, once I started doing the gentle stretch and folds inside the bowl, I covered the bowl with plastic wrap to prevent the dough from drying out too much. When it came time for the parchment paper, using scissors, I cut a circle of parchment to the approximate size of my three quart dutch oven to get the dough into it easier. I also preheated my gas oven to 475 degrees (splitting the difference between 450-500 degrees he recommends depending on your oven) and kept it at 475 degrees the entire time baking.
Jim recommends to "slice the dough to help it rise." I didn't do that just because I forgot but it didn't seem to me to be absolutely necessary.
For this recipe I used King Arthur all purpose organic flour and King Arthur organic wheat flour.
My sourdough starter which is normally fed at a 1:1:1 ratio (that is 1 part sourdough starter to 1 part flour to 1 part water by WEIGHT) this time I fed it at a 1:4:4 ratio which was 20 grams of sourdough starter to 80 grams of flour and 80 grams of water. I feel that this gives the starter more vigor in my experience. When the sourdough starter was at its peak of activity about eleven hours later I started the recipe.
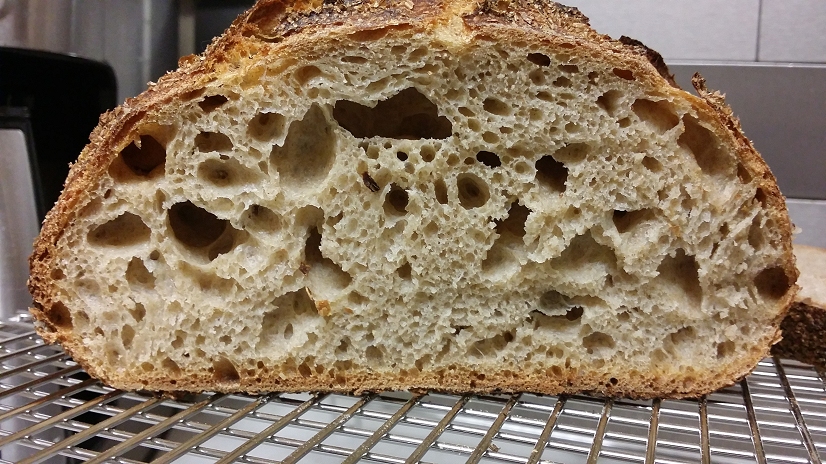
The bread has a delicious light "nutty" flavor that my wife says is her new favorite. The crust and crumb on this easy to make bread is out of this world. Once toasted I really have to pace myself and not eat too much of it :-)
Yield: One 9-inch round loaf.
Equipment: A 4½- to 5½-quart heavy pot with lid; a large piece of parchment paper.
100 grams prepared starter
200 grams (about 1 1/4 cups, plus 2 tablespoons) unbleached all-purpose flour
100 grams (about 2/3 cup) whole wheat flour
6 grams (about 1 teaspoon) fine sea salt
230 grams (about 1 cup, plus 1 tablespoon) 65F-70F water
Wheat bran, for dusting
1. In a large bowl, combine the white flour, wheat flour, and salt and whisk to combine. In a small bowl, whisk the starter and water until the starter is fully dissolved. Pour the starter mixture into the flour, and use a flexible spatula to quickly mix. Cover the bowl loosely with a clean kitchen towel, and let the dough sit at room temperature for 30 minutes.
2. Turn the dough, pulling it off the sides of the bowl and folding into the center as you turn; work it as little as possible. Cover loosely and let rest for 30 minutes before turning the dough again. After approximately 5 turns, or 2 ½ to 3 hours, the dough should be ready. (Don’t expect to see a big increase in size in this dough—by turning the dough every half-hour, you are doing what I call the lazy man’s version of kneading the dough—improving the texture without much effort.)
Note: How do you tell when it’s ready? You want it to get to the point where it is capable of holding a shape, and not ooze into a pancake when you shape it into a ball. It should be so interested in sticking to itself that it easily peels off the bowl when ready to shape.
3. Place a large piece of parchment paper on a sheet pan and cover with wheat bran, so that you can no longer see the paper. Transfer the dough to a lightly floured surface and form it loosely into a ball: hold it with both hands and gently tug the sides down and under, into the middle of the dough, to make a taut ball; don’t let the dough tear. Set the dough seam side down on the bran-coated paper. Dust the top of the dough lightly with more bran. Cover loosely with the towel and let it sit at room temperature until doubled in size, about 2 hours.
Slice the dough to help it rise.
4. Preheat the oven to 500F (450F if your oven runs hot). Preheat a cast-iron ovenproof pot with tight-fitting lid, such as Le Creuset, in the oven. Carefully remove the lid and transfer the dough on the parchment into the pot. Use a serrated knife to score the loaf with a long slash, to allow the dough to expand. Cover the pot immediately and place the pot in the oven.
5. Bake the bread for 35 to 40 minutes with the lid on. Carefully remove the lid and tear off any excess parchment. Bake for another 10 to 15 minutes with the lid off, until the crust is a very, very dark brown. (I urge you to let the bread cook, uncovered, until the top of the bread nearly blackens and the sides reach a very, very, very dark brown.) Remove the loaf from the pot. Cool the loaf on a wire rack. The loaf will continue to cook as it cools, so try to wait an hour or so before cutting into it.
- NYC_BreadGuy's Blog
- Log in or register to post comments
Looks like a nice loaf, I am curious about the proofing phase. In the absence of a banneton or bowl to contain the dough, does it spread on the bran-covered paper?
Yes it does spread out somewhat. Trying to make it into a taut ball certainly helps. By the time I put it into my hot dutch oven it was covering most of the parchment but the oven spring was very nice when I removed the lid.
Hi! I’m on my second attempt at this loaf (and.. second attempt at bread ever) and I have some questions.
If the dough isn’t strong enough by the end of the folding phase, can I knead it?
If it hasn’t risen at all by the end of the resting phase, should I continue to let it rest?
If it HAS risen in between foldings, but isn’t keeping shape, will continuing to fold it undo the rising process by flattening out the air pockets?
thanks!