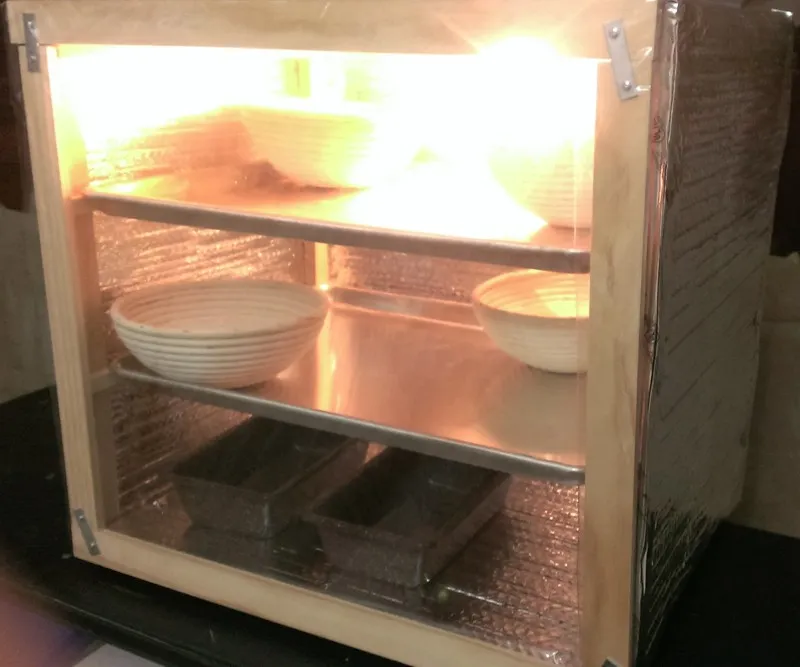
Okay, with the weather changing I decided I needed a proofing box. I do woodworking so for me it wasn't too complicated, but I did a simple box with a 3/4" plywood base and 1x2" corners, a 1/2" plywood top and 1/4" plywood backing. Lined with foil bubble insulation. Installed a 25 watt candelabra bulb unit at the top and a small aquarium fan inside for circulation. The door is 3/8" wood with clear vinyl stapled to it and is held closed with Velcro. I ran the light on all day long and the top was 82 degrees, the mid section 80 and the bottom 78. So that's when I decided to add the fan which I already had. Now the temp reads 80 at all levels.
It looks fabulous. I'm so tempted to get my husband to make me one. I have the Brød and Taylor and it has served me well but I really would like one that holds multiple half sheet pans and not just 13x9.
Hi, thanks for sharing what you have done. Years ago I had a small bakery with a cafe. I made all the breads etc for the cafe. We made a proofer out of plywood. It was a large box about 5 ft tall and wide enough for 1/2 sheet pans. we put a warm vaporizer in the base of it and used that. It worked great. However.....we have built another one now for my home and am having trouble with the condensation on the bottom of the pans. Thus drips on the lower pan of dough. i can't ever remember dealing with this issue. how do you deal with the condensation? I don't think we had a fan. Does that do it?
Nicely done!
Thank you.
I wanted to build the box using only materials I already had on hand. I thought about the clear vinyl because that's what I use on my screened patio in the winter where I keep tropical plants, it's inexpensive, durable and it really works quite well (plus I already had some). I used industrial Velcro and it's already pulling the vinyl off the frame :(. There's not enough space for a sliding latch. So, I plan to use a sort of jewelry box latch that you would insert a lock into, but without using a lock. If I find cooling trays that will fit that would be a nice idea, but for now the fan is working perfectly to circulate the air. There's a 1" gap in front of and behind the trays, and 3/4" gap on both sides.
It is big as every couple weeks I sell sourdough bread at a small local farmers market. Not commercial, but Texas Cottage Food law.
that looks nice...the shelves would be handy.
I did the cheapest version possible, so not as elegant, but it works really well:
Very nice setup! easy to put together and take apart and put away. :) I tried something similar using an underbed plastic storage container with a heating pad inside. It was tall enough to hold a few baskets and a couple loaf pans without the dough hitting the top, but too small for the number of breads I make. And the heating pad worked surprisingly well.
What did you use as your heating source at the bottom? I can see it but can't tell what it is.
It is a shop/mechanics light with a conventional light bulb in it...
like this one (but mine is a bit cheaper and less heavy-duty):
http://www.sears.com/craftsman-100-watt-work-light-with-metal-bulb/p-03483022000P?plpSellerId=Sears&prdNo=15&blockNo=15&blockType=G15
Thanks so much I really love your idea and totally plan on stealing it!... ---- I hope you don't mind❗
I cannot tell what the small white thing is outside the box. It almost looks like a dimmer swith, but your light does not appear to be plugged into it. Is it a thermostat of some sort?
in thw garage and the garage is already full of stuff I can't ever find:-) Nicely done!
Very nice. Love the room inside and your 'selves'. I made my own too several years ago using a reptile terrarium, reptile cage thermostat and ceramic heat lamp plus a discarded computer fan for circulation. An old piece of plexiglass fit nicely on the side with a bit of silicone paste. Works like a charm and is easy to maintain. Just have to wash the front window every once in awhile.
Thanks for posting your idea.
Janet
OK so I know its probably a stupid question, but why the need for a proofing box, whats wrong with a tea towel over the banneton left on the kitchen table?
The proofing box was originally going to be more for winter. Especially when my house temperature is going to be much cooler and it will take my sourdough much longer to proof, longer than I want it to. Since I bake several loaves for a small local market the oven can't hold it all. Even if the room temperature is perfect, I can still proof everything in the box and not have baskets and loaves spread out all over the dining room table and counter top :) So for me with or without the heat turned on it allows for a relatively small area to put 20 or so loaves of bread to be proofed at room temperature. :)
I would love to know More how you do that? What kind of loaves do you bake? Not clear on your proofing box? How do you make it? How do you bake so many loaves in one day? What to do when the weather heats up? I hope you are willing to share! Thank you so much!
There are two main benefits to a proofing box - consistency, and sometimes time. If you put a temperature controller on your proofing box, you are always dealing with the same temperature in the proofing box, so if you leave your dough in for two hours, you will get the same amount of rise every time. If you just put a tea towel over a banneton, your kitchen might be anywhere from the 60's to 80 F - so if you leave you dough in the banneton when it is 80 F for 2 hours it may be well overproofed, while if you do the exact same thing on a cool summer day, it will be underproofed. While most suggest you watch the dough not the time to determine when it is proofed, it is nice to have the exact same temp, so you don't have to check it as much. The second potential advantage is speed - if you set your proofing box at 80 F, you dough will rise much faster than if it is sitting in a banneton at 65F . I have heard that the rate of activity of yeast doubles for every 18 F ( 10 C ) rise in temperature, so the time saving can be considerable.You would not need a temperature controller for this, just a way to be sure that the temp stays somewhere close to 80. Other options are putting the dough in the oven with the light on, or in a microwave oven with a cup of boiling water ( but not turning on the oven ).
For those who only bake 1 or 2 loaves at a time and don't have the space or desire to use a proofing box, your stove is very well insulated and will remain warm for a long time when heated on low for only a minute. Some people will add a pot of hot water to their oven, or turn the oven light on, both of which do very nicely for warming the environment. If the microwave is a suitable temp, I find proofing in there a nice way to keep my counters clear.
i heat my stove for just a couple of minutes with the door open, then put a pan of boiling water in just before placing dough in. I place an instant read thermometer on a sheet pan inside to make sure it's not too hot when I place the dough in. Then leave the thermometer there so I can monitor the temperature.
Those are really great points. Consistency is important. I tested the box for 16 hours and it stayed at 80 degrees. But you’re right that temperature may cause my sourdough to proof too fast. And while room temperature right now is perfect, as winter draws closer it will take much longer for the sourdough to proof as the house becomes cooler. I did research thermostats and a seed mat thermostat looks like a good option. It has a temp range of 68 to 108 and is relatively inexpensive. Herp thermostats for reptiles would be another option. So I may have to go that route to keep the temperature consistent and a bit cooler inside the box. Do you know if that rate of yeast activity also applies to wild yeast?
I have always used my oven for a proofing box when baking a few items, and even for my cheese that needs to sit in a warm place for 18 hours. I simply turn the oven light on and it warms the oven enough and then turn the light off.
had a thermostat set up that had a temperature range of 75 degrees
had a thermostat set up that had a temperature range of 75 degrees
That had a thermostat set up with temperature range starting at 75 degrees
Do you plan on adding a humidifier?
Thank you. I don't know that it will need one. I guess if it did I could microwave water in a cup and place it inside or use damp towels to cover the baskets.
But I mostly make pan bread, and I want soft crust, so I oil the outside of the dough, this helps to keep the dough and later bread from sticking to the pan, but it also keeps the crust from drying. Anyway, I believe you can build a simple humidifier with an aquarium air pump ducted or plumbed to pump the air inside the proofing box so that it bubbles recirculated air through water in a bottle. You'd probably want a digital controller for it as well, or at the very least, a humidity meter.
With some breads, like sandwich loaves, I'll lightly oil a small piece of plastic wrap and place it on the top. It keeps it from forming a skin, and allows the bread to expand.
Sorry.
So the box is dumb, no temperature control, right?
Hahaha, not dumb for me. At this time I don't see a need for temp control. The foil bubble insulation, the small light and the fan keep the whole box at 80 degrees, no fluctuations for 24 hours, which is way longer than I need it to keep a steady temperature.
A proofing thermostat is a great investment. I use one that brewers use. It has a probe which pokes right into the dough and allows very tight regulation of the temperature.
My proofing setup consists of a heat lamp positioned above my mixer bowl. I mix the dough and proof it right there in the mixer bowl. Works great!
Very nice, I was also told you could put a tray of water and set your oven to warm.
My oven temp on warm is about 180 degrees, so definitely too hot. Just keeping the oven light on, however, has always worked in the past. The heat from the lightbulb in the enclosed oven keeps it between 80-90, at least in my oven it does.
I love this box. I haven't made any changes to it or bothered with a thermostat. It just holds the same temperature of 80 degrees all day, I bake sandwich loaves in cast iron loaf pans and the bottom easily holds 8 pans for proofing the top two shelves will hold 4 bannetons each or my homemade baking couche for 5 batards or six baguettes. With the light off or on it's great for autolysing my doughs.
I built this proving box many years ago. I wanted a folding box that could be stored in the garage and then brought into the kitchen and assembled within two minutes.
It comprises four sides and a lid. The sides sit on the worktop/counter. They consist of two centrally hinged panel pairs with magnetic catches at the edges to quickly join the panel pairs together.
Each panel is made of 4mm ply inner and outer leaves with softwood separator battens and 12mm expanded polystyrene/styrofoam insulation in the cavity.
Inside the box is a 12mm ply platform on legs. The proving dough containers (bulk or final) sit on this platform. Underneath there is a cartridge heater in an aluminium heatsink and a fan.
Temperature is controlled by a simple external on/off temperature controller with a thermistor probe. You can easily adjust the temperature setpoint to whatever you need.
The fan runs on slow speed all the time except when the heater is on, when it runs at fast.
Lance
Very nice.
I thought everyone was ignoring it!
Lance
Love the fold up idea -genius!
Then suddenly I got an idea when I saw a defunct old stainless steel microwave at the local e-waste dump.
That costed me some convincing at the staff there and ended up at zero $$$.
Then I order from Amazon a “Nashone elctrical thermostat” for $34. Took an old electrical cord. Used the old light socket from the microwave with an 40W appliances bulb (can be bought everywhere for a few dollars.
Took my power drill with an metal hole saw with 2 7/8” and 7/8” and drilled 2 holes in the back and on the side of the interior of the MW. Connected the parts and the proofing box was completed.
The whole costed me not more than $50 (Canadian). And I thing the proofing box looks very slick (see pictures).
Now I can set the temp at the thermostat at 85oF (or any desired temperature) and the light will warm up the box at the given temperature. The thermostat controls light bulb. An external timer helps me to control the length of the proofing process.
Hope you enjoy the idea.
oops the pictures are not in sequence
I missed some of the pictures of my previous post...
Image

Image

Image

I believe that I can use THIS as a dough proofer, as long as it is set to about 80 degrees! But dough usually rises fast in my kitchen!!
Droble, nice work. BTW, in the states, normally if a microwave has a stainless interior, it was sold as a convection - microwave , meaning it also cooked using convection , and often was better insulated than the standard microwave. Either way, the stainless interior is a nice touch.
II have wanted one of those, for a long time! The other thing on my bucket list, is a dough trough. I am on my way to having both...maybe. I have a 24”x24” butcher block island, that is just the right height for kneading/stretching & folding. I just talked my husband into helping me “bowl” out the top, to turn it into a dough trough. Of course, we’ll have to build up the sides a bit, so it’s deep enough, but we have some nicely cured olive wood from our tree for that, so it should work out well. The other modification I want to make, is to turn the underneath space into a proofing cabinet. I love your pictures & the features you included. It inspires me to move forward with mine. Thanks!
dear Debdp
Greetings from Birmingham England
I saw your proofing box and want to ask if I can build one from your plan.
this box is intended for a small bakery I am setting up in an impoverished area in Johannesburg South Africa, the need to create food security with the community is great and needed
There is a person with DIY skills that can build it once we have the dimensions and material options.
The bakery itself, is being planned, will use a rocket fired barrel oven and it is been built as of now.
I wanted it to be completely off-grid but will rely on electricity for warm water and prooving which is a pity.
I ink the box will have a dual purpose, to sore ingredients when it is not used as a prover
Would you be happy to supply me with a detailed plan and list of materials. .
I am happy to pay for it if need be.
It is going into a project which I think will be a success and a great resource once it opens in Mid April,
Thank you I hope you can help
Good bye
Albert smith
Albert, while you are waiting for a response, I can jump in. You need a heat source and a control. Debdp used a light bulb as a heat source. Another option would be a heating pad , either a standard plug in one that does not have an auto shutoff, or one made for terrariums like this mat Then you need a controller. controller This is the whole package with a range of 68 F to 108F controller and heat pad The wattage of the pad will impact how large a volume of a proofer you can keep at a set temp . More wattage equals more heat. The wattage, however, must be less than the wattage rating of the controller.
I'm placing this here to avoid another proofing box thread.
I'm a casual baker, but an committed tinkerer, so building an inexpensive proofing box was a nice challenge. I started with items on hand: Some plywood scraps, a nice Coleman 36 Gallon cooler, various wire, and a 12v DC adapter from God knows what long-since discarded device. To this I added (all from Amazon) a $13 temperature controller with Hysteresis capability, a 100W Ceramic infrared heat lamp, and a ceramic lamp base. The results in these photos:
The total cost was just over $30, and it works very well. The "Hysteresis" function proved very useful, especially since the ceramic heating element stays hot a while after it turns off. The controller allows you to set a desired temperature, where the device will turn off, and an offset which is the difference below the desired temperature at which the device turns on. Because the ceramic element stays hot, the proofer will continue to heat after the power is cut off, so I found that setting the hysteresis (offset) temperature to .5C works well. With that setting the proofer will overshoot the set temp by about 1.5 degrees C before it starts to cool, so the overall variating is about 2 degrees. Incidentally, I keep the fan going constantly - it's a very gentle flow of air. The proofer heats up quite rapidly. From a standing start at about 68F it takes about 4 minutes to bring it to 82F.
I like the look of the ceramic heater. Ideally I guess you want the fan and heater underneath the main chamber (hot air rises), but the fan probably means it's not too important.
Lance