Woman does not live by rye or barley alone.
So this woman decided to follow suit, when she saw that a lot of other bloggers on The Fresh Loaf were having fun with bagels. I have a formula for Montreal-style bagels from my instructor at baking school. He got it, scribbled in pencil on a brown paper bag, from bakers at the St. Viateur Bagel Bakery where they've been supplying bagel lovers since 1957.
First, I had to scale back the formula. St. Viateur makes almost 10,000 bagels a day at its main location, so the original formula is a big one. It uses 40 kilos of flour, which they make several times a day. At school, we cut that back to 5 kilos. I thought I might manage with 1 kilo at home, which would produce just a baker's dozen. Even so, my poor Kitchen Aid mixer was straining. I quickly moved to hand kneading after the dough came together.
I'll publish the recipe below. There are two significant differences from others I've seen. Firstly, no salt. That always surprises people. I never know how to answer. Either the baker forgot to write it down, or it's what makes this particular bagel extra chewy and delicious. I don't miss it -- not a bit. Secondly, no proofing. At all. You can even skip bulk fermentation, if you let the bagels rest in the fridge overnight after shaping. Or production can be a continuous process after bulk fermentation where you go directly to dividing, shaping, boiling and baking. Then eating. :)
Here's the dough after 8 minutes of kneading:
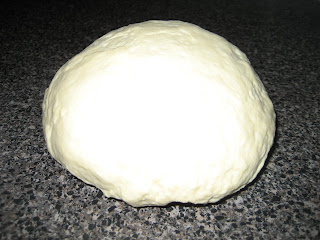
You can see the stiffness characteristic of bagel dough. I flattened the ball to a circle about 2" high and used my bench scraper to divide it into 4 oz. wedges. These, I rolled into strips much as Jeffrey Hamelman describes in Bread. As you handle the dough, it becomes smoother and more pliable.
I hadn't made these in over two years, but it was coming back to me. (Don't stack them like that...argh, they'll stick together. Oh yeah, keep a spray bottle handy to mist them or remember to cover with plastic while I process the rest. Wait a minute, no dusting flour...best worked on a damp surface!) The stream of consciousness continued, as I talked myself through the vague memories that my hands recalled better than my brain.

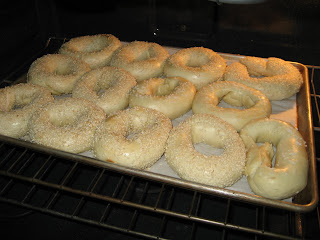
Then came the boiling and seeding. We never worried about colouring the water much. A handful of brown sugar or some malt syrup if it was handy -- just enough to help gelatinize the starch on the surface in a tasty way, making the bagels smooth and shiny. The dough already has sweetness from malt extract. Today, I used about 2 T of brown sugar in the boiling water. I love sesame seeds, so I used them for most of the bagels and coarse salt for the rest.

Here's what they looked like at half-time on my baker's half sheet pan in the oven. #13 of the baker's dozen got squished. That's okay. I found they needed extra time to brown properly. So near the end, I divided them between two smaller sheet pans without parchment and jacked the heat back up for about three minutes. Did the trick.
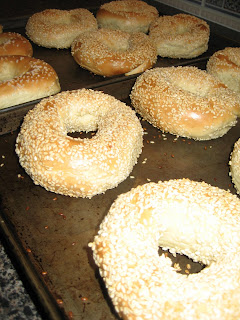
Who's got the cream cheese?

Montreal Style Bagels
1 kilo bread flour (about 8 cups)
2 grams instant yeast (2/3 tsp)
40 grams sugar (3 tbsp + 1/2 tsp)
9 grams malt (4 1/2 tsp)
50 grams egg (1 large)
463 grams water (scant 2 cups)
2 1/2 tsp vegetable oil
Scale or measure out all ingredients. Blend dry ingredients together in mixing bowl. Add wet ingredients and mix until dough starts to come together. If using a stand mixer, change to hand kneading at this point rather than strain the motor of your machine. Continue kneading until developed fully. At this point, you have some choices. The instructions that follow are for continuous processing. If you want to incorporate overnight retardation, see my two replies to Michael below.
Cover the dough and give it about 45 minutes rest on your counter, aka a period of bulk fermentation. When the time is nearly up, put a large pot such as a Dutch oven full of water on to boil and throw in 2 T brown sugar or some barley malt syrup. (Honey or maple syrup are fine, too.) Divide the dough into 13 units of about 113 grams (4 oz) each. Roll into strips and shape as bagels. There is no need to proof the bagels once shaped, but keep covered and/or mist so they don't dry out. Place on a sheet pan beside the pot of water. Process 6 or 7 at a time, however many will comfortably fit in your pan, moving them around in the water periodically for a minute or so. When ready, they float. Remove back to the sheet pan, and put the next batch on to boil.
While still damp, dip the boiled bagels in your preferred topping and place on a second baking sheet which has been lined with parchment and sprinkled with cornmeal. (If you have a hearth-style oven, the bagels may be placed on a peel or other loading device sprinkled with cornmeal and transferred to the oven to bake directly on the hearth. The technique with a wood-fired, brick oven is different again, one with which I'm not familiar.)
Bake out completely until a nice, golden brown, about 20 minutes at 460F. Reduce the temperature after the first 10 minutes, if your bagels are getting too dark. As mentioned above, I had all 13 bagels on a baker's half sheet, roughly 17" x 12", and they weren't quite baked through where they touched. I transferred them to two smaller sheet pans without parchment and gave them an additional 3 minutes. There was a lovely smell and a small bit of smoke when I opened the oven door. The bagels were perfect!
- apprentice's Blog
- Log in or register to post comments
Decided to add the recipe to the original blog entry on Montreal style bagels. Silly to have put it in as a comment, sorry!
just so I'm clear, these bagels have no retarding period whatsoever?? it doesn't sound like this recipe would yield much depth of flavor at all...thanks for sharing though :)
Retardation could be added to the process. Why not? In commercial baking, retardation is routinely used to tweak a production schedule. If you also get more depth of flavour from retarding the dough, I say go for it! My textbook says that bagel dough can be:
With the high turnover at St. Viateur (bagels, not staff), their production is by continuous process. But there's no proofing, once the dough is made up. Like I said, significant differences. They must be doing something right. People make pilgrimages from all over the world to the shop on St. Viateur in Montreal. They have four bakeries, two cafes and ship throughout North America.
A Montreal-style bagel might not be your thing, Michael. But since you've been putting a fair bit of time and energy into making great bagels, why not risk a little flour?
For anyone interested, here's a link to the celebrated Montreal landmark: http://www.stviateurbagel.com/main/
Thank you so much for posting this recipe! I miss Montreal bagels so much. Now I just need to find some malt and get going....
Leah
Michael's request for clarification led me to further research. For one thing, I looked at the videos on the St. Viateur website. It's clear from the images there that the dough has had a bench rest! It looks all spongy and full of bubbles. (On viewing the video, I remembered seeing that in person, too. My daughter and her family live in Montreal.)
Meanwhile, I emailed my former instructor/head of the baking program at Vancouver Island University and just had a reply. Seems the reason we skipped the bench time was to facilitate dividing 8 lb. "heads" (hunks of bagel dough) in a machine called a bun divider/rounder. The dough got its rest instead after shaping, during an overnight retardation. He reminded me that after taking them out of the retarder, I should let them come to room temperature before boiling.
Have amended the recipe in my blog entry for future readers who might not bother to look through the whole thread. Thanks for seeking clarification, Michael. Look forward to hearing your results, if you try the formula.
All that being said, the bagels I made Monday (even without bench rest after the mix or retardation after makeup) are light years better than anything I can buy!
I've actually read a post here from an individual from St. Viateur, who advises not to let the bagels proof after shaping. I think you lose the density of the bagel by proofing.
I've also had a lot of success from taking shaped bagels straight from the fridge, and right into the water and oven. :)
Besides no proofing, I am also surprised by the amount of yeast used in this recipe. It's only 0.2% in Baker's percentage.
Yep, but don't forget that the normal range of 0.5 - 5% yeast in yeast-raised doughs applies to fresh yeast. When you use instant, you need much less. Most formulas suggest a 1:3 ratio when replacing fresh with instant dry.
Even so, I take your point. This style bagel uses less yeast than most -- with fresh yeast, 0.625%. The original formula calls for fresh yeast, 250 grams for 40 kilos of flour.
Remember, there’s no salt, so less yeast is needed
Loonie, I finally got round to making another batch of bagels yesterday. I used the bulk fermentation method instead of retardation this time so I could try and duplicate what you're doing. No stickiness to my dough, so I'm mystified as to why that's still happening for you.
Do you weigh out your ingredients and keep pretty close to the recipe proportions? I'm wondering if it's the flour you're able to get in Belgium. Is it bread flour made from hard wheat with about 13% protein? Does your bag give an ingredient list? Subbing a bit of extra flour for the malt flour you've been unable to find should not contribute to a stickiness problem -- only a slight difference in flavour and crust colour.
I was moderately pleased with this latest batch in other respects, but I think the flavour and texture are better with overnight retardation. The change I notice may also be due to the fact that I scaled the recipe down by a factor of 90% to get a dozen instead of 13 bagels but still used one whole egg. Who knows? Just to be sure, I'll stick to the baker's dozen version of my formula in the future.
I made these bagels last week. They were the best. We didn't miss the salt. But I will try them again and add a little salt to see if it affects the texture. These bagels stayed chewy and didn't toughen up. One question: I have found Malt Powder (looks like a mix of flour and the hull of the wheat) in a local farmer's market Indian section (which I used in this recipe), is it the same as Malt Flour? The package doesn't say whether it is diastatic or non-diastatic. Great recipe. Thanks!
Just a note: I made these bagels again and added two (2) tsps. sea salt to the dough. The salt only made these bagels most delicious. I don't find that it changed the chewiness at all. I'll be making these for a long while. Thanks!
perhaps you're baking the bagels too close together?? maybe try to give the bagels ample space to bake.
Life got exceedingly busy for several months! Sorry not to visit and try to answer your questions. Popped in today because I'm just back from a trip to Montreal. Visited the main location of the St. Viateur bagel operation again and settled some things I wondered about.
On the salt issue, they confirmed that they use none whatsoever in their particular recipe. On how many times they let the dough rise, just once for 45 minutes right after the mix. Actually, it's more of a bench rest aka bulk fermentation time than yeast dough's traditional rise to double in volume. (My baking instructor retarded the formed bagels overnight in the fridge instead to fit in with other production demands, which also works and some say yields more flavour.)
Re: what form of malt to use, it's the non-diastatic powder. Malt flour is sometimes used as a synonym for non-diastatic malt powder aka extract in the baking industry, but I hesitate to comment definitively on what any particular manufacturer calls his/her product. You'd have to check with the source.
The person asking about yeast, don't apologize for asking elementary questions. Those are usually the most important ones in baking. There are 3 main types of yeast available to the baker today: fresh compressed yeast in cakes or blocks, active dry, and instant aka bread machine. They're listed in order of historic development. Each works best within a specific temperature range for optimal results.
Converting a recipe from one type of yeast to the other, depending on which type you have/prefer, is easy enough. Active dry is not popular with professional bakers for a number of reasons, but many home bakers swear by it. One important thing to know about active dry is that it must be rehydrated before use. That is, dissolved in four times its weight in very warm water (105-115F). Use about half as much active dry as you would fresh compressed.
The rivalry between lovers of Fairmount and St. Viateur bagels is longstanding. I actually like another Montreal bagel better than both of them. If you get a chance on your next trip to Montreal, Deb, visit Beaubien Bagels on the street of the same name near the intersection with Rue St. Hubert (just a few blocks from the Jean Talon market).
If you revisit this thread, Loonie, the question about yeast has me wondering if active dry was the cause of your stickiness problem. You didn't say if you used something other than instant. One of the reasons active dry is not popular with professional bakers is that it contains a lot of dead yeast cells which release a substance detrimental to gluten quality. This tends to produce a sticky product unless handled carefully. There's really no upside to using active dry, imo, but to each his own.
Thanks so much for the recipe. I made them (using the 460 ml figure for water, rather than 434 grams; that has to be an error) and after a bad experience shaping with the rolling method they turned out wonderfully. Next time, though, I won't bother with overnight refrigeration, I'll just wake up a little earlier on Sunday morning. I blogged about it too.
Jeremy
Apologies to anyone who soldiered on trying to use the previously published amount of water in this bagel recipe. I double-checked the original formula and saw my mistake in scaling down from the bakery-sized version. The water was in kilos, not liters like the liquid eggs on the previous line! Then I compounded the error by converting the supposed ml amount to grams.
The correction has been made. I also added volume measurements to the recipe. That was actually what brought me back to the blog entry -- to add those for a family member who wants to make them and works in volume rather than weights. Many thanks, Jeremy, for noticing my mistake!! Glad you trusted your judgment and added more water.
...Started to ask a question, but noticed it was answered further down. I guess there's no way to delete/remove a reply? Only edit it? Hmmmm.....
thx for sharing this recipe.
Made these tonight, turned out well. I went 1hr for rise, but 45min probably would be enough. The rise was visible, but I wouldn't even say it rose 25%. Didn't matter; they have a slightly more open texture than those fermented overnight anyway.
I've never had a Montreal bagel before, so I have no frame of reference. That said, compared to all the bagels I've had over the years, the flavor was creamy, almost custardy (probably because of the egg), with a hint of sugary sweetness. The no-salt aspect I think enhances the sweetness & custardiness. With some salted butter, it kind of balances out nicely.
Browning was good and not as deep as some overnight fermented bagels I've been making, a little spotty, despite that they had a nice shine.
I think next time I will add a little bit of salt, perhaps dial sugar back. Not sure if I find this a keeper yet, probably because I prefer savory bagels, and my NY bagel recipes fit that profile.
Thanks for sharing the recipe! I found it worked quite well. I did 2min mix, 20 min autolyse, 7min at KA speed #3, 1hr rise, shape in 120g portions, boil for 10sec per side in malt syrup water, then immediately 460F bake for 19 min. Would share photos but too lazy :)
Hey Apprentice:
Thanks for this recipe. I am anxious to try it, but curious about the very short ferment and proof times, I suppose because I have been doing all sourdough and pre-ferments over the past 2 years. Still I have had St. Viateur and Fairmount bagels and love them both, so as you say, they must be doing something right.
To my point:
1 ml of water at 4° C = 1 gram
500 ml of water at 23° C = 499.1 grams
The metric system has a simple one-to-one ratio for grams to milliliters that accurate enough for most water temperatures. I am confused by your volume/mass conversion. Do you typically weigh your water, or measure it volumetrically? This might have contributed to Loonie's stickiness issue.
Anyway, I am not trying to split hairs, but if you have any guidance, I would appreciate it. Thanks.
Happy to help. Just hope I don't confuse you further. This was a large-scale formula given to me in weights during my training as a professional baker. I avoid working in volume measures like the plague, and my personal preference is the metric system over pounds and ounces. I weigh everything out in grams or kilos, including liquids. So originally, I scaled the formula down in grams for baking a small batch at home and shared the results on this site. Figured out the volume amounts for a relative who wanted to make bagels. He's a fabulous home baker, but only works in volume. Thought I might as well add those numbers to the post.
The conversion is based on values I trust because they come from one of the most exacting bakers on the planet: Rose Levy Beranbaum of The Cake Bible fame (and many other books). Her chart, page 440 in that book, gives the weight of one cup of water as 8.337 oz. or 236 grams. If you have an accurate kitchen scale, try measuring 250 ml. of water, and you'll be able to check her chart value for yourself. I can promise you that it won't weigh 250 grams!
Given that context, you'll understand that the most accurate measurement in my formula is the mass: 463 grams. Using Rose's value (463 divided by 236), you need 1.9618644 cups of water. I rounded that off to 2 cups or 500 ml. You're absolutely right. Doing that resulted in a tiny bit of extra water: 9 grams to be exact which is about 1.8 tsp.
Would 9 grams make a difference? If you were to scale the recipe back up significantly using my volume measure of 500 ml for the water, you'd compound my error. But someone wanting to make a bakery-sized version would probably use the figures I gave in weights, establish bakers' percentage values, figure out a conversion factor, and go from there.
The notion that you can use a simple 1:1 ratio in converting grams to ml. for water is only an approximation. It works for most recipes. Don't try it on anything where a small amount of water can make or break the results. For accuracy, there is no substitute for weighing your ingredients as Rose has done. I recommend her chart to you without reservation.
I'm not sure if this is the sort of guidance you were seeking. What I would say is to try the recipe and see what you think. Hold back a couple of teaspoons of water if you like. Do let me know how you get on.
Hi Apprentice!
Thanks for your very prompt and thorough response. My big question was whether you were using the volume or the weight, and I appreciate your answer. I will use 463 grams of water and see how that goes.
With respect to the equivalencies of grams and mls of water, however, this is the part of the thread where I peel off my mask to reveal that I am not a cute and cuddly novice artisan baker, but a hideous PhD scientist! (insert evil laugh here). While I can't comment on the venerable Beranbaum formula, I can speak with a reasonable degree of confidence (and pedantry) about the weight of water. Until 1964, a kilogram was actually defined as a litre of water at standard temperature and pressure, however more precise measures have emerged redefining both the gram and the meter and the units have diverged slightly.
So 1 ml water = 0.9982 gram water at 20° and standard pressure, but we can probably safely round to 1 gram, given most scales will have precision much smaller than 2 micrograms. If the recipe were scaled up by 1000, I certainly agree that there would be a vast difference between 463 kilograms of water and 500 kilograms of water, but there would be less than 1% difference between 500 kilograms and 500 litres of water, and given the nature of baking, this difference would be negligible.
My problem is most likely that in the recipe states:
"463 grams water (2 cups or 500 ml)"
So 463 grams of water might easily be 2 cups, but by definition, it can't be 500 ml. The problem is in the equivalence between 2 cups = 500 ml, and while this is roughly correct, they are different. In fact 8 oz = 236.588 ml, which as Rose points out, is 236 (ish) grams when it comes to water. Because I am a metric guy, I just read 500 mls and was trying to figure out whether you were using weight or volume. If anyone has a 250 ml measuring cup that gives less than 250 grams (give or take 2 grams) when filled with water, there is problem with the cup or the scale.
For the kids reading at home this whole gram/milliliter thing only works with water.
Apprentice, you have been very kind in sharing this recipe and giving a thoughtful response, and this is my first engagement on the Fresh Loaf. I know I have much to learn from you and everybody here, and don't want to come off as a know-it-all. But I was confused by the water amount, which led to my question, and now my punctilious response.
I will try the bagels in a couple of days and let you know how it turns out with 463 grams of water, at 173 meters above sea level, and a room temperature of 20° C. ;)
cheers,
b
Since "metric" cups are often defined as 250ml, that might be the rationale behind the "2 cups or 500ml" note. For most cooks and bakers, that isn't quite as helpful as it was perhaps intended to be since, as you note, the divergence between the stated weight and the stated volume get worse and worse as recipes are scaled up.
Paul
I haven't been able to contribute much to the site in the last four years or so. Too busy as a caregiver, then executor for my mother when she died and after that, figuring out what was next, whether I would re-locate, etc. But you can bet that any time I needed to research something to do with bread making, the Fresh Loaf community was and remains my first port of call. Coincidentally, I'm on a learning curve with spelt at the moment and was "lurking" a lot when glortman posted his/her questions and comments.
You're quite right that I was trying to be helpful when I posted the 500 ml figure. I reckoned that anybody who's working in volume measures is probably not in the market for a formula to scale up to bakery production levels . And chances are they might have the same Pyrex cup that's in my cupboard with the 250 ml and one-cup marks at exactly the same height on opposite sides (= 236 grams). Or they might have one like my two-cup Pyrex, which is more accurate. Since the days I said, "Yes, chef." and "No, chef" to my instructor about everything, including the weights vs. volume issue, I've never looked back. He was right. Using cups and tsp. is just asking for trouble -- especially when you want to scale up, as all three of us have noted in this thread. Or when you try, as I did, to convert a weight-based formula to volume measures.
Fortunately, the difference is not usually critical in a small-scale bread recipe. And there's room for every kind baker in this wonderful community, which is exactly why I posted the figures for volume-based bakers. I always admired RLB enormously for her dedication to serving North American bakers in that way despite the difficulties and frustrations; Hamelman, too, with the bracketed numbers in his "Home" column in Bread: A Baker's Book of Techniques and Recipes. In my opinion, we owe them a great deal.
See you around! Look forward to catching up with your bread experiments and those of others I remember, not to mention the new people who are doing some really amazing and inspiring work. Cheers.
Hey again, b.
Great! I see I can be a little more forthright. But please don't rule yourself out from the "cute and cuddly" category just because you're a scientist. It's hard sometimes to walk the line as a pro baker between too much and too little info when you want to be helpful. It wasn't clear to me that you mainly wanted to know whether I was using the weight figures or the volume amounts given in brackets.
So yes, I know that 236 grams for a cup of water is an -ish figure. Rose does, too. When building her conversion chart about 30 years ago, she used the kind of scale you'd be very familiar with, accurate to much less than a gram. How much less, I can't quite recall.
I understand hers was one of the first North American cookbooks to use ounces & grams as well as cups for the home baker. But she knew she'd have to be respectful as well as helpful if she wanted to make the case, which she did, that volume-based baking is inherently rife with accuracy problems. And way harder than scaling ingredients right into the mixing bowl. Precise and nearly effortless: It doesn't get better than that for baking!
The other thing she knew is that many people would resist change and continue to use the "standard" cups and measuring spoons available to them, which vary quite a lot in how much they hold. So by definition -- not even taking into account HOW people measure, e.g., sifting, lightly spooning or dip and sweep method for flour -- any conversion between volume-based amounts and imperial or metric is going to be an -ish proposition. My home scale is only accurate to 1 gram. So over the years, I've come to rely on her chart if I'm forced against my better judgment to bake from a volume-based recipe, or when I have to cost an ingredient that is sold in ml. However, there are some food items not on her chart, and then I have to get out my trusty scale and measure them for myself.
We're talking water, though, which is somewhat simpler. I also wanted to be respectful and helpful for my relative and the bakers at this site who use volume measures. I was trying to get them as close as possible to 463 grams of water, so I gave them options. I should have said 2 cups and left it at that.
Bottom line, I stand corrected. Two US cups = 473.176474 ml. water, close enough for this formula. I'll delete the reference to 500 ml, which I added without thinking since many people use 1 cup = 250 ml. That only applies if the baker and the recipe both happen to be using a metric cup. I appreciate your bringing the error and possible source of confusion for others to my attention.
Bake on! And welcome to the Fresh Loaf community.
Hi Apprentice:
Thanks again for the time you took to answer, and thanks Paul for the assist. I like weight-based baking because of the precision, but support Rose's (and your) idea of supplying people with units they will actually use.
I look forward to participating in the community!
Hello apprentice,
I wanted to say thank you for the great recipe! I currently live in Ontario but have never been to Montreal to try their famous bagels (we are planning a trip later this year!) and was very excited to try your recipe.
For the past few years I have had a huge interest in sourdough leavened breads and so I actually just made your recipe but using my own sourdough starter instead of yeast. The results were fantastic! The bagels came out beautiful and are very soft inside like other commenters noted, with just a tiny hint of sourdough flavour.
I thought I would share my process if anyone else is interested in omitting the instant yeast and using a sourdough starter instead. I simply omitted the instant yeast and instead added 300g of 100% hydration sourdough starter levain prepared the night before. I then followed the recipe as listed but omitted 150g each of water and flour to account for the starter. The only other significant change is that instead of a 45 min rest, I gave the dough a 3-4 hour rise after kneading during which it increased in volume maybe 20%. The dough did come out a bit sticky after the 3 hour rise and I had trouble shaping using a water spray bottle so I ended up using a fine dusting of flour to combat the stickiness which worked just fine.
Also in case anyone is interested I did not have malt flour on hand and instead replaced the malt and sugar in the recipe with malt syrup. I read a few other bagel recipes that called for malt syrup and so I believe this is an ok substitution. I'm not sure if this is related to the dough's stickiness or not...
All in all this recipe is a gem. I can't believe how well these bagels turned out! They are perfect, chewy, soft, and golden. It's a wonderful recipe and thank you so much for sharing!!
What a delight to get your message this morning and hear about your experiments with the recipe. Well done! Your tweaks sound right on to me for converting to sourdough and also for using the malt syrup substitution. Thanks for letting me know and for sharing with the Fresh Loaf community.
Enjoy Montreal. Be sure to check out advice ahead of time for good bakeries to visit if you have time to fit them in your schedule. You'll be spoiled for choice! One of my favourites is Boulangerie Guillaume on Fairmont just around the corner from St. Laurent. Trip Advisor shows it in the Plateau district, but I think locals call that area Mile End.
Perfect timing. I wanted to try sourdough Mtl bagels this weekend. Thank you :)
Thanks so much for posting this, apprentice! I wanted to make my own Montreal-style bagels and I knew this was the recipe to follow because it was the only one I've seen that matches the ingredients in the packaged St-Viateur bagels sold in supermarkets in Montreal, most notably the malt flour and the lack of salt.
I made the recipe with the following variations:
The recipe was very easy to follow. The dough was difficult to knead (my first time making bagels so I didn't know what to expect) but because it was so tough the bagels were very easy to work with after forming: they held their shape well and didn't stick to pans or each other.
The final result was great! As in the photos in the original post, they came out puffier than the real thing, but the inner texture was good:
and the taste was about right.
After baking the bagels weighed about 90g each, still substantially more than the ones in the sleeve (75g each).
Next time:
So glad you had some fun with the recipe, Hundt, and your results are great. Good to know that a vegan "egg" works. Boiling the bagels longer seems a bit drastic to me, but you could certainly try it with a few to see what happens. I assume you're wanting to make them denser/less puffy? You might also try to ensure that you're taking them very quickly through the production process, i.e. a short bulk ferment (or the overnight retardation), into the boiling water, seeds and preheated oven. Refrigerate the bagels, once shaped, if anything happens to hold things up for some reason. You don't want to proof these babies at all!
Bottom line for me is remembering that they can only be Montreal style - not the real thing. Great idea you had to try the pizza stone - a step in the right direction. But you'd need a wood-fired oven to get super close to the taste & texture that have made these bagels so famous and well-loved. Another tip is to use a strong baker's flour, i.e., high protein. My memory may be playing tricks on me, but I think I saw 20k bags of Robin Hood's Keynote 39 flour in photos online taken at the St. Viateur bakery. That's a flour sold in Canada, specifically recommended for pizza & bagels. If you're in the US, you'd probably find that King Arthur has an equivalent. I just use my regular bread flour, which is Robin Hood's Keynote 45.
Very kind of you to let me know how you got on. Thanks!
Cheers, apprentice
Wow, so pleased to get a response from you!
Yes, I would like to make them a little less puffy.
I used the short bulk ferment method and regular King Arthur bread flour. (I am in the U.S.) I did take my time a little between boiling and baking. But I did three batches of baking, with all the boiling done ahead of time, and I did not notice any substantial difference between the different batches, so I'm not sure that was the issue.
I did find that the shape of the bagels was closer to what I wanted after boiling but before baking:
which was what gave me the idea of boiling longer. But perhaps it will make them too tough on the outside or otherwise hurt the end result.
Thanks again for all the advice! I'll let you know if I make any further discoveries!
Hello again! I was looking through the earlier comments for something in particular and came across this message from Westka:
"My bagels turned out wonderfully albeit with a few minor things I'd like to fix if possible. I know on the other thread Vincent from St. Viateur said it was in the wood oven otherwise they'd balloon and mine did just that. Not hugely but a few had minor 'bursts' around the inner 'equator' :) and they were a bit airier than I was expecting."
Westka asked for tips from others on how to get them less airy, but no one responded. So short of building a wood fired oven in your driveway, maybe try a little less yeast? It's already such a small amount, but maybe worth a try. You could also try skipping the bulk ferment. Or if you retard the shaped bagels overnight in the fridge, don't bother bringing them to room temp before boiling. Go straight from the fridge to boiling & seeding them. The dough will likely be warmed up enough from the shaping process not to slow the water coming back to the boil too much.
Indeed, that is exactly what happened to my bagels as the photos show! I'll see what I feel like trying in a few weeks when I run out of the ones I made!
Hello again! I was looking through the earlier comments for something in particular and came across this message from Westka:
"My bagels turned out wonderfully albeit with a few minor things I'd like to fix if possible. I know on the other thread Vincent from St. Viateur said it was in the wood oven otherwise they'd balloon and mine did just that. Not hugely but a few had minor 'bursts' around the inner 'equator' :) and they were a bit airier than I was expecting."
Westka asked for tips from others on how to get them less airy, but no one responded. So short of building a wood fired oven in your driveway, maybe try a little less yeast? It's already such a small amount, but maybe worth a try. You could also try skipping the bulk ferment. Or if you retard the shaped bagels overnight in the fridge, don't bother bringing them to room temp before boiling. Go straight from the fridge to boiling & seeding them.
Thanks for all this useful information. I'm making bagels (similar recipe but far less flour) for a local market and learning as I go. My first attempt at overnight refrigeration, for larger batches, resulted in flat bagels. I think they were over-proofed, left out on the counter too long before boiling. Will try going straight from fridge to pot next time. My question is whether it's best to proof the dough before I shape them & put in refrigerator; or just shape and put in fridge? I won't be letting them go to room temp the next morning. Ditto if I use freezer instead of fridge. All advice is appreciated. p.s. bagels tasted great nonetheless despite my mistake. Big hit!
IT, I'm not sure what you mean by "flat bagels." Montreal-style bagels don't get a full proof at any stage. They're not meant to be light, airy and puffed up like bagels from the supermarket or other traditions. If you're doing continuous processing, the dough gets a short bench rest after the mix, 45 minutes tops, before shaping, boiling, seeding and baking. That's it. You want them to be dense.
Using refrigeration to retard fermentation overnight means that your dough gets its rest in the fridge. So no bench rest is required before shaping your bagels. Mix the dough, shape it, place them on your trays, bag the trays and refrigerate them. It would be best to let the refrigerated bagels have at least a little time at room temp before boiling, seeding and baking.
Glad you're having some fun with the recipe.
Thank you for your reply. My "flat bagels" last time were super flat. I've made them before and they turned out perfect, exactly like Montreal style bagels. I then sometimes have the reverse problem - puffy and bread-like inside. All following the same recipe so I think it has something to do with the dough temperature and/or proofing. Since I'm trying to sell at the market I'd like to solve the problem, to ensure consistency of quality. I was fine doing single batches of 12 but now with a bigger batch I must find a way that's more efficient, using overnight retardation. It's a fascinating journey! How I'd love to take a workshop.
Since you were doing fine with the single batches of 12, it occurs to me to wonder whether the problem is with the method you're using to scale the recipe up for a bigger yield. Have you come across info about baker's percentage, how to resize a formula using a conversion factor, etc.? If not, get your hands on a copy of Bread: A Baker's Book of Techniques and Recipes by Jeffrey Hamelman. In his 2nd edition, the section you want starts on p. 442. So much useful info in that book for anyone who wants to achieve good results on a consistent basis. Worth buying imo, but maybe you can get a copy through your public library system. Good luck.
Thank you for your advice. Unfortunately, it remains a mystery since I made 3 single batches (doing them different ways: one batch continual process that morning, one bulk dough refrigerated overnight, and one batch shaped into bagels and refrigerated overnight) instead of one big one. Therefore, it's still my guess that since I had all three batches on the counter (at room temp or higher), waiting for their turn to boil and bake, that they became over-proofed and turned out super-flat. And as for my opposite problem, of over-inflated bagels (with the same recipe and process), my only guess can be the boiling process or over-kneading. In any case, I'll keep trying! I'll see what the book says too. My next strategy, to improve efficiency, will be to freeze them in advance and then boil and bake later. Any input on this? Mix, Rest, Shape, Freeze, and later boil (from frozen state?) and bake?
I finally got around to trying again! In the meantime I saw this article on the Montreal Gazette, in which the owner says that the bagels are boiled for three minutes. This renewed my confidence in the idea of lengthening the boil to reduce the puffiness. I also made sure not to let the bulk ferment go on for long--it was probably only half an hour before I started shaping.
Other than that it was similar to last time (used malt syrup instead of powder, and a flax "egg" instead of a real one). I made eighteen 86g bagels. My pizza stone broke, so this time I baked them on two baking sheets preheated to 500 degrees F.
This time I also have an exemplar of the real thing that someone brought me back, so that I could do a side-by-side comparison!
The final product came out much closer to what I was looking for than last time:
In the side-by-side comparison, you can see that they are very similar indeed! (Original on the left, mine on the right.)
The main differences I would say are the charred spots and the external texture: the original is sort of wrinkly whereas mine is a little shiny.
The side-by-side comparison also allowed me to compare the taste! And in fact I find the originals are noticeable better! So that will be my next challenge. They have a distinct sweet note that is very tasty in the original and lacking in mine. It could be a product of the baking method, but my guess is that it's because they use (according to the video) honey water, compared to my barley malt water. I would like to avoid honey (to keep them vegan) so my current theory on the best alternative is to try to find a sweetener with a similar sugar profile (mostly fructose and glucose, roughly 55/45 ratio). High-fructose corn syrup is almost an exact match, but that doesn't seem to be available except commercially in very great quantities (think tanker truck full). So my next best guess is invert sugar, which is 50/50. Maybe I'll try that next time!
Not sure why you wouldn't consider honey vegan. OK, maybe florian, since it is partially dehydrated nectar. Other than the organism doing the dehydrating (insect versus mammal), it's analogous to maple syrup. If you like honey, use it. If not, don't. In either case, don't make the vegan circle so small that a plant product like honey is excluded.
Good work with the bagels
Paul
Thanks, Paul!
Unfortunately, changing my wife's dietary constraints is outside the scope of this project for me.
No point in stirring up that which can be left alone.
Paul
Thanks so much for posting this! I too am an ex-Montreal and greatly miss the taste of fresh *real* bagels. These have so far come pretty close to scratching the itch!
Regarding the boiling time. Someone else posted a link above where a St Viateur baker discussed boiling the bagels for 3 minutes. I found this older video from St Viateur where the baker says they boil it for about 5 minutes: https://www.youtube.com/watch?v=E9MoLyyR088
I'll try my next few batches with different boil times, but I'm curious about your thoughts.
In baking school, we stopped asking our instructor how long to bake things. He always said, "until they're done." In other words, there's no substitute for developing and using your capacity for observation as a baker. As I said in the recipe, they float when they're ready. That might take a couple of minutes. Or 5. There are variables like how many you're trying to boil at once, whether the bagels are at room temp or fresh from overnight retardation in the fridge, whether you brought the water right up to a rolling boil, etc. Use all your senses as a baker, including common sense, and you can't go far wrong.
hello apprentice,
thanks alot for sharing this recipe. To be honest I was skeptic at first that you had the real Montreal bagel recipe. as I read more comments it made sense to me that you might in fact had the original recipe.
does the flour have to be bread flour only?
can I use olive oil instead of vegetable?
best regards
All I can tell you, bluebagel, is that the head of my baking program showed us the brown paper on which one of the St. Viateur bakers scrawled the formula. I think it was a torn-off piece of a flour bag, but don't quote me.
What I can tell you about the flour is that it should be excellent quality and fairly strong, i.e. somewhere in the range of 13% gluten. A quality bread flour milled from blends of hard spring and hard winter wheats is what we used at baking school. In Canada, all purpose flour milled from hard spring wheat comes close and will do in a pinch. It contains sufficient protein to make decent yeast breads, yet not too much for quick breads, everyday cakes and cookies. If you want to use exactly what the St. Viateur bakers use, I saw 20k bags of Robin Hood's Keynote 39 flour in one of their videos. That's a flour milled and blended especially for making pizza and bagels. And if you want to experiment with other flours, go for it!
Vegetable oil is used because it's light and adds no taste of its own. That's my preference because I like the taste and texture of a traditional bagel.
Cheers! apprentice
For years I had been using a recipe I found in the Montreal Gazette that I thought was pretty close. Lately I was having a lot of trouble with it and wanted to try a different one. I found one a few months ago that created something that looked more like boiled oatmeal than a bagel. I could barely boil them and ended up tossing the whole mess before even baking. Yesterday I decided to continue my search and came across a few recipes that alluded to being true Montreal St. Viateur style bagels but they all looked suspect in one way or another. Your recipe intrigued me more than the others simply by what I thought was a typo.... 2/3 tsp yeast in 8 cups of flour? I said this can't be right and I kept looking but that still stuck in my head. I decided to go back to this site and started reading the comments and it all began to make sense. Today I rolled up my sleeves and ventured into one of the largest recipes I have tried to date. With a little tweaking, based on my own experience and taste, I was extremely pleased with the results. Not having lived in Montreal for over 25 years (we live in Alberta now) my taste buds were very happy (although my wife claims they were a little hard on the outside).
Just a few notes on my tweaks: That previous recipe that I discarded had copious amounts of malt syrup that made the recipe inedible so I decided to replace the malt flour with 1/4 cup of honey added to the dough. I also used 1/4 honey for the boiling water. In addition, considering the various comments of the quantity of water needed, I started of by using just under 2 cups of water but ended up adding a few splashes of water (probably another 1/4 cup) as I was kneading because there was no way that I was going to get the full eight cups absorbed into the dough. Even after kneading for at least ten minutes, I estimate there was at lease 1/4 to 1/2 cup of dry flour left on the work surface. I was however pleased with resulting dough and put it aside to rest as indicated.
Knowing all this now, I adjusted the recipe to my taste (I did add a teaspoon of salt and may add a bit more next time) and labeled this as the best bagel recipe I have to date!
Thanks to you and the comments of the other readers for such a wonderful experience and recipe.
P.S. Kneading this dough was a really great upper body workout!
So happy that you had some joy and good results in working with this formula. That's exactly why I posted it in the first place.
Hi Apprentice, A big thank you for the recipe. Tracked down some Keynote flour and made a dozen +1 bagels. Finally a correct recipe that works. Although my KA mixer is not happy mixing the dough. Broke the dough into smaller chunks and it was a little better to mix then finished by hand.
Enjoy
So good of you to write. What a treat to hear from both you and KxRjsWpO today. You've got me craving them. If I weren't heading to Montreal to visit family in a couple of weeks, probably would have gone straight to the kitchen to start a batch. :) So glad you're enjoying them. And btw, smart to baby your KA mixer some with that dough. It's so dense!
So grateful to have found this forum and learning from everyone’s bagel experiences. I am a former Montrealer and want to make these beauties at home, minus the wood oven. I thought I’d try wood plank in my bbq.
On the St Viateur website, their listed ingredients are wheat flour ( that’s unbleached bread flour, right?) and malted barley flour. Has anyone tried to use the barley flour, and if so where would you find it?
I am going to try my hand at the bagels soon, but haven’t found barley malt yet. I may try molasses until then.
It's been a few years since I last posted, but the latest reply prompted me to respond and say thanks again!
I've been using your recipe (with minor tweaks) regularly for the past 2.5 years and it's been so wonderful. I've baked hundreds of them at this point and they really are fantastic. The only real difference is the tiny bit of wood smoke that I'm missing. Thanks to you I get to enjoy a big part of what I miss most about Montreal on a regular basis. I even have certain family members that make me bake them in bulk for freezing when I visit. This is literally the only thing I've ever baked and if I can do it, anyone can.
Thank you for this gift!
I can see why your family puts you to work when you come to visit. Your bagels are perfect from the exterior to the crumb, and I have no doubt, in the taste as well. As I told painterman above, you guys made me hungry, the pictures most of all! I really appreciate your taking the time to write. But mostly, I'm so delighted that the gift of this recipe, passed on through so many generations of bakers, has found another fan in you. One who does it proud. Well done!
Those bagels look perfect KxRjsWpO! What minor tweaks have you made to the recipe? Do you stick with no salt? How long do you boil them? Do you flip them over?
I tried this recipe twice. I ended up having to flip over the bagels when I used the high 460F start temperature. I also tried out a cinnamon sugar coating on a few instead of the sesame seeds. It was like a yummy desert bagel, a little tougher on the outside but still worked. I used the Montreal bagel recipe with the sourdough starter modification shared by Noonanna. I am curious to know what tweaks are working well for KxRjsWpO to incorporate in my next batch.
Thanks!
Oh my goodness, TheReligionInBread! I just saw the emails about the activity on this thread and looking back, I realized I never replied to you! I'm so sorry!
Definitely no salt! Before I found this recipe, that was always the easiest way to see if a purported "Montreal Bagel" recipe was based on any reality. Ingredients on the bag do not list salt.
My tweaks were very minor. I spent a lot of time trying to watch Youtube videos of St. Viateur to see what they were doing exactly, and I even went around weighing legit bagels to get the numbers "right". At the end of the day, I wanted as close of a facsimile to what I grew up with as possible. Size, texture, taste, etc.
Tweaks:
- from what I can tell, the bagel shops use honey baths exclusively, not malt, brown sugar or maple syrup. I tried it with malt, and it was too malty. Maple syrup was just off.
- the recipe called for 2 spoons of honey. I'm not sure if this was scaled with the rest of the recipe, but I found this to not nearly be enough. I fill up a large pot of water and will use a LOT of honey. I buy bulk honey from Costco and use that as my 'bagel honey'. I probably use about 6-8 tablespoons, and maybe more if I'm doing a bigger batch and need to add more water.
- I saw a lot of videos discussing 3-5 min of boiling time. I was having a problem with the bagels sticking to the bottom of the pot and never actually floating, so I started to initially stir the bagels (using tongs to get them off the bottom safely if they stick). Once they've cooked for a few seconds, they don't really stick, so I can leave them alone shortly after dropping them in. I usually am processing another batch simultaneously, so I just stick with 5 minutes as it lets me get other stuff done.
- St. Viateur bagels weigh about 80-100g when baked and with sesame seeds. I try to aim for about 90g of dough per bagel. This usually ends up about at around 16 bagels per batch. I find doing 4oz/113g to result in bigger than 'authentic' bagels.
Since my last post, I purchased a Traeger pellet grill, and I use it to bake the bagels with really good success. If you use a very mild wood and a pizza stone, along with the same 460f, you get a nearly identical taste to St. Viateur, IMO. I wish I could do blind side-by-side fresh bagel taste tests, but I'm pretty confident that it would hold up well.
I'd like to try baking them in my wood fired Ooni Pizza oven, but I haven't yet. Will be a project for this summer.
Good luck!
(And thanks again to Apprentice!)
@apprentice, The malt that you are using , is it Non Diastatic or Diastatic malt powder . Thanks again!
Hi painterman, good to hear from you. It's the non-diastatic. Malt flour is sometimes used as a synonym for non-diastatic malt powder aka extract in the baking industry, but I hesitate to comment definitively on what any particular manufacturer calls his/her product. For instance, the word "extract" is sometimes used as the name for barley malt syrup. The product I use is a powder called barley malt extract.
The diastatic versions of malt can be problematic if not scaled precisely. Can lead to gummy results. Normally, bread bakers find that there are sufficient enzymes in well-balanced flour from a good mill, so it's unnecessary to use diastatic versions. What you're after instead, using malt in bagel dough, is the unique malt flavour, some sweetness, and added nutritional value along with help for fermentation and browning.
btw, I'm guessing you're in Canada since you're able to source Keynote flour? I'm hoping you know about Keynote 39, which is Robin Hood's formulation especially for bagels and pizza. I find Keynote 39 and Keynote 45 (bread flour) in 20 kilo bags at Wholesale Club locally, a division of the Loblaw's chain. If other Canadians are reading this later who don't have access to a Wholesale Club store, I believe Robin Hood's Best for Bread flour in supermarkets is the same as Keynote 45. It works fine for pizza and bagels, too.
Hi Apprentice, Wow thanks for all that info. This malt thing is was very confusing, you did a good job of making it more clear. I have been using the non type all along so all is good. Problem is that it is no longer available on Amazon.Ca. The barley malt extract that you use ,is it available to purchase online? Yes I am in Ontario not far from Belleville. The Keynote flour I bought just says Keynote, A different mill makes the flour for Robin Hood and it looks like they do not have Keynote 39 or 45. But they do have several other specialty flours for pizza . Have you tried boiling the bagels in the malt, seems that is a thing. Thanks again for all your help...Ever though of teaching? Stay safe and keep your space.
Hi again, painterman. The good thing about malt is that you have options, not only diastatic vs non-diastatic but flour, syrup, and extract or dried. As I said previously, most bakers shy away from the diastatic versions because there are sufficient enzymes for converting starch to sugar in well-balanced flours from reputable mills. However, the diastatic products can be a huge help to bakers who are milling their own flour. There are specific guidelines for how much to add to different doughs all the way from 0.5% of flour weight up to 5.5%.
Bakers also shy away from malt syrup for bread products because it's inconvenient to work with--sticky, heavy and bulky compared with dried malt (sometimes called malt extract). That said, I do use Eden Food's organic barley malt syrup whenever I make Winnipeg rye bread. It's non-diastatic, readily available, and easy enough to spoon out the small amount I need for my formula (molasses being the suggested alternate). I dissolve it in the water, so it spreads more readily throughout the dough. That's probably what I'll do for the bagels when I run out of my malt extract powder if it's no longer available locally.
I seem to recall another commenter using the syrup because that's all they could find in their area. One might have to throw in a touch more flour or cut back slightly on water to compensate for the additional moisture. Plus the dry malt has a slightly higher sugar content, so I'd probably increase the sugar a touch as opposed to an extra bit of syrup. Re: using the syrup in the boiling water, it's a fine idea. I'm a Scot, though, so I look at the price difference between my Eden's syrup and brown sugar. No contest, brown sugar every time. :) But you only need about an oz. of syrup per 3.5 kilos of water if you add some sugar as well. That way, you'd get the best of both worlds - extra malt flavour along with a smooth shiny surface. Go for it if the idea intrigues you. Some people use other sweeteners like honey or maple syrup, but to my knowledge not for a Montreal-style bagel.
I bought the product labelled Barley Malt Extract locally in Victoria BC, packaged for the store by Annie's Natural Foods. No idea if it's actually non-diastatic, but I strongly suspect it's the syrup that's undergone complete evaporation by means of a spray drying process with heat that would kill the enzymes. I believe Annie's was bought out by General Foods. I'm still working on the bag I bought ages ago. Don't make a lot of bagels since I visit family in Montreal often enough to satisfy most, but not all of my bagel cravings.
Re: the Keynote flour, I see now that the designation 45 vs 39 is no longer showing on the bag. Vaguely recall I was able to assure myself last purchase that it was the 45 by looking at the store's info on the shelf label. The company changed the name to Keynote Strong Bakers Flour as the main designation with product number 10496. It's from Ardent Mills in Mississauga, and they added the message "New Name, Same great flour since 1909" beside their logo. I can check what the bags are called that Wholesale Club is continuing to shelve under the Keynote 39 designation. There might be also be info on the mill's website: www.ardentmills.ca
Thanks for the kind comments. I'm not sure I have the stamina to be a teacher, but I do love sharing what I've discovered with people who are truly interested.
Hi Apprentice, Thanks again for your input. Just baked some stay at home bagels.This batch was done wife fresh duck eggs..
Image

Yep, anybody who loves to bake isn't bored during this time, at least so long as you can source ingredients. Nice for this batch that you had access to fresh duck eggs! They look delicious.
Had planned to drop you a quick line for a couple of reasons, but you beat me to it! One is that looking for something else in Hamelman's book Bread, I happened to see his recommendation for subbing malt syrup for powder in his recipe for Toast Bread. He says, for that recipe anyway, that you can use malt syrup at about 5x the weight of the powder. Or it can be left out entirely without greatly changing the bread's handling characteristics and flavour.
The 2nd reason was to say that I noticed a difference between the product numbers, if that's what they are, for Ardent Mills' strong bread flour sold down east and that sold on the west coast. Their website shows the number 10495 on the bag (front bottom left), whereas the bags sold here in Victoria show 10496. It's the same product, and my bill for the latest bag still calls it Keynote 45. I won't be able to check for awhile on what Wholesale Club is selling locally under the former name Keynote 39. I'm on total lockdown, being in the vulnerable category with underlying lung health conditions. Wonderful friends are picking up my supplies for the time being. However, I note on the mill's website that they say their strong bakers flour is good for bagels, pizza, pan & hearth breads, flat breads and Vienna rolls.
Hi Apprentice, I think that 10495 is bleached and 10496 is unbleached flour. Found an interesting use for diastatic malt in making mashed potatoes. Hanson has a recipe that I am going to try tonight. Ya fresh duck eggs are very rich, fun to experiment with. I have been in voluntary locked down for a couple weeks now. Stay safe.
You're absolutely right about the variations for Keynote. Hadn't looked closely enough at the Ardent Mills' website except to see the image up top of 10495, the bleached one. And in the list to the side, that they also have Select, Super and Untreated versions. Glad we get the unbleached Keynote locally. Sounds like you're having lots of fun in the kitchen. Me, too! You stay safe as well. And all your loved ones.
Hello apprentice,
Thank you for posting this bagel formula! I live near Pembroke, Ontario, and spent part of a winter in Montreal, one block from Fairmount Bagel. I almost lived on their bagels, and am hoping this formula is similar in taste and texture. I have not had a bagel from St. Viateur.
I can get a 13% unbleached white flour at Bulk Barn. Do you think that will do until I can track down a flour more specifically for bagels? I just bought a pound of dry malt extract on Amazon, as I could not find it at either Bulk barn or a local brewing supply store. I will try honey for the water bath.
What has me particularly excited is that I am just breaking in the Alan Scott oven that I built last summer. It is not quite finished yet, but is usable. I hope to have everything I need for the first attempt within a few days and will post the results. Thanks again!
Dean
Sounds like you will, Dean! Re: your question about the flour, can't speak to the quality of flour from Bulk Barn. In your shoes, I would check out Wholesale Club on Front St. in Pembroke. They may stock the exact flour used by St. Viateur, which I noticed in pictures posted by them online. It's from Ardent Mills and formulated specifically for pizza, pan bread and bagels. It's now called Keynote Select Strong Baker's flour (former name Keynote 39). Product number for the unbleached version is 10457.
My local Wholesale Club used to sell it, but now just carries the Keynote strong baker's flour formulated for bread, rolls and pizza (product no. 10496). But it does a fine job on the bagels, too. All their Keynote products come in 20 kilo bags. Not terribly expensive, somewhere around $18 CAD. The Pembroke store's website only shows product # 10597, one called Super Keynote which I wouldn't recommend for bagels. It's been treated to enhance gas retention for larger volume. All this product info is available btw on the Ardent Mills website.
You don't need a membership to shop at Wholesale Club, at least not here in Victoria. If 20 kilos is more than you want to buy, you could try Robin Hood's Best for Bread. I believe it's Ardent Mill's supermarket equivalent to Keynote 10496 and widely available in smaller bags. Kudos on tracking down the dry malt extract extract. About the honey, it might produce a more bland result than you'd enjoy. My baking program instructor recommended dark brown sugar. Seems to give a result very close to the real thing, i.e., authentic Montreal bagels, though I'm not able to bake them, as you will in a wood fire oven.
Wow! That's one heck of an oven you've built. Good for you. You'll probably get amazing bagels with that! Look forward to hearing how you make out.
Hello apprentice,
Well I am having a very hard time finding the appropriate flour. Wholesale Club had two employees working and both were busy with lineups at the til. I saw no flour visible anywhere in the store. I will try calling them and see if they can order 10457 for me. I contacted Ardent Mills hoping for a link or a store in my area that sells it. But I searched their website for 10457 and turned up nothing. Bulk Barn appears to have stopped labeling their flour's protein percentage. Instead, it gives 4 gms protein per 30 grams of flour. This works out to 13.3%. For all their flours. So I have no idea which is 12 or 13% anymore. Not sure if the virus and supply problems have anything to do with this or not.
I searched all over Pembroke for Robin Hood Best for Bread with no luck. Pickings are slim, and all there seems to be on the shelves is all purpose no matter where I go.
As for the honey in the water bath, I recently found this video https://www.youtube.com/watch?v=CBfgVuP6udQ which says that Fairmount Bagel uses honey in their water. Since I am used to the taste of Faimount Bagels, I think I will try honey for the first attempt.
I made baguettes yesterday and roast chicken in the brick oven today. Now that I am this close to tasting Montreal bagels again, I have developed a serious craving. Hopefully I will find the right flour soon or I may have to make a trip to Montreal to visit Fairmount Bagel and the empanada restaurant 1/2 a block away on the corner of St Urbain.
Thanks again for the info and I will let you know how the search and first attempt goes, whenever that is.
Dean
Hello again apprentice,
I talked to Wholesale Club on the phone today and they can get me a sack of what used to be 10457. The told me the name is the same, but the number has changed to 10497. And unfortunately, it is bleached. Unbleached is not available. Except for colour, do you think this will make much difference? I should have the flour next Wednesday.
Meanwhile, I am too impatient to wait any longer, and thought I would do a practice run with the 12% unbleached flour that I usually use for Tartine style bread. The oven is firing now, and I should have some bagels to try later this evening.
I am going to use homemade bagel boards, but don't have any burlap for them. I am only doing sesame seed though, and I love them totally coated, so I am hoping that will prevent them sticking to the boards. The plan is 3 to 4 minutes on the boards, then flipped onto the hearth and baked until done. I am hoping to have a small fire flickering against the back or side wall of the oven, and will use a piece of angle iron to shield the bagels from the direct flame if necessary. Getting the oven to 450 - 500 degrees is not difficult for me, as I am used to doing that for bread. But having a fire going at the same time adds a new wrinkle, and I don't know how much or how fast that will raise the overall oven temperature during the bake. I guess I will find out soon enough!
Dean
Crossing all my fingers and toes for you, Dean, in the practice run tonight. I've never worked with a wood-fire oven, so can't offer any advice. But I expect you'll learn a lot in the process and maybe even have some yummy bagels to eat. You may have them already! Must be just after 8 pm now in ON.
About the advice from Wholesale Club in Pembroke, I'm mystified. According to the Ardent Mills website, there is no Keynote strong baker's flour with the product number 10497. There's a bleached one with product number 10597 called Super Keynote. That's the one I mentioned, treated to enhance gas retention for larger volume breads, that was listed on the website for Wholesale Club in Pembroke. If that's the case, maybe they're just trying to sell you what they have rather than order another product in for you? No idea what the gas retention thing is all about, but "Wonder Bread" comes to mind for me. Be sure to check out the product number carefully if you stop by the store Wednesday. It might be okay even if it is the 10597. I can't say for sure one way or the other. But I'd be more inclined to look for a strong flour that's good for pizza if I couldn't get the 10457. Both pizza and bagels benefit from a good, strong flour.
Meanwhile, take a closer look at the Ardent Mills website. Here's the page with ALL their offerings in the strong bakers flour category. You just have to scroll down in the box to find all of them. When you click on the product number, they give you detailed product info after a slight pause. Product #10457 (formerly keynote 39) is clearly listed as still available under the Keynote Select heading, and it's unbleached. https://ardentmillscaprod.azurewebsites.net/products/traditional-flour/strong-bakers.html
If you click on what they call the "Sell Sheet" for any one of the flours, that takes you to a pdf about the mill's entire flour portfolio. The second page has recommendations for what each flour is best used. Here's the link: https://cms.ardentmills.ca/uploads/sell-sheets/en/Flour%20Portfolio.pdf
Oh and I'm sorry for not thinking that you might have trouble sourcing Robin Hood's "Best for Bread" flour in supermarkets at the moment. So many people have got into bread baking lately, probably with time on their hands while "sheltering in place". It's a good thing really.
Carol
Hello apprentice! And thank you for the info about the flour. I will call Wholesale Club tomorrow and double check that number. They gave me the impression it was recent that it was changed. Ardent Mills got back to me and were very kind but told me the minimum order was 1200 sacks of flour!
Tonight went much better than expected for my first attempt with the wrong flour. The bagels are very good, but I have a few things to work on. There is a stronger malt taste than I am used to from Fairmount Bagels, but I can adjust that to my liking in future batches. The bagel crust seems a little tough..almost like the very beginning of going stale. The crumb is very nice though..creamy and soft as it should be. Overall I am thrilled, and can’t believe that I can make bagels like this or better any time I get a craving now.
For anyone interested in the oven technique that I used, first I burned the dome clean, which took about 3 hours and took the oven to about 800F. I spread the coals and let them burn down a bit before removing them and sweeping and mopping the hearth clean. I put the door on and left it for about an hour. When I returned the oven had equalized and stabilized at around 650F, and was slowly dropping as the heat moved deeper into the mass of the oven. I timed the bagels to go in when the oven was at about 525F with the door still on. I figured with the door off, it would drop at least 100 degrees, and with a small fire burning off to the side, I hoped to have it maintain around 460F.
I returned some of the coals to the oven and put a piece of angle iron to shield the bagels from any direct flame. The small pieces of wood I put on the coals to make a small amount of flame didn’t catch so much as smoulder and created too much smoke. And the temperature of the oven started falling below 400F with the door off. So after 4 minutes on bagel boards, I flipped the bagels onto the hearth. I then removed the pieces of smouldering oak, and sealed the oven shut with the door. This brought the temperature back up to about 450F, and the bagels came out of the oven after 20 minutes total time. I like them a little light, and with loads of sesame seeds, so they were perfect for my taste
Thank you so much again for posting this formula Carol! I expected a long and winding road to get to where I got with one attempt, and I have you to thank for that. I feel about 80% of the way to where I am trying to go, an am confident the last 20% is probably just a matter of time and practice.
Dean
And that word "awesome" barely covers it. I'm so happy for you!!
Hi, I lived in Montréal for 10 years and now back in France, I tried your recipe a couple of times and really liked it, you did a great job. However I have 2 questions about flour and barley malt.
What would be the equivalent of your bread flour? Is it T65, T80 or T110? I'm a little lost.
I can't find barley malt powder non-diastasic but instead found some barley malt syrup, do you think I could work something out with this?
I would really appreciate your input on this.
Hi Arn0, happy to offer a couple of suggestions. But first, all credit for the formula goes to the source, the St. Viateur shop in Montreal, delighting people with their bagels since 1957. Also to my baking program head & chief instructor from Vancouver Island University who was having a great chat with the bakers on a visit to Montreal and asked if he might have the formula. To his surprise, they scribbled it out then and there! Of course, as noted in the comments above, these are only "Montreal-style" because it's impossible to duplicate the shop's ambience and the taste that comes from a wood-fired oven. But we've come close.
Yes, of course, you can use barley malt syrup. For tips on how to do that, check back in the comments. Others have done that, sharing their results, and I offered some thoughts. If you take the time to read through the comments--there are only two pages--you'll learn a lot of other useful things as well from folks who tried their hand.
I'm afraid I'm not up on the flours of France. My recommendation would be to post this question to all and sundry on the website. We have some very knowledgeable participants, including a truly gifted baker who lives in France. Not sure if she's still active on the site, but someone will be able to help you. I did check a recipe book I have from l'Ecole LeNôtre, which you undoubtedly know has a worldwide reputation, and saw they recommend something called 65-grade flour when making their pain sur levain.
Good luck! And happy baking.
Thanks for your quick response!
I'll read the comments again, I most likely missed something. I was told to look for a high protein flour. I'll check that.
Hello am0,
This is definitely not my recipe, and apprentice is going to likely be much more knowledgeable than I about it. I am also unfamiliar with the flours of France, but I think if you use the highest protein you can get that would likely be what you want. I think French flour tends to be lower in protein than North American flour.
And I am glad you asked about malt, as I have been meaning to return here myself to ask apprentice a question about it. And my question is - what effect does different malt powder have on the final taste of the bagels? I bought mine from a brewer supplier, and they sell several "flavours" of malt. Since the malt taste is so noticeable, I can't help think the type of malt could have a big effect on the final flavour.
I have done a few more batches, and while I love the flavour, I am still not totally happy with the consistency of the bagels. They strangely seem slightly stale when just cooled from the oven. I will figure it out eventually. And I once again want to thank apprentice for posting the formula! I will be using it forever.
Dean
Thanks, I appreciate it.
I too am looking for something as close as possible to a Montreal bagel which I loved so much. My attempts were very promising but something was off, maybe the flour or the malt and they were slightly stale too.
I'll give it a try with a different flour and adjust the barley malt syrup.
Hello AmO,
Have you tasted Fairmount bagels in Montreal? They were just across St. Urbain from where my gf and I lived. Their bagels were so good and so convenient that I never tried any other bagel shop like St. Viateur's. I was wondering if you knew if there was much difference in taste or texture between St. Viateur's (this formula), and Fairmount bagels?
Dean
I wish I could tell the difference but my palate isn't trained enough. I think the texture is slightly different tho. My go-to was st-viateur because easier to get.
Hi Dean, sorry for delay in responding. But I haven't experimented with flavoured malts, so not much advice to offer. Just a guess that there would be some impact, likely noticeable to a discerning palate. Maybe worth an experiment if there's a flavour that appeals to you?
Have been wanting to post as well about the bleached vs. unbleached flour issue for some time. Can't speak for the whole baking industry, but in my experience bleached flour is a no-no for bread products by and large. What it's perfect for is fine cakes and pastries. Historically, North American recipes for butter cakes, etc. were developed using bleached flour. So our European friends have a heck of a time when they want to use a recipe, say, from the US. Some UK folks posted on Rose Levy Beranbaum's website (author of The Cake Bible) about microwaving plain flour and other such experiments to use locally available ingredients for her recipes.
That's a digression, but I was wondering if bleached flour might cause the slightly stale quality that you've noticed in previous batches. Or is that problem solved now? Stunning results with your oven. Lovely work.
Hi Carol,
Do you know if there is malt available that is not flavoured as it is from a brewery supply store? I didn't seem to have a choice but to select a flavour, but I don't know if that is just because of where I bought it.
I was only using bleached flour to get rid of some that I had to buy if I wanted to bake at all when flour was in short supply due to covid109. I had no luck finding a source of the Keystone flour that would sell a sack at a time only. So I have been using flour 331 from Bulk Barn. It is an unbleached hard winter wheat flour. Last year they advertised it at 13%, but this year it is 12%. It makes really good bread and pizza dough, but I don't know if it is the best I could be doing for bagels. I do still have the issue of them seeming to be instantly a little stale. And it's not just the crust but the crumb as well. I have been eating St. Viateur's bagels lately, and they are much softer to chew than mine. I will hopefully figure this out next summer.
I am just about to try to get across the border with my RV and head to the desert for the winter. I am a dual citizen so I should be able to cross. But that is just about it for enjoying the oven for 6 months. Back to the Dutch oven for a while.
Dean
I've purchased malt-syrup made from brown rice at Korean and other Asian grocery stores. It tasted malty to me.
Usually in the same aisle with other syrups, vinegars, and oils.
Usually labeled "Brown Rice Syrup" on the front label, but read the ingredient list on the back to confirm it is malt syrup.
They "should" have an English ingredients label or sticker. If not, ask a clerk to translate. Do not just ask "is this malt syrup?", because some will say "yes" just as a shortcut.
Look up brown rice syrup and malt syrup on wiki for more details.
Thanks again for this recipe!
There is the last batch I made, very happy with the result.
My instructor at baking school always used to say if we got some of our products baked a little on the dark side, especially croissants, "That's not overdone. It's just European style!" :) Your bagels look great. So pleased that you had a good result with which you're happy. Did you use the T65 flour?
Thanks! I did yes.
I lived in Montréal when I was a kid. My family always bought bagels from St. Viateur so their bagels are my ideal of what bagels should be. I decided to try making bagels myself and was pleased to find your recipe with lots of discussion about yeast quantity, bulk fermentation, etc. It was very helpful. Here's a double batch I made recently.

I formed, boiled, seeded, and baked 6 bagels at a time so that the formed bagels didn't have much time to rise.
Good strategy for minimizing fermentation! Did you cover and refrigerate the "dough-in-waiting"? This dough takes well to retardation. At baking school, we used to put the whole batch of formed bagels covered on trays in the fridge overnight. Did the boil, seeding and bake first thing in the morning. Worked well with the teaching schedule.
Glad you found the post helpful. Montreal bagels are also my ideal of what a bagel should be, but I guess to each his or her own.
I just let it sit on the counter for about an hour, covered with plastic wrap.
I'll try refrigerating overnight to give the bagels more flavor. As a bonus, this would mean freshly baked bagels for breakfast!
@apprentice, what do you cover the bagels overnight with?
Hello Danny,
Your bagels look great!
I am thrilled to have this bagel formula, and still can't believe that I can make bagels this good at home. I still haven't solved the problem of them tasting slightly stale right out of the oven. St Viateur's are definitely a softer chew than mine so far.
And all credit for this bagel formula goes to apprentice who so kindly shared it with us all. I had expected to take at least a year of experimenting before I could make bagels like this. I could not believe my luck when I saw this formula posted here.
Dean
I added some vital wheat gluten to all-purpose flour to get the desired percentage of protein. For the malt powder, I used this. I found the malt flavor quite subtle at 9 grams per kilo of flour. My current challenge is finding good quality poppy seeds in large quantities; sesame seeds are easier to find. I've tried baking the bagels directly on a pizza stone as well as on sheet pans. They cook faster on the pizza stone, but it makes more of a mess with burnt seeds all over the bottom of the oven.
@ Marlayna :The barley flour that you are referring to is Diastatic malt powder. Should be able to locate on the web. This recipe works perfectly, try to find the highest protein flour you can get. I increased the sugar to 60 g to get the taste closer to the original taste. Again I would like to thank Apprentice for posting the recipe. Have a great New Year everyone.
@painterman: we are neighbours! I am in Belleville, but not able to find large bags of flour. Was at No Frills today and saw these two. But, as @apprentice noted, not rec'd for bagels. Where does one track down large bags of "bagel flour". Have you been able to bake them in a wood oven?
Hi Marlayna, Ya its a small world....until you try to paint it :) Robin Hood 39 is the original flour that was used commercially , That was change to # 45 when Arden Mills took over Robin Hood flour. That has been changed to what I am using 10496 that is a unbleached flour. You can pick it up at Flour Confections in Pickering. FYI do not oil the proofing bowl . Oiling will make it very difficult to "join" the rolled out dough. If I can be of further help let me know. Stan
Hi. I love this post. What a treasure! And, it's been going on since 2009! So amazing :)
I am a hobby baker and have been experimenting with Montreal style bagels for a little while now using and adapting a few different recipes. I tried this recipe yesterday and love the results. I have a few questions that I couldn't find answers to in the original post or discussion and would love any advice or tips:
- Is hand mixing the dry ingredients fine, or do you recommend a mixer?
- When you add the wet to the dry, what's the best process for doing so? All at once? Pour in a bit at a time and mix? Is it better to add the dry to the wet one cup at a time? Again, is hand mixing fine or better with mixer?
- When you say to "cover" the dough for 45 min, how do you cover it and with what? On the counter under a bowl? In a bowl covered with a wet or dry towel? Do you oil the bowl or dough first? Does any of this matter or make a material difference?
- I tried using a homemade "everything" mix (poppy, white sesame, black sesame, onion flake, garlic flake, salt) and found that much of it got burned in the over (I baked for about 18 minutes). I think it tended to be the flakes rather than seeds because the seeds don't burn when I bake just poppy or sesame bagels alone. Any advice on why this might be happening and how to prevent it?
- I'm finding there is a lot of seed loss after the bake. Is that normal or any tips on how to prevent lots of seed loss?
- If I experiment with overnight retardation in the fridge, do you shape the bagels first and then put in the fridge, or do you put the dough in the fridge after 45 min rest but before shaping into individual bagels?
Thank you so much!
...but first an apology to you, and others writing lately, for being MIA this last while. A busy time in my kitchen over the holiday season, and there hasn't been much let-up since. I did read everyone's queries and made time to do some research about the flour. (More on that later.) But this recipe is quite forgiving, so I'm sure y'all did just fine. Nice to see that folks were helping each other.
Addressing your queries, stclarensbagels, in the same order as asked:
Glad you enjoy working with the recipe. I do, too!
Thank you! I'll try overnight tonight and a fresh bake tomorrow. Looking forward to it.
I use more yeast than the recipe. I think 2tsp, but I kind of like the puffiness of them.
Cinnamon raisin requires at least 4 T of cinnamon.
Thank for all the tips everyone!
Thanks to this forum I have now made a little side hustle from my Montreal-style bagels. I use my regular home convection oven, 30qt Hobart mixer and have 2 part-time assistants. It's been amazing. I don't know when it will become full-time. I've been in business for over a year now and it does not seem to be slowing down.
You can find me at www.mabelsbagels.com
Not sure if it's just me but the link doesn't seem to work in my last post, but the website is definitely live
www.mabelsbagels.com
That's awesome Mabel! Good for you. We can see the website, it looks great! I will plan to get some of your bagels when we next pass through Belleville! It's inspiring to see a fellow bread enthusiast make a passion a career! Thanks for sharing.