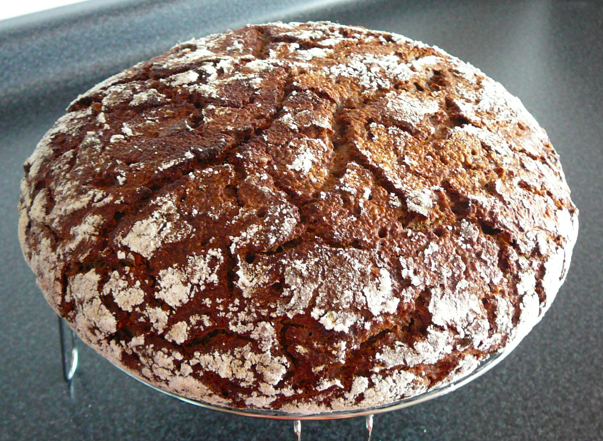
This rye recipe is my Chilean version of my favorite rye ratio recipe using a rye sourdough starter and the addition of chia seeds that increase the dough hydration yet maintain a nice shape. Use a large Dutch oven for a free form shape.
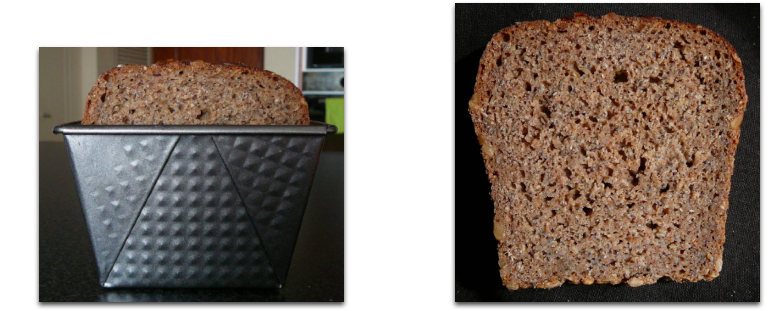
I designed this recipe for one narrow tapered loaf pan: cm: 30 x 11 x 7.5 or inches: 11 3/4 x 4 1/4 x 3
It is my basic rye recipe (starter:water:flour) (1: 3.5 : 4.16) plus 6.1% chia (on total flour weight including flour in the starter) plus 4 times the chia weight in water added to the dough. Also added nuts, seeds and 90g to 100g arbitrarily selected moist rye altus (day old bread.)
DARK RYE & CHIA BREAD
The wet:
- 175g vigorous peaking rye starter 100% hydration
- 90g moist rye altus
- 812g water 24°C (75°F)
1077g
The dry:
- 728g rye flour (dark rye 14% protein)
- 50g chia seeds
- 17g salt (2%)
- 17g bread spice (2%) (toasted crushed mix: coriander, fennel, caraway seed)
- 17g toasted sesame seed (2%)
829g (total dough so far 1906g)
(optional:)
- 4g black pepper (0.46%)
- 100g broken walnuts
- 150g chopped Araucaria Pine nuts
- sunflower seeds to line bottom and/or sides of buttered form
Method:
Inoculate (1:5 to 1:10) sourdough starter soon enough to have a vigorous starter when ready to mix up dough.
Plan to bake in 3 hours from the time you start combining liquids with the flour to make dough.
Combine liquids and break apart floating altus. Stir dry ingredients and add to liquids stirring until all dry flour is moistened. Scrape down sides of bowl, cover, let stand 2 hours. No kneading ever! Dough will stiffen as it rests. (Another order for combining is to add the chia and spices to the wet ingredients and allow to swell 15 minutes before adding flour, salt and nuts. Not sure if it makes a difference but if you find you're getting a gummy crumb, let the chia soak in the water and swell before adding the flour.)
Smear bread pan with butter and dust/coat with raw seeds, crumbs or flour. Spoon or plop dough (trying not to trap air) into form or floured banneton. (The recipe lends itself well to free form in a large Dutch Oven.) Use a wet spatula or wet fingers & hands to shape dough. Pile the dough up higher in the center for a nice rising shape. Sprinkle with seeds and press lightly into dough while making a nice dome shape.
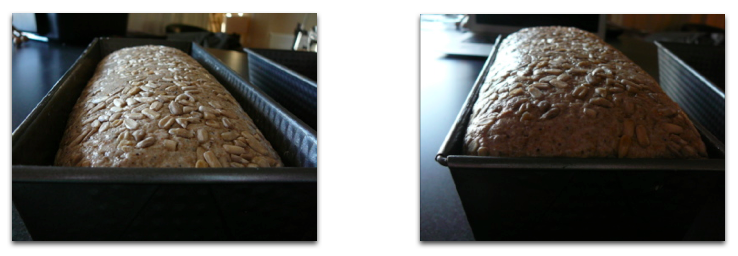
Let rise about an hour. Meanwhile heat oven 200°C to turn down to 185°C (365°F) 15 minutes into the bake. Make a cover for the loaf from a double layer of alufoil or flip an identical pan over the top. Leave room for loaf expansion.
When ready dock, take a wet toothpick and poke about one hole every inch, all over, toothpick deep. Wait a few minutes and smoothen over with a wet spatula. Dough is ready to dock when you see the dough surface threatening to release trapped gasses under the surface. One or two little pin hole bubbles is enough to start docking.
Spray or rinse the inside of foil or empty bread pan cover with water and cover the dough to trap steam during the bake. Bake for about 40 minutes on the lowest rack, then rotate and remove the protective cover to brown the loaf top. Finish the loaf in another 20-30 min for a rough total of one hour baking time. Inside temp should reach 94°C, sound hollow, but I tend to shoot for 96°C or 205°F. Cool on rack. Wrap when cold.
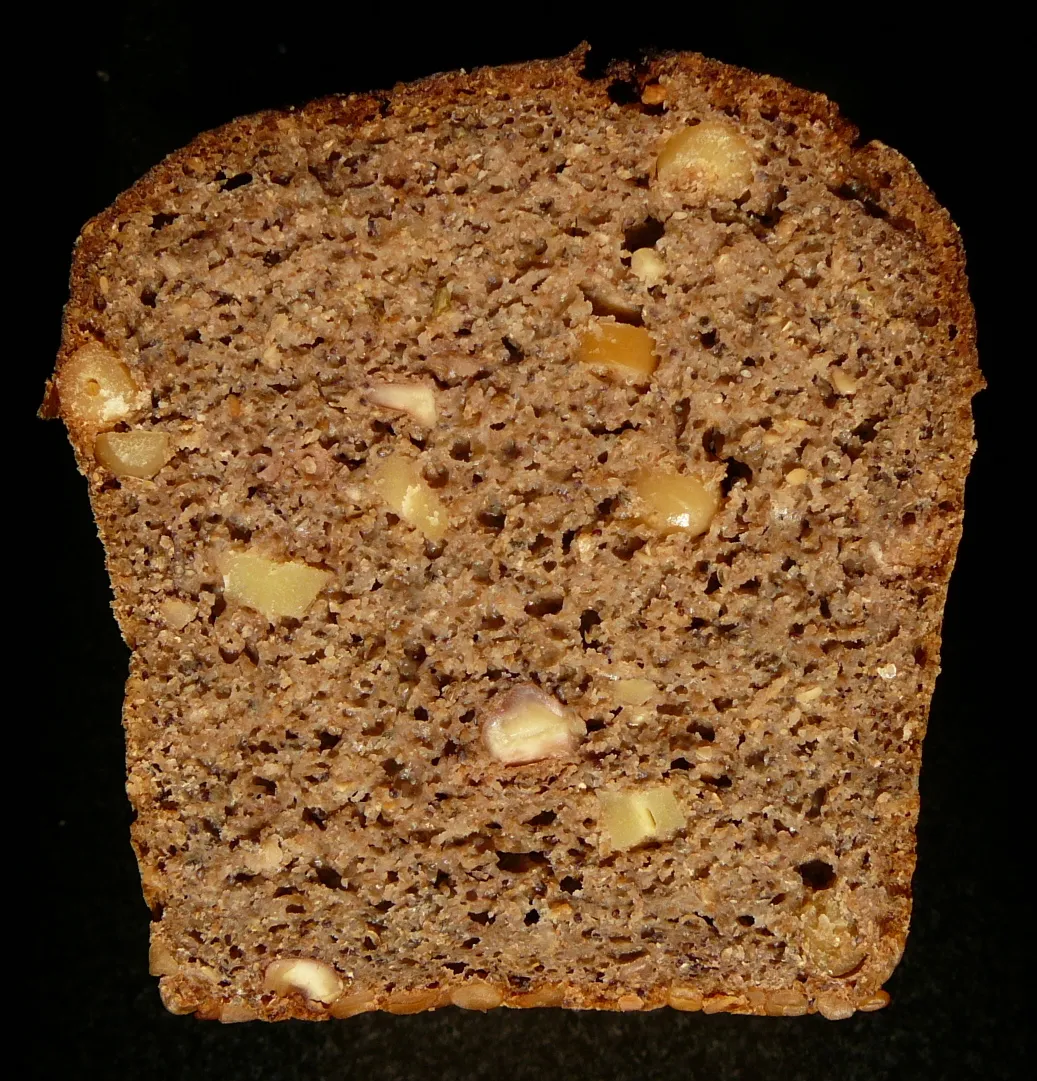
Here is the cold loaf (after 12 days, last 6 in the fridge) and you can see how much the dough rose. The shaped dough would have been rounded under the rim. There are no nuts in this loaf other than what came from frozen stored altus.
Free form using floured rice sieve: Oops, I spy a few docking holes!
Have fun, I do! Really proud of that one!
- Mini Oven's Blog
- Log in or register to post comments
Awesome, Mini. Would you mind if I featured this on the front for a bit?
Wow! Thank You, Floyd!
what a beautiful moist looking crumb!
And it should be! Also known as Monkey puzzle tree. Araucaria araucaria. Come in both males and females and when the female cones are ripe... here are the seeds will hulls:
...and the cooked and hulled nuts:
I tried using them whole in a loaf one time. The nuts popped out of the bread slices like knots in knotty pine planks leaving bread slices to be confused with swiss cheese. Those that did stay in were too much a mouth-full as they don't tenderize too much in the bread. When chopped up, they "bite" easier. I would love to run these through my electric grater back home! I understand that the nut is often boiled & dried for storage, later being turned into flour or added to soups and stews. I can only think that early man must have loved having these nuts around.
They have a mild taste closer to a mild chestnut or even corn. Black pepper complements their flavour nicely. Raising the salt level in the dough would be a good idea. We are near the end of the pinos season here in Chile. Soon the snow will deck the Andes again for Winter.
This evergreen grove is located just before crossing the Argentinean Border to Patagonia East of Lanin Volcano. Photographed out of a moving bus. (I think that little white rectangle in the tree branches is a reflection of my camera flash. Villarrica National Park.
Weird. I was wondering what those were.
If someone needed a substitute for those could they use pine nuts?
would work. They are a lot tastier than the milder araucaria pine nuts. One could even use whole canned corn drained well or drained canned whole beans might be interesting. The juices from beans could be used with the water. Or just leave them out and sub soaked/cooked and drained whole grain berries. Anything that doesn't go mushy would work.
What is important here is the chia. If no chia, reduce the water by 200g and then it is a plain high whole rye bread. I'm using black chia with a sprinkling of light chia seeds.
and fascinating ingredients!
Juergen
bookmarking and downloading you and your links. You are continuously so helpful! Have you run across any European use of chia? Stat sheets?
http://www.bakeryandsnacks.com/Ingredients/Ireks-sees-superfood-demand-in-UK-as-it-launches-chia-seed-bread-mix
Mini
Must try them - I haven't so far!
Thanks a lot, Mini. It's great to know there are followers!
My baking is taking funny turns these days, almost like an "impulsive buying" trip in the supermarket...
Juergen
She sent me a generous sample from Australia years ago. I had been smuggling them into my rye for years. Here chia is pretty easy to get. Guess I'll have to ask my local store in Austria to stock it. Wouldn't surprise me if some Euro-bakers are already using it. Pretty neutral tasting so I hesitate to use it on the outside preferring chia inside, evenly distributed.
At my age, I have to watch what I eat and feed my husband. I'm after more quality than quantity, nutrient packed foods. Great things in little packages. My impulsive buying has a magnifying glass attatched and I eat a lot of pictures. We all have different things that inspire us. Stay inspired.
Mini
Hi Mini,
Nice to see how you work with your rye loaf in so many variations yet always the same base. Makes it easy and these loaves look beautiful! What an incredible spring. Must be that the dough was trying to compete with the height of the mountains around you. * ^ }
Thanks for the post and information about the seeds too. Very interesting.
Take Care,
Janet
P.S. Do you moisten your altus so it doesn't compete with the hydration of your final loaf? I ask because I am using some today and am wondering if I can just toss it in dry because it isn't as messy. Thinking that I can just add a tad bit more water in the final dough.....
you can weigh it and add the proper amount of water to be in your target hydration later to the dough.
What made a challenge was the rye's high protein amount, meaning more of the ouside layers of the rye berry speeding up the fermenting times.
Thanks,
Mini
That's what I will do. Flour etc are resting now for an hour to absorb etc but when I do the final mix I will adjust there. Good to know I was on the right track. *- )
Take Care,
Janet
Congrats on the feature Mini. Well deserved for a rye expert such as you. I am trying to take as much advice as possible to fix my recent rye issues. Interesting ingredients too!
Nice :)
John
formally educated in rye. Andy posted a link last week on a rye thread that leads to a wealth of reading material. Interesting... I hope the sperts help me out here too if the Q's get tough.
Take care John.
I missed the thread of which you speak and would love to check out the link. If you recall the title of the thread I would love to look into it as Andy's link.
Thanks,
Janet
discusses briefly rye-pollard the non-endosperm part of the rye berry. Lots of neat info will have everyone checking their labels.
http://www.thefreshloaf.com/node/33265/white-rye-extraction-rate
Thanks for this. Amazing that all of this info is 'out' there...
Janet
Mini. By Andy you mean ananda? Could you post the link? I searched his site and couldn't find the rye thread you mention.
John
Hi John, this is the link: http://www.thefreshloaf.com/node/33265/white-rye-extraction-rate#comment-254438
Mini...awesome bread. Love the ingredients, and note just over 10% pre-fermented flour to leaven the whole thing. amazing!
Best wishes
Andy
see down the thread after the market lady.
That's a beauty Mini! Perfect in every respect. Just the kind of bread I like. Those Chilean pine nuts look like genetic freaks. Do they taste the same as regular pine nuts?
All the best,
Syd
in the oven, the aroma was first like wet wood, then it changed more to roasting sweet corn when they were done. I think a lot about jack fruit nuts... they're in your neck of the woods. Boil some up and try it with those.
Mini
Deserves it's top billing too!. Those pine nuts are gargantuan, a word not used enough as said by a one eyed samurai, sword wielding killer of some fame.
Nice baking Mini!
This makes a long loaf so I often give half of it away. I've got a few containers of the cooked nuts in the freezer. They are great little snacks. There is a shoot that runs up the middle easy to see when broken in half or cut.
Hmmmm 100% Rye, sounds very tasty.
I was looking for sourdough in your recipe and you are using the rye starter instead of classical rye sourdough.
It's that correct?
Mirko
between them.
This is a sourdough rye bread recipe. :)
A real beauty that packs tons of flavors, Mini!
Those pine seeds are huge!
Your rye rose elegently and the result is an excellent bread. Nice methide in doming the shaped loaf, then poke it. excellent.
So, is rye flour easily sourced in Chile?
-Khalid
Thanks Khalid,
I do think that doming the shape of the raw dough in the form is essential to getting a nice shape after the bake. If the dough is packed flat or level, it seems to stay that way because "spring" in rye is not so dramatic as in wheat breads. With a wheat bread, one can see from the crumb shot the direction of the "spring" but high rye dough seems to rise straight up, more like a cake. Shape it round, it rises round. Shape it flat, chances are good it rises pretty much flat.
Also, don't be afraid to correct the shape before baking. Use a wet spatula and push the drooping sides back into place over the form so you don't end up with mushroom topped loaves.
The protein levels here are 10% and 14% the higher being half the price of the other one yet has better flavour and is better food value. (go figure! the demand of the masses!) The 14% is less available but also makes a great 100% loaf however the stuff ferments fast packed with lots of enzymes. Both are milled here in Chile, I just buy the one kilo packages. I carry everything in my backpack and walk to get my exercise. So I haven't asked for larger (comes in 1,3,5,10,40 kg) sacks of flour. The 14% is coming from Valdivia, www.molinocolilco.cl which has German origins.
This 14% power flour goes flat in 4 hrs., 3 if I delay salt or use warm water. Take into account that I value a long wet time on my dough to reduce the phytic acid in the outer berry layers, I'm stuck trying to slow it down and bake lower longer even after reaching inside temperature. Raising hydration speeds up fermenting but slows browning and increases baking time, with the free form loaves I lower the heat to 180°C keep it covered longer and let it take two hours to bake.
So... With local rye flour, I've had to add salt early, cut all my rise times when using my favorite formula, add more water and lengthen baking time. (higher protein also absorbs more water.) So how did I deal will extra hydration? I added chia seeds. They are little super water sucker-uppers giving it back slowly during baking. This keeps my dough paste from being a batter and any tougher bits moist. Chia also raises protein, fiber and trace minerals in the bread.
thank you Mini. I have learned a lot just from this section. I am still on the quest for the 100% rye loaf. Had some success, but then failure. I am using currently a rye grown in North Carolina from Carolina Ground, a project that aims to bring NC farmers, millers and bakers together. <<carolinaground.com>>. The rye is a old variety which was grown here already at the time of the civil war. I grind the grain in my nutrimill to a rather coarse meal. I bake Hammelman's 66% Rye for my customers. I am amazed about the creamy texture and the wonderful smell when baked. I did last week a 100% Rye from Martin Pöt's book (Der Sauerteig, das unbekannte Wesen): it looked amazing but it is very dense. I don't know if thats right but I know european breads are denser (I am from Switzerland).
Thanks for the tip regarding doming, I will use this next week. I will also find out about the protein content of my rye. How coarse is the flour you are using? I also like the longer baking with lower temperature. Will try your recipe as soon as possible. thanks again. Barbara
A 100% whole rye bread is dense but it doesn't have to be hard or dried out or solid with no air bubbles. It should have a pleasing texture and not send you grabbing for a glass of liquid to keep from choking. Slice thinner (3/8") than more airy breads.
My flour?... It claimes to be fine, but my camera gives more detail. I poured out 10g of 14% protein rye next to 10g of chia seed and pressed it with a spoon. Does not feel like a fine flour and is gritty yet coats the spoon with dust and makes dust so I would say it is full of different sized particles.
Zoom in if you need to. The chia seeds look neat up close too! Hope this helps.
love his bread spices! I have noticed that the spice mixture does change slightly over the years by many bakers and producers. Play around to find the mixture you like. Rye in NC! So you are the midwife that makes this rebirth happen! Demand is going up. Will check out the project. I've just sent this TFL link to the flour mill that bags this wonderful rye. Curious what they will say. Sounds like you're a rye lover too! Even the 10% protein is high for a rye flour. Most are between 7 and 9%.
Mini
Thanks Mini, but I do not deserve that feather on my hat. Jennifer Lapidus from Carolina Ground would be the person to be adorned with it. I think she is the founder of this wonderful project. I learned about this and her mill in Asheville at the bread festival in Asheville. It just makes so much sense to me and I am very excited that I am able to use some of their grain.
Your flour looks about like the one I am milling in my nutrimill. I don't like the very fine ground rye flour which looks like cement. I use in one of my other breads (a mix of AP, WW and Rye) a very coarse pumpernickel meal. I have tried it with a finer flour but the texture just was not the same.
Thanks, i learned so much from your reply above.
-Khalid
easier. Rye is not so complicated. I read somewhere that it was discovered as a weed growing in the wheat. As it tended to thrive in some locations better than the wheat, it was encouraged and cultivation spread. Funny not more rye is grown in these "climate changing" conditions we seem to be facing.
That is because people want soft bread, and rye will not offer that. I never new Rye bread before 2009 (the year i joined TFL), and my first was mild rye bread. I wanted a dark loaf of bread at the time, but never thought that 100% rye bread could be so flavorsome. You have encouraged my to bake Rye too, Mini.
-Khalid
I can't miss, Mini. It's gorgeous!!
Still looking for flour! Thank you for all your encouragement and translations. You have a way with words!
I picked up the last batch of chia in this market north of Concepcion on the coast. Along with fresh dried oregano.
hi mini, beautiful rye loaves. congrats on the feature. i have so much to learn about rye. i love rye bread, but it is hard to handle, sticky. and with chia .. wow can't imagine how i would handle this. for sure it is a challenge for me. thank you for the formula. love to try this one day. will bookmark this page!
evon
i've been following your lovely posts. i see you like using chia and spelt and rye just seems to be a grain that you might like combining with those two. keep your tools and hands wet help keep it from sticking to you. the nice thing about this recipe is easy clean up. only a bowl (or two) to wash, a spatula or spoon, and the pan practically cleans itself. the toothpick hits the trash.
optional ingredients are: walnuts and a nice top coating of tiny green pumpkin seeds (pepitas?) :
Oh, and I threw over 2kg of dough into an Angel food cake pan (tube pan) with the tube removed. I flattened a small foil pie pan to support the bottom and lined with baking parchment. Clothes pins hold the parchment in place while I spoon in the dough and round it. Trim paper, remove pins, let rise about 1/3, dock the loaf before covering with foil for steaming. Makes a great baking chamber parked on the bottom oven shelf. :)
to making a loaf. I wanted to make a loaf yesterday, forgot to use standing water and used tap. The sourdough starter was taking it's dear sweet time so I stirred it to knock it down, covered & put it into the fridge for the night. Normally this starter would then be flat lined but smell great and I would continue to put together a loaf today, rather delayed, but not too worried about it, it's a powerful culture.
Took the rye sd starter out of the fridge this morning and it hadn't fallen, had actually risen a little, was still elastic and looked only half fermented. Not stringy, not separating, smooth bubbly and creamy, smelling a little weak but that is common with cold starters. How strange! What ever was delaying the yeast (in the water?) was also working on the enzymes in the rye flour to ...what? cancel them out? Is that possible? Enzymes affected by chemicals in the tap water? Maybe a different batch of flour... no, same flour...
I poured 175g of starter over two slices of old bread (rye altus) covered with a lid and trying to figure out when I should add more water and flour... waiting for the starter to pin hole/ burst bubbles on the surface and the aroma to increase. Right now looks like SOS without the meat. (Chipped beef on toast) I've got some standing water now to mix with the dough but this is grabbing my attention.
Why?
Hi Mini,
I only ever use tap water in any sort of bread dough, and have never had any issues with it. However, if you usually run off your water and leave it to stand, then change procedure, that may be of significance...I can't advise on that, sorry.
Also, note that we both use very different methods to produce and maintain our rye cultures, and then build and use them in our breads. But your culture must be strong; so even if it's not working as you expect just now, surely it will be working just fine very soon
Very best wishes
Andy
is that the wet rye didn't break down. I actually retarded the stuff! I could never have retarded rye before. It would just distroy itself structure wise. I normally keep a refrigerated mother starter and take a few heaping teaspoons to make about 200g of sourdough starter. Usually overnight but I wanted to watch it so I inoculated in the morning and by evening it wasn't quite ready yet. It sat over 24 hrs before I mixed it with flour and stood out water to make dough. My tap often smells lightly of chlorine.
The idea of getting longer wet time on dough using treated tap water is a new concept for me. I did add some diastatic malt to this batch, just to give it a little kick. Back to the kitchen...
Thanks, Mini
Drat! What was in the water? Now I'm working on getting my starter back to itself. Had a slow rising gummy loaf and it should not have happened. The day long feed actually separated. Double Drat! Feeding on the counter top for a while, and feeding it the gummy altus. Smelling better.
interesting ingredients (Andes meet Alps!), and nice photos, not only of the bread.
I learned something new: the information of late re-shaping or doming a rye dough. I would have never dared that. I wonder about your last experience with the rye sourdough. We had horrible water in Bar Harbor, heavily chlorined, and hard, so I always filtered it. Lately the water quality improved, no noticeable taste anymore, so I use tap water, too. I never noticed any difference.
And I always bulk retard my rye sourdoughs (if they also contain part instant yeast). They do rise a bit in the fridge. My rye flour or meal is not freshly milled, but bought in bulk, I know that makes a difference.
Happy baking,
Karin
my starter stopped. Just stopped. So I left the lid off, gave it plenty of air so the chlorine could evaporate and stood water overnight in a pitcher. I tend to do that anyway because it is amazing how good so-so water can taste when left to air just one hour. It also reminds me to drink more water. Anyway yesterday's bread dough did come around and I mixed it up but it took 4.5 hours to be oven ready. The bulk rise being 3 hrs. Rise and shape was starting to pin hole (counted two holes at 1.5 hrs) and rise about 1 cm above the pan's edge, so I covered it and put it into the hot oven. It was there 5 minutes when I realized I forgot to dock it so I pulled it out again and attacked it, covered again and back into the heat. Marks closed up nicely.
I baked it 180°C for 1hr+50 minutes. I removed the inverted pan cove at 40 min, should have left in on longer as it took the loaf longer to reach inside temp. Sort of dried & darkened the top crust. Also had a husband disaster. I had this loaf baking after supper but working late brought hubby home with a fresh hot loaf cooling. He cut into it and yes, made a mess of my loaf. (Hi, John) His camembert even melted off the slice! I stood the cut end on a plate to keep any moisture from escaping and left it that way to cool until I got up around 4am.
The loaf was cold, could have stood longer open but I wrapped it tight in plastic wrap. Now to keep him away from it for at least another 6 hrs. Out of sight, outta mind... so into the back of the cold oven. I made jasmine rice while I was at it so the kitchen smells more Asian and less nutty dark rye.
This bread is like an ultimate destination for rye newbies like me.
hi Mini, i don't have Chia at hand but flax. Would it be better to soak the flax over night? What do you mean by inocculate 1:5 TO 1: 1O? Thanks
I think if you substitute flax, you should reduce the water in the recipe by 200g then add equal amounts of flax and water to the recipe. If you want to add 50g flax, carefully add 50g water to the liquids. Use crushed flax to line the pan and don't add much water if at all. Flax has a different kind of gel than chia, more slippery Soaking overnight? not sure that it makes a difference, I found that flax absorbs all it wants to in the first 30 to 40 minutes being wet. Could soak and drain then add and fix the recipe water at 612g (or 200g less than recipe.)
http://www.thefreshloaf.com/node/22570/along-lines-egg-whites-chia-foam#comment-160705
Inocculate 1:5 to 1:10 ... means inocculate your rye culture for how it works best considering your temperature and the starter for the time you allow it to ferment. One to Five (1:5) is 20g starter combined with 100g each water rye flour to make 175g sd starter with a little left over. One to Ten (1:10) is 10g starter combined with 100g each water and rye flour. Anything between will also work. Just be sure it is fermented well (or wait for it to be ready) when mixing up the dough. If flour and water is inoculated before going to bed it should be ready in the morning. If not, the starter may need more refreshing before it is strong enough with yeast to raise the dough.
I find chia in the health food and sometimes the beauty section of the supermarket or where they keep the vitamins.
Hi Mini, thanks for your answer I just found now. Since we have the new format I don't get any e-mail notifications any more and I have not found out how to fix this. So I don't check in very often anymore.
I tried to follow your recipe and the bread looked pretty good and also tasted good but after a couple of days it started to fall apart. Also the pieces I froze are falling apart after one day. I am using a rye I get from Carolina Ground and I mill it myself rather course. I am wondering why this bread falls apart. Could it have to do with protein content of the rye? I just sent en e-mail to find out how high/low it is. It look like there is no gluten at all. Would you have an idea? The 66% rye (Hammelman) I am baking for my customers works out great. It has a creamy eating feel to it. I still would like to have a 100% rye in my assortment.
That is very interesting. I can't say that has happened to me unless I chilled the baked bread. Even then it would crack in half but not fall apart. Would like to know more...
Mini
Mini, it's disturbing to read that among all starters in the world the one that suffers is right yours!
If you really believe it's water, did you try to boil it? Boiling should remove most of chlorine and chloramine. Some claim that lemon juice can remove chloramine, too, but I don't know if it's true. For sure some drop of lemon juice will re-establish a sane pH in the water and in the starter, too.
I always add some sugar, salt and lemon juice to my refreshment bibit and my starter is extremely happy :-) . Could I be so cruel to remove such goods from its diet? :)
Ran across this research paper. For those of you interested in a comparison study of Rye sourdough LAB
I can only say that my starter is not the same and I'm working on getting my aromas back, Nico is helping me with my gummy crumb, so far zapping the bread with microwaves is setting up the crumb. The problem looks flour related. So it is affecting my starter as well. We are working on controlling enzymes now. (Need more sour.)
Enjoy!
http://www.ann.ugal.ro/tpa/Annals%202011/vol%202/10%20Banu%20et%20al.pdf
http://llufb.llu.lv/conference/foodbalt/2008/Foodbalt-Proceedings-2008-89-93.pdf
Not sure in Fig. 1 stages 2 and 3, totals of 400g is coming from, should read 350g total. Seems strange that the 4 writers missed this error. Keeping in mind that it takes 24 hrs to read a test sample to count colonies of bacteria grown in that time... there is a lag time for data meaning that one full day has passed to chart it. So the first day is actually missing and that this is a 4 day process.
What I find interesting is the temps rising as the experiment continues and that ideal yeast temps are first applied before raising temps for LAB, starting out around 26°C and raising to 32°C.
Interesting reading. Thanks for posting the links!
(July 5th)
Made a loaf with 960 Austrian rye flour and it came out! Now that I'm back in Austria, wanted to duplicate this recipe with white rye flour. Wow, what a difference in dough! Wetter, uglier, and more like wet cement. Dough stuck a lot to my spatula.
Oh about a week ago I got my starter up and working. It has been sitting in the refrigerator, no, it had gone to South America and come back with me, dated October 2012. I still have one that sat here the whole time. Low hydration, in a ball shape sitting in a jar with a little flour and a tight lid. Got it up in 4 to 5 days and then used it after a 1:10:10 test.
All the times were slow which didn't surprise me, I aimed for a 3 hr bulk rise which took 4 hrs and then the shaping... well the shaping was more of a few spatula folds & pouring. After filling the pan I was worried this goop just might rise over the sides and crawl away dragging on the 150g of walnuts pieces in the dough. It was level and flat after my attempts to round the top. I dusted the top with rye flour (was thinking about running out for rye flakes) and with the help of the spatula got some flour deep into the sides between the pan and the dough. I was hoping the flour would soak up some of the water and firm up the crust as it rises. I would brush it off afterwards if it was too ugly. I set it in the cold oven to rise. I also reshaped the top the best I could.
I Docked the loaf after 3 hrs and shoved it into a cold oven with a alu-foil tent pinched tightly to trap steam. Set the oven to blow hot air at 220°C and in 15 minutes, the oven was hot. Let it hold 210°C for a quarter of an hour and then let it fall back to 200°C. Uncovered it 45 min after reaching temp. and rotated the pan. The crust was not the best looking, had a crack down the middle but it had sprung! Sprung into a nice loaf. Wow, caught me by surprise.
When it was cool the next day, I cut it open and much to my relief, the crumb was light in color but very satisfying.
Pictures to follow... (please forgive my late update, been busy and am now in Canada.)
Here is the consistency of the rye paste, quite wet...
And the crumb shot !!!
It was my fault. The Canadian rye is quite good however faster fermenting than my Austrian rye (more bran) yet more time than the Chilean rye. A very beautiful dark (Rogers Dark rye) flat frisbee round and tasty too. Hey, I docked with a cut off Q-tip swab! (must be a first!) I realized when I folded the dough after a 3 hour bulk rise that I had my hands full. Almost lost my loaf through my fingers until it was deflated enough.
Wonderful aroma and bubble distribution. Half stuck to my make shift banneton. Loaf top fell out a split second late after flipping. Well ...let's call it a radical pre-docking maneuver. I was too eager and should have let the dough fall in its own time. Next loaf should be more photogenic.
I have 5 hours from mixing to baking. Shape after 2 to 2 1/2 hrs of bulk rise.
Hi Mini, I'm giving this one a try today. Few mods, no altus and no add in, 'cept for black sesame seeds and chia seeds. Added an extra 60 grams of water to make up for the missing altus goop. Using Anita's stone ground rye. I've tries rye a few times in the past but quickly lost interest in working with 100% rye flour doughs. Not what I'm used to I guess. I'm thinking of committing to it. We'll see! Thanks for the well thought out recipe.
for 100% rye, ever. Crazy. I'm worried it's gonna collapse!!
so far with the exterior -
Do I really have to wait 12 days before eating?
It looks very good! (so far) and all those seeds! How many did you pick off and nibble on before cutting it? Yum!
Can't wait for the crumb shot! 12 days... you're funny... :)
Very nice crumb, supple with good elasticity and nice flavor. I could make an actual sandwich with it. Every other whole rye attempts resulted in very hard, dense and brittle crumbs with almost no rise. I guess I treated the doughs like I do wheat doughs. This was a completely different treatment and with way more water. Thanks again for the tutorial, Mini.
Maybe breakfast but probably lunch since I gotta fly out the door first thing tomorrow. Curious about the crumb as well. I took your advice and baked it pretty close to 205 F. Cheers.
focused elsewhere but a great crumb! Congratulations!
Your baking and travelling has me very impressed, not to mention envious!
I am working on your 100% rye ratio bread (only 2nd time baking this). The first bake was wonderful tasting-I added dates,toasted walnuts and sesame seed and just a little honey. I was aiming for a dense,chewy, slightly sweet toasting bread and hit it perfectly. Thank you!
About chia seeds in this bake:
Does the water used to soak the chia seeds affect the rye ratio? Is it that the rye ratio takes care of the rye hydration needs and the chia water takes care of the chia needs so there is no adjustment of the ratio?
Have you ever used psyllium husks? I've just started using them as a binder in GF bakes but don't have a feel yet for how much water is needed to completely soak them. Some more kitchen experimentation is called for.
My plan is to use the 100% rye ratio as a base and be able to make different flavors of bread (different seeds and fruits). My co-workers that like rye did like the loaf I had made and asked for repeats in the future. They are great testers!
I am going to begin a rye starter in the morning -- too many projects on the go this aft. I am nearly finished my volkornbrot and just HAVE to give your formula a try. It really looks delicious. Some of the other loaves posted on this thread also look pretty awsome!
Thanks for sharing! Brian
Hi Mini, I love the taste of this bread. I'm on my second try and I keep getting 1/2" of what looks like compact unraised dough on the bottom of my baked loaf. I have split the recipe into two to fit my pans. Also it is taking about 4 or 5 hours to reach the pinhole stage with some rise at which time I'm docking then baking as per recipe. Can't figure out what's going wrong.
the crumb? If you have heat under the loaf, a layer of compact dough starting about 1cm up from the bottom, often means the dough over-proofed and then that collapsed interior dough doesn't bake through. You really want to bake it before the surface gets pinholes. Try shortening the rise. If you strike the dough very smooth, you will see slight bumps on the dough surface before pinholes as gas bubbles try to rise to the surface. That is, if the dough is wet enough.
Perhaps it wasn't baked long enough?
Or the starter wasn't up to snuff and needed another refreshment before using. Be sure to let the starter peak rise and not just double.
Hi, I like the photo of this bread a lot and would like to try and bake it without the chia seeds. Unfortunately I am not good at maths and need some help. If I omit the seeds from the recipe how should I work out the amounts of the other ingredients or does it matter? I could use a dough calculator on Bakery Bits to make more than 1 loaf.
along with 200g of the water. I haven't tried either dough calculator to make more than one loaf. I just use the ratio and it can easily be multiplied. Subtract the water and chia first and then multiply for more loaf ingredients. Times 2 or 3 or more loaves. :)
I hope it turns out looking as good as your one.:)
and also if it is better than mine. :)
If you want to run the final figures past me, that's fine too, I don't mind checking the maths.