Pita bread is a great bread for beginning bakers or for making with kids. The entire process of making them only takes about two hours too, so it is also a great one for people on a tight schedule.
Flat Breads
Flat breads can be made in dozens of different ways. They can be made from grains other than wheat, such as corn in corn tortillas. They can be made with no leavening, such as matzo or flour tortillas, with chemical leavening (baking soda or baking powder) such as pancakes or crepes, or with yeast, such as naan or pita bread. They can also be made from a starter. And they can be baked (pitas), fried (fry bread), grilled (zebra bread), and, I would imagine even steamed (I'm drawing a blank... anyone?). Flat breads of some sort exist in just about every culture on the globe.
Anyone who grew up in a household where flat breads are an essential part of every meal knows will attest that they are a hundred times better when baked fresh than when bought from the store wrapped in plastic and already two or three days old.
I wasn't brought up in such a house, actually, but a year or two ago I started going to a local Lebanese restaurant solely for the fresh pita bread that they baked. After draining my wallet by eating lunch there every day for a week, I realized pita bread must be pretty simple to make at home. So I tried it and was extremely pleased with the results. I still visit the Lebanese restaurant for their pitas every few weeks, but I've cut back and saved myself a ton of money.
About The Ingredients
There are only 6 ingredients in this recipe for pita bread, and you even have quite a bit of flexibility in choosing which of those to include. I'll go through the ingredients one-by-one:
- Flour - I like to use one cup of whole wheat flour and 2 cups of all purpose unbleached flour. It gives the pitas a heartier flavor than using all white flour. You can use any combination of the wheat flours you have around the house, from 100% white flour to 100% whole wheat flour. You could probably even use flour made from other grains, though I'd suggest trying it with wheat flour the first time before getting too crazy.
- Salt - Salt is necessary to retard the yeast (slow it down) and to flavor the bread. Without salt bread is pretty... blah. I used kosher salt for this, but any type of salt you have in the house will work just fine.
- Water - Plain old tap water, assuming your water is drinkable. If not, bottled or distilled water. Something close to room temperature (warmer than 50 degrees fahrenheit, cooler than 100 degrees) works best.
- Sugar - A touch of sugar or honey provides a little more food for the yeast and will make the bread brown faster when it caramelizes. It also can add a touch of sweetness to the dough. You can safely omit it from the recipe and it will turn out fine, or add more if you like it sweeter.
- Yeast- I use instant yeast, which is also know as Rapid Rise or Bread Machine yeast. Instant yeast is a little more potent than active dry yeast and can be mixed directly in with your dry ingredients and will have no problem waking up when the water is added. Active dry yeast works just as well as instant yeast, but requires being activated in a little bit of warm water before being added to the rest of the ingredients. If you are using active dry yeast, read the instructions on the package to figure out how to activate the yeast before adding it to this recipe and reduce the amount of water you add later in the recipe by the amount of water you proof the yeast in (i.e., if you activate the yeast in a half a cup of water only add 3/4 to 1 cup later).
- Oil - Oil or fats soften the bread and keep it fresher longer. Olive oil is the most traditional oil to use in Mediterranean and Middle Eastern cooking, but if you do not have any you can use whatever you have in the house. And, in the worst case, you can even omit it.
Pita Bread
Makes 8 pitas
3 cups flour
1 1/2 teaspoons salt
1 Tablespoon sugar or honey
1 packet yeast (or, if from bulk, 2 teaspoons yeast)
1 1/4 to 1 1/2 cups water, roughly at room temperature
2 tablespoons olive oil, vegetable oil, butter, or shortening
If you are using active dry yeast, follow the instructions on the packet to active it (see the note on yeast above). Otherwise, mix the yeast in with the flour, salt, and sugar. Add the olive oil and 1 1/4 cup water and stir together with a wooden spoon. All of the ingredients should form a ball. If some of the flour will not stick to the ball, add more water (I had to add an extra 1/4 cup).
Once all of the ingredients form a ball, place the ball on a work surface, such as a cutting board, and knead the dough for approximately 10 minutes (or until your hands get tired). If you are using an electric mixer, mix it at low speed for 10 minutes.
(The purpose of kneading is to thoroughly combine the ingredients and to break down the flour so that the dough will become stretchy and elastic and rise well in the oven. A simple hand kneading technique is to firmly press down on the dough with the palm of your hand, fold the dough in half toward you like you are closing an envelope, rotate the dough 90 degrees and then repeat these steps, but whatever technique you are comfortable using should work.)
When you are done kneading the dough, place it in a bowl that has been lightly coated with oil. I use canola spray oil, but you can also just pour a teaspoon of oil into the bowl and rub it around with your fingers. Form a ball out of the dough and place it into the bowl, rolling the ball of dough around in the bowl so that it has a light coat of oil on all sides. Cover the bowl with plastic wrap or a damp kitchen towel and set aside to rise until it has doubled in size, approximately 90 minutes.
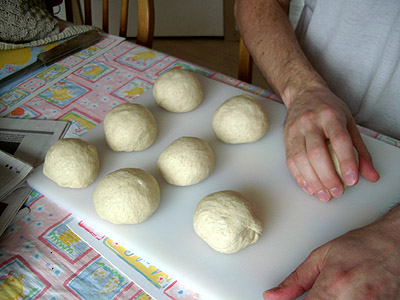
When it has doubled in size, punch the dough down to release some of the trapped gases and divide it into 8 pieces. Roll each piece into a ball, cover the balls with a damp kitchen towel, and let them rest for 20 minutes. This step allows the dough to relax so that it'll be easier to shape.
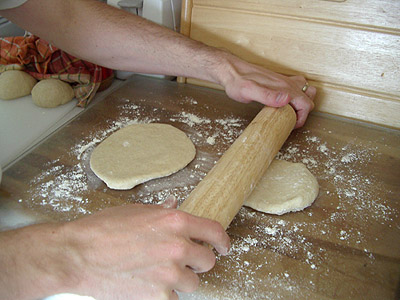
While the dough is resting, preheat the oven to 400 degrees. If you have a baking stone, put it in the oven to preheat as well. If you do not have a baking stone, turn a cookie sheet upside down and place it on the middle rack of the oven while you are preheating the oven. This will be the surface on which you bake your pitas.
After the dough has relaxed for 20 minutes, spread a light coating of flour on a work surface and place one of the balls of dough there. Sprinkle a little bit of flour on top of the dough and use a rolling pin or your hands to stretch and flatten the dough. You should be able to roll it out to between 1/8 and 1/4 inch thick. If the dough does not stretch sufficiently you can cover it with the damp towel and let it rest 5 to 10 minutes before trying again.
If you have a spray bottle in the kitchen, spray a light mist of water onto your baking surface and close the oven for 30 seconds. Supposedly this step reduces the blistering on the outside of your pitas. I've skipped it many times in the past and still been pleased with my breads, so if you don't have a bottle handy it isn't a big deal.
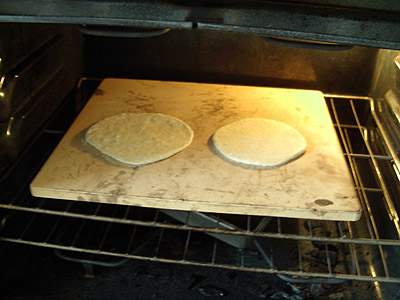
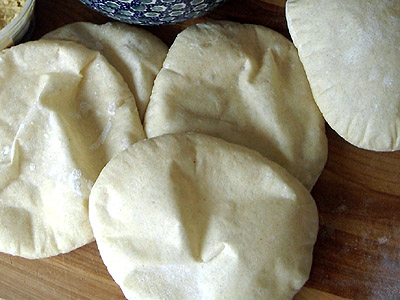
Open the oven and place as many pitas as you can fit on the hot baking surface. They should be baked through and puffy after 3 minutes. If you want your pitas to be crispy and brown you can bake them for an additional 3 to 5 minutes, but it isn't necessary (in the batch pictured here I removed them at 3 minutes).

That's it. They should keep pretty well, but we almost always eat them as soon as they come out of the oven.
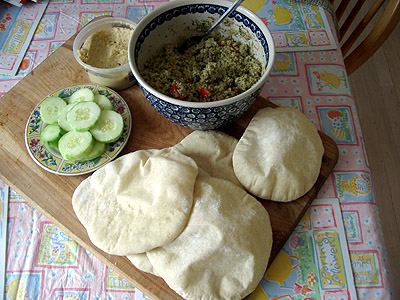
Yum!
If you have any tips on baking pitas or have a recipe you'd like to share, please add a comment below.
Comments
this is indeed an enjoyable and tastey recipe. i also had some puffing issues. some of mine half-puffed, while others puffed fully. (by half-puff i mean, it has 2 or 3 medium sized bubbles inside of it, but not continuously through) i made these twice, first time being a complete novice, second time i experimented with rolling widths. i had the same results as my first batch even though i rolled them out much thinner. next time i try it i will test oven temperature.
i had it at 400 both times, by how much do you think i should increase the temerature?
Hello all,
I'm new to the site, though I've thoroughly enjoyed lurking for a couple of months now and have, thanks to you all, finally learned to make eadible sourdough. It's got a long way to go to make me really happy, but it's come a long way from the paving stones I produced without fail several years ago!
Floyd, your pitas look wonderful; I learned to make it from a recipe very close to yours, but they are cooked on a skillet on the stove top. The puffing isn't completely reliable (sometimes you just end up with flat bread), but the hot skillet also gives the pita a flavor that reminds me of the lebanese bakery I grew up frequenting. The pita cooks briefly on one side, then gets flipped right before bubbles appear. Puffing happens on the second side.
Thank you all for sharing your knowledge so generously!
edh
I was so surprised that these worked for me :)
They were so delicious.
I put a mixture of Wholewheat, Wholespelt and rye flours into these and they tasted looovely. I might try other flours experimented with. Barley flours sound delish! (I love barley pancakes)
http://www.flickr.com/photos/34851581@N00/425773347/thegreenbaker
i've made this recipe 3 times, and i do love it. at first i had some issues with getting them to puff up well, so i read all the responses and the next two times i decided to experiment with higher temperatures and rolling them out thinner.
sadly i still can't get them to puff up fully. i get a good sized half bubble (one half of the pita bread puffs up while the other stays flat).
so i was wondering if anyone knew what i am doing wrong.
they still taste delicious, it's just slightly annoying to have to cut half of the pita so the opening goes all the way through.
thanks!
pompeii,
It's not a sure fix because, as I said, I don't get a completely reliable puff on the stove top, but the recipe that I've used calls for letting the dough rest not only in the individual balls before rolling out, but also for 10-15 minutes after rolling out. I've found that leaving that step out seems to affect the puff to some extent.
Good luck!
edh
I just made these for dinner tonight. Very easy and much tastier than storebought! I baked them two at a time and only figured out how to get full puff-ed-ness on the last set. The others were partially puffed. The thinner the better, it seems.
I baked them for 5 minutes, and I think I'll even go a minute or two longer next time.
Sue
I just made these for the third time, and every one puffed completely! I started the oven at 450F instead of 400, and let it heat for about 30 minutes before starting to bake. I figured so much heat is lost each time you open the door to switch batches, I would crank it up to see if it helped.
Of course, everyone's oven is just different enough to make you nuts, but I found a higher initial temperature made it work for me. All the pitas had puffed fully after about 2 minutes, and I left them in the oven for another 2 after that.
Sue
Will you share you tsatziki recipe. Our family loves it! But we usually buy it. Thanks! Albert
Hi Albert- my simple recipe for Tsatziki is
Start wih one carton of whole milk yogert- put in lined strainer for approx 1 hour to drain whey
peel, deseed and finely grate one cucumber- remove as much moisture as possible (I prefer the hand method of repeatedly squeezing small handfulls until I can't get anymore juice from the cuc
mix with drained yogert
to this add- 4 cloves crushed or finely minced garlic, 1t vinegar or lemon juice, 2T olive oil, salt and pepper to taste- adjust acid and oil to your liking
thats it! Store in fridge until ready to use- adjust ingred. to your families personal likings- we happen to be garlic lovers and I actually use 6 cloves per batch!
ENJOY
Happy Holiday to all,
Alison
I consume 2 oat bran pitas a day for my lunch. With prices going up I think I'll just make them myself. I saw the question asked before, but about how much oatbran should I use in the recipe posted here. Do I need to add extra liquid in the recipe? Thanks for any help you can provide.
Good bread is the most fundamentally satisfying of all foods; and good bread with fresh butter, the greatest of feasts.
James Beard American chef (1903-1985)Thank you so much for sharing this recipe. I have now made these twice. So very good! Tonight I added wheat bran and germ to the AP flour. I used my tortilla press (for corn tortilla) to shape these puppies. Best idea I have had yet! They were perfectly round, as when I use a rolling pin they took on a tear drop shape.Also the thickness was more consistant. I let them rest for approx. 30 min before baking. This time all of them puffed up beautifully! We snarffed them before I remembered to take a picture- oops. Thanks again, Alison
Cool! I didn't realise there was a recipe here for Pitas.
I made them the other day sans recipe with some spare sourdough starter and they turned out very nice - but I learned something very important from it. Half of my pitas didn't puff up correctly. Why?
From what I can tell, Pitas won't rise and expand properly unless you roll the dough out as evenly as possible.
Stretching by hand gave me a great approximation of a Naan bread but the steam/gas did not form a 'pocket' like Pitas should.
Re: fat/oil - I didn't use any oil and the pitas were still great the next day. I will definitely consider adding sugar next time to see if it yields a browner result.
this is the first time i've made pita bread and it was spot on for a first-timer.
normally I cook with cast iron, except when something needs to be on a larger surface, in which i use glass or thin cookie sheets. I did these on the cookie sheets, they puffed up a little, but not that much and not on the full surface, i took them out thinking they'd be done, but they were a little light all over, so I reheated on my cast iron skillet.
I saved one dough for the cast iron as a test. on the stovetop with my cast iron skillet the pitas puffed up PERFECTLY. so next time I'll do it this way.
still, even with them not being puffed all the way in the oven, they were just super tasty and easy and fairly quick - really really great!
thanks!!
I had a little leftover oatmeal bread dough and decided to experiment one day; rolled it out quite thin and baked them in a very hot oven, et voila! Oatmeal pitas.
Has anybody tried rolling pita with a pasta roller?
The pita would be small (or rectangular), but the dough would be thin and even.
I never expect my pitas to exactly the same or even perfectly round, but I wouldn't use a pasta machine; they'd be too thin.
I know it's been a while since this was posted, but I noticed while reading this that you didn't know what kind(s) of bread were steamed, and would like that information. So without further delay:
Right off the top of my head I can think of one bread/bun that is steamed: Bao. Not really a loaf of bread per se, but it fulfills all the "prerequisites" of bread. It has flour, water, yeast, and salt in it (sugar too), it's kneaded and bulk fermented, and it's shaped at the end before being allowed a final rise and then cooked (steamed).
I eat these little lovlies on a fairly frequent basis... at leats once every two weeks, more often if I can gather the ambition to make them. There is also a less traditional baked varient of Bao, but many purists don't recognize this as being a legitimate bao bun. Rather, they see this as an Americanized meat filled bun. I've had both, and they are quite different (although both are very good.)
There are many other forms of chinese bread/buns/rolls that are similarly cooked with steaming, but other than "buns" I don't know their names, and am too lazy to look them up right now ^^.
Cheers,
Taco
Confusion is a state of mind... or is it?
For a first time is great! eventhough I made them at 1/4" and they didn't puff well. next ones i made thicker and it was a success!
Gonna eat with lentils and broccoli- Little curly baby boy Caspar loves also! bearing in mind he stills hate lumps and chewable stuff!
Thanks for the great recipe...
and since I have found an awesome red pepper hummus recipe, I'm totally hooked!
If anyone is interested in the hummus, you can find it here: http://allrecipes.com/Recipe/Spiced-Sweet-Roasted-Red-Pepper-Hummus/Detail.aspx
I switched out the cayenne pepper for pepper flakes- just under a 1/2 tsp
Well, I appear to be the only one extending this thread, but that's ok. I think I've figured out the trick to making the pocket in my skillet-"baked" pita. If I have the skillet at medium/medium high rather than high, flip the pitas constantly, and keep them over the heat for a long enough time, the pocket forms. Previously, I was using too high a heat, so I never left it on long enough for the pocket to form. I'd only get individual bubbles.
It's not only "OK," it makes things easier to find and keep stuff together. Thanks for not starting a new thread. I sometimes think the search engine is too far upper left. it should be smack in the middle of the front page! Rest assured, you won't be the last to extend it. (hehehe)
In references to heat... Everyone's "high" setting can also be different, nothing like experimenting and reporting the results, that's the wonder of this site... everyone learns something and shares.
Mini
For those of you who do not want to heat your kitchen in the summer, try baking your pita in a barbecue grill. With the door closed, my grill reaches about 500 degrees. I preheated the grill with a very heavy flat baking sheet. The pita puffed up perfectly in 3 minutes.
Also, after shaping 12 round balls of dough, I used my tortilla press to quickly and easily press out perfectly round pitas ;-) I was so impressed, that I decided to buy an 8" tortilla press for larger pitas.
Diane
How does the amount of time bagels are in the water affect the crust. Longer time equals more crispy crust ? I know it could be anywhere from 30 seconds to 2 minutes but what does the boiling water actually do to the crust
http://www.thefreshloaf.com/node/9923/boiling-bagels-what-are-we-trying-achieve-here
I made them a few days ago and they turned out great, I was really surprised, and the pockets were great.
Thanks for this great recipe!!
I just made these and they were perfect. I used 1 cup white whole wheat flour too. I have made pita's about 3 or 4 times before with some success but usually they don't puff or only a few will. For Christmas I got a baking stone... and I am sure that is what made the difference this time. I put the pita's on the stone and in 2 minutes they puffed-all 8! I was amazed... so if you can't get them too puff make sure they are super thin and bake them on a preheated stone or even try a preheated baking sheet turned upside down.
I have been using this recipe as the basis for trying to make 100% whole wheat pita for about two years now. And always, my results were inconsistent. If I was making 8 pita loaves, maybe just under or over half of them would puff up correctly. Couldn't figure it out. And then, by accident, I nailed it. So, here's what I've learned about making whole wheat pita:
1) Add vital/essential wheat gluten if you're using 100% whole wheat flour
2) White whole wheat flour (a softer whole grain flour made by King Arthur and Trader Joes) works better than other whole wheat flours
3) If you're using a whole wheat recipe, that RESTING step is critical - and will take longer. Like TWICE as long. That was the bit I recognized by accident (got caught up in email when I left the dough resting)
Thank you SO much for publishing this recipe - there is really only one problem with it now: Once my family tasted home made pita, the store bougt stuff was permanently off limits!
Thanks for the recipe. They were very good,easy to make. It's a keeper.
-Jonathan
I finally got around to making these tonight and for the most part, these turned out great. I used 2.5 cups of AP flour and 1/2 cup of whole wheat flour. This recipe was easy to throw together, and due to the hotter days, the rise time was short! 20 minutes! Yikes! For the most part, these tasted pretty good...except that I had forgotten to add the salt when assembling the dough initially! Oops! I did notice one thing in regard to puff though...these definitely need to rest for 150-20 minutes before baking, or else they will not rise. I'm going to try this again soon, hopefully I'll remember the salt this time! Thanks for the great recipe!
Did anyone weigh your flour before adding it?
I made this dough today and had to add a ton more flour than the recipe called for - which meant I had to mix it longer so I am worried that the extra mixing will act like extra kneading and will affect the texture of the finished pita.
So, does anyone have this (or another) pita recipe using weights?
Yum! thanks for sharing this recipe. My results posted on my TFL blog here. I rewrote the recipe slightly based on weight.
I followed this recipe to a 'T' this afternoon and came up with one VERY SERIOUS problem. I baked them in twos on a pizza stone, and by the time a set was done, my wife and I had eaten the previous set....
Intervention #1: Don't make the Hummus before completing the Pitas.
Intervention #2: double the batch.
I followed the recipe (3 cups flour to 1-1/4 cups of water) and the dough came out like batter. I don't see how I can possibly knead this!
I guess I need to add more flour.
I weighed my flour: 4.5 oz = 1 cup.
I cut my pitas into 8 wedges, then split each wedge into 2 wedges. I spread them on a cookie sheet and spray them with olive oil, or you could toss them in it, and bake them at 375 for about 5 minutes then I sprinkle them with a little, fine popcorn salt. Sometimes it use sea salt and pepper and oregano. Other times I sprinkle with a little curry. The sky is the limit for seasoning. I then put them back in the oven until slightly browned. They crisp as they cool.
Watch them closely at the end because they don't all get done at the same time. Terry
Thanks for the recipe, after years of making these thus far this one has worked the best. I just need to remember adjust the water next time and have hummus on hand.
Great tutorial! I tried pitas for the first time end they turn out wonderful!
But how do you manage that they flatten? Mine stays puffed up (as on the photo in the oven) and crispy.
Thanks
zdenka
I make this recipe for pita's too. It's excellent. I use all whole wheat flour to make it healthy. I use a pizza stone in which I use the lowest tray insert in the oven to cook on. What I was told is that try not to touch the pitas, because this will ruin them puffing up, like it's suppose to. What I do is I have a pizza peel and sprinkle corn meal on it and put dough on and with a roller flatten it out and trying to make it as round as possible. When ready for the oven, the corn meal helps slide it right onto the pizza peel. Cooks like in 4-6 minutes. I do not and refuse to buy pitas from the store anymore. I freeze them. They freeze well. I use them to have my once a week home made falafel sandwiches. If anybody is interested I have a great falafel recipe which I got from dedemed.com....super nice lady who cooks mediterranean food with recipes.
Ok folks, I am following the recipe exactly and the pita is definitely Puffing but there are no pockets of air within.
Am I missing something? I thought there should be pockets within the pita after the Puffing........or am I wrong?
What does happen to me is that they are puffing up but it ends up more like a small Pita loaf of sorts with it all being bread inside instead of air.
They look great but I am getting bread and not air inside.
Please note I am rolling these pitas to a thin 1/4 before putting in the oven and the oven is 475 degrees and it is on a hot cookie sheet on the bottom level of the oven.
Please advise.
cb
I suspect they need to be a little thinner than 1/4".
Mine were and I got about half to get full pockets. All got at least partial pockets.
That "loaf" really seems to indicate they were not thin enough.
OK, next time round it will be thinner than 1/4, but that is getting pretty thin. it looks like 1/8" of an inch as it is.
However, next time will be really thin.
Yes, I am getting partial pockets as well...........
many thanks,
cb
Gosh this recipe is great. My Pita's turned out really well and i got a real good puff out of a few of them. Some of them i rolled REALLY thin and made some Pita Crisps. I sprinkled cinnamon sugar and put some butter on them and they are quite delectable. I can't thank you enough for this recipe!
I am so pleased with this recipe. This is my second time using it and i am just amazed how they puff up so nicely. We use them as pizza crusts for mini-pizzas and they work wonderfully. I personally eat them with butter and honey or cinnamon sugar. but they always turn out wonderfully and thank you for this marvelous recipe!
I never really liked pita or hummus until my family stayed in Israel. Now we are a bit snobby about what kind of pita or hummus we will eat. Although I make pretty much everything homemade, pita has been one of the things I've had trouble with perfecting. I can make a mean Naan or flatbread but my pita's never hollow out very well. I can't wait to try this recipe!
As per a video posted by Chef John of Food Wishes dot com, http://www.youtube.com/watch?v=NPiA69p4gqE
I now bake my pita on the stove top in a cast iron skillet. It conserves expensive propane as this method is more efficient and, in my opinion, yields a superior pita.
Check it out on YouTube if you're interested, or just make your favorite pita dough, form the pitas as usual, and bake them on a preheated cast iron pan or skillet. Flip them over after they've become speckled and brown. They usually puff up, but they taste great whether they do or not.