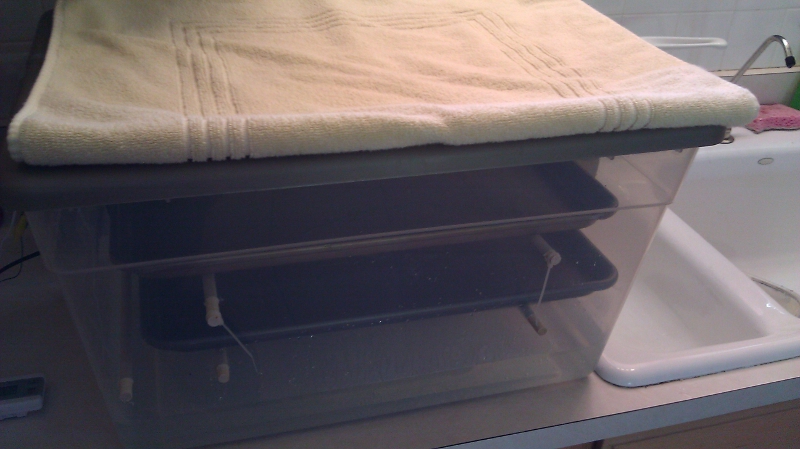
Hi all, Living in the desert of Palm Springs where our humidity is usually around 15-20% I find it hard to keep my sourdough from drying out. I have tried the Oven, Microwave, box and so on and really haven't had the success I wanted. So poking around TFL and the internet I found for under $50 I was able to roll my own. I am pretty sure you can do it for less if you buy some of the supplies online.
| Aqueon 100 Watt Fish Tank submersible heater (UPC 015905 061018 ) | $31.49 |
| Sterilite 56Q plastic box (UPC 073149 165916) | $5.48 |
| Plastic Cable Ties | $1.90 |
| 2 - 3/8" wooden dowels |
$1.78 |
| Sub TOTAL | $40.65 |
| tax 9.75% | $3.96 |
| total | $44.61 |
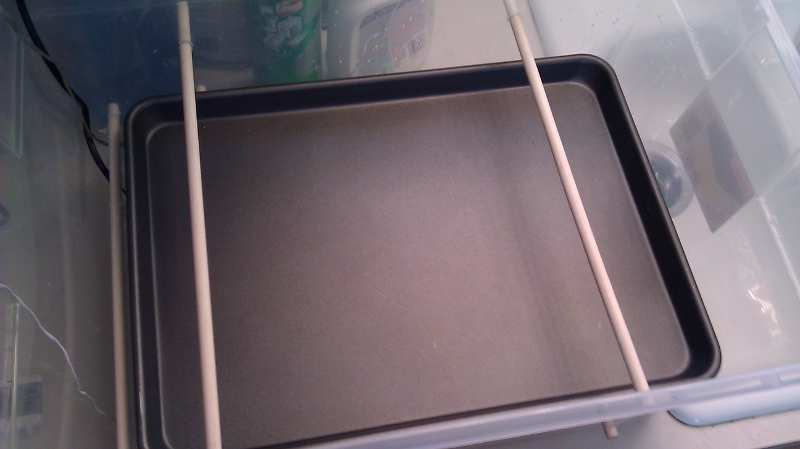
I drilled two 3/8" holes on each side 4" up from the bottom and 4" from the site (that is 4 holes). Then drilled 4 more holes 4" up (towards the top) from the last holes. I cut the 3/8" wooden dowel so they stuck out about 1" from each side and used the tie wraps to hold them in place. The bottom dowels are not removable. Then cut the other dowel for the top rack making the dowels stick out a little longer, they are removable incase I'm making rolls I can use two 1/2 sheet pans or when making bread just the bottom rung will be used.
You fill the bottom up with water to about 3" or make sure you are covering the submersible heater all the way. That is all I needed, I do throw a towel on the top to keep the heat from escaping from the top.
Its simple and works. Here is a link to the photos, since I didn't know how to do it on TFL -> http://proofer.pen.io/
Andy
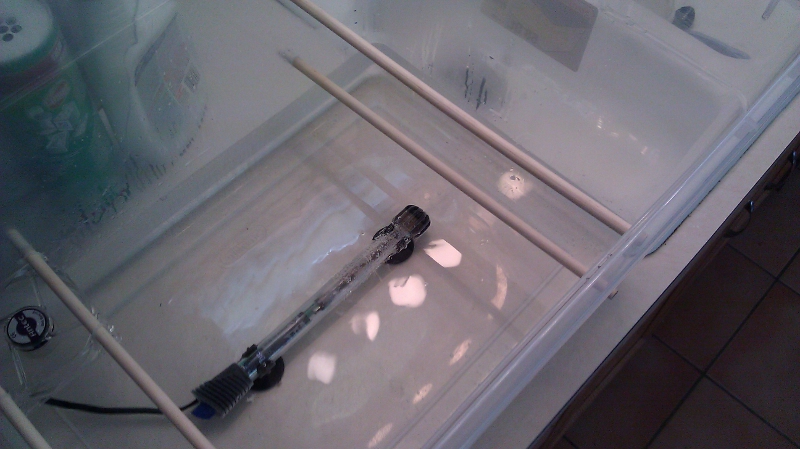
I added a computer fan to move the moist air around, but testing it I'm not sold that I need that in there.
I found the heater for under $20. Accuracy to within one degree.
http://www.aqueonproducts.com/assets/012/23817.pdf
Thanks. At 6000' in the high plains desert of central Utah, this looks like something I could use.
Michael
Looks great! What is your sense of the temperature inside?
Do you cover the dough with anything like a towel or is that not needed given how moist it is inside?
Kudos: Always great to see creative solutions to problems that we all deal with!!
I just put it in without any covering. Though it is a moist environment so the dough over time would absorb some of the moisture. I haven't made any rolls that need a 2 hour rise, so I will see how that goes, It may be from one extreme to another but I would rather my rolls puff up nicely than the hard lumps of dough I have been having - lol
My test I kept the water around 85 and the air temp was at 77-78. Again I don't know how this will work when I have a two hour rise
Hi,
I notice you posted this almost two years ago, and I was curious if it was still working for you. With cooler weather on it's way, my starter and yeasted breads have been less than thrilled. I'd like to find a solution before my bread just flat out refuses to rise (if you'll pardon the pun!).
Thanks,
Raquel
I picked up a cheap heat pad ("cozy spot" at Walmart for $10) without auto-shutoff and put a stoneware baking pan (for brownies maybe) on top of that and whatever container (bowl or bread pan or just the bread itself) on top of the stoneware with a small cooler over the top. It rises bread fast and does a nice job. But I'm sure I don't get the humidity like you've got there as seen with the condensation on the continer's walls in your pictures.
If I want a lower temp I just use the more insulated side of the heating pad (more material between the pad and my stoneware), If I want hotter, I use the side with the thinner material. Seems to work pretty well and maintains 80 - 90F depending on which side of the pad.
I also put just a touch of water on the stoneware pan to keep up the humidity and maybe help even out the temperature across the stone.
Got the heating pad idea somewhere on the net. Works very well. If anyone else uses the idea, most cheaper pads have auto-shutoff. Most were in the $12-$20 range. This was THE cheapest one there at $10. It has only an on/off switch and NO auto-shutoff. Probably safer with the auto feature (liability for them to not have it I'd guess). But for rising sourdough, who wants to keep turning it back on every 60 minutes.
Probably not the humidity of the box shown above but it works. Love the idea of the box in the first post. If I get some time someday, it's on my list of things to build!
Over the year I have used my proof box with lots of success and some not so successful.
What I found is the heating element is not really needed. Just hot water works for me, and when the kitchen is warm, just a spray bottle of water to wet the sides works great. I did find putting water on the botom was a little too moist. So now I only spray the sides of the box when I'm rising my bread in Brotforms. Eliminates the spread and makes a taller loaf. Or pour a cup or two of hot water into the bottom for the long rise breads.
I guess you can spray the sides with water and keep a heating pad either inside or under the box.
The recipe I’m following to make my own starter needs a 70 degree environment to grow. For proofing a few hours I’ve used a heating pad in a similar box successfully, but it can’t meet a constant 70 for 24 hours.
think this setup, amazingly simple would work?
If you want a temperature controller, and already have a heating pad, I would get a prewired controller - there are several available. This one goes from 68 F to 108 - while it is designed for a heat mat, it should work with any heating pad that is under 8 amps. https://smile.amazon.com/gp/product/B000NZZG3S/ref=ox_sc_act_title_1?smid=ATVPDKIKX0DER&psc=1
This one goes from 40 F to 108 and can handle 8 amps https://smile.amazon.com/Century-Thermostat-Controller-Germination-40-108%C3%82%C2%B0F/dp/B01I15S6OM/ref=sr_1_2_sspa?dchild=1&keywords=digital+temperature+controller+110v&qid=1585433941&s=lawn-garden&sr=1-2-spons&psc=1&spLa=ZW5jcnlwdGVkUXVhbGlmaWVyPUExTldMUEZYMFZES1NGJmVuY3J5cHRlZElkPUEwNjgwNjM4MUQ1VlE4UllWMEFLUyZlbmNyeXB0ZWRBZElkPUEwNjEwNDgzMTlEUVE2VzVSNTVSMiZ3aWRnZXROYW1lPXNwX2F0ZiZhY3Rpb249Y2xpY2tSZWRpcmVjdCZkb05vdExvZ0NsaWNrPXRydWU=
You can get something cheaper https://smile.amazon.com/Ohuhu-Thermostat-Controller-Germination-Temperature/dp/B07JG1KYCT/ref=sr_1_42_sspa?dchild=1&keywords=digital+temp+controller&qid=1585433772&s=lawn-garden&sr=1-42-spons&psc=1&spLa=ZW5jcnlwdGVkUXVhbGlmaWVyPUFRV0FPN0dTNjNHMCZlbmNyeXB0ZWRJZD1BMDMzMTAwMDFRVUkwTzFSU1RQMFImZW5jcnlwdGVkQWRJZD1BMDUzODcyODVZTFRIRjlUN1RHRCZ3aWRnZXROYW1lPXNwX210ZiZhY3Rpb249Y2xpY2tSZWRpcmVjdCZkb05vdExvZ0NsaWNrPXRydWU= though some of the reviews were not positive.
This is what I have https://smile.amazon.com/Dorhea-Temperature-Controller-Centigrade-Thermostat/dp/B07R44SGLX/ref=sr_1_4?dchild=1&keywords=digital%2Btemperature%2Bcontroller%2B110v%2Bstc1000&qid=1585434099&s=lawn-garden&sr=1-4-catcorr&th=1 . If the prewired ones were available at the time I bought mine at a decent cost, I would have gone that way. While this allows you to turn on heat, and turn on a cooler, you have to wire it yourself, and it is no where near as easy to set temperature as the ones listed above.
Also, check to see if your heating pad has an auto off function, if so, you either need to disable that, which involves soldering, or get a different heating source.