I haven't tried the NYT No-Knead recipe, although I've read some of the discussions on The Fresh Loaf along the way. Based on some questions from KipperCat about the amount of starter that should go in a sourdough conversion of the recipe, I decided to give converting this recipe to sourdough a try.
I've tried to stay very close to the recipe in The New York Times, although I did a few things differently - some good, some bad, probably.
I have some photos of the process and also a spreadsheet in html or xls format.
Ingredients
- 15 grams (1/2 oz, 1 tbsp) of 90% to 100% hydration white flour starter or 12 grams of firm Glezer style starter or similar.
- 346g (12 oz, 1.5 cups) water
- 450g (16 oz, 3.25 cups) bread flour, should be stronger flour if possible.
- 9g Salt
Mix
Mix water and starter and stir vigorously until starter is fully dissolved. Mix flour and salt to fully distribute salt. Put flour and salt together and use a dough scraper to work the flour into the water. Continue working around the bowl scraping dough from the side toward the center and pushing it down in the center, until you have a shaggy mass. Do a few "french folds" (I still don't know what to call this technique) as in the video I took, if you want, but this step can be omitted. Place dough in covered bowl to rise at 75F for 10 hours.
At 70F it needs to rise for about 13.5 hours. Or, at 70F, use 45g of starter instead of 15g to have a rise time of about 10 hours. Similarly, at 65F try using about 130g of starter. If using larger amounts of 90% starter, remember to adjust the water down in the final dough. For example, for 45g of 90% hydration starter, reduce water by about 15g or 1/2 oz, and for 130g of 90% hydration, reduce water by 50g or almost 2oz.
As you can see, an important aspect of the sourdough conversion is knowing the temperature and how fast your starter is. The above suggestions for the various temperatures would work for my 90% hydration starter, which would double from a feeding of 10g:50g:50g (starter:water:flour by weight) in 6 hours at 75F. The firm version of my starter at 60% hydration would double in volume in 5.5 hours if you fed it (10g:50g:50g) at 75F. At 70F the respective rise times for 90% hydration and 60% hydration starters would be 8.25 hours and 7.5 hours, respectively.
The dough should roughly double in volume or a little less. It's not too important if it doesn't make it all the way to double, and it's probably better to lean toward stopping the fermentation and moving on to shaping earlier, rather than overfementing the dough.
Shaping
I have a video of my attempt at this. I was not used to the gloppy dough you get after letting it rise without folding for so long, but I pressed forward. Scrape the dough out onto a lightly dusted surface. Fold it over itself letter style, turn 90 degrees and repeat. I then attempted to form a boule, but I found it sticking to me and to the surface, so I turned it upside down and made the boule by gathering the sides in toward the middle and pressing together, as you can see in the video.
Place the round loaf seam down on parchment paper dusted with some regular flour and some semolina or corn meal. Place the whole thing in a "ziploc" big bag, or find some other airtight container for the final rise. Place a bowl of water in with the loaf to create a humid environment to avoid a dry skin on the loaf.
The final rise should take about 2 hours at 75F, 2.5 hours at 70F, and 3.5 hours at 65F.
Slash and Bake
Here again, I have provided a video of my somewhat frightening slashing attempts, as well as of lowering the loaf into the dutch oven.
Preheat the dutch oven to 425F about 1/2 hour before baking.
Slashing is optional. AnnieT suggested that this loaf needs no slashing and cracks on top during baking, resulting in a rustic look. I did slash it, but it's somewhat difficult to do with a wet dough like this. Getting the lame wet helps. A very shallow cut at an angle is less likely to stick.
Be very careful to use thick, heat resistant hotpads or very heavy oven mitts. A cast iron dutch oven preheated to 425F is dangerous to move. Be warned. Be sure to have a place prepared for the dutch oven and the lid that is heat resistant when you remove them from the oven.
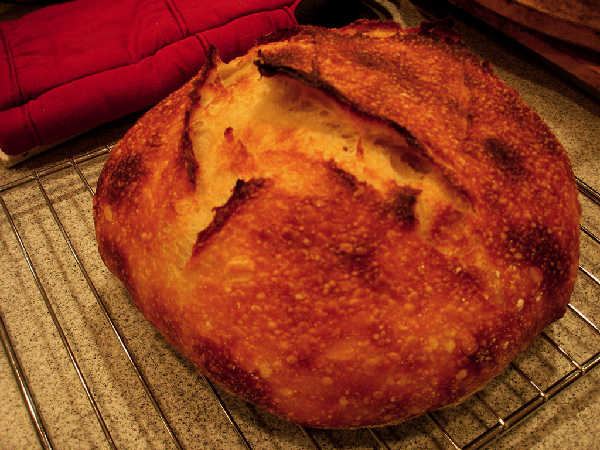
Drop the loaf, holding it by the parchment into the dutch oven. Place the lid on top. Place the whole dutch oven back in the oven. I baked it for 25 minutes, less than the recipe states, as I was worried about discovering a small piece of charcoal in the dutch oven if I let it bake too long. It was fine, though, and not even that brown after 25 minutes at 425F. At this point, I should have just left the lid ajar and placed the whole thing back in the oven. However, I removed the loaf from the dutch oven, removed the parchment paper, which was very easy, and placed the loaf on the oven rack. It took only a few minutes for the ears on the loaf to start burning. The internal temperature was about 207F, but as is typical with higher hydration doughs, it was somewhat underbaked. Faced with a choice between burnt ears and an underbaked loaf, I decided to just stop the bake. I like to toast or reheat my bread in the next days anyway, so underbaking it is fine for that situation. However, I would in the future keep it in the dutch oven and hope that with the lid only partially ajar, it would keep it from scorching and allow a longer bake.
Summarizing, bake for 30 minutes at 425F with the lid closed, then place lid so it is slightly ajar to let steam escape, and allow it to bake to a dark golden brown color 10-20 minutes more, probably.
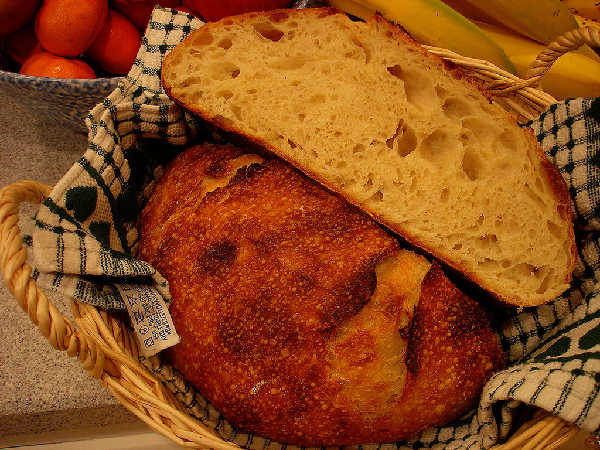
Results
The flavor was excellent. The crust was a little thin and soft, due to my poor decisions during the baking described above. However, it still tastes great and is easily rectified by reheating or toasting. The crumb is what I find typical of higher hydration loaves. The texture is spongey and light with a moist, cool, creamy feel. This bread reminds me very much of the "Pagnotta" recipe in my blog.
- bwraith's Blog
- Log in or register to post comments
It does really look good and your description that it tastes like your pagnotta recipe is enough to make me swoon since that is one of my all-time favorite recipes. But there is a big "but" here. :o) I just can't bring myself to try this method. I would no doubt be burned head to toe and the baking in pot concept just scares me to death. I will leave that to others but you sure offered some good info here and no doubt a wonderful recipe again.
How does this method differ from Susan's baking under the pyrex bowl? I'm also afraid to try that for fear of breaking glass in my oven. Gosh, I'm sounding like a big chicken here.
Btw, Bill, great new video on the French fold. You did it perfectly!
It was fun using the Magic Bowl (Pyrex), 'cause I could SEE the rise and marvel at it, but it is much safer using a stainless steel bowl. It does the trick, doesn't stay hot nearly as long after it comes out of the oven, and doesn't weigh much of anything, so it is easier to take out of the oven.
I leave the bowl on for 15-20 minutes, then carefully lift the edge with a spatula and slide my oven-mitted fingers under the edge of the bowl and lift up and over. Mariana's beautiful SS bowls have a side handle and I'm sure are much easier to manipulate. If you want to sacrifice an SS bowl to baking bread, you could mount an oven-proof handle on the top (bottom) of the bowl.
Susan from San Diego
zolablue, I've done the NYT bread in a dutch oven with a cold start. I placed the dough in the dutch oven as soon as it was shaped. It came out wonderful, and simplified things a bit - besides avoiding that screaming hot pan! While the idea of that hot pan gave me thie willies, after a few times it's no big deal. My last loaf, I baked on a preheated stone with steam in the oven. I'll see if I took pics.
Here they are. As you can see, the unbaked loaf was not pretty - still a bit floppy. I had proofed it on a very-well-floured towel in a colander. I picked up the towel and poured out on the stone. It stuck in a few places, but was easy to separate from the towel. Here I've just closed the oven door. You can just barely see the frying pan on the bottom with the hot water.
And here is the finished loaf. It may look beautiful, but that crust was black in places with a definite burned taste. For some reason I'd preheated well at 500F, instead of 450F. I enjoyed the nice crackly sound, but a thin burnt crust is still burnt. The crumb had a lovely taste, and was nice and airy, with 1 or 2 small baker's houses. No pics after this one though. We were too busy eating.
Hi ZB,
I agree that burning yourself is a potential problem with using any cumbersome or heavy very hot equipment, like a preheated dutch oven. I imagine the pyrex bowl could have similar issues, but maybe Susan can comment on that.
I will say that by putting an upside down half sheet pan on my counter to receive the dutch oven and another to receive the lid, I made it pretty easy. I used nice thick oven mitts and only had a short walk from the oven to the place I had laid out for the dutch oven. The parchment paper allowed me to drop the relatively small loaf into the dutch oven without any trouble, as you can see on the video. So, it seemed very controlled and safe to me overall. The biggest point is to have thick, well insulated mitts and a prepared spot for both the oven and the lid after it is removed from the oven.
I'm not sure how good it is for the dutch oven to preheat it that way without anything in it. However, I used the remaining heat in the oven to reseason the dutch oven, and it looked fine afterward.
Although it might not as effective, conventional steaming of the oven with some water in a skillet or other similar technique along with a good stone should still produce a nice bread, if you wanted to just drop the loaf, parchment and all, onto your stone in the oven, as you probably do with the "pagnotta" recipe.
Bill
I don't preheat the Pyrex bowl, just rinse it out with a little hot water before upending it over the loaf I just slipped into the oven. Do the same using a SS bowl, too. Don't know why everyone doesn't use an upended SS bowl, as it works so much better than misting or adding water to a hot pan, IMHO. Hehe, of course, I am limited to boules or short, fat loaves, but that's okay with me!
Susan from San Diego
Yeah, but Susan, how do I get my Volkswagon sized loaves under an SS bowl, eh?
I see that it works great for normal loaves, though. The dutch oven was very effective also and easy to do with parchment paper, but I see the SS as probably even easier and maybe a little safer just because of dealing with less weight. The handles on the dutch oven were helpful compared to an SS bowl, so I agree that if you were doing this all the time, it would make sense to figure out an SS bowl with handles to make it easy to pick up or drop down on the bread.
That would be fun, wouldn't it? Maybe a sort of pop-up dome that would cover our breads in the oven, then fold up for storage. One of you inventors/entrepreneurs get busy!
Meanwhile, I saw this technique on another site.
Susan from San Diego
KC, I quit using my stone. Didn't seem to matter when using the bowl. How about a large, heavy pizza pan on the second shelf from the bottom? Our Miele oven came with oven-sized trays, so that's what I've been using. Love reading your comments, btw!
Susan from San Diego
Hmmn, do you do a cold start as well? Or do you preheat your tray? We've been meaning to get some heavy duty half sheet pans anyway.
I also have a bowl about the size of the one you showed above - it's probably plenty big for the size loaf I should be making. Today's had 788 grams flour, which I guess is about 6 cups. But I wanted to use a lot of starter, so made a big loaf. I really need to either bake with starter more often or be content to throw more away. We'll have 4 for dinner tonight, but have enough bread for 14!
Thanks for the kind note. I always enjoy reading yours as well - and I usually learn something.
KC, the tray is preheated along with oven, and it doesn't take nearly as long to preheat the oven without the stone, of course. I am trying very hard to stay simple: I refresh my batter-type starter once a day at starter ~1/4 cup, water 1/2 cup, flour 1/2 cup and usually bake a sourdough boule or two every other day or so, giving one away. Buying 50# of flour at a time certainly mitigates the use of 1/2-cup flour a day. There is no science behind any of this, it's just what seems to work well enough for me. I have much admiration for those who choose the spreadsheet route, etc., but that's just not me.
A half-size, heavy sheet pan is on my list for our Prescott oven. It's a Whirlpool, and much larger than the Miele.
Susan from San Diego
Volkswagen!!!! Nice BIG loaves, eh? There's just no hope for you! My loaves, admittedly, are small, but there are only the two of us. And, closing in on 60, we are trying to keep our weight under control. I think we are down to two bread nibbles, a carrot, and lots of exercise most days. At least it seems that way sometimes.
I did find this bowl, 6 quarts, at Wal-Mart for $5. It will easily hold a loaf containing 3.5-4 cups of flour. The baby boule shown is only half that.
BTW, let me congratulate you on your beautiful new oven, and the NK bread above is just lovely! You're a real inspiration to me.
Susan from San Diego
Susan,
VW's in the garage...
Love it, Bill, just love the photo! And I just realized that I owe you an apology because I hijacked your page. Please forgive me.
We're in Cambria, CA this weekend, going to visit Hearst Castle this afternoon, and wondering how we're going to manage getting around the disastrous tunnel wreck on I-5 tomorrow when we leave. I feel so sorry for all the folks involved.
Hope Your day is a great one. Happy Baking!
Susan from San Diego
Susan,
The issue of what to do to steam the loaf in the easiest, most efficient way is very relevant to this page, so I'm glad you commented. I've admired your loaves and the simple technique, whether with SS or Pyrex bowl for steaming the loaf. Thanks for chiming in again here on these techniques. The whole idea behind this no-knead bread is to achieve total convenience with minimal attention and without sacrificing bread quality.
Bill
I like what's coming out of your oven! I really do.
Chestnuts were in the market today and I picked up a good kilo. Tempted to make chestnut flour by grating wet nuts, even though the flour is usually ground dried nuts. I can just see some roasting away in your oven (don't forget to score them first or they might explode.) Chestnuts are alike to potatoes in flavor.
Mini O
MiniOven,
I was wandering in the grocery store and saw a barrel full of chestnuts. I'm no chestnut expert, but your suggestion, submerged in my subconsious after a time, rose to the surface. I bought a big bag and roasted them in the oven, scored as you warned, at the end of another big roasting session after a roast pork loin, steamed cabbage in a dutch oven, and mashed parsnips. They were obsessively shelled after dinner along with some other dessert items and have been added to the oven roasting repertoire. Thanks for the suggestion.
Bill
Hi Bill, I finally tried this, with great results - once I re-read your instructions, that is!
“The dough should roughly double in volume or a little less. It's not too important if it doesn't make it all the way to double, and it's probably better to lean toward stopping the fermentation and moving on to shaping earlier, rather than overfementing the dough."
The original NYT NK with commercial yeast said to “When surface is dotted with bubbles, dough is ready.” On the video he also mentioned looking for the gluten strands on the side of the bowl. I kept looking for those surface bubbles and gluten strands, and didn't go ahead and shape even though the dough was more than doubled. I was so used to it tripling in the commercially yeasted version. So I finally shaped that loaf about 6 hours late. It was very sour, with a smallish crumb.
Then today I realized the problem, followed your instructions and had a great loaf. :)
Hi KipperCat,
I'm glad it worked out, even if it took a second attempt. I like the idea of combining the aspects of the NYT recipe - minimizing the amount of attention, good timing, the flavor enhancing slow rise, and the texture of higher hydration dough - with the flavor of sourdough.
I think it's true that the timing is more touchy with a sourdough version because it will start to fall apart sooner if allowed to overproof. Also, the texture of the dough is different because of the acids that develop in the sourdough, so a sourdough version will not behave the same in terms of surface bubbles, stiffness, stickiness, and whatever other signs you would expect with the yeasted version. I'm feeling good about having added that sentence about not letting it rise for too long. Once you've done it a couple of times, you'll probably get to know the changes in the dough that indicate it's time to shape. It should have a puffed up look and some volume increase (less than double) and probably feel very light and spongey if you poke it.
Bill