I've been prodded by a certain TFL friend (username starts with "Z") to do this recipe, and I finally got around to it. I have to say it's too bad this didn't happen sooner. The recipe is just excellent. I've included some photos of the process and a spreadsheet of the recipe I used.
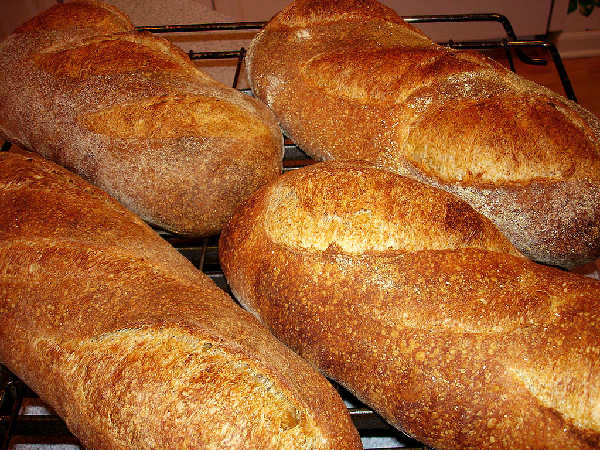
The recipe I followed is almost exactly as specified in Artisan Baking by Maggie Glezer on pages 82-83 except I doubled the recipe and made 4 loaves. I used Wheat Montana AP in place of the bread flour and KA Organic AP in place of the AP flour in the recipe. I made the firm levain using 36g of my 90% hydration starter in 321g of Wheat Montana AP and 197g of water. The inoculation is slightly lower, and I'm starting with a somewhat higher hydration storage starter, since that's what I had on hand. I made the inoculation lower than what is specified to gain a few hours in my overnight levain fermentation, since I knew the dough would not be mixed for about a full 12 hours after the levain was mixed.
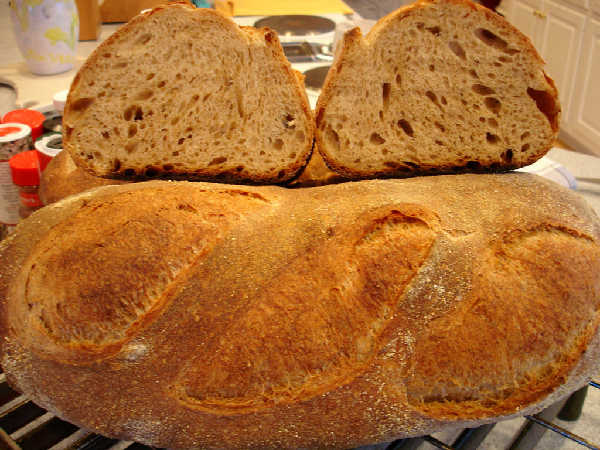
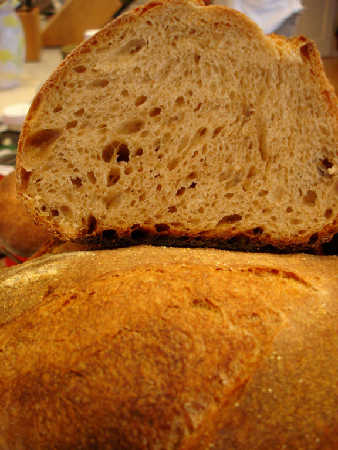
I kneaded the dough by hand using the suggested Glezer technique of working up and down the dough squeezing it and extruding it through my fingers. I also did some of her folding motions The slashing was easy, since this bread is only at about 65% hydration or so. I had to add a little more water because the Wheat Montana AP seems to absorb a little more water, but it is a firm, fairly dry dough. The flavor with the toasted wheat germ, whole wheat (I used Wheat Montana Bronze Chief), and whole rye was outstanding. The firm levain was just peaked when I used it, and the smells coming out of it were very pleasant when I added it to the dough.
I had a little trouble with the shaping stage. The dough was very gassy, even though I stopped the bulk fermentation after 3 hours, before it had doubled, as specified. As I shaped the first one, it just seemed like the dough needed to be deflated or I would have gigantic holes in it, so I did aggressively pat down the loaves, form them into rough ovals and let them relax a few minutes before forming batards.
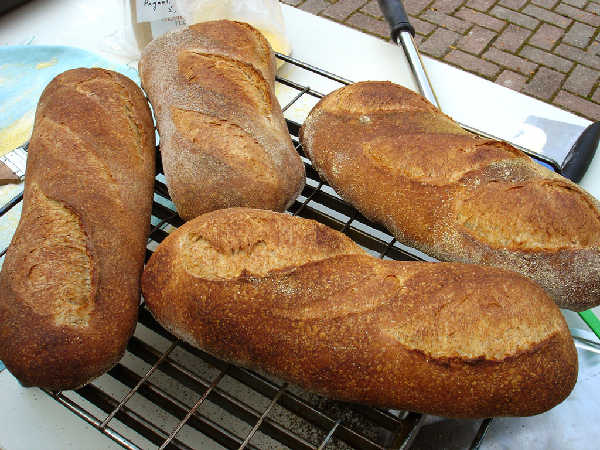
I've been experimenting with my newly installed outdoor brick oven, which has been a bit tricky to figure out. I scorched the bottoms of these loaves a little, so a couple of extra moppings of the oven floor may help to cool down the hearth just enough. The temperature of the dome and air seemed good, as all but the bottoms seemed to come out nicely baked with the firing I gave it this time, which gets the hearth up to about 530F, the air temperature to about 450F, and the dome up around 600F. Those are just the temperatures right after firing. Then, I turn off the fire, let the oven cool with the metal door in place, and mop the hearth floor before starting to bake. I have been especially pleased with the ability to steam the oven with a garden spray mister and seal it with a wet, towel covered wooden door. The crusts are coming out great this way, and the freedom to do larger amounts all at once adds some fun to the whole process. Being outdoors while baking is pleasant too, but I'm not sure what will happen in the winter.
The other bonus of the brick oven has been that the retained heat can be used to cook an entire very delicious roasted dinner. For example, after baking I've done lobsters, corn-on-the-cob, and asparagus, and roast leg-of-lamb, candied yams, and roast cabbage, and roast chickens, roasted halved potatoes, and garlic heads. So, you can enjoy a whole afternoon of baking and cooking from firing the oven one time before baking.
- bwraith's Blog
- Log in or register to post comments
Wow, Bill, it's really wonderful to see some lovely breads from your new oven and hear a little bit about it. You said before that your oven can be fired with wood or gas -- I'm curious which one you used here. For the wood firing, do you build the fire directly in the oven cavity?
Susanfnp
http://www.wildyeastblog.com
Hi Susan,
You can build a fire right in the chamber over to one side. However, I'm still just learning what to do with it using gas firing. I suppose one of these days I'll figure out a source of the proper kind of wood, get myself a few more tools for starting fires, cleaning and storing the ash, and so on. However, I have to admit that right now, it's more than challenging enough to just figure out the process with gas firing. In theory it shouldn't be too different, as you would still get the oven to about the same temperatures with wood firing.
Bill
Well, I just love that recipe and you've sure produced some beautiful loaves. You got some nice ears, too, I see. Don't you think there is an added richness because of the barley malt syrup and the toasted wheat germ? Anyway, great job.
I think what you're able to do in your new oven is just fantastic. It is such an added benefit to be able to cook meals for your family as well as turning out beautiful breads. Please keep us posted on all the things you're doing with that great new oven.
Hi Weavershouse,
Thanks, I do think I've had better crusts with this oven. I just couldn't figure out a really graceful way to steam the home oven as easily as I can with the brick oven. I literally shoot mist from a garden sprayer into the chamber, followed by creating a pretty good seal of the oven with a damp towel covered wooden door I made for it. The result seems to be more steam. I also think the 4 inch thick walls and hearth maintain the heat and radiate it differently than I could ever attain with my home oven.
The same was true with the roasting process. The roast chicken was crisp outside and moist inside in a way that I've never done with my regular home oven.
Bill
ZB,
You've pushed me along with the Glezer book over the last months, much to my benefit. I would not have crawled out of my little ruts without some prodding. Thanks for introducing me to Glezer's firm starter techniques and to some great recipes in Artisan Baking by Glezer. This recipe is a keeper for me. I could do this one over and over and not get tired of it. Of course, that's how I end up in a rut sometimes.
Bill
A beautiful addition to the Columbia archives.
Your oven puts me in mind of the summer kitchens the old farmhouses tacked on to their backsides, which concept holds endless charm for me in July.
Browndog,
I've been trying to figure out what will happen in the winter. With a little ingenuity, I'm hoping it will be possible to work out there in the winter, but it's hard to say until I really try it.
Bill
Bill ... I had a wood fired oven outside when I lived in Connecticut. Winters were not much different than other times of the year for me. I had to fire the oven a wee bit longer but that was all.
As for scorching on the bottom ... It took me a LONG time to develop the patience needed to let the oven "soak" properly. Mine was wood fired inside the cavety so my oven floor got even hotter than yours. Be careful with using water to cool the floor ... you can crack the fire bricks if you get water down between the bricks. Better just let it soak longer ... and time your last proof given this longer soak.
BTW ... the great thing about a wood fired oven is that when you burn wood in it you can burn anything and everything ... except maybe old lead-paint covered housing. You don't need good quality firewood.
Nice bread ... the Columbia is one of my favorites and my son used to work at Essential.
Paul
Paul Kobulnicky
Baking in Ohio
Paul,
Thanks for those tips. I've suspected that just waiting a while will help. As for the water, I am being careful. I'm really just mopping with a damp towel, not a very wet towel. It does seem to moderate the oven hearth surface a bit. In addition to a gas burner that creates a flame in the back of the chamber, there is also a burner underneath the hearth. I suspect that it may be better for me to turn that off a little earlier than I have been, so the heat only soaks in from the chamber.
Anyway, thanks for those tips. I will continue working on it and hope to have it more or less dialed in after a few more tries.
I still haven't tried burning wood in it, but it is capable of it. I want to get to that at some point, but I though it might be better to first gain experience with the gas fired approach and go from there.
Bill
Paul,
I'm doing a miche at the moment. I heated the oven so that the hearth thermocouple buried in the hearth was at about 535F, the surface of the hearth measured with an IR thermometer was about 575F, and the sides of the oven were about 575F. I guess the back of the dome was probably up to about 700F. Then, I sealed it with my towel/wooden door for about 1/2 hour. I think it's working fairly well. I tossed a little flour on the hearth, and the flour right on the hearth browned in about 20 seconds, while any flour that landed piled up, didn't brown too much by then. Anyway, the hearth surface seemed quite a bit cooler than on my previous attempts where the bottom scorched a little.
When I put the bread in, the air temp was around 450F, the hearth thermocouple was at about 500F and the surface maybe a little over 500F. I sprayed mist for about 30 seconds and sealed with the damp towel/door again. It was still up around 450F air temp, 450F hearth temperatures 15 minutes later, when I removed the towel/wood door and replaced with a metal door that lets a little air flow out the chimney and should allow all the steam to clear fairly quickly.
I don't know for sure, but it certainly seems much better than what I was doing. Can you tell me if the above sounds about right and any suggestions gratefully accepted.
By the way, did you steam your oven with mist? I'm just curious how you managed steam or if you bothered with all that. Also, I'm wondering how you accomplished that in the winter if you did.
Thanks, Bill
B -
Maybe I missed it but did you post pic's of your oven?
and how you pulled it altogether.
Slide__Out
Slidething,
I have posted a few pictures of the oven and the process of installing it. Woodstone ovens come fully assembled and have to be forklifted or craned into place. A hole 4 feet deep and 7x7 feet on a side was excavated. Concrete was poured. It cured for a couple of weeks. Then, the oven arrived and was forklifted into place. A mason then built the brick facade and stone roof. The mason was very experienced and was able to build it based on some rough hand sketches I did of what I thought it should look like. I spent some time looking at images on the internet of brick ovens, and then I drew what I imagined would work for me, given that we wanted to restrict ourselves to very common red brick and blue stone we had available at the local supply house. The holes for tools have turned out to be extremely useful. It requires a fairly substantial gas supply, as you can imagine. The oven also works fired with wood.
The oven hearth and dome is made of a specialized type of molded ceramic and has very few seams - none on the floor, which is smooth throughout. The dome is covered with a form of fiberglass insulation. I had to make my own doors for "retained heat method" baking as one would do with bread. The oven is more designed for pizza, it seems to me, and is used in many commercial pizza places, like California Pizza Kitchen. However, with a few adjustments to the process, it works very well for bread, too. I needed to make a wooden door covered with tea towels for the steaming phase. I also needed to modify the metal door to allow it to seal off the oven to retain heat once it has reached the desired temperature and is turned off. These modifications are strictly for when there is no combustion going on in the oven, as you can imagine.
The same modifications allow for the oven to retain plenty of heat for a number of hours, so that I can roast a couple of chickens or a leg of lamb or do some braising or whatever. Actually, the dinners have been as satisfying as the bread making, I've discovered.
The following links are to photos of breads I've done since I started using the oven.
Essential Columbia
Thom Leonard Country French w/Spelt Levain and Golden Buffalo Flour
Thom Leonard Country French With Golden Buffalo Flour
My Basic Sourdough
Sourdough Raisin Focaccia
Another Miche
Miche Using KA Flours to Simulate High Extraction Flours
Pizzas
Thanks for the pictures, I haven't seen one like this before. Makes my mud oven seem very...rustic, lol!
I do envy your temperature gauge, my determination of hearth temperatures are much less scientific and involve staring at the inside walls and feeling various spots on the exterior--I find that when it just starts getting warm on the outside it obviously means the heat has soaked through the entire oven and is ready to go. Actually, it's probably just before the outside gets hot, but that's harder to tell, ha ha.
I baked a lot last winter--actually more than this summer as I have more free time. It didn't make as big of a difference as I though, really the difference between an outside temp of 20 degrees and 75 doesn't mean much when your goal is 500+. I can see the doorway of the oven from the backroom of my house, so I can keep an eye on the fire from inside. The main problem is lack of sunlight, even if I start early in the morning it's always dark at the end and I'm unloading using a flashlight. How long does yours take to get up to temperature using the gas? Between building the fire and cleaning out the hearth I'm probably spending 4 or more hours getting mine hot.
I'm enjoying the non-baking too. This week we cooked dinner--a pot roast and baked potatoes--and then I roasted a squash to make soup out of the next day.
Well, I have to say that I very much admire the "real thing", as opposed to this more modern technological and ready-made approach. I just didn't have the guts to try building one all by my lonesome from scratch with no experience and no friends around here who've done it themselves to consult with. I felt somewhat confirmed in that reluctance when I saw the skill of the mason. I know I wouldn't have done a good enough job all by myself starting from only that which I could learn from a book and the internet after seeing all the mason did that I managed to understand, let alone the vast number of things he was doing that I probably missed completely in my ignorance. He was just building a facade. Building the actual oven chamber would have been far more complicated, I'm sure.
I don't think the firing timing is much different - 4 hours is about right, as otherwise you would have to fire it very aggressively, and the heat wouldn't soak in fully. I think the gas flame is similar if not a little weaker than what I could build in there with wood. I haven't tried wood yet, although it can use wood. You just build a fire on the floor of the oven over to one side. The temperature gauge in the hearth is quite helpful, although I've found myself spending quite a lot of time, as I learn how to manage the heat in the oven, measuring the surface temperatures with an IR thermometer.
To steam the oven, I'm using a "Foggit" misting wand that delivers 1/6 gal/minute of water from a garden hose. That will not be available in the winter, as I would worry about using those spigots in the winter, so I will need to think of how to adjust my methods somehow.
I'm also worried about critters deciding to make a home out of the space below the oven, which will be warm at least some of the time, if I use the oven in the winter. It is not completely sealed off, nor can it be, due to the need for combustion ventilation openings.
I've also done some nighttime baking, which will of course be the norm in the winter. I got a headlamp, a fashion disaster, as if I really cared, to help me see the oven interior in the dark. I've been thinking about how to set up some additional lighting, but I haven't done anything special yet.
A headlamp--What a good idea! The visual image is rather funny, but I'm sure it's worth it for the hands free value.
Nice to hear that gas firing takes about as long. Wood is my only option at the moment, it can be messy and smoky so you're not missing a whole lot. But it is fun and worth it for me for now.
As for steaming--For now I don't really steam as my oven is a bit more fragile than yours, and I just use the wet towel on the door and the moisture from the loaves themselves to do it. I have considered using one of those garden sprayers that you hand-pump. Unused of course! Or I might try a cup with a hole punched in it to slowly leak onto a pan or something....
Critters...my oven is full of spiders when I go to use it, but since I fire right inside they either leave fast or .... not. I did worry about the chipmunks or squirrels using it for winter storage, but so far not a problem. I guess the good thing about such high-heat is anything left behind from a critter visit will be long gone in four hours.
Thanks again!
Breadnerd,
Yeah, I'm still not trying wood. Eventually, I'll probably find it impossible to resist giving it a try.
Do you find that the towel and a large loaf of bread is sufficient to get a good crust? I wondered if maybe it was just redundant to spray the oven. The towels on the oven door probably has at least 2 cups of water absorbed in it if not more, which is more than what I put in there spraying for 20 seconds at 1/6 gal/minute, but I don't know how much of the towel water is being converted to steam. I do get a great crust doing what I'm doing. I can't really make the same thing happen in my kitchen oven, and I've come darn close to killing my kitchen oven too many times.
I have a fairly large open area below the oven chamber where the ventilation and gas valves and some electrical controls are located. That's where I'm envisioning some critters. I guess it doesn't matter too much, although if they start eating the insulation off the electrical wiring, it would be a big problem, obviously.
Bill