I’ve made this bread before and loved it, just as it’s written up in Joe Ortiz’s wonderful book, The Village Baker. His formula begins with a sponge that uses commercial yeast and it results in a delicious bread. But I was recently looking for a way to use some active sourdough starter (I hate to waste it!) and decided to try it as a sourdough loaf. For some reason it escaped my notice until after I had embarked on my experiment that he already has a sourdough version of this bread in the book(!), but it was interesting to see how mine differed from his. (For example, he uses a full cup of 100% hydration sourdough starter, making adjustments to flour and water to compensate, and mixes the sponge a bit cooler than I did mine; I will try his method the next time I make this. I also use a bit more salt than he calls for; he calls for 2¼ tsp. in the direct method and 2½ tsp.—scant—in the sourdough method. I use about a tablespoon, and I like Celtic salt in this.)
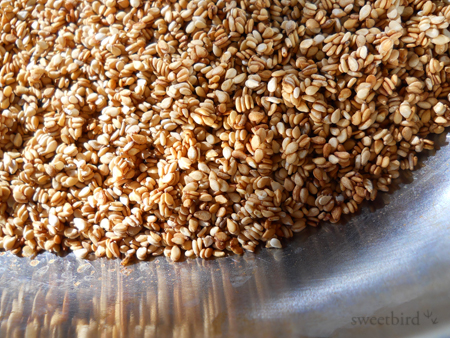
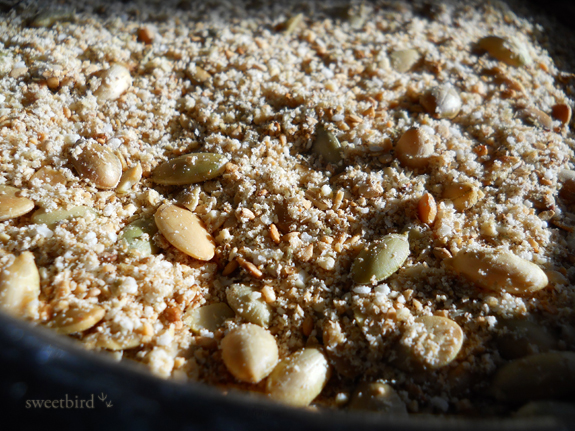
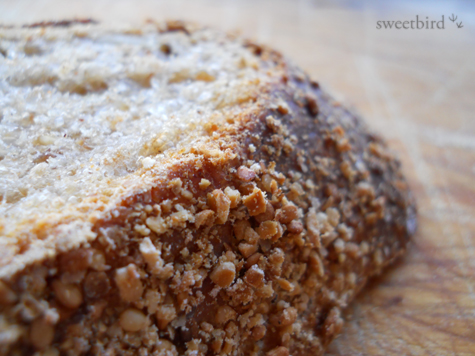
This bread’s most unusual (and, I think, brilliant) feature is the seed mixture, which Joe Ortiz says he learned from Kurt König, a baker from the Bavarian village of Miesbach, who describes himself as “your organic grain madman.” There is a fun and fascinating profile of Kurt König in the book. His bakery has existed in the same spot in Miesbach since 1650! Anyway, the seed mixture is deeply toasted and has the added magic of soy sauce, which is mixed and toasted with the sesame seeds. I want to try this mixture in a Tartine loaf one of these days.
The Village Baker came out near the beginning of the artisinal bread revival in the U.S. (copyright date is 1993), and I think that’s probably the reason that his formulas are based mostly on measures rather than weight, since weights would have seemed strange to most home bakers at that time. Now I don’t think you’d ever find a serious book without weight formulas. In any case, I’ve converted it and will also try to indicate the measurements in case that’s helpful for anyone.
By the way, for anyone not yet familiar with The Village Baker, one interesting part of the book is the final section of professional formulas (which are given in weight) and which result in serious amounts of bread!
Here’s the formula & method I used for my sourdough version of this bread:
Makes 1 large 2-lb. loaf or 2 smaller boules in 8″ brotforms
Seed mixture:
75 gms (½ C.) unhulled sesame seeds
2 tsp. soy sauce (I used San-J naturally fermented tamari)
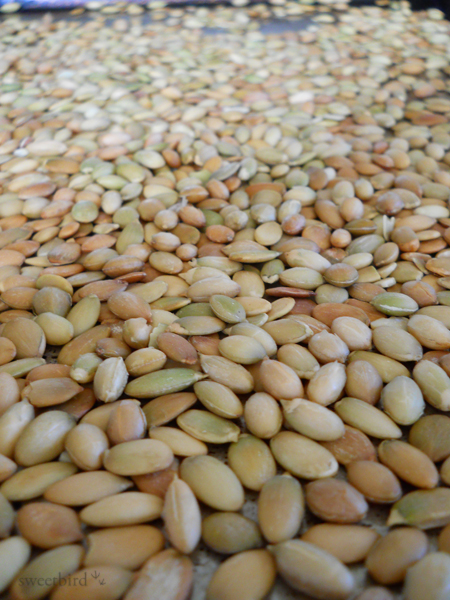
152 gms (1 C.) pumpkin seeds
Rye sour (sponge):
25 gms sourdough starter (100% hydration)
566 gms (slightly less than 2½ C.) warm water
198 gms (1½ C.) organic dark rye flour
134 gms (slightly less than 1 C.) unbleached organic AP flour
Dough:
All of the rye sour from previous step
374 gms (2½ C.) unbleached organic AP flour
11 - 12 gms fine Celtic salt (approx. 1 Tbs.)
To make the seed mixture:
Toss the sesame seeds with the soy sauce until well coated and toast them in a 350°F oven for between 15 and 20 minutes until just browned (not too dark). Toss a few times while roasting to keep things even. Toast the pumpkin seeds dry in a separate pan at the same temperature for 10 to 15 minutes, stirring around a couple of times for even browning. Don’t worry if some are darker than others—that’s normal—but don’t let any of them get too dark or they’ll be bitter.
Let all seeds cool down completely, and then grind half the sesame seed mixture and one-third of the pumpkin seeds until you have a medium powder. Add that to the whole seeds, mix together and set aside. This can be done the night before when you set up your rye sour or can be done the morning of the bake.
To make the rye sour (sponge):
Mix all the ingredients together, cover with plastic and let sit overnight at moderate room temperature for 12 hours.
To make the dough:
Transfer the rye sour to the bowl of your stand mixer, but begin the process by hand with a wooden spoon. Slowly add the flour, a handful at a time and stir vigorously after each addition. When you still have about a cup of flour left, add the salt. At this point I switched over from hand mixing to KitchenAid mixing (with the dough hook) and continued to add the flour. I don’t really see any reason why this couldn’t or shouldn’t all be done in the KitchenAid, but Joe Ortiz recommends hand mixing the whole way. The dough will be moist and sticky. The seeds will absorb some of that stickiness in a few minutes, so don’t give in to a temptation to add too much flour. You’re aiming for a slightly stickier dough than you might otherwise want. I did find that I needed to add a few tablespoons of extra flour, though, in spite of that. I decided to add whole wheat flour for my last few tablespoons because I thought it would be delicious in this bread. I didn't add that to the formula, since that's based on how your dough performs.
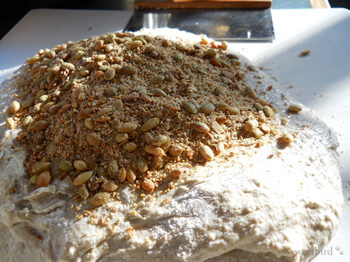
Flatten the dough on your board and add all but ¼ cup of the seed mixture. Incorporate by kneading and folding into dough. This is difficult! Next time I will try adding the seeds at the end of the KitchenAid mixing and incorporating them gently on a very low speed.
Here are the seeds waiting to be incorporated:
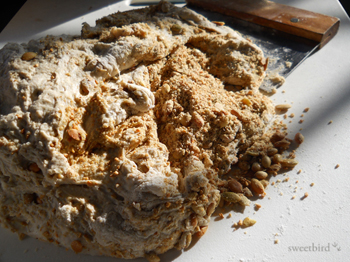
Here is the first attempt at incorporating them:
Here they are trying my patience:
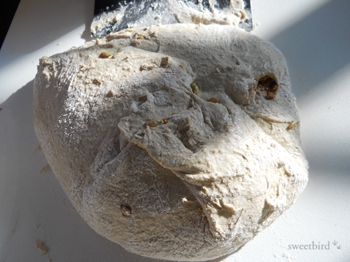
And here is the finished dough trying to pretend it was always a little angel and never once misbehaved:
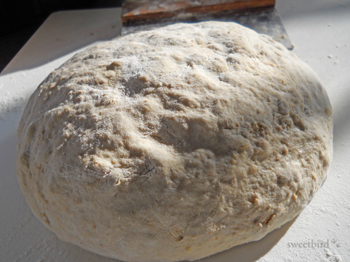
Place in lightly oiled bowl or container of some sort and bulk ferment for about 3 hours at 85° or so, with two stretch-and-folds at 45 and 90 minutes.
Remove to lightly floured board and roughly pre-shape. Cover with plastic wrap and allow to rest for half and hour. Shape into desired shapes, coat the loaves with the remaining seeds* and let rise in a warm area until ready to bake. Mine took a little less than an hour and a half.
* Note about coating with seeds: I lightly sprayed the loaves with water and turned them over into a shallow bowl with the seeds, but I don’t think I’ll do it that way again. They didn’t adhere too well and didn’t look attractive. In fact they looked downright ugly. Joe Ortiz recommends glazing the top just before they go into the oven with 1 whole egg whisked with 1 Tbs. milk, then sprinkling with the seeds. I'm not a huge fan of glazed breads but this is probably a good idea! However, be careful about the baking temperature. He bakes at 350°F (seems like a low temp. to me), and that may be because of the glaze. I baked (without the glaze) at a more normal temperature for hearth bread.
Begin preheating your oven and baking stone to 500°F about 45 minutes before you expect the dough to be ready, and prepare for steam. Load the loaves and lower the temperature to 450°F. Bake for 10 - 12 minutes with steam and then remove the steam source. Turn halfway for even browning. Bake for about 30 - 35 minutes more or until internal temperature is at least 200°F. Let sit in hot oven with door ajar for about 10 minutes. Cool completely on rack.
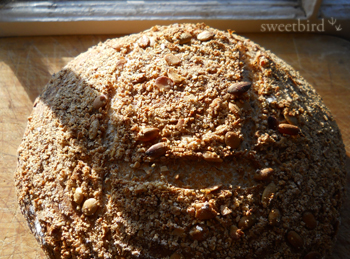
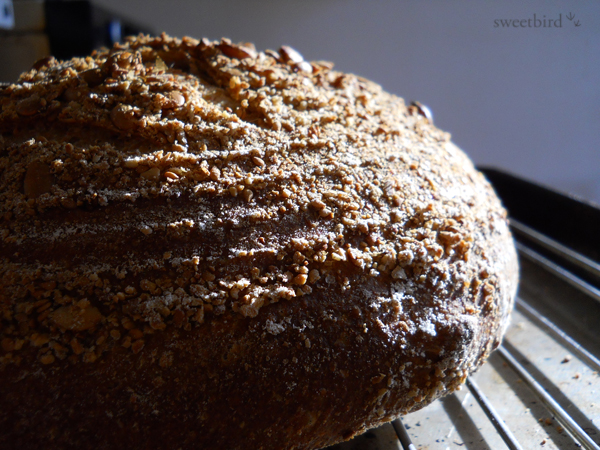
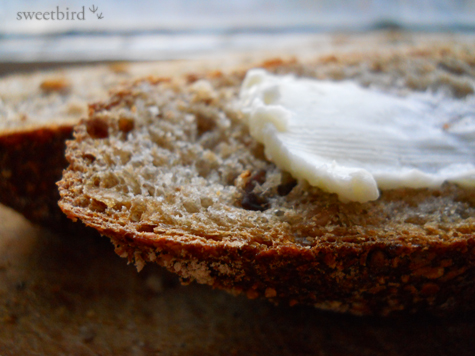
I don’t like to badmouth any of my bread “offspring” but I have to admit this one just wasn’t a pretty sight coming out of the oven. It looked like something that had been dug up out of the earth with mud and twigs and pebbles still clinging to it. I was a little crestfallen when I first saw it. But once it cooled down and I got to taste it, my happiness returned. It wasn’t perfection, but I loved the tang of the sourdough against the texture and flavor of the seeds, which are deepened by that tiny bit of soy sauce that is roasted into them. And the best part was that it turned out to be one of those breads that improved with age. I liked it better each time I tried it. It was baked on a Monday afternoon, and my favorite slice was on Wednesday morning.
Now I want to get this post finished so I can hurry up and write my next one. I took another Joe Ortiz loaf (a Pain de Campagne) out of the oven last night and it's wonderful! I’m looking forward to telling you about it.
All the best,
Janie
- sweetbird's Blog
- Log in or register to post comments
Your breads have the best crust and your photography is artful to say the least. Your oven must be blessed with exactly the right kind if heat and moisture. I have to make this one too. My bread bucket list gets longer as yours gets smaller.
Very nice bread indeed.
Sweetbird,
This loaf looks very inviting despite what you think of it's appearance :-)
I have never thought of grinding up part of the seeds I use in my seeded loaves so will have to give this a try next time. (I do use almond meal in loaves but hadn't considered doing the same with seeds for some reason.....)
Ever since I learned how to bake with wild yeast and convert IY recipes to WY ones I find it very hard not to convert the loaves I bake into WY leavened breads. It simplifies the whole process in the long run and I can be sure my fresh grains have all had a good long soak!
Thanks for the lovely post and formula.
Take Care,
Janet
Thank you dabrownman & Janet for your nice comments. It's great to hear from you. I love the idea that each formula we post on this site can inspire others in so many different ways!
Best to you,
Janie
That's a very interesting loaf Sweetbird. Would never have thought of adding soy sauce to a loaf, nor would I have thought of grinding up half of the seed mixture. You have given me two new techniques. :) I love the taste of both sesame and pumkin seed, so this loaf really appeals to me.
Very nice baking,
Syd
Hi Janie,
Great write up ... the seed mixture in the dough sounds fantastic. Like Syd, I would have not thought of grinding part of the seed mixture. Sounds delicious!
Cheers,
Phil
Thank you for your comments, Syd and Phil. The seeds are definitely the stars of this bread, and the concept could be used in all kinds of loaves. I was startled by the soy sauce when I first saw the list of ingredients, but then thought about the fact that it's a fermented product and it made more sense. The added depth of flavor is really lovely, to my taste, and having some of the seeds ground brings depth of flavor to every morsel!
Janie
Lovely texture to this bread Janie! I love the nutty appearance of the crust, too.
Just beautiful.
love them seeds! :)
Ha! I love them seeds, too . . . :-) Thank you, Mebake and Mini Oven!
Janie