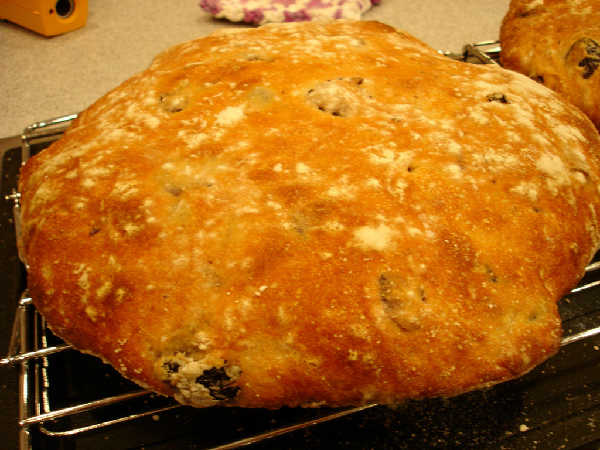
Sourdough Pagnotta With Olives
Sourdough Pagnotta With Olives (1)
Sourdough Pagnotta With Olives (2)
Sourdough Pagnotta With Olives Recipe
This recipe is a slight variation of Sourdough-guy's blog entry on Pagnotta and Ciabatta. Many thanks to Sourdough-guy for the recipe, which he says is his variation of an Il Fornaio recipe. I've posted pictures of my process and a spreadsheet with the amounts in ounces, grams, and baker's percentages.
Ingredients
- 400 grams fresh 100% hydration starter (my starter was taken out of the refrigerator after having been refreshed 3 days earlier. I probably should have used more recently refreshed and vigorous starter)
- 650 grams water
- 700 grams KA Organic AP
- 50 grams KA rye blend (optional - substitute white flour, whole wheat, or other)
- 50 grams Heartland Mills Golden Buffalo flour (optional - substitute white flour, whole wheat, or other)
- 18 grams salt
- 300 grams pitted halved olives (I used calamata olives)
Mix
Mix ingredients until well integrated and there is some resistance to stirring. Cover and let rest for 30 minutes.
I think there was slightly too much water for my choice of flours and maybe because of the olives, which made the dough harder to handle. This was very slack dough. I would use a little less water next time, but I'm reporting this as I actually did it.
Fold and Rest, Repeat
Every 30-60 minutes pour the dough out onto the counter, let it spread a little, and fold it up into a ball. Put the dough back in the bowl, cover and let rest 30-60. Repeat this process every 30-60 minutes 3-4 times.
I may not have repeated this enough, given the very wet dough I ended up with. The dough was still too slack later when I tried to shape the loaves.
Bulk Fermentation
Place the dough in an oiled rising bucket or bowl. Allow it to rise by double at room temperature.
Actually, I wanted to bake by midnight, so I let it get a little warmer, about 80F, which may have been a little bit of a problem. I think it made the slack dough even a little more slack to also be warm.
Shaping
Pour the dough out on the table on a bed of flour and cut in two. Work with each loaf separately. Form a ball by carefully and gently pulling the sides toward the center repeatedly to get some surface tension on the smooth side underneath. Do not overhandle.
Here I was a disastrous dough handler. I way overhandled it because it was too slack and would not form a ball. It just kept spreading out quickly. Well, I just decided after way too many times pulling at the sides to stop trying and went for flat bread. So, I can't emphasize enough, don't overhandle. Just make that shape and be done with it.
I am doing a second version, and I think I've discovered how to do this. Use thumbs and fingers of one hand to pinch and hold the gathered sides over the center, holding the gathered edges up a little to help the sides stretch and the shape to become more round and taking a bit of weight off the loaf. Use the other thumb and a couple of fingers to pinch a bit of the side, pull the bit out and up and over to the center, stretching the side as you do. Gather that bit in with the first hand along with others as you work your way around the loaf. Try to make it round by gathering a bit from the place that sticks out the most.
Turn the dough over onto a thick bed of flour with the rough side down.
Final Proof
Allow the loaves to increase in size by double.
For me, this took about 3 hours. I'm still having a hard time figuring out when these higher hydration loaves have finished proofing. As I said there was too much water, and I never got these loaves to stiffen up very much. They mostly spread out on the counter.
Bake
Bake at 425F.
This took about 25 minutes, and the internal temperature went quickly to 210F, which I've experienced with these flat high hydration loaves. I didn't get much oven spring. I think the overhandling was a serious problem
Cool
Allow the loaf to fully cool.
Results
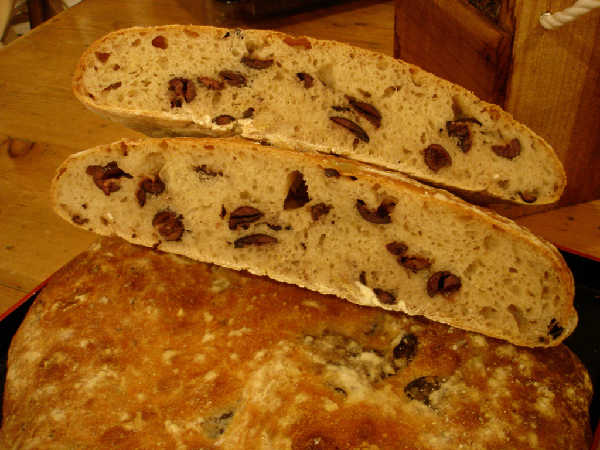
The flavor was as good as any bread I've made. The crumb was much less open than I had hoped but was soft and flavorful. I think the flatness was because of the overhandling and maybe adding too much water to the dough. Maybe another fold or two would have helped. The gluten never really stiffened up enough. Still, this was a great tasting bread. My bad for the handling, but I'm already trying a second one. I also think the olives made the dough wetter, heavier, and harder to handle. The next try will be without olives.
- bwraith's Blog
- Log in or register to post comments
Bluezebra,
Yes I think it tasted very good. The sourdough flavor blends very well with olives, even though the olives have a strong flavor. This and the plain pagnotta both had a very satisfying, creamy, flavorful crumb. Our housekeeper who is from Portugal always talks about sourdough bread made by her mother every week in a wood fired stone oven on a farm she grew up on. She follows my breadbaking closely and was eyeing me suspiciously after tasting the plain pagnotta, insisting I had added butter to it, lol. She just couldn't believe the flavor and texture was only from salt, water, and flour. The kids haven't left much of it around, but I secretly freeze chunks for later.
Bill
standpoint to start my sourdough experience but could I used a preferment (again, sorry if I'm using the wrong term here...please advise) instead? Something like Floyd's 1 cup water, 1 cup flour, 1/4 tsp yeast poolish and then add a tsp of ady to the final additions to make "something" approaching this bread?
I don't know what the math would be to equal 400g of poolish...
Hi Bluezebra,
You can make very good version of this with a yeasted preferment. Zolablue is the champ at the high hydration dough with yeast preferment, as far as I'm concerned. You should take a look at the "ciabatta challenge" thread. She has posted the Ponsford/Glezer recipe from Artisan Baking there. That's a very nice recipe. I think you used the correct term, by the way. We haven't said what kind of preferment, so it makes sense to just say preferment or maybe yeasted preferment.
If you want to just do the recipe here but with yeast, I would try as follows. Make the preferment by mixing 200 grams flour, 200 grams water, and 1/8 tsp of instant yeast. Stir it until it becomes a batter, then let it rest at room temperature until it rises by about double in volume and becomes bubbly - should be about 3-6 hours - use or refrigerate before it starts to dip and fall back. You can refrigerate it overnight or use it right away. You may get some additional acid and flavor in the preferment if you leave it overnight, which can help both the flavor and texture of the dough itself. The preferment can then be substituted for the starter in this recipe. This preferment is a poolish, i.e. an unsalted yeasted batter preferment, just to continue the terminology discussion you mentioned.
Then, follow the instructions in the recipe. I'm not sure about the rise times going forward with the yeasted preferment, but I would imagine that it will be a fair amount shorter. If you want to make the bulk fermentation of the dough something on the order of a few hours, add about 1 tsp of instant yeast to the dough when you mix it. Maybe someone who knows how to calculate rise times from percentages of a ripe yeast preferment can give us a clue. Still, if you aren't really pressed for time one way or another, you can just follow this and let the dough rise by double. The time after shaping for the final proof may be quite a bit faster also, especially if you toss in the extra 1 tsp of instant yeast to the final dough.
I would be very curious how it goes, if you try it.
Bill
I think this has become our favorite bread. It is delicious, full of flavor and better than a lot of the sourdoughs I've made. And very easy to make. Thanks to TTonka for first posting it. Hope this helps. weavershouse
Hi weavershouse,
The Hamelman book is a favorite of mine. I like VT sourdough recipe and the mixed flour miche, which are kind of regulars for me. I do mostly sourdoughs, so I'm not very good at guessing how the yeast timings will come out.
I don't know if when you let it sit overnight above, you do that at room temperature, but with the larger proportion of yeast I had suggested, I thought it would be safer to just let it rise a few hours and refrigerate to avoid having the poolish get too ripe.
Because the version I've converted only from only has 20% of the total flour in the preferment, I think it will take a while longer to rise than the Pain Rustique, especially with no added yeast when you mix the final dough. That's why I was suggesting adding some yeast into the final dough, which should make the bulk rise happen in a few hours.
Well, I hope Bluezebra gets a reasonable result out of all this one way or another.
Bill
When it says to "turn twice" are you talking about stretch and fold technique or something else?
Thanks for the help!
Yes, stretch and fold twice during the 70 min. Be sure to wait the last 20 min. after the second stretch and fold to complete the 70 min. fermenting time. The recipe is here........ http://media.wiley.com/product_data/excerpt/72/04711685/0471168572.pdf I did not use any frames to hold the dough while it was rising. It's strong enough to hold its own. After the 70 min. I divide in two, rest 15 min., gently shape without deflating and set right on semolina (or flour or cormeal) dusted parchment paper on a cookie sheet to rise about 25 min. I sprayed the oven once, slashed the loaves (just one long slash each loaf), put them in the oven, sprayed once more after 2 min. Baked right on the cookie sheet on the second from the bottom shelf. The bottom shelf has a stone on it but probably doesn't matter.
Let me know if you have any other questions. If you search on this site for Pain Rustique you'll come up with a photo of my pain rustique and TTonka's. Good luck. weavershouse
Bluezebra,
I don't know the precise definition of "turn" vs. fold, so maybe someone can give us some more detail on that distinction. However, I think you should be fine with doing enough folds to tension the dough. The recipe weavershouse provided has a lower hydration, I believe. That will make it easier to work with, which should mean less folds, than with the dough in the pagnotta recipe. It should be less sticky, so you can just form boules or batards in a more normal way. However, you may find it harder to work the olives in. You may want to add a little more water, to make the dough a little less stiff. I think the olives will incorporate more easily.
Bill
Thanks for the advice and education! I will try the version Weaver gives so that I can make 2 loaves. One of them will be the olive loaf and the other will be plain (dh doesn't like a ton of olives).
I will take piccys if it comes out at all... :D haha you know it sometimes doesn't! I will start the preferment tonight per the recipe!
Cheers!
Well I went to bed last night torn about which method to try. I decided to get up this morning and used Bill's instructions since that's what I set out to do at first. So I have the preferment built and on the counter. I will let it go till about 4 this afternoon and then start building the rest of the dough.
I used 200g AP flour, 200g water, 1/8 tsp ady yeast.
Boy it sure is alot more firm than the 1cup: 1 cup yeasted preferment I've been building from Floyd's Daily Bread! :D
Bluezebra,
Right, this formula is more stiff than what you described that Floyd does. It should still work just fine. I like to use the somewhat stiffer poolish only because it's what I'm used to with 100% hydration starter. In this case, you don't have to change the water amounts, since it's the same as 100% hydration starter as far as the flour and water amounts. Don't leave the poolish out once it rises and dips in the middle. Once it does that, even if before you want to work on the dough, put it in the refrigerator.
Bill
Hi Bill and Weaver! Here were the results from yesterday. One main thing to note, I was not a patient baker yesterday because of making my preferment yesterday morning instead of the night before. So I decided to "ramp-up production" by doing 30 minute folds instead of my usual 1 hour. What I noticed is there is a difference in crumb structure doing it this way. My holes here are not very developed. I also tried "rolling" the dough, again with crumb structure suffering.
I used Bill's recipe and did the following:
200 g AP Flour
200 g water
1/4 tsp yeast (cuz I wanted to speed this along)
800 g AP flour
650 g water
18 g salt
2-1/4 tsp ady yeast (cuz this is roughly double Floyd's Daily Bread amount so I did a little less than double on the yeast - and I wanted to speed this along! ;) )
3/4 cup kalamata olives
I made the dough and kept out about a scant cup of flour from the 800g measure to use for folding the dough. Let it rest initially after the first stir for 1 hour.
After 1 hour rest, I folded the dough 8 times in the bowl using a rubber spatula, pulling the dough up and over into the middle then turning the bowl a quarter turn each time. Then covered and let it rest 30 minutes.
Then turned the dough out onto a well floured surface using part of the remaining flour that I set aside. I folded the dough like a letter in both directions then using a pastry cutter, divided the dough into two groups. (I wanted to make 1/2 olive and 1/2 regular). Then returned each of the halves to their bowls.
To the batch assigned to become olive bread, I added pitted kalamata olives folding in the bowl as much as possible to incorporate. Covered both bowls and let rest 30 minutes.
I repeated the stretch and fold (both directions each time) a total of two more times with 30 minute rests in between. The dough was beginning to have spring but could have probably stood one more fold or at least longer rests between folds.
Bulk fermentation after 3 stretch and folds plus the stretch and fold I did initially in the bowl, I covered and let dough rise for 1 hour. It had doubled in the bowl.
I ended up using all of the reserved flour plus about 1/4 cup additional flour during these steps and the ones to follow.
After the final fold, I split each batch of dough into two groups as follows:
Regular: 1 Batard, 1 Boule
Boule shaping - using wet hands, I then folded the dough again and tightened/shaped into a round. Set it on a flour dusted parchment and dusted the top of the boule well with AP flour.
Batard Shaping - using wet hands, I stretch the dough out and folded two of the top edges toward the middle like an airplane then began to gently fold the dough over onto itself like a jelly roll. The dough was so wet, that this did not go well and the batard ended up like a blob.
Olive Bread: 2 Boules
See notes above for boule shaping. These went much easier with the exception that the olives kept being forced to the surface of the bread and I kept having to poke them back in. I think I will have to add the olives in the initial mix next time.
Covered bread with tea towel and let rise 1 hour. Then removed towel and baked on sheet pan with parchment.
Baking: Baked at 500 degrees on parchment in a sheet pan for 20 minutes. Removed bread from old floured parchment and replaced with new parchment pan. Baked another 15 minutes. Removed to rack and let cool.
I think these breads had much more oven spring before I took them out and transfered to the new pan. They deflated a bit.
I cut into them this morning and warmed in the oven and they were delicious. I still don't know how to get the thick crust but it has a relatively medium and crunchy crust and a moist creamy crumb.
Excellent bread, Bill! Thanks so much for the recipe!!! BTW, I finally figured out the secret to transfering to your proofing pan is to wet both hands! Then the dough does not stick! Worked much better with the olive loaves by doing that!
Bluezebra,
I sure like the look of those. Beautiful crumb in there, eh? I'm glad you got this to work. Your notes are great.
I don't know if the pictures are showing the olives right, but it looks like the olive one could use more olives, but I love lots of olives.
Anyway, I'm very impressed by the pictures and the explanations.
If you do this again, one suggestion for something to try is to have a greater portion of the dough in the preferment. Most of the yeasted recipes I've seen would have a larger preferment. So, you could easily do that by just taking equal amount of flour and water from the dough part of the recipe and adding it to the preferment part. You could get up to about 50% of the flour contributed from the preferment and be consistent with recipes in the BBA or Artisan Baking. The same was true for the recipe suggested by weavershouse.
Bill
I think I will try weavers recipe for next weeks bread then. Then go on to try the full 50% part. I think I'm feeling a tiny bit more of confidence and am hoping to start my sourdough experiments by the end of the month. Hubby is asking when I'm going to be starting lol!
It was weird about the olives. They kept working their way out of the dough. I think I need to not only add more olives but also add them at the very beginning as your recipe suggested.
Anyways! Thanks!
Hi BZ,
Glad to hear you did this. Very nice blog. I see you are not only a baker but very accomplished in the cooking arena, too. Nice work. Lots of fun.
Bill