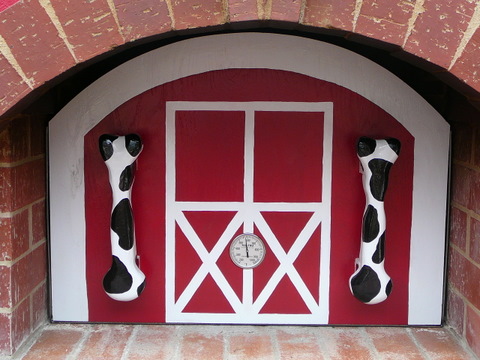
Got the door set with Thermometer!
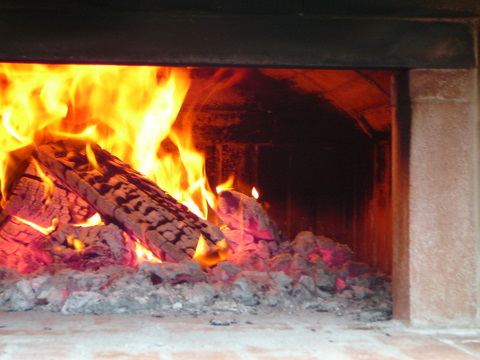
Fire burned oven clear in about 2.5 hours.
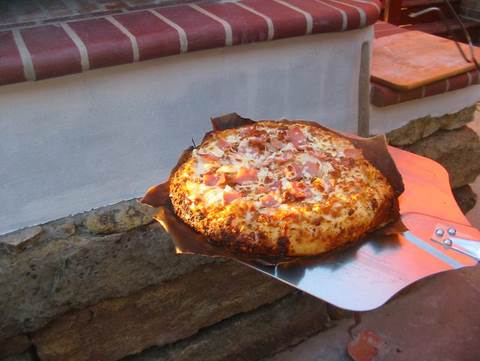
Made four smaller pizza's to try different ways to put it in the oven. PP caught on fire with the 3rd! :)
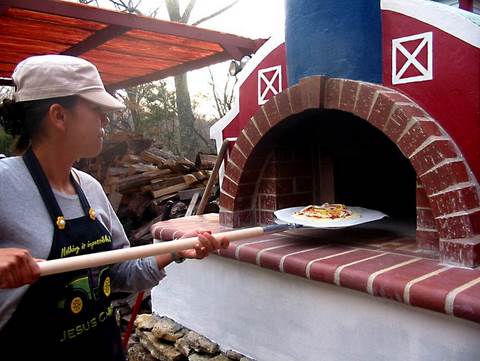
Loaded.

Cooking.

Getting a little burnished!
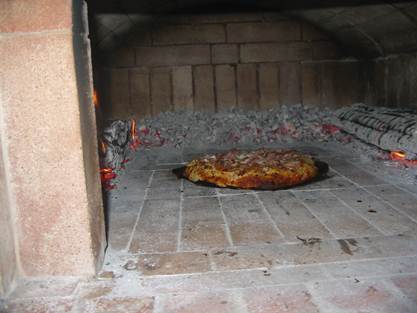
Came out pretty good. Center could have been done more. Too hot, and should have taken the logs out or pushed them farther back.
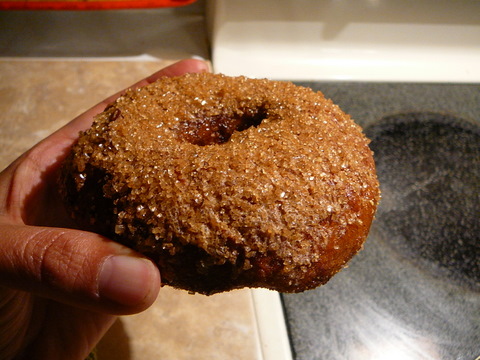
Oven wasn't hot enough for the bagels, so had to cook them longer. A bit too chewy, but still pretty good for a first try. I was happy! I just can't believe I made pizza and bagels using no electricity!! Not having to pre-heat the oven for an hour! It was great!

So anyways, lovin' my oven! Having fun. Baking cookies in the morning, then have my 2x batch of French Bread to try! YEAH!! :)
S-W-E-E-T, you are sweet! ;)
Come over any time and I'll make you some pizza! :) It would be fun! :)
Looks like you had a successful first bake, that's great. Making pizza isn't always as easy as people make it look. Oven temperature and dough hydration are very important. A lot of times I make the mistake of adding too many toppings. The thicker the pizza, the slower you have to bake it.
By the way, I think I got a cavity looking at those bagels!
:)
The more (sugar) the BETTER! Ummm....toasted with some butter! A little slice of heaven! Cavities...no pain, no gain!!
IME, the best way to cook pizza:
1) Fire the oven until it's clean white.
2) Let the fire die down and spread the coals evenly across the hearth to continue soaking the oven until most of the coals are burned away -- 30 - 45 mins.
3) Rake the coals over to ONE side. Add more kindling & small diameter wood to get a nice medium-sized, bright fire going. It should be hot enough that it's doesn't blacken the oven again. Keep that going for a bit until the hearth has cooled enought that it won't burn your pizza. I like to shoot for around 600° hearth temp. Also, if you have the fire on only one side, you can control the baking temp by moving the pizza closer to, or farther from, the fire. Makes it easier to mop the oven floor as well, so you can skip the parchment paper. ;-)
4) Mop the hearth and cook your pizza. Keep the fire burning enough so that some flame runs up across the roof of the oven -- that helps cook the tops so they get cooked before the bottoms burn -- almost like using a broiler. The key is balancing the heat of the oven floor with the radiant heat from the ceiling/fire. The heat from the top needs to be higher than the heat from the bottom.
5) Do yourself a favor and pre-bake your crusts a bit -- just until you start to get the beginnings of browning. (I like to brush on a bit of olive oil and a sprinkle of garllic salt before the pre-bake.) It makes your pizzas a lot easier to deal with after they're loaded up with whatever toppings you choose. We like to make a dozen or so pre-cooked crusts and freeze them for future use making pizza a "spur of the moment" menu choice -- nice for when guests drop by or you need a quick meal.
PS: I got a chuckle out of your coment that you were happy that you didn't have to pre-heat the oven for an hour. Right -- more like 2-1/2 hrs.! ;-)
Nobody uses a WFO 'cause it's easier/faster than the kitchen stove!
ClimbHi
Pittsburgh, PA
Thanks for the helpful oven tips. I'll give them a try. I've been thinkin' and thinkin' how to go about this whole firing thing. I appreciate the help. I'm almost tempted to just go at a lower heat and cook the pizza just a bit longer, so that i can use my parchement paper. Not that I can't use it, but I just like having all my pizza's made, vs. making them one at a time and then throwing them in. I don't mind if I have to even wait 7 min. for a pizza vs. 2 min. To have the use of PP is worth the few extra minutes to me, and to have them all made is a plus too. I've tried the freezing method and found the crust doesn't get as good a rise. So I just like to make it fresh, even though it was nice to grab it out and throw it in on the spur of the moment. But, I guess I'm a Pizza Princess and just like it fresh best! ;) Keep sending out the helpful tips!! :)
Faith
I meant we freeze the pre-baked crusts. Then just pull 'em out, load 'em up and you're off to the races.
Also, I have no gripe against parchment paper -- I bake almost all my bread on it. Makes it easier to reposition the loaves if necessary once their on the hearth before they begin to set up. (Comes in handy while loading the oven.) But, if you're paper is toasting underneath the dough, the floor is too hot. Let it soak a bit longer until the temp goes down a bit, but keep the dome hot with the fire off to the side. Also, since good pizza needs a pretty hot fire, the paper will almost surely burn just from the hat of the fire. If you lower the temps, you compromise the pizza.
The problem with WFOs is that no two are alike -- what works in mine most probably won't work in yours. You just need to experiment and keep notes so you can tweak things each time until you figure it out. Just remember that, for most things, you're shooting for a hot dome and a not-so-hot floor.
You say you like making all your pizzas ahead of time. IME, letting raw pizza shells sit too long dries it out too much and/or, if you put sauce on it while it's sitting around, it just gets soggy. With a bit more practice, you'll be able to throw a shell in about a minute and a half -- just long enough to bake the crust you just loaded. So you won't really need the paper.
Good thing it's such fun doing the experiments! ;-)
ClimbHi
Pittsburgh, PA
Yeah, I get what you mean about having the dome hotter. I think that was part of my problem? I'm going to try again this week. I'll let you know how it goes! Thanks for the info though! Keep it coming! :) Helps me to think it through more and figure out what I'm trying to do! I want to do sugar cookies next, it's supposed to be at 400 and the cookies have no brown edges! Ha! HOW AM I GOING TO DO THAT?!!! I'm just hoping they will be "kinda" good, and that i won't open the door too many time to check! Ah...this is a big learning curve, but a fun one! :)
We generally bake desert items (cookies, brownies, cobblers, pies, etc.) at the end of a long baking process, i.e., after baking appetizers, bread, dinner, veggies, etc., after the oven has cooled down. I'll generally let the oven cool while eating dinner and then toss in the desert to bake so we get desert fresh from the oven after dinner's settled a bit.
You'll find that when using a WFO, you'll plan your menus around times and temps of the oven. I suggest that the next several times you fire up "The Barn", get yourself a notepad and take -- and record -- hearth and dome temps every 20 minutes from the time you rake out the fire until the wall/hearth temps get down to around 400°. After you have 5 or 6 burns, graph out your oven's average temp profile with temp on the "y" axis and time on the "x" axis. To do this, you need to get in the habit of trying to keep your fires consistent in time and temp (wood type and amount) -- generally a good idea anyway. Once you have that profile as a guideline, you can plan out cooking your meals better, as in what you can expect to bake when and for how long, since you'll be able to match up a particular food's baking needs with your time/temp graph. Also, I find that, as a rule of thumb, if you want to bake something at a particular temp, you can guestimate your baking temp by subtracting 100° from your dome/hearth temp. For example, if I want to bake a cake at 350°, I'll shoot for masonry temps of 450°. Another trick is that some things (like maybe sugar cookies?) bake better not resting directly on the hearth, which tends to "fry" things on the bottom. We keep an old cooling rack near the oven to raise up pans/baking sheets off the floor for such items.
We try not to waste any heat in the WFO (hey, wood can get expensive!) and, by knowing how hot the beast will be at any point in time, we try to plan to cook something that is best at that temp. For example, fire roasted tomatoes and peppers are great on pizza. You can't cook pizza until the oven has fully fired, but you can sure get some great roasted tomatoes, onions and peppers to top those pizzas while the oven is still heating up. We just put peppers directly on the hearth near the fire to roast, and tomatoes and onions in pans in the door area during firing. Makes those pizzas even more special when topped with wood-fire roasted toppings. Then, cook your pizza. When done with that, rake out the fire, leaving the oven ready for something like chicken or veggies (oven-roasted fingerling potatoes make killer potato salad). After the temps have fallen a bit more, it's ready for bread, then deserts. Even when the temps have fallen too far for baking, you still have a gold mine of heat just begging to be used to, say, slow roast ribs or a pork butt for pulled pork which can/should stay in the falling oven for 12 hours or more.
I searched long and hard for a book on "oven management" -- how to best use the heat available from a typical firing -- but there's not much out there. So the closer attention you pay to your own oven's heat profile, the more versitile you can be when planning a bake.
ClimbHi
Pittsburgh, PA
Man!!!!! Thank you so much for all this information! I was thinking while I was reading that you should write a book! Then I saw what you wrote at the bottom!! Funny! I remember when looking at a million oven pictures, you and your wifes pictures where the only ones I really found with all the food. I remember showing my mom all the stuff! It was a big selling point to build the oven!!!
Well, there's only one thing I hate more than the dentist. MATH!!! Yeah, go figure?! I love to cook and bake, but math is my biggest (Ha! one of the biggest) weakness I have! Still just scoop out with measuring cups and count on my fingers! I don't do the whole bakers weights, which I KNOW is better and that is what TRUE, SERIOUS, bakers use. I just read that on another post last night. Well...I guess I'm just behind. I hate measuring anyway, so weighing it all and doing more #'s just puts me over the edge!! HAAAA!!!
Graph my oven!! Aiyiyi!! But yes, I think what you suggested is really the only way I'm going to figure out my temps and not waste the wood and heat. Graphing isn't hard, it's just math, and did I tell you I HATE math! ;)
Thanks for taking the time to write out ALL that information and all the different ways to cook foods! THAT IS AWESOME!! I totally want to try the potatos for killer potato salad!! Umm...that sounds so good! Plus putting in stuff for the toppings of pizza is a great idea too! I think I'm going to do pizza tomorrow, so I will try some of those ideas!
I will have to print out the whole thing you wrote so I can study it and figure it all out! I SO APPRECIATE the time and information you've given me ClimbHi, for my door, my thermometer, my oven, my food!! Man...,am I blessed or what?! :)
Tell your wife thanks too for all the work she put in the oven. I rembember when seeing the pictures of her putting in the arches I thought, "Well hey, if she can do it, I can do it"!!! :) You guys have been very helpful to me in my oven build, and now my oven managment!
I have two racks of ribs in the freezer! How should I go about roasting those?
Thanks for your help!
Faith
They're ART!
So, no need to worry about it. Just do it! ;-)
Ribs. We do these at the end of a bake. A perfect time to experiment with those potatoes. Just get a bag of fingerlings or sweet potatoes, toss them is some good olive oil and herbs/spices of your choice, and bake 'em up. After you're done baking, and the oven wall temps are down around 450°, light a smallish to medium fire off to one side and let it burn down to coals. Don't worry when the soot from this fire blackens the oven -- doesn't matter. Just don't get a fire so big that you raise the oven heat too much.
Coat your ribs (well, not YOUR ribs!) with a nice dry rub. We like a mixture of brown sugar, cajun spice, pepper, salt, onion and garlic powder and whatever herbs strike our fancy. Heck, I've even tossed some powdered cocoa in a couple of times.
Load the ribs onto a rack in a disposable aluminum pan. (You can use a regular pan, but it'll get pretty black from the smoke which is to come.) I like to use a rack that raises them above the bottom of the pan so they stay out of the juices. Slide the whole mess into the oven and toss a handful of sawdust or soaked wood chips onto the coals. Mostly close the oven door, leaving it cracked open just a bit so the fire doesn't go out right away. (NOTE BENE: some woods are NOT meant for human -- or animal for that matter -- consumption. I'd stick with oak, hickory or mesquite for smoking things. Definately avoid walnut, or any wood you can't clearly identify.) Re-apply the sawdust/chips every 10-15 minutes or so as needed to keep the oven smoke-filled for about the first hour of cooking. If you find the ribs cooking too fast at any point, just cover them loosely with some foil. When you toss on the last load of sawdust/chips, close the door tight for the duration.
Let them alone for 4-5 hours. You can peek once or twice, but don't make it a habit. You'll know they're done when the neighbors & dogs start coming around to see what all that good smell is. ;-) Also, the meat should pretty much fall off the bones. Add BBQ sauce if desired for the last 15-20 minutes.
Pretty much the same process for pork butt (pulled pork). Just put it in after dinner and go to bed. Pull it out in the morning after 12 hrs or so, let it cool and pull. Add your favorite BBQ sauce and maybe some carmelized onion and hot peppers. YUM!
And now that I think of it, this is pretty much how we do turkey as well, which is what we'll be doing later this week. If I think about it, I'll take a few pics.
Also, that's how it works in OUR oven. Yours may (probably will) be different. This will depend a lot on how fast/slow your oven cools. If it's slower than mine, you'll have to start at a bit lower temp. If it cools faster, you'll have to start at a bit higher temp. If it cools too fast (e.g., a traditional thin-walled pizza oven or an oven with inadequate insulation), it won't work well at all. You'll just have to experiment. Which is half the fun of a WFO anyway!
ClimbHi
Pittsburgh, PA
I'm totally going to try that! That sounds soooo good! I was wondering about how to get that smoky taste? Thanks so much AGAIN for all the helpful tips! Really, you should go and be on the Yahoo Brick Oven group, you would have SO many helpful tips with cooking and building! But then you'd have to yell at me twice about my pizza screen on two groups and I could see how that might push you over the edge!!! ;)
YES, take some more pictures of your cooking! Esp. the turkey and all the other stuff you're going to be cooking! I am a visual learner!! ;) I really must get my notebook ready for Thanksgiving! I was planning on doing a 3 hour burn the night before, then another burn in the morning to be ready for Turkey and the other stuff.
I'm excited to give it a try! Thanks for all the details about the ribs! You are the sweetest! I really do think you should write a book! But for now, I am so greatful that you are sharing with me! ;)
Thanks again!
Faith
to "preheat" your oven the day before if you're planning something like a turkey. It helps keep the temps more stabile for a longer time during the bake since the masonry is already "deep-heated" -- i.e., it flattens your heat curve -- you'll understand that better when you have yours graphed. ;-)
It also allows for a shorter burn on the following day. I'm doing exactly that this evening. But, I'll be using the firing for *something* -- baking sweet potatoes, roasting peppers/onions -- dunno yet what all.
I am a member of the Yahoo Brick Oven group -- but I haven't been over there for about two years now. Just don't have the time for all the stuff that's out there. But there are some great resources over there.
Oh, and not to beat a dead horse, but a pizza screen is something that those poor WFO-deprived individuals use to mimic a masonry hearth. So using one in your WFO is kinda like covering your leather chairs with naugahyde. ;-)
ClimbHi
Pittsburgh, PA
Haha!! I still really might try that dead horse one more time?!! ;) I just like the fact of maybe "not" haveing to use PP, "not" having to flour a peel and throw in the crust, "not" having to "have to" parbake my crusts. I know, I know, covering the leather chair as we speak!!!! HA!!!!
Anyways, I am printing out all the other info you have written. What about smoking the Turkey? I think that could be really good?!! Would I just do the wood chip thing for the first hour the Turkey is in? And I'm thinkin' the Turkey probably goes in at about 350 for an hour to hour and a half, I think my mom got a 23lb Turkey. So, what do you think my wall and dome temps should be? Probably around 400ish or something? I know I need to start graphing, I will do that tonight. I just don't quiet get the "middle" heat of the oven yet. I know the walls and dome and floor will be a little hotter than the "inside middle cooking heat", right?!
Thanks again for your help! You are a funny, funny, WFOer!! :) I hope you and your wife have a wonderful Thanksgiving! I hope you do take some pictures! Can't wait to see what YOU GUYS are having!! :)
Faith
okay, I kinda get it, if I'm mapping out my x's and y's of my hearth and dome, i should be able to average and find the "middle heat"! Aiyiy, did i tell you i hate math?! don't even like to think about it! And....it AIN'T art!!! I don't care what you say!!! HAAAAAA!!!! don't try and cover that math graph with "art frosting" IT'S STILL MATH!!!
I don't have a WFO, yet, but, I'm liking the idea.
My comment here is regarding the use of parchment paper and pizza.
I bake my pizza on a stone, which I can preheat to about 550-570 degrees. I use a handy little laser thermometer I picked up on a whim at Lowes one day, and it laid around collecting dust for a year, till I started baking again.
It's perfect for checking the actual stone temp! finally a use for this hi tech toy.
Anyway, I ran out of parchment last week, so decided to try aluminum foil. Now, recalling some loaves of bread that got impossibly stuck to the foil a couple years ago, I opted for spraying the foil with EVOO and dusting with corn meal.
It worked like a charm, but the real bonus was the crispness of the crust!!
Personally, I'm a fan of Pizza Huts, Pan Pizza Style Crust. If you get it fresh in the store, not carry out, it's wonderfully crispy fried on the bottom, and bread like through the center. Not at all soggy, which amazes me, considering the thickness of it.
Anyway, the use of foil and oil gave me the type of crispy fried texture I love in my crust.
And no problem with sticking at all.
Very nice looking pizza and bagels. I wa going to give you the pointers ClimbHi did. The good thing about fire learning fire management, is that you get to eat your mistakes :)
What was your oven temp the following day? Any shots of the cookies and bread that you did.
This was my French Bread. HA! It actually looks more golden in the picture. They were pretty "blond" almost white! I got a good spring, but they just couldn't get anymore color. This was a little over 30 min.
The darker ones are where the fire was. If I had put them in just after I re-fired, they would have probably burned, and not even had been done inside. I figured out that my door had a pretty big gap at the top. We've fixed that and the temp didn't move for about 7 hours! So...I think that was part of the problem. I didn't do cookies yet, but I'm planning on those next! :)
I remember when I got PR's BBA in the back there is a little story about a guy with a WFO, I thought it was sooo cool. I didn't ever, ever, ever, think I would be able to get one! EVER! Then this happened...
DISASTER!!!!
See...God can cause all things to work together for the good!! :) YEAH!!! See where that yucky blue tarp is? That is now the sight of my new oven!!! Wow!!! Truly amazing!!!
So you never know, when things are looking bad, and actually go WORSE,...don't worry-Lord willing...it's for some REALLY SWEET PURPOSE, LIKE THE CUTEST BARN WFO EVER!!! ;)
Thanks for your sweet comment! :)
I think you are not getting much colour because most of the sugar was used up by the yeast, I often glaze the bread with an egg wash just before it goes in the oven. Doing this gives a really nice golden colour.
Gerhard