[size=18][b]Introduction[/b][/size]
Usually I am not too much involved in the blogging world, or the blogosphere, as it seems to be called. There is a fine line between writing just for serving your own ego and writing as part of a social endeavour, the desire to contribute to the wide array of knowledge and media which is the source for all the people, including myself, in the need for advice. I always feared going too much for the former.
When I started baking a few months ago, I learned that this is a craft which is less about pure facts and information but more about feeling, instincts, checking out boundaries, trial & error. All the things involved in social relationships. Thus it seems to discuss and reflect on the craft of baking in the environment of a social community is the natural way to do it. Often I learn the most from just reading about what other people have done, about their individual success and mistakes, originating from their individual circumstances. It makes me feel getting a better sense of the thousands of individual factors you have to take into account when baking.
As I am still quite new to baking, I am far away from being experienced. Therefore I won't be able to post fancy regional recipes yet. I definitely hope to get to that point in the future, in order to give something back to the community. At this point of time, this blog will be more of a personal baking diary, which serves as tool for myself to keep track of my own progress and mistakes, but maybe there are still some people left who are less experienced than me an might take some useful information out of my posts. That would be exciting!
[size=18][b]General progress: sharpening my senses[/b][/size]
Although I have produced some decent loafs of bread in the past, the results are generally varying a lot. Sometimes when taking the goods out of the oven I think "Wow, I should open my own bakery!". And then the next day something more along the lines of "Ehm, I should wrap this loaf in paper so that no one ever can see it" comes to my mind. Being well aware of having not quite figured out how long I have to knead, proper shape without every second loaf becoming flat again, at which point the final proof is finished and such things, I finally decided to buy a few books as advised here. I ordered Peter Reinhart's "The Bread Baker's Apprentice, Jeffrey Hamelmanns "Bread: A Baker's Book of Techniques and Recipes", and "Bread Science" by Emily Buehler. The latter has arrived yesterday, so I haven't read the whole book yet (but I have a feeling that this will be my favorite and the most enlightening one), but I've already absorbed the other two.
Reading those books literally took me to a new level of bread making. When I made bread after having read them, it was the first time I really opened my eyes and tried to use my senses. It was the first time I actually started to get a feel of what I am actually doing. I learnt a lot of new concepts, like thinking about the dough having an axis, with two poles, the smooth side and the seam side, and that you should try keeping them on the positions. It feels like having progressed from step 3 of 100 to step 7 of 100 or so. Thus I am still far away to produce really good and constant results, but I have become yet again really motivated to finally get to this point.
[size=18][b]Most recent baking experiments[/b][/size]
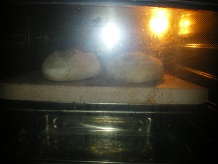
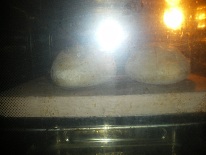
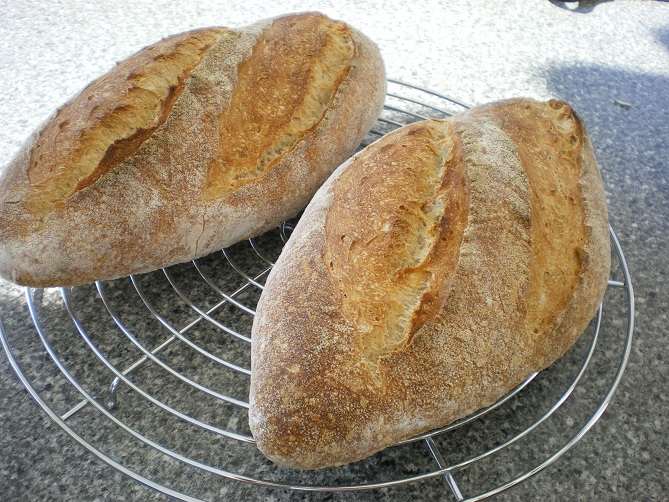
[size=18]Ciabatta[/size]
[b]dough pieces / oven spring / crust /
crumb[/b]
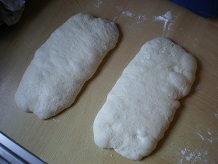

The Ciabatta is made from an 80 percent hydration wheat dough with a biga (30% pre-fermented flour). Since I don't have a stand mixer, I used the Richard Bertinet kneading technique (http://www.gourmet.com/magazine/video/2008/03/bertinet_sweetdough). Unfortunetaly, I didn't knead long enough so the gluten wasn't developed enough, which I realized while doing the stretch & fold during bulk fermentation. That's probably why the dough flattened a little during the final proof, but that's okay. I am really happy with the crumb. It has an open and glassy texture, just as I expect it from Ciabatta bread. The flavour was good, too.
Still I have a problem which I still haven't figured out, which is the following: My Ciabatta loafs tend to have rather hard crusts. I believe I know why it comes out like this. When pouring the dough onto the counter, I need a lot of flour to prevent the dough from sticking. The dough has a really wet surface (probably partly because I do the stretch & fold directly in the bowl and with wet hands) which hydrates the flour and creates sort of an outer layer of fresh and unfermented dough. As I use more flour because it is absorbed into the dough over time, this layer thickens. In the oven it creates a hard crust and prevents the loaf from properly browning. Another problem arises when I turn the dough upside down on the baking stone after its final proof. On the bottom side of the dough the flour from the counter builds thick lumps (especially when you stretch or scrape the dough a little) which are often incorparated into the dough when handling it. These lumps harden in the oven as well. I'm still searching for the perfect solution to use as little flour as possible and create a nice crust. Not turning the dough upside down when going to bake helps (see this photo: http://www.abload.de/image.php?img=ciabatta5j5u1.jpg), but then all the flour sticks to the bottom of the bread and I almost have to cut it away because it is too hard.
Well, I'll keep trying.
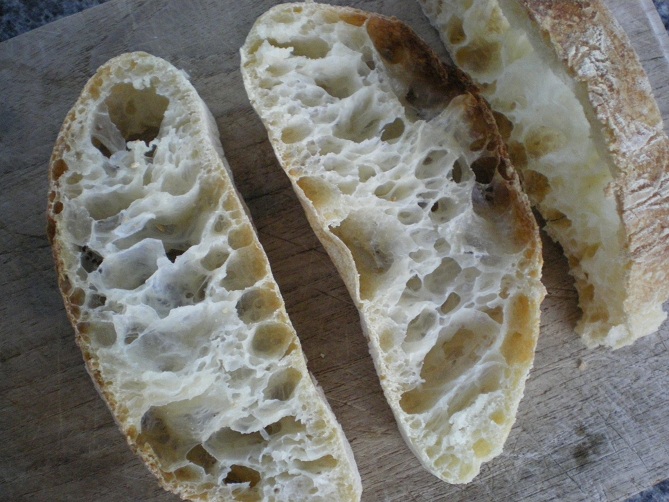
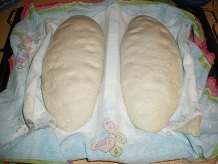
[size=18]Norwich Sourdough[/size]
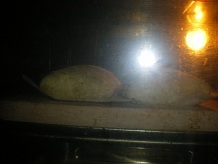
[b]proofed dough pieces / right after loading into the oven /
3 minutes of baking / 8 minutes of baking / crumb /
crust[/b]


This is a Norwich Sourdough (http://www.wildyeastblog.com/2007/07/08/my-new-favorite-sourdough/). I basically used Susan's recipe, but I used medium dark rye flour (Type 1150) because that was the one I had here. I used a little more sourdough (16,7% instead of 15% pre-fermented flour). I am really happy with this one. I would say, these are the best loafs I have produced so far. I've learned a lot from reading the above books and finally found out that my shaped loafs need much more than the advised 2 1/2 hours (which produced this underproofed and very dense crumb: http://www.abload.de/image.php?img=crumbkjw0.jpg). I let them proof about 4 hours and the dough still felt very elastic (springing back when poked). This time I used the "put some dough in a glass, mark it and wait until it doubled"-test (http://www.abload.de/image.php?img=glassj7eq.jpg ; I let it triple) which helped a lot.
Especially considering that you cannot really find high protein or malted wheat flour in German supermarkets (the usual one used for breads has 9,8% protein relative to the whole flour weight [including natural moisture], that's why most white breads that are sold in Germany have additional pure gluten in the dough) I am quite happy to have finally produced a rather "big" loaf that is holding it's shape. Maybe I will try to find some malt to produce a more reddish crust, but if I will be able to reproduce my current results I am perfectly happy for now.
[size=18][b]News from the local baking scene[/b][/size]
"Aldi", the most popular discounter in Germany (a supermarket that offers a limited range of products but to the cheapest prices), slowly wants to set up vending machines for baked goods. You can imagine it like this: You press some buttons on the machine and order some rolls. Then the order is sent to some people in the store who finish half-baked rolls which come from big factories (and may contain a lot of chemical additives) in their ovens. Traditional bakeries are now protesting against it by trying to make a case out of it to bring to court. The bakeries charge Aldi of falsy using the term "freshly baked" where in fact the goods aren't really freshly baked but just warmed up industrial food, kicking the traditional craft of baking with their feet and just trying to make money. One of the bakeries is "Bäckerei Huth" (http://www.baeckerei-huth.de/weitere-seiten/news.html), which is home near the town I was born and therefore well-known by me (they have my favourite lye bretzels!). I'm eagerly waiting for which direction this whole case will be taken and keep you updated.
- Vogel's Blog
- Log in or register to post comments
Your loaves are very impressive. The crust and crumb is outstanding.
It's great to hear you are looking to improve your skills and give back to the bread baking community with knowledge. I know my past post were bland and unhelpful at times, often baking the same loaves without learning from my mistakes.
I can't wait to see your progress though, you sound like you have a lot of heart to put into baking!
Hello, Vogel
Your bread are looking perfect. I have tried Susan's Nowich Sourdough for several times so far that are all failure. These crumb were rubbery and eating like a slippers. Now, I know why, but I used a pinch of yeast for Susan's sourdough today because I learned hybrid bread recently. I still want to try the original Norwich Sourdough. When I saw your fabulous sourdough, that motivates me not to cheat! Thank you for sharing your wonderful bread pictures and great write up.
Sincerely,
Akiko
Vogel,
What a great idea!
Thank you for updating!! Now, I can try tomorrow!! Many thanks to you, Vogel! I will enjoy baking sourdough more than I enjoy feeding my starter!
Akiko
I wouldn't say that using additional yeast for sourdough breads is equal to cheating. If you have a whole range of techniques available to you, it is perfectly fine to use all of them if appropriate and producing good results. I have done it like that for quite a while, too. It took several months for my sourdough starter to be active enough to fully rise a dough on its own. Therefore I used my sourdough mainly as a flavour enhancer and used commercial yeast in addition, which gave good results.
I am happy that you find the "glass"-test to be helpful. I found out about this little trick here, too. Maybe you'd like to read the following post: http://www.thefreshloaf.com/node/15368/second-rise-proofing-tests . In one of these posts there is a link to another forum, which offers a very detailed demo and detailed information about the final proof of sourdough breads: http://forums.egullet.org/index.php?/topic/82234-demo-proving-bread/ . You may find this very interesting, I definitely did. Just be sure to fill the glass with dough at the same time as when you begin the final proof of your loafs, treat it in a similar way (so degas the piece of dough if you degas the other dough prior to shaping the loafs) and let it rest in the same place in order to have comparable conditions.
Good luck with your next Norwich Sourdoughs! I would be pleased to hear how it turns out.
Vogel,
I don't know how to say " Thank you " to you. Your advice was a huge help!!! I would not figure out my problem without your advice. Thank you so much.
Here is my Susan's Norwich sourdough today. I used whole wheat flour instead of rye flour because I didn't have enough amount of rye flour. I like your crust though. I like to add a little of yeast into rustic bread ( hybrid bread) that is soft and nice texture. I just felt little tricky to use a pinch of yeast for Susan's Norwich sourdough. :)
I don't have a banneton. I used a strainer which is made of stainless. I placed the fine cloth on it so that the shape looks shaky a little bit. It pasted 5 hours when I put it into the oven. But it is overproofed a little bit. I went for walk with my dogs and my daughter and my neighbor's 2 boys after 4 hours past( It was not ready to bake yet) When I saw the dough in a glass, it rose a little over 2 times in bulk.
I did the same thing for my baguettes too. It is getting better. I am not happy with my all bread covered with a lot of flour dough... When I spray water to the dough directly, that will collaspe to have ears and blooms. Do you have any suggetion?
I am looking forward to reading your next post!
P.S That is sad to hear that "ALDI" bakery wants to use vending machine for baking bread. It is just bread, but I want to the taste of the handmade bread. It is not only bread, but all food we eat.
Akiko
Wow, your loaf and your baguettes look really nice. I wish I would be able to do such nice and even baguette shapes (I haven't tried in a while, but last time they were really uneven). I wish I could take some slices right from the photos :).
I am glad that you've found useful advice in my post, albeit the ideas originally came from other TFL members. As I am quite a beginner, too, I'm afraid to not really have an advice for the floured crust problem. On your round loaf it makes for a really beautifully rustic look and there is definitely no need for a change, in my opinion. With baguettes, rolls and Ciabatta you may want to have an extra thin crust (because of the high crust/crumb ratio of these kind of breads in the first place) without too much extra flour. As you can see in my blog entry, this is still an issue for me, too, and I haven't quite figured it out. For doughs that aren't too wet (I guess it should work for baguette dough) you could try to use a baker's brush to clean the dough surface from flour prior to scoring. But I guess you have to do it very carefully in order not to flatten the dough.
I have often read that spraying water directly on the dough during the baking process is not advised. It may cause the dough to collapse. I actually used this method for a long time, too. It gave a really clean, shiny and thin crust, but also caused the loaf to be really uneven with a flatter side where I sprayed the water on and a higher opposite side in the back of the oven where the sprayed water didn't reach. So it seems to be better just to create steam by spraying on the walls of the oven (be careful not to hit the lamp or the glass of the oven door) and by pouring water into a pan (one that is suitable for ovens) preheated in the oven to create enough moisture so the crust doesn't form too quickly.
I hope that there are other members who can provide more helpful advice for you problem than I do.
Thank you for taking a time to write for me. I really appreciate it. I agree with you not to spray water directly on the dough. That doesn't work at all. I rather use pouring 2/3 cup of boiling water in a small pot with some small broken blicks in it. I am afraid to spray water on the wall of the oven....
About thin crust:
I used oil on the work-surface when I preshaped and shaped to make baguettes today. Their crust were good but bottom that I closed the dough by pressing down were burst. I should pinch the line very well, or I better use a rectangle wood board covered with stocking for shaping the dough next time. I don't know if it works. I will let you know about the result. I also hope that somebody will help us to solve this problem too.
Here is the bread that I made 5 Grain Lavein by Hamelman.
I didn't score because I wanted to see if I got the natural cracks like the picture in the book "BREAD" by hamelman. I couldn't get it. but I am very happy with this bread. It was very tasty and I love it. Of course, I used the techniques that I took some of the dough for testing and finger test too. The crust is very thick, but I liked for this bread.
Akiko
Beautiful pictures!
Well, I guess I misunderstood you in the first post. You mean that the bottom of your baguettes, where you sealed the dough, are bursting in the oven? In this case you might just try to do the final proofing with the seam side up and the smooth side down. The seam side then smoothens while rising and you do the scoring on this side. Since the smooth side is then on the bottom on the loaf when baking there should be no weak spots which could burst. Another reason for bursting can be that the shaping is a little too tight the scoring is not deep enough so there is too much surface tension.
I know what you mean with "natural cracks" as I've seen the picture on Hamelmans book and that's how rye breads often look like in bakeries here. Well, I am not completely sure and I haven't tried it yet, but I could imagine it works the following way: After you shape the boule, put it seam side (the "ugly" side) down in the well-floured bannetton or bowl with a towel where you do the final proofing, watching that keep the seals together so that they don't spread out too much. In this way the seams are "pressed" against the floor of the proofing bowl and therefore won't smoothen out like when you put the seam side up for the final rise. When you are going to bake, turn the dough upside down out of the proofing bowl so that the seam side is now up and bake it. The weak spots of the seam side (which should still be visible right before baking and should spread a little as the dough relaxes) should cause the dough to split randomly while baking and give this rustic look.
Vogel,
<You mean that the bottom of your baguettes, where you sealed the dough, are bursting in the oven?
Yes, Exactly what I mean. You are right about the shaping was too tight. I did shape it tighter a little bit for blooms and ears. But I definitely try the way that the seam side on the top and proof you mentioned. I did it before; they didn't burst on the bottom. But it was little difficult for me to transfer . I will practice!
Thank you for the tip for the "natural cracks" I wrote. I don't know what I should call it anyway. Again, I try the technique you told me. It sounds very good!!
I really thank you bunch, Vogel. I will tell you the result when I bake them again.
Sincerely,
Akiko