Sourdough Ciabatta - One Step
 Sourdough Ciabatta - One Step (1)
 Sourdough Ciabatta - One Step (2)
 Sourdough Ciabatta - One Step (3)
Sourdough Ciabatta - One Step Recipe
I made my first attempt at a "one step" recipe, similar to Sourdough-guy's recent blog entry (thanks, SD-guy). Photos of the process are posted. A spreadsheet showing the quantities in ounces and grams, bakers percentages, and some other percentages, such as hydration is also posted.
I wanted to use some more of my "sifted flours" obtained during a recent phase of obtaining and testing some "sifted whole wheat" flours for the fun of it. You can create a substitute for this flour by substituting a mixture of 87% white flour with 10% whole wheat and 3% wheat germ by weight. If you don't want to use wheat germ, you might try something like a 50/50 mix of white flour and whole wheat flour. I haven't tried doing it with all whole wheat, but I suspect that would also make something good with this recipe. The "sifted whole wheat flour" I used is "Golden Buffalo" from Heartland Mills. It is described as sifted so that the germ and 10% of the bran remains in the flour, which makes it about 87% extraction flour. It's characteristics are much closer to whole grain flour than white flour. For example, it absorbs a lot more water before it becomes slack like a ciabatta dough, and it has fairly high ash content and and protein percentage, and it results in a darker crumb and nuttier tasting crumb. Also, it is a high protein flour to begin with, as it is made from a higher protein wheat. At some point, I'll make this with something like KA organic AP, which should rise better and have a softer crumb and a more typical white ciabatta crust color.
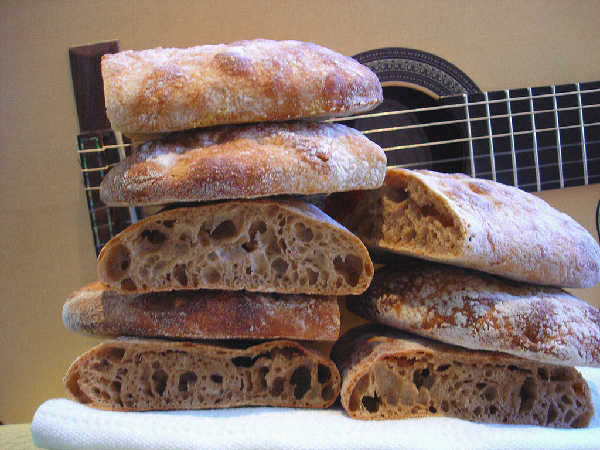
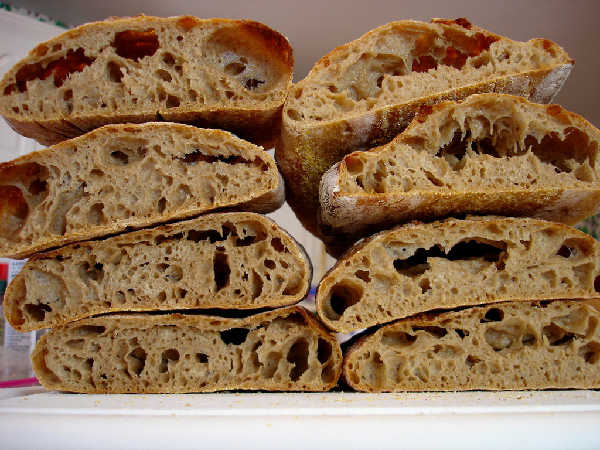
Overall, this recipe worked fine, although I realize now that I probably needed to be a little more agressive about rolling and tightening the loaves when they were shaped, as there was the "big hole down the middle" problem to some extent with these loaves, particularly the ones I shaped more gently and baked first. The ones I let proof a little longer also happen to be the ones I shaped a little more tightly, and they seemed to come out better.
Ingredients:
- 57 grams 100% hydration white flour starter (almost any reasonably active, recently enough refreshed starter will do)
- 2 grams diastatic malted barley flour
- 14 grams salt
- 665 grams water
- 57 grams light rye flour (I used KA rye blend)
- 610 grams high extraction wheat flour (I used Golden Buffalo from Heartland Mills - You can mix some AP or bread flour w/whole wheat and wheat germ as mentioned above)
Mix and Rest
Place starter in a large mixing bowl and add the water. You may want to mix only 540 grams of water to begin with, which is 82% hydration. Then, after you've added all the flour, you can mix in more water until you get the right consistency. The water absorption properties of flours varies over a large range, and the amount of water I used in this recipe is at the very high end of what you're likely to need, due to the type of flour I happen to be using. Stir the water and starter well to get the starter dissolved into the water. Add the diastatic malted barley flour and mix well again. Add the rest of the flour and mix just enough to blend everything with a spoon, dough hook, scraper, as you like. Or, do this all in a mixer but use low speed and mix for only 3-4 minutes just to get the ingredients well integrated. Then add the salt, sprinkling it over the whole dough and folding it in. At this point go around the bowl with your tool scraping the outside of the mass into the center and pushing down, similar to a fold, a few times to incorporate some air and mix the ingredients with the salt well. You don't need to do much more than get the ingredients reasonably well mixed.
You may need to add either flour or water to adjust the consistency of the dough. The dough should be fairly wet. It should be more stiff than a batter, but it should feel wet and pliable. It will feel a little wetter as the water incorporates into the flour. At some point the gluten will develop, and it should become an elastic, somewhat slack, pliable dough. In my case, I am using 100% hydration, which is higher than you're likely to need unless you are using a high protein hard whole grain flour, like a hard spring wheat from the northern plains. The flour used in this recipe is of that type, except it has 90% of the bran sifted out. It takes a lot more water than if you make this with mostly white flour. So, you have to do this by feel. What should happen is that when you eventually pour this dough out on the counter to fold it, it should spread out slowly over the course of a minute or so. It shouldn't be runny, but it shouldn't hold it's shape well either.
Cover the bowl with a moist towel and set aside for an hour.
Fold in the Bowl
The first fold probably needs to be done in the bowl, if it is as wet as it is supposed to be. Reach under the dough with a scraper on an edge, lift it up and out a little holding the top gently with your (wetted) fingers, stretching it just a little, then fold the edge over to the center. Do this for all four sides. Let it sit another hour or so.
Fold on counter
An hour after the first fold in the bowl, the gluten should be forming enough to do the folds on the counter. Gently loosen the dough from the bowl and pour it out onto the counter on a light bed of flour. Spread the dough out a little if it doesn't spread out all on its own. If it is very wet, it may not need any help spreading. If it's not quite so wet, you can encourage it to spread out with your fingers or palms. Don't stretch it aggressively, just spread it out, which it should readily do if it is wet enough. Wet your hands well to get all stickiness off them and shake off the drops a little bit. Snuggle your hands under one edge of the dough and gently lift it up and out slightly. Then fold it over to the center or past the center somewhat. Do this for all four sides. If it ends up as a nice tall cube shape, pick it up and turn it over. Then drop it into a dough rising bucket or a bowl for further fermentation. To make it easier to pull out of the dough rising bucket the next time, you can either spray the bucket with some oil spray or give the dough a good dusting with bread flour on the sides before dropping it into the bucket. I often get a rectangular shape after the last fold, since I'm still not anticipating the size of the folds perfectly. If so, you can fold it over itself one more time to make it more of a cube shape and roll it over to bring the stretched side of the dough on top all in one move to end up with a tall cube of dough. Then it can be picked up from the sides or slightly underneath and lowered gently into a rising bucket.
Wait an hour and fold, wait another hour and fold, etc., as above until it begins to have some "resistance" to folding. The gluten will develop all on its own with time and some folding. In my case I did 3 folds on the counter. Ideally, you can wait as long as it takes for the dough to flatten out, as a liquid would, before folding. That's the indication the dough has "relaxed" and is ready for another fold. After a few folds, the combination of gluten developing and enough time going by for the fermentation to start to generate some gas will result in a slight "crown" forming in the dough as it sits in the bucket, so that the dough won't really flatten out anymore. You can try folding again and should now begin to be more elastic and resistant to folding, consistent with the gluten development.
Bulk Fermentation
I intended to have the total rise time be about 12 hours, and I guessed the amount of starter accordingly. I started the mixing a few hours before I went to bed. It did double in about another 7 hours after the last fold, allowing for a good night's sleep if you're a bit of a night owl like me. You can adjust the time to your convenience by putting less starter in at the beginning. I would think it would take about 2-3 more hours for each halving of the amount of starter, but maybe Sourdough-guy can put a finer point on that. The one step method is new to me, so I still haven't developed a good feel for the timing over extended periods with a very small percentage of starter in the dough.
Shaping
When the dough has doubled, turn it out on the counter in a bed of flour. It will be full of air and very soft and slack. Fold it over itself once to get a long rectangular dough. That one fold will stiffen the dough a little. Gently slice the dough into four equal size pieces. Dust the cut ends with flour or roll the pieces in flour. Lay the pieces out in rectangles about 10 inches long and 4 inches wide by gently stretching them in one direction. Roll them up fairly tightly along the short end, occasionally folding the ends of the roll into the center if it is getting too long as you roll it up. Dust them well with flour and place them in a dusted couche. You may want to use some rice flour mixed with bread flour to dust the couche. The dough is very wet and will be sticky. However, if you dust the dough itself well, and also dust the couche with a combination of rice and bread flour it should be OK. I use 25/75 rice/bread flour to dust the couche. I spray the tops of the loaves with some oil and dust with some flour in order to get that ciabatta flour streak crust look.
Final Proof
Cover the loaves with a towel and allow to rise at room temperature for about 1.5-2 hours. I didn't try getting them warmer, like 80-85F as in Sourdough-guys recipe. Also, I am not sure how long the final proof ought to run, and the poke test is harder to read with this higher hydration dough. The longer proofed, slightly more tensioned loaves had a better crumb and rise, so maybe I didn't let the proof run long enough.
Sourdough-guy suggested an estimate of more like 4 hours for the final proof in his recipe from which I derived the recipe in this blog entry, so it may well be I have underestimated the right length for the final proof. I will try a longer proof next time, and if someone tries this recipe and goes for a longer final proof with good results, I would appreciate your comments.
Bake
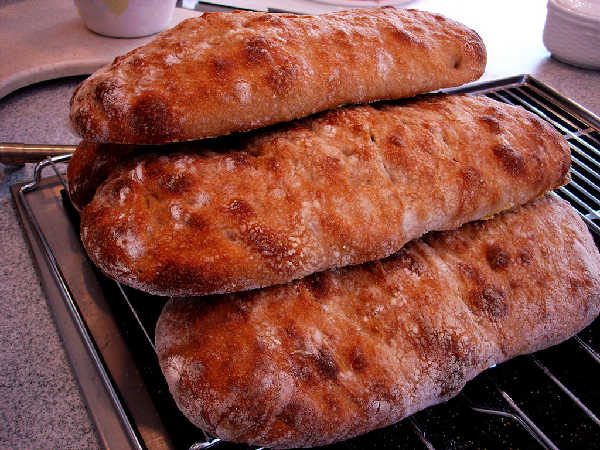
Place the loaves on a parchment dusted with corn meal or other similar flour to avoid sticking. As you place them on the parchment stretch them out to about 10 inches long. Then use your fingers to press down firmly all over the dough to dimple it and spread it out. I lightly sprayed the loaves with water using an atomizer pump spray bottle. You should have about a 10 inch by 5 inch rectangle when you're done with lots of dimples on it and only about 1/2 inch tall. Bake at 450F for about 18 minutes. I think the crust color darkening is the best indication of doneness, as it seems like the internal temperature isn't a very good indication of doneness for this very wet, airy, flat dough. These only rose to about 1.5 inches. I'm not sure if this is due to my flour choice or the amount of proofing. I suspect that any whole wheat-like flour may tend not to rise quite as much as a similar white flour version. However, it may also have to do with finding the right amount of time for the final proof.
Cool
Allow to cool completely. The crumb will not set properly if you cut into it too soon.
Results
The crumb was soft, cool, and creamy, and the flavor was mild with a nice after taste and only a touch of sour flavor. I believe this is fairly consistent with what I've been reading in Sourdough-guy's blog on the topic of "one step" sourdough. I get fairly similar results with my two step methods of past blog entries. However, I'm realizing that my mild results are probably the result of feeding my culture frequently, i.e. before it is very, very ripe, and also from refrigerating my intermediate "recipe starters" when they have just doubled or even earlier. I also stop my bulk fermentation when the dough has just doubled. The result may therefore be similar to the one step method, since not letting each intermediate step ripen should make the whole process closer to one long slow rise from a small percentage of starter. I think the two step method can result in more sour and stronger flavors if you let the starter and "recipe starter" ferment to a riper stage before adding them to the dough.
As with most of my attempts with sourdough ciabatta, the result is a chewier crust and slightly chewier crumb than yeast raised versions I've made. Also, the rise isn't quite as dramatic. However, the flavor more than makes up for it, and I like the chewy texture most of the time. If doing a barbecue or hamburger sandwich bread, I might prefer a white flour and probably would prefer a yeast raised version such as the Glezer recipe in Artisan Baking.
Feedback
My blog entries are written with the intention to share with and learn from those who participate here. Questions and suggestions regarding the written explanations or improvements to the methods are welcome.
- bwraith's Blog
- Log in or register to post comments
Great job on this write up Bill. I haven't tried this yet but it is on my "to do" list. Really nice looking bread!
Eric
PS: Did I see some flour on those guitar strings Bill? "You picked a fine time to leave me Lucille, two hungry children and the breads not done still". :>)
Eric,
I'm still wandering in ciabatta land, but I've also been more into browner nuttier breads lately, like the dinkelbrot and kartoffelbrot, and then Sourdough-guy and yourself with all the discussion of one step SD, less mixing, more folding recipes, so you can see how I end up with a brown, part way to whole wheat, one-step, low-knead SD ciabatta. Makes perfect sense to me.
A little flour just makes those guitar strings less squeaky. We have all kinds of synergies around here.
Bill
Bill, haven't tried Heartland Mills Buffalo Wheat yet but I have been trying to find better/nuttier/deeper flavors for WW breads, whether 100% or 50%. I'm still looking for a big full flavor that is far removed from sawdust. Jmonkeys formula's have been good but I'm afraid I won't discover that full flavor if I move to fast and change more than 1 item at a time. Any thoughts? Spelt seems interesting and Graham also.
I couldn't help myself with the music metaphor. You would have to be a 70's country fan to get the reference :>)
Eric,
No problem with the references, but you're right I'm not too good at getting them. I arrived here in the USA from being raised in Peru in the '70s, and my musical tastes revolved around south american traditional classical guitar music until some high school rock fans helped me move more into the then modern age, at least in appreciation if not practice. Country wasn't one of their favorites either, so I'm clueless.
As far as WW flavor, I'm not a WW god, but I have liked spelt, both in the recent German recipes from Marcel's grandmother, which are just delicious, and in the recent miches I've done. I think it does work well in preferments, particularly. As far as nutty deeper flavors, I'm not sure what to say. For me, the flavors I get in my miches when I go too far with the red whole wheats is too strong or bitter, but maybe that's something related to my techniques. That's why I was trying out combinations of spelt, white wheat, and red wheat, which for me results in a good but milder whole grain flavor.
This ciabatta does taste very good with the "high extraction" hard red wheat flour. I would recommend getting some of the Golden Buffalo flour and try something simple with it, like your basic sourdough round and see what you think. They sell over the internet in relatively small quantitites, so you can test it out "for a few bucks", if you're OK with spending extra for shipping in the interests of experimentation.
I got interested in the sifted flour concept when reading in the BBA, where Reinhart describes the flour that Poilane was using, which was described as approximately 90% extraction "partial whole wheat" flour. Our housekeeper is Portuguese, and she is always talking about growing up on a farm in Portugal, where her mom would go to the mill and they would sift the flour for her to remove some of the bran. She said it was one of her mom's favorite flours. Then there is the whole type 55, type 110, etc., way French flours are categorized. After reading some of the discussion in "The Taste of Bread" by Calvel, it sounds like the Golden Buffalo might be similar to something like type 110, which is described as having applications in rustic breads and whole grain breads.
Bill
Bill, I'm sorry if this is off topic but knowing you are a guitar man and a quality guy, I just know you will appreciate this. The reference I made earlier to a lyric was to a song that was popular in the late 70's. This link will make it all clear and even my lame attempt to rhyme into the baking interest.
http://www.homestead.com/deenotes/lucille.html
Eric
Hey Browndog5,
I grew up on another part of the planet and got here to the USA in '71. I can't remember the lyrics of a song to save my life, although now that I hear the song, I realize I've heard it a zillion times. So, no worries, you're still young. I'm just clueless, but we aren't going to call that news.
Bill
Katie, 50 coming up this year. Bill
Hi Bill,
That shot of Ciabatte with the classical guitar in the background was a nice touch. It reminded me of my teenage years when I was as fanantical about playing the classical guitar as I am with bread now. I could remember playing the guitar at least 7 hours a day until my mom complained about getting a headache when I kept playing Leyenda by Isacc Albeniz for hours. I love South American music especially that of Barrios.
Sorry for going off topic, couldn't help it after seeing that guitar. Ciabatta was one of the breads that I got me hooked to baking and I think is the perfect vehicle for learning the stretch and fold method.
One local bakery here in Singapore has a filled version of Ciabatta. Here is my imitation of their bread.
The filling tend to result in a hole though but dosen't really present problems when sliced horizontally. The rest of the pictures are here.
http://www.angelfire.com/planet/tomsbread/ciabatta-pesto.htm
Tomsbread
Hi Tomsbread,
Thanks, I like the idea of stuffing a ciabatta. I'll have to get around to that. I wonder if a kalamata olive ciabatta would work. I made a kalamata olive bread a while back, and I'm thinking I should do some more olive breads. I've also thought about doing a focaccia with the same basic process here, to test out one-step focaccia, adding olive oil to the dough, and olives might be good to add to it also.
On the South American guitar front, Barrios is probably my favorite. I probably drove some people nuts with Leyenda and a few others, too. I gave it up for almost ten years when a combination of work and kids kept me way too busy, but I've kept it up somewhat the last few years.
I enjoy wandering on your web site, by the way. I've found lots of good ideas and information there, as well as in your posts here on this site.
Bill
That is more wonderful looking sourdough ciabatta. I'm seemingly on brain-drain after having arrived home from vacation. :o) I have been meaning to bake for the past couple days but can't decide which to make.
At any rate, since I'm being a bit dense these days so could you please explain what exactly you mean by "one-step" and did I miss something on this whilst I was away? I also would like to know what I have missed about autolyse as I thought that meant resting. I guess I'll have to look it up again in some of my books.
That bread looks so delicious. Feed me now.
Zolablue,
What I mean is that this is the analog in natural leaven to the "direct method" (and somewhat like a no-knead approach) in yeast raised breads, i.e. there are no intermediate prefermentations built. You go directly to mixing the final dough with your starter, rather than making an intermediate "recipe starter" or preferment. Depending on how small you make the proportion of starter, you can control the time required for the rise, but typically we are talking about times like 12-24 hours for the total time from mix to bake.
In the last two versions I described, which I would then call two-step, there was either a large amount of liquid starter built or a biga-like firm starter built the night before and refrigerated. Then, that fairly large amount of starter, with around 25% of the flour contributed by the preferment, is mixed with the final dough, and a relatively short bulk fermentation of about 4 hours gets you to the shaping stage. The same method is used for the miche recipes, too.
I think Sourdough-guy, the no-knead school, and various others on the site are saying it's easier and you get the same or possibly better results by just doing one long rise with the final dough, rather than messing around with intermediate rises or preferments. You can just mix a smaller amount of starter into a final dough and let it ferment overnight and shape and bake the next day.
This was an attempt to do something in that basic style, although with ciabatta, and probably with high hydration whole wheat recipes, some folding has to be added to the process, in addition to just very brief mixing, rising, shaping, and baking, which is nicely explained with photos of some very nice resulting bread in sourdough-guy's blog entries (linked to somewhere near the top of this blog entry.
Bill
Hey the more I'm learning the more I get confused! :D bwahahahaha!
Did I hear you right that after your final fold, you actually rolled your dough as you would a sandwich loaf or baguette, in order to do the final shape and get tension on it? If so, I'm even more impressed because the crumb is so open and the holes so large, I thought that was only achieved by "not" rolling the dough and by simply pulling it to final shape.
My ciabattas so far, seem to peter-out on the final proof/rise. I think maybe it's because I'm missing the part about redistributing my yeast. (I know that yeasted stuff is going to behave differently than starters.)
Also, on my stretch and folds, my dough usually continues to grow in my bowl each rest period. Should I be punching the air out of it each stretch and fold?
Last, I thought autolyse was a period of slow mixing of the initial wet ingredients followed by the rest time when gluten strings were strengthened and elongated? The initial agitation starts the formation of the gluten but the wet mixture and resting period is a continuation of the autolyse.
Since I don't have a mixer, I do this part by hand with a rubber one-piece spatula and stir it for about 3 minutes as hard as I can (which isn't very hard) then I cover it and let it rest for about an hour. When I do this initial stirring, I use about 3/4 of my total flour in the mixture so it is really a snotty consistency! ;) Then I come back to it and add the yeast, any remaining flour and salt and stir again, then rest another 20 minutes or so, then begins my folding time.
Am I totally screwed up on my understanding of autolyse and do you think I'm over working my dough and maybe that's why at the end, I'm not getting a good rise on it?
Thanks as usual for your advice!
Hi Bluezebra,
Right, there are so many variations, that it's continuously surprising what works and why. I like reporting what I've done this way, so people can see one that worked (at least sort of worked), things that went wrong, and whatnot. Some give you ideas and advice that may or may not work, others try it out and discover something wrong or something else that works better. Sometimes I end up more confused than when I started, but it is interesting.
On the final shaping: yes, I do roll it somewhat like a batard. However, the dough is very puffy at this point, so it's not quite like shaping a batard with regular 65% dough. What I'm doing is just turning the dough in to the center and rolling it to bring some tension as I go. The recommended technique in BBA is to just fold it like a letter with no tensioning of the surface other than what the folding does, if I interpret the pictures right. However, I've preferred the results I get by doing something that is closer to forming a batard. I don't exactly "roll it up", which I don't really do for a batard either. It's more like I stretch it a little as I fold it over itself to get some tension in the sides. I find the ends stick out, and I fold them in a couple of times to keep up the tension on the ends, too. Then I place that seams down on the couche. I'm not squeezing out gas much when I do it, although it must do some. However, after doing SD-guy's pagnotta, I'm seeing the possibility of folding the edges in toward the center in a very similar way to the pagnotta shaping. I think I see that sort of shaping done in a picture of the Ponsford/Glezer ciabatta recipe.
When you say they peter out, I'm not sure I understand. Are you saying they won't keep rising? It makes me wonder if you are running the bulk fermentation too long. Remember that it will rise while you are doing the folds, so by the time you get to the bulk fermentation, it is already somewhat risen. So, to get a dough that is doubled from its volume after the mixing, it may not have to double at all relatively to where it is after the first fold. You can figure it out by putting the dough in the container it will rise in just after you mix it, and mark the bowl or bucket so you know the starting volume. I think it may help to stop the bulk fermentation even a little before it doubles.
You don't really need to punch out a bunch or air each time you fold. The idea is to stretch it gently. You can do that after it's on the counter by either gently the center and edges outward, or you can gently pick up the edges and pull them a little bit. I don't think it helps to do that in any aggressive way. It's just to stretch it out a bit, to the extent it is relaxed and can do that. Then, you fold it back up to make a more or less rounded cube. I think there are some pictures of the result after folding, if you can see those by going to my photos link above.
Your description of autolyse sounds right. Sourdough-guy took issue with the term autolyse, when he says I should have used the simple term "rest". I think he was right. I had been using a mix of flour and water followed by a rest, which might be more properly called an autolyse in many of my previous recipes. However, SD-guy seems to dispense with that and instead simply mixes all the ingredients and lets it rest. I liked this approach, as it is much easier, but I had left the term autolyse in the recipes, which to some extent are formatted the same from blog to blog entry. So, now I've removed the autolyse term from blog entry and replaced it with "rest" to try to avoid any confusion with the term autolyse.
I have hardly used my mixer at all since I figured out that simple mixing up approximately as you describe works fine. I don't even stir it hard. I just fold the dough over itself in the bowl a few times to mix up the ingredients in "a most relaxed and carefree manner", lol. In other words, if your working very hard at kneading and mixing, it's your choice if it feels good, gets out some frustration, get some exercise or whatever, but actually it's just not really necessary as far as I can tell.
I doubt you could overwork your dough by hand doing what you described. It seems fine to me. However, Ponsford in Glezer's book is very clear in the ciabatta recipe in Artisan Baking about not mixing much at all - to the point of even leaving lumps in it, he says.
If the dough is a little too dry, and you fold a few too many times, you might make it so stiff that the final proof would seem like it "petered out". In that case, it would probably make a comeback if you wait for the dough to relax. Or, if it is overproofed at the end of the bulk fermentation, maybe that would cause the "petering out". I doubt the food would run out, although if it's an organic flour, maybe it needs some diastatic malted barley flour. Sometimes organic flours have not had that added, and then you need to add some.
That's all I can think of. If anyone is reading this and wants to comment, even to tell me we have gotten it wrong here, please do say so. Still trying to figure this stuff out. Thanks...,
Bill
Zolablue,
I think it's the same thing. Glezer calls it diastatic malted barley flour, I think. However, I imagine the KA diastatic barley malt powder must be the same thing, and that is what I use, too.
Usually you can figure it out from the package or from the web site. It's often the organic flours that will not have the diastatic malt barley malt added. They will often say that you have to add it yourself somewhere on the web site in the product description. Sometimes the package gives a clue. Some of the KA organic flours show barley malt as an ingredient, while others don't, for example. I've also just called the mill. Usually they can put you in touch with someone who knows the answer. In the case of KA you could send them an email to their customer service desk and ask. They've always been very responsive to any question I had.
Bill
Do you have the recipe for the Ponsford ciabatta in the Glezer book, Artisan Baking? You need to make that ciabatta and like magic you will have great success. It is a wonderful recipe for making incredible ciabatta that I think must be fool proof.
Unlike Bill, who obviously has great success with ciabatta, I handle my ciabatta dough very carefully. I only fold gently in a letter style and then place in a floured couche to proof. Are you using a couche? That could be part of your problem if your loaves are flattening out. And you do not want to degas (aka punch down) that dough but handle carefully to preserve the bubbles.
I think this autolyse thing is confusing because one is discussing the term, which means to rest, and then one is discussing what is resting and what action takes place during that autolyse. As stated by Glezer in her title on page 12, “Autolyse, a.k.a. Resting” and then she goes into detail about what action takes place in the dough during said autolyse and why. So think rest and not mix.
Another tip for you is to buy one of those metal dough whisks from KA and other sites. I bought one recently and was intimidated by it but with the encouragement of Eric (ehanner) I went for it and that tool works really well to mix dough by hand. KA has two sizes but I bought the large one.
I think you might have better luck mixing in all your flour and allowing it, during the autolyse, to absorb all the water which begins to develop the gluten.
Also, have you watched the Julia Child video, again that Eric pointed me towards, to make French bread? It will completely give you confidence and teach you a lot just in doing the exercise of following those instructions for making the bread.