 Olive Bread - Sourdough Yeast Hybrid (1)
 Olive Bread - Sourdough Yeast Hybrid (2)
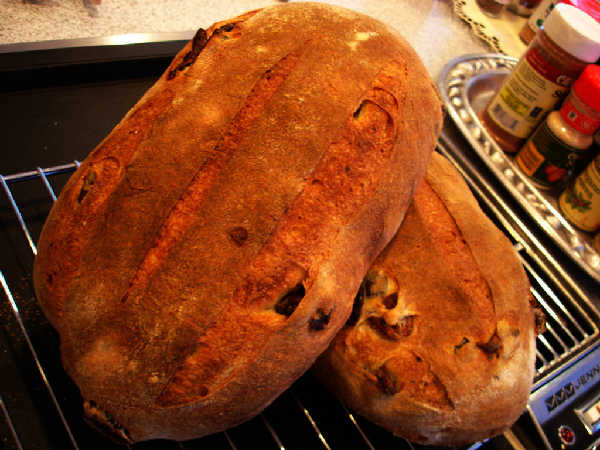
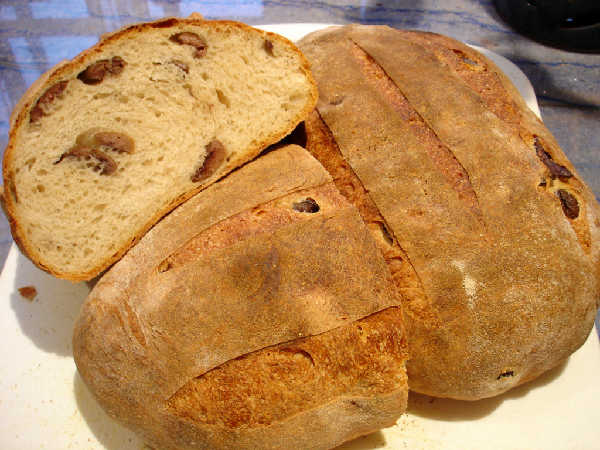
My wife said we were invited to dinner and could I make some bread to bring. This was in the morning of the same day, so I was unable to do a long rising, multiple step, sourdough bread, as I would have with more warning. So, I went for a fast approach. I had some left over starter that was intended for some bread I never got to. It was 5 days old sitting in the refrigerator. I decided to use it as a flavor ingredient, and add regular yeast to the dough in a "hybrid method". I also have had some kalamata olives in the pantry, thinking I might want to make some olive bread, which I had not done before. The result was a very mild sourdough flavor combined with olive fragrance and brine flavor. It seemed to go over fairly well. I took some photos and thought I would post this recipe. It's a way to get some sourdough flavor even if your starter is not fully revved up or if you are just in a hurry.
Olive Bread - Sourdough Yeast Hybrid
For the Dough:
- 360 grams of 5 day old refrigerated 100% hydration sourdough culture (mine is BBA style, fed with KA bread flour)
- 320 grams of AP (I used KA organic AP)
- 100 grams sifted white wheat flour (this could just be more AP, some white whole wheat flour, or other "rustic" flour)
- 50 grams KA rye blend (again any rye, whole wheat, or other "rustic" flour)
- 285 grams water
- 13 grams salt
- 1.5 tsp instant yeast (I used SAF instant)
- 0.5 tsp diastatic malted barley flour (not critical - optional ingredient)
- 200 grams kalamata olives, pitted, halved, stored in natural brine (that's what I had, but I'm sure lots of other types would be good, too)
There is a lot of flexibility in the age of the starter and the type of starter. I'm just using it as a flavor ingredient. You could easily make this a pure sourdough recipe by using fresh starter and leaving out the instant yeast. The bulk fermentation and final proof would just run longer, maybe 4 hours for the bulk fermentation and 2 hours for the final proof if done with pure sourdough.
Autolyse
Mix flours and water together, and use frisage, dough hook, or mixer to get it reasonably well mixed. Let sit for 20 minutes.
Mixing and Kneading
Work in the starter, yeast, then salt, and use frisage or mixer to get all the ingredients well mixed. Press in olives a dozen at a time and fold dough a few times to get them integrated into the dough. Knead for a few minutes until the dough is resilient. It will probably be quite sticky. The hydration is about 71%, so it is wetter than regular french bread dough. The ripe starter will make it have a wetter stickier consistency also. Place the dough in a covered container to rise. You can spray a little oil in the container beforehand and also on the exposed surface of the dough, but it's not that critical.
Bulk Fermentation and Folding - about 2.5 hours at 78F (or a little longer at room temperature)
Fold the dough at about 1 hour and then again at about 2 hours. At 1 hour it should have risen to about 1.5 the original dough volume. At 2 hours, it should have risen to about double the original dough volume. To fold, turn the dough out onto a lightly floured surface. Spread it out, pressing down gently without ripping the dough. Then, grab one corner of the dough, stretch it out gently and fold it over itself into the center of the dough. Do this for all four corners. If the dough is hard to stretch, just do two opposite corners, like a letter, rather than all four corners.
Shaping
Turn the dough out onto a lightly floured surface. Split into two equal pieces and let rest 10 minutes. To shape, create a rectangle about twice as long as it is wide. Roll the rectangle up from the short side, tensioning the outer surface as you roll. Pinch the sides under tightly to create more tension. Then, pinch the ends under also. Let it rest ten minutes with the seams down. Place the shaped loaf seams up in a couche lined banneton floured with a very small amount of rice flour or use other rising form as you prefer and optionally spray a little oil over the exposed surface. Cover with a towel and let rise for about 1.25 hours until puffy and probably a little less than doubled in volume (I did this at 78F, so adjust times if doing it at room temperature).
Bake
Preheat oven to 500F. Turn loaves onto a peel using your favorite method. I use parchment paper sprinkled with corn meal on a peel. Slash lengthwise a couple of times. Optionally mist the loaves with water very lightly using a fine mist spray bottle. Place loaves in oven, and generate steam using your preferred method. Just wetting the surface of the loaves is one simple appproach. Bake at 500F for about 10 minutes. Open the oven door and remove all the steam generating stuff you may have, and drop the oven temperature to 450F. Bake another 10 minutes or more until internal temperature is about 207F (at sea level).
Cool
Let them completely cool before you cut into them.
- bwraith's Blog
- Log in or register to post comments
Great photos and many thanks for the recipe. Olive bread is one of our favorites.
I baked up my first attempt at an olive and mushroom filled loaf using an Italian bread recipe last summer for a friend's barbeque. I envisioned a swirl of minced olive and mushroom artfully centered in the loaf. What we got was a bizarre bread that prompted RC to break off "a wing" for a snack as it came out of the oven. I wish I'd been snapping pics of the baking back then. The mishaps have great entertainment value.
I will certainly give your recipe a try. Your writing is very clear and very useful to those of us trying to improve our baking technique.
"Place loaves in oven, and generate steam using your preferred method. I have a stone and a skillet on the rack below the stone, all preheated at 500F. I use a tunafish can that has a tiny pinhole in the side near the bottom. I add about a cup of water to the can and place it on the skillet."
I love this! What a great idea. do you boil the water first?
Hi gianfornaio,
I can't take credit for the idea, which I used because I read it on the site somewhere else, but I just don't remember where. The skillet is definitely at least a floydm idea. I've seen his pictures. The basic idea is to slowly let the water out after the oven door has closed. The iron skillet has a high heat storage capacity, so it won't cool down to 212F quite as quickly when a small amount of water is placed on it, and the water is converted to steam quickly enough that way. However, even a skillet would cool down fairly quickly if you just pour a bunch of water on it. The pinhole allows water to flow out of a confined spot and will be converted to steam if the skillet doesn't get saturated with water. It seems to work, as far as I can tell. The oven looks "cloudy", at least. Like Zolablue commented recently, it does seem to make a difference. I also have a relatively small oven, like she does, and it only has a couple of small vents that I can plug with a wet towel. That probably also has something to do with it. I think the best approach, however, which I have yet to implement is some kind of cloche or glass cover, dutch oven, or certain steam injectors and lids, which clearly concentrate the steam and the radiant heat from oven surfaces. I've been reluctant to use them, since I tend to do larger loaves that don't fit in dutch ovens a mere mortal can lift without inadvertently roasting meat - your own, or I'm doing a couple of loaves at once. One of these days, maybe I'll buy a commercial oven with steam injection, but that takes money, space, kitchen redesign, and so on. It's just hard to justify all that for a what is really just a hobby for me, as much as I enjoy it.
Bill
Bill,
I don't want to be an alarmist but, depending on what the can is made of and how it is made there might be the possibility of releasing some nasty chemicals into the air in the oven and absorbed by the bread. I want to say that there shouldn't be any galvanized steel in food products but as this is an International audience anything is possible. The Zinc in galvanizing is poisonous when heated above a certain degree. Also I think some products that are naturally acidic like tomatoes come in a can that has a resin inside. The heat in the bottom of the oven above the red hot coils gets hot when the water runs out.
I remember the warnings of people becoming sick from using refrigerator grates to grill on. Just be careful and know what you are using. Maybe there is a metallurgist amongst us??
Eric
yes. That would be my worry. setting off some nasty chemicls or metals. :S
thegreenbaker
Eric,
I didn't realize the can could be toxic when heated. Thanks very much for the warning, and I'll quit using that method.
Bill
Instead of pouring water into a can (I will ask hubby about the metal when he comes home) you can stand this or similar figure in the corner. So get out your clay and make your own! Important is that it be thin, and the only opening the size of a pin hole. Mini Oven :)
MiniOven,
Good story. I'll have to think about a clay version, but I need something low profile to fit underneath the stone. That's why the tuna can was the right shape. Oh well, something will eventually come to mind, or I'll figure out what metal is OK.
Bill
Bill,
It might be OK but if you hadn't thought about it I figured I would raise the issue under a "whoda-thunk-it" if you know what I mean. Anytime we use something for an unintended purpose there is a chance of something weird. In the barbecue biz there were some folks using electrical boxes to hold wood chips for smoke. The Zinc was burning off and collecting on the ribs. Ouch!
I think Aluminum foil with a pin hole would do the same thing wouldn't it? I might try that myself.
Eric
Eric,
Again, thanks for the warning. It's not kind of thing you want to err on. I am just not really sure what type of metal or metals the can is made of, so better to just lay off of it. Aluminum foil might work, too, although getting just the right size pinhole would be more difficult. I used a a very small drill bit from a Dremel kit to make the hole on the can. It takes a while for 1 cup of water or so to dribble out - about 5 minutes. I have removed the can a couple of minutes after it ran out, so I'm hoping that the can never had time to get very, very hot. Can't be sure, though. I'm still not even sure there is enough steam to make a difference. I suspect the biggest effect is to be had from just misting the loaves a couple of times, but it's not a piece of the bread making puzzle I've spent much time trying to really figure out.
Bill
Boy, those are really beautiful. I want some right now!
Funny, I am an olive freak - love the things. However I rarely eat them. I do on occasion drink them in the form of garlic olives in my martini (hehe) and relish in the zoo breath that causes for the next week because they're sooooooo good. (lol) Since my DH does not like olives I have never made olive bread. I keep drooling over photos in my bread books and wiping the tears away...sniff, sniff. Since hubby says no way will he even try olive bread I could keep a bit for myself and give the rest to neighbors who would love the stuff. We have to leave on vacation in a few days but when I get back I think I'll put this on my list.
Do not use galvanized metal or zink coated objects in oven or for cooking.
Mini Oven
I realise this is a very old post now but stumbled across it last month when I wanted to bake a loaf but didn't have any active starter. However I did have 2 jars of discard sat in the fridge so went looking for a hybrid recipe. Yours was the first one I looked at and I had everything I needed (although I left out olives as we don't eat them). It was a fantastic bake - really soft and delicious and it went down very well at the party I took it to. :-D