In Search of a Good Miche Version (2)
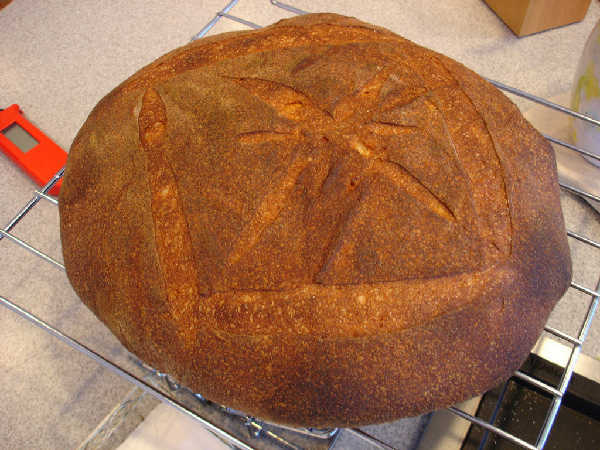
 Mixed Flour Miche (2) Crumb (a): Mixed Flour Miche (2) Crumb (a)
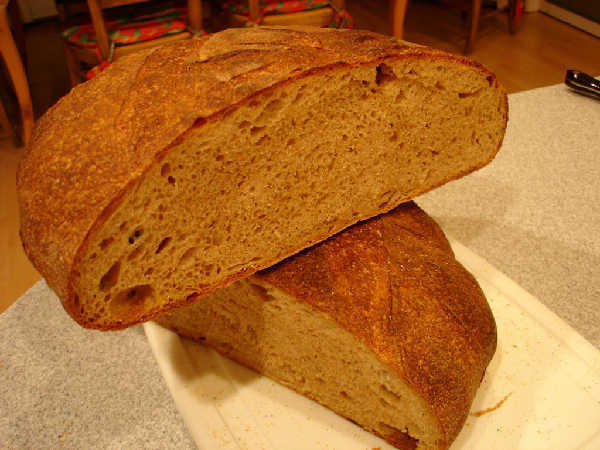 Mixed Flour Miche(2) Crumb (b): Mixed Flour Miche(2) Crumb (b)
Mixed Flour Miche (2): Mixed Flour Miche (2)
Mixed-Flour Miche: Loosely based on BBA Miche and Hamelman Mixed-Flour Miche.
I did a new slightly different version of the miche in my first blog entry about this recipe. I have a spreadsheet showing the recipe and percentages.
I have some photos of my process, but it is from the original blog entry, not for this specific bread. However, the process was the same other than as noted below.
Many, many thanks to JMonkey, SourdoLady, Zolablue, Mountaindog, Floydm, and numerous others. My results on this and other recipes are much better because of the great ideas I've found in the various blogs, postings, and lessons here.
Mixed-Flour Miche (2) as in version (2): Loosely based on BBA Miche and Hamelman Mixed-Flour Miche.
There is a "firm starter" that is built from white poolish-like starter as in the BBA "barm" version (50/50 by weight using breadflour and water), which is retarded overnight and included in the dough which is baked the same day.
The recipe I've been doing lately has evolved from the BBA miche recipe to be more like the "Mixed-Flour Miche" in Bread by Hamelman. My objective has basically been to have a high whole wheat content, but use sifted flours to get a less coarse crumb. I have also mixed red wheat and white wheat flours as well as tried some spelt trying to come up with a flavor that is not too "grassy" or "nutty". I find the taste of 100% white wheat bread to be a little too bland, whereas using too much red wheat seems bitter in a way I don't like.
As a result, I've ended up mixing various flours in an attempt to get something that is mostly whole wheat with some of the coarser bran sifted out and partly red wheat, partly white wheat for flavor.
The recipe showing in the photos above is as follows, and is loosely based on both the BBA Miche and the Hamelman "Mixed-Flour Miche" in Bread.
For the firm starter:
- 7oz "BBA style barm" (100% hydration bread flour starter)
- 4 oz KA Whole Spelt Flour
- 3 oz KA Organic Whole Wheat
- 2 oz KA Bread Flour
- 4oz water
Mix/knead ingredients for about 3 minutes to get a fairly firm not very sticky dough. Place in container and let rise to about 2x in volume - about 3 hours. No extra punch down and additional rise at this point, compared to original recipe. Place in refrigerator overnight.
The difference in the firm starter above from the version (1) recipe is I substituted 4 oz Whole Spelt and 2 oz KA Bread Flour for 6 oz Golden Bufallo Sifted Red Wheat Flour. The objective was to get a more mild, less sour flavor. I also only let this rise for 3 hours, rather than 5 hours in version 1. This bread tasted better to me. The sour flavors that seemed a little too strong, as noted in the original blog entry, are more mild and complex this time, with no subtle excess of sour dominating the after taste of the crumb.
For the dough:
- 3 oz KA whole spelt flour
- 8 oz Golden Buffalo sifted red wheat flour (Heartland Mills)
- 3 oz KA Organic Whole Wheat
- 8 oz sifted white wheat flour (Homestead Grist Mill)
- 7 oz Sir Lancelot High Gluten flour
- 3 oz KA Rye Blend
- 29.5 oz water
- 3/4 tsp diastatic malted barley flour
- 24 grams salt (about .8 oz) (2 grams less than in the first version)
- Firm starter from day before.
The overall difference from the previous recipe is just a small decrease in red wheat flours, and less spelt flour in the dough, since I have more spelt flour in the firm starter. Also, the hydration is a little higher, about 83% from more like 82% in the previous recipe. Also, I used water on my hands and on the kneading surface instead of flour, instead of the flour that was used in the first recipe (based on some recommendations from the WW gods on the site), so that may account for a significant difference in the wetness of this dough. I imagine that could contribute an additional 1% difference in hydration.
Cut up firm starter and cover with towel to allow the pieces to lose their chill.
Autolyse: Mix all but salt and starter in bowl until the ingredients form a uniform shaggy mass. Allow to rest for 30 minutes.
I decided to use less of an autolyse, based on some advice in Raymond Calvel's book, "The Taste of Bread" which seems to indicate that letting the autolyse go on too long may take away from bread flavor.
Mix and knead dough: Push the pieces of starter into the dough and sprinkle with salt. Use a "frisage", i.e. use the heal of your palm to push the ingredients out along the table, so that all the lumps become mixed. See the Danielle Forestier video on the Julia Child video site. Mix/knead for 5 minutes to form a supple, fairly soft dough. I grab an end, lift it from the table, stretching it from the other end, which is stuck to the table. Then, toss the middle sideways and drop the end back down against the end stuck to the table, which forms a fold. Then, do the same thing from a quarter turn of the dough, i.e. grab an end at a right angle to the end you grabbed before. The total hydration of the entire overall dough is 83%, so it is relatively soft at the beginning. Place in a container to rise.
Fold the dough every 30 minutes: The total bulk fermentation time was 3.5 hours. I was folding it using the technique in Hamelman's Bread, i.e. (very roughly) turn the dough out on a bed of flour top down and gently spread it out/push out some of the gas. Then pull out and stretch one side of the dough and fold it toward the center. Do the same for the other three sides. Put the dough back in the container with the top up and the seams down. I folded 3 times, then let it rise for the rest of the time.
This time I folded every 30 minutes instead of every 60 minutes, and I only folded 3 times instead of 4 times. The result was a much more slack dough after completion of the bulk fermentation. This time, because of the higher hydration of this version, I probably should have folded at least one more time to get a dough that would hold its shape better. This dough spread out a little too much. It had good oven spring, so that compensated to some extent, but overall I wished it would hold its shape better than it did. Next time, I may reduce the water slightly and fold a little more to get a better shape.
Shape into boule: Form a boule not too differently from the folding technique above, except it is more of a gathering in of the edges of the dough and pinching them together underneat to stretch the top of the dough. Let the boule relax for 10 minutes to seal the seams underneath. Flour a couche very lightly with rice flour and place in 8 quart steel mixing bowl, and then place the dough in the couche seams up.
This time I tried to use mountaindog's recently blogged techniques for shaping the boule "right side up" instead of my previous upside down technique. I also allowed the relaxation of the boule for 10 minutes this time. The only gotcha I suffered was that the dough didn't come out of the rising bucket properly because it was still fairly gloppy - not enough folding of the more hydrated dough. As a result, the dough ended up lopsided, and a couple of the seams from the folding were slightly visible on the top of the dough after the final proof. I slashed through it, to not so gracefully hide that - oh well, next time I'll do better. This time, I did an additional fold after turning the dough out on the table, as it seemed quite gloppy. I need the fold to get to the point where I could form the boule.
Final Proof: Allow to rise for about 2 hours.
Last time, I think the final proof went on too long - 3 hours, and that probably contributed to slightly excessive sour flavors I wasn't so happy with. Also, I think it was long enough that the oven spring wasn't that great. This time, the flavor was very good, at least I thought so. The flavor of this one is complex, slightly sour only, with a cool, light, moist crumb. Although the gloppy dough did spread out, it also had decent oven spring, so the overall shape was slightly flatter than I wanted but not a huge disappointment.
Place on parchment: Place parchment on an upside down baking sheet or a peel and flour with coarse corn meal. Invert the bowl with the dough onto the parchment and pull away the bowl. Gently pull away the couche, which works great with the rice flour on the couche. Slash as photos show. I very lightly spray water on the dough with a pump pressure spray mist bottle.
When I placed the dough on the parchment paper this time, it spread out alarmingly, but was not a disaster. I realize that I need to fold the more hydrated dough one or two more times.
Bake: Preheat oven to 500F well before this point, like an hour before. Use various steaming techniques as described many places for home ovens. Drop temperature to 450F after about 5 minutes. Bake at 450 for 10 minutes, then rotate loaf and drop temperature to 400F for another 15 minutes. Then rotate and drop temperature to 375F. Continue to bake until internal temperature is about 208F.
This version had great flavor. I think this is partly because of the more mild starter, which used spelt instead of more red wheat flour. Also, I fermented for less time at all stages this time, which seems to have helped remove the slightly too sour after taste of version 1. I think the oven spring was better because of more hydration and less folds earlier. The crumb was a little more open for the same reason. Next time, I want to use slightly less hydration and one or two extra folds to make the dough a little stiffer - closer to version 1.
- bwraith's Blog
- Log in or register to post comments
Mountaindog,
Here is some additional thinking on the "sifted" flours I used. This is all based on very limited information about the flours - lots of guesswork - so, please view this as more illustrative of what motivated me to try these flours, rather than any brilliant treatise on flour.
The Heartland Mills web site describes Golden Buffalo as stone ground red whole wheat that has been sifted such that 10% of the bran remains in the flour.
Assuming whole wheat has 83% endosperm, 2.5% germ, and 14.5% bran, then the Golden Bufallo flour would be 83 parts endosperm, 2.5 parts germ, and 1.45 (10% of the bran) parts bran, then you can figure out the percentages respectively, as 95.5, 2.9, and 1.6.
Doing a similar calculation for 90% extraction flour, which is what I gathered in some discussions with people at Homestead Grist Mill (also Littleton Grist Mill), where I got the "sifted white wheat flour" and "sifted red wheat flour", then the percentages of endosperm, germ, and bran would be 92%, 3%,5% respectively.
If I take regular bread flour as 100% endosperm, then I can take all the percentages of components of the wheat kernel and figure out what my dough composition is. The result is that I have about 92.5% endosperm, 2% germ, and 5.5% bran in my dough the way it is in the recipe in this blog entry.
If I were to just do the BBA recipe w/50% bread flour and 50% whole wheat, the result would be 92% endosperm, 1% germ, and 7% bran. I guess you could then fairly closely approximate my dough by just adding a 1/2 oz of wheat germ. You could get closer still by using half white whole wheat and half red whole wheat flour for the whole wheat part of the recipe. And, even closer would be to use whole spelt or at least white whole wheat for about half of the whole wheat part of the firm starter.
So, with the above in mind, this recipe ends up being just an attempt to include more parts of the wheat kernel for flavor and probably nutritional benefit, but take out some of the bran for better texture and less bitter flavor. Additionally, it's an attempt to balance white wheat and red wheat flavors, which to me are very different.
Maybe I should try to create a recipe that is similar to this version, yet uses conventional flours, like KA organic whole wheat, KA organic white whole wheat, and optionally KA whole spelt, along with KA bread flour or KA Sir Lancelot High Gluten. It should be much easier for most people to get flours that are equivalent to these one way or another, so they could try this recipe without worrying about my somewhat unconventional flour choices (though they are all available over the internet).
Bill
Hi Mountaindog,
First thanks for all the lessons in your recent blog, which definitely helped, as I think the early folding is better, as is the boule shaping technique. My only serious problem was not getting the dough out of the bucket properly at the point of shaping the boule. It rolled a little bit and ended up approximately on its side. I didn't want to mess with rolling it around, so I just went forward. It worked fine, but I'm going to be more careful to fold it a little more or drop the hydration slightly next time. it was just a little too gloppy for that late in the game.
As far as the flours, I was trying to find flours that are closer to the description in the BBA for the Poilane miche. The manufacturers of the various flours are listed in my first miche blog entry, which is linked in this blog entry. There are some mills that seem to mill in an old fashioned way, i.e. stoneground followed by sifting. The result is to get a very high extraction rate, like 90% according to one of the millers I talked to on the phone. Essentially some of the larger particles of bran are removed, but most of the grain and some part of the bran remains. You can see it in the flour. Whereas, I believe that KA whole wheat and many other whole wheat flours contain the entire grain, just milled fairly fine. I like the texture and flavors from these "sifted organic stoneground" flours, but I'm not at all an expert. This is a very new thing for me to try. I just got these flours over the last few months via the internet.
The Golden Buffalo from Heartland Mills is a red wheat sifted flour, and the Homestead Mills "sifted white" comes from white wheat.
Before this, I've just mixed whole grain flours and bread or all purpose flour together, which certainly is similar, but I've been very happy with the flavor and the texture I've gotten out of these flours.
I wanted to get as much of the whole grain in there as possible, yet remove some of the bran just for a more refined texture. I think the bran may contribute some of the bitterness I taste in 100% whole grain breads, particularly the red wheat bran. I also think red wheat has a strong, slightly bitter flavor while white wheat seems almost too bland. So, I mixed coarse white wheat flour, coarse red wheat flour, high extraction white wheat flour and high extraction red wheat flour, and some regular bread flour, hoping to get a fairly high percentage of whole grain nutrition combined with a somewhat less coarse texture and less bitter flavor, but not too bland. I've made all white wheat bread, and it seems relatively bland - I like some, just not 100% red wheat flavor. I did a spreadsheet that is also linked above, and it shows some of the percentages that I was playing with, like the percentage of "bread flours", the percentage of "white wheat flours", the percentage of "red wheat flours" and so on.
I used spelt flour only because it has been talked about as a mild flavored whole grain. I've heard comments that starters taste very good made from spelt. Also it is said to be a component of the actual Poilane miche. I used it in the starter, and I think the starter had a milder, more sweet character than my previous one which had more red wheat in it, even adjusting for the shorter rise time of my firm starter in this version.
Bill
What a nice job you did documenting all that you have done with this project. The thought that has gone into selecting flavors is indeed detailed. You are quite the artist with the slashing tool also. Indeed "Artisan".
So did the taste and texture live up to your expectations?
Eric
Eric,
Yes, I was very happy with the flavors and textures of this version. The shorter fermentation times probably account for most of that. However, I also think it was much better to use more spelt or white wheat flours in the starter and less red wheat. However, I'm not a big sour flavor fan, so there are many who might prefer the more sour flavors of the first version. I think the very high hydration has made a big difference in the texture of the crumb, which is fairly elastic, slightly softer, and dissolves a little more quickly, as opposed to more dense, stiff, and very chewy. I think some of the flours have not malted barley flour added, so I do add a small amount, and that may help to make the darker crust color. The flavor of the crust has been good in both versions.
Bill
Hey bwraith and mountaindog
I made a couple of miches last weekend. I used mountaindogs early and often folding technique. I normaly use Hammelmans evenly spaced fold technique. The differences were quite noticable. I was able to get 4 folds in quite easily every half an hour. When spaced every 50 min or so I have a hard time getting the third fold to stay. It wants to spring back. After the final proof is where I noticed the most difference. The dough almost felt like it does after the second fold. Pretty sloppy. It did allow me to preshape and finaly shape easily. Leaving it on the counter ten min after shaping sealed the bottom well,( great tip.) One thing I did have problems with is the top was starting to seperate from the rest of the bread. I am not sure what causes this but I get it every once and a while. I think I will try 2 folds early next time let it proof and 1 or two more folds later and see what happens.
As for the recipie I like to call it "miche light". It is Hammelmans Point Callere with the exception of I add 100g of whole wheat flour and the rest is white. I find I like bread with just a kiss of wheat. I started at 50/50 and a couple of years later I ended up here. This bread is the best on so many levels. Great taste that gets better after 2 or 3 days. Great variety of possible cuts. Like crust you got it, Like sandwich size cut open the middle. The one shown cut up has 20 grams of malt syrup in it as well. Both were baked using the no preheat method. Thanks for all your previous posts regarding the best shape in bread.
Da Crumb Bum
Hi Da Crumb Bum,
I do like a good miche - you got that right. Thanks for the posting your results. I had much the same thing going on regarding spread after early folding, and I know there is some happy medium where the dough is not way stiff like when you fold every hour or so, yet is also not so slack at shaping time.
I got a touch of that top separation also. I'm wondering if a little actual "punchdown" as opposed to only folding might solve that. It would be similar to the Glezer advice for ciabatta, where you press your fingers into it. Or, maybe some misting of the "top" after each fold would help. I think it comes from a dry skin forming on the top, but I'm not sure.
Bill
Crumb bum - beautiful miche! I will have to try your no-preheat method next time if you got a crust like that - seems like other examples I have seen of that method produced some anemic looking crusts for our tastes, but not your example here. My problem is I bake a couple of batches a weekend so the oven is hot anyhow from cooking all day, but maybe as gardening season picks up I'll be cutting down on that and I'll try not preheating.
As far as the top separating for both you and Bill, I am not sure what causes that as I have not had that problem yet with my miches, but perhaps maybe it is the surface tension during final shaping? If you pull the boule really tight and have a lot of surface tension, maybe that prevents the large gas bubbles from spearating the skin from the rest of the dough? Others here may have a better idea of what causes that.
Hey Mt Dog
Thanks for the complement. I think the reason the crust turned out well on this one is because I made the dough with cold water and stretched out the fermentation all day. I notice the longer the ferment the more reddish the crust. Must be the extra starch conversion that takes place given the extra time. A couple of things regarding the cold oven method. I baked the whole miche pictured directly after the first one. I imagine the oven was 300 or so at that point? I always leave the bread in the oven 10 min after the bake with the door slightly open. It seems to make the crumb a little more glossy and drives a little moisture out of this pretty wet bread. I put a little water 1/2c on the oven floor like the first loaf. Slash and crank it to 525 after 15 turn down to 440. It does not seem to make any difference that the oven is already pretty hot. Last but not least when you put the slashed dough in the oven and watch it it will seem to spread out and you will be cursing my name thinking what have I done. Just give it 15 minutes though and your sad spreading dough will have popped up and done its magic. I think it takes a while for this large loaf to heat through. As for the crust seperation I only had it on the first loaf, the second was normal. Both shaped the same, another mystery to solve.
Da Crumb Bum