The Fresh Loaf

A Community of Amateur Bakers and Artisan Bread Enthusiasts.

wassisname's blog

wassisname's picture
wassisname


Well, it’s fall and the hearty breads are calling.  This turned out to be a fun one with some elements new to my multigrain loaves. 

I have a new toy!  I got crackin’ on some rye berries with the cheapest burr coffee grinder I could find (I couldn’t bring myself to try using the good coffee grinder I already have).  I made a coarse rye meal to use in place of the rye flour that would normally have gone into a loaf like this.  I can tell this thing is going to get a workout.  It’s not up to making actual flour or large amounts of anything, but it is perfect for tinkering with any whole grain that strikes my fancy.

The other first for me was the millet and quinoa.  I don’t know what took me so long but they both worked beautifully and have a flavor different from the usual seeds and grains I use.  The only catch is getting them to just the right softness.  On my first attempt at this I gave them a hot soak by pouring boiling water over them and letting them sit overnight.  This didn’t soften them as much as I thought it might.  They were visually striking in the bread but a little hard on the teeth, at least until the bread was bagged overnight.  For the loaves pictured here they were fully cooked.  That made the bread easier on the dental work but the grains weren’t very noticeable.  Something to tinker with.

And then there is the hydration.  I give the dry weights of the millet and quinoa in the formula as a starting point, but the results can vary widely depending on how cooked the grains are and how much water you manage to squeeze out before adding them to the dough.  The dough pictured here was very, very wet. 


So this isn’t the most precise formula you will ever come across.  That’s kind of the point, though.  This is the sort of bread I won’t ever make exactly the same way twice.  The whole fun of multigrain is grabbing whatever sounds good and seeing what happens! 

I can’t really give a detailed method for the same reason – it’s different every time. 

This is not one of those subtle, delicate breads.  No matter how it comes together it will have loads of flavor and texture.  Perfect for the season!

Marcus

I got a chance to get out on my bike with the camera and catch the last golden bit of fall.


wassisname's picture
wassisname


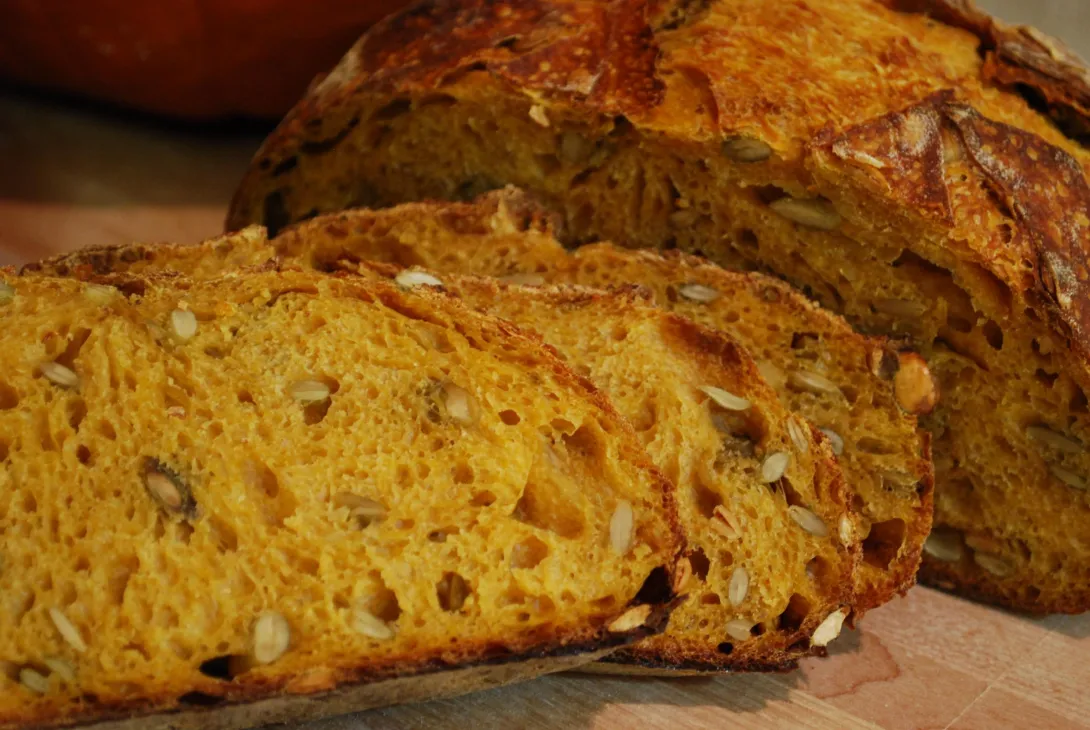
First off, many thanks to Karin (hanseata) for posting her bake of Dan Lepard’s pumpkin whey bread.  What a great idea, and not just for autumn bakes.  This is a sourdough, whey-less take on that lovely bread. 


I love what the pumpkin does for this bread!  The colors are striking, the crumb is exceptionally moist, and the flavor is wonderfully complex.  The amount of pumpkin added to the dough will affect the flavor of the finished loaf pretty dramatically.  The flavor using this formula is subtle – there, but not up front – and fades over time.  The flavor is much more pronounced with the addition of even 25g more pumpkin (reduce water by 15g to keep the hydration about the same).

I really do recommend an autolyse for this dough because it starts out very sticky.  I tried mixing the first attempt straight off without an autolyse and it was a mess.  I was convinced the dough was far too wet, but it eventually worked itself out and ended up being a little tight if anything.  The loaves pictured here are the second attempt.  They were handled much more gently and turned out much better for it.


Another idea I tried was to mix a bit of cinnamon and allspice with flour and use that to dust the bottom of the loaves.  I kept it very light and the flavor didn’t come through in the finished bread, but it is something I will play with in future bakes. 

And, there will certainly be future bakes of this one, because… YUM!

Marcus

Oh, and the type 85 flour could just as well be whole wheat, but it's what I have on hand at the moment.


wassisname's picture
wassisname

My pears were kind enough to hold out long enough to give me one more attempt at this bread.  With a head full of great input received on my last post, the formula was tinkered with (of course) and includes less whole wheat and barley, more pears and a hotter bake.  It also features the twisted “tordu” shape that I clearly haven’t mastered but have a lot of fun with.

First the bad news - The bread was both underproofed and overhandled, as the crumb photo shows. The former because I didn’t do a very good job scheduling my day, and the latter because I am not very good at this shape… yet.


On the plus side – I like the new formula and the bolder bake.  When the bread first cooled I wasn’t so sure, as the toasty crust flavor, while excellent, more or less overrode all the other flavors.  With time, though, the flavor really changed.  The sweetness of the barley and pears came through.  The crust had gone soft and the whole bread a bit chewy but I just couldn’t stop gnawing on it.  The rest of the family agreed.  When pear season comes again next year this is the formula I will be starting with.

Marcus

****And I just spotted error in the instructions:  The bread was baked for a total of 45 minutes, not 40.  That extra 5 minutes made a big difference in the crust!


wassisname's picture
wassisname

I guess I should begin with a disclaimer:  I’m not usually one to put chunks of fresh fruit in my breads.  Nuts, seeds, grains, even a bit of dried fruit, sure.  But something about having all those mushy bits in the bread has made me wary of the whole concept.  Plus, the sandwich possibilities can be limited.

Of course, where there is a rule there is an exception, and this is it.  The credit goes to Hanne Risgaard’s Home Baked, which includes a very tempting pear sourdough bread.  That by itself would be little temptation if not for the pear tree in my yard.  Even with the birds claiming their share I still come away with more than enough to do some experimenting. 

And so an annual bake has been born.  Last year I stuck pretty close to the recipe in the book and baked some very tasty loaves.  This year I changed almost everything and got some more very tasty loaves!  Maybe there is something to this bread-with-fruit-in-it after all…


And so an annual bake has been born.  Last year I stuck pretty close to the recipe and baked some very tasty loaves.  This year I changed almost everything and got some more very tasty loaves!  Maybe there is something to this bread-with-fruit-in-it after all…

The original recipe features spelt, toasted semolina, and yogurt.  I kept the semolina, ditched the yogurt and spelt, and added whole barley flour and type 85 flour.  The barley flour was a craving borne of some barley flour cookies I’d had recently, and the type 85 is just what I had on hand.  Whole wheat flour would work in place of the type 85, though I might reduce the percentage to avoid adding too much of a bitter note.

For more on baking with barley check out blog posts by mebake, hanseata and sam.  Barley has its limits in bread baking and without some background info from fellow TFLers I could have found myself in trouble!  (I’m sure there are other posts but these were the first few that popped up.)

As for the result, no complaints!  The crumb is close but very soft.  The mild, slightly sweet flavor of the barley comes through and compliments the pears very nicely.  I added to the toasted semolina flavor by using it on the bottom of the loaf when loading into the oven (otherwise, I just use regular flour) and that comes through as well.  This bread doesn’t keep particularly well – moisture from the pears is my guess – so it is best enjoyed fresh.  I’m sure there a more, and probably better, ways to put this loaf together, so any suggestions are welcome! 


Meanwhile, up at the office we were enjoying the first day of... fall? 

I always love it when Old Man Winter throws out a quick teaser of snow in September!

Marcus


wassisname's picture
wassisname

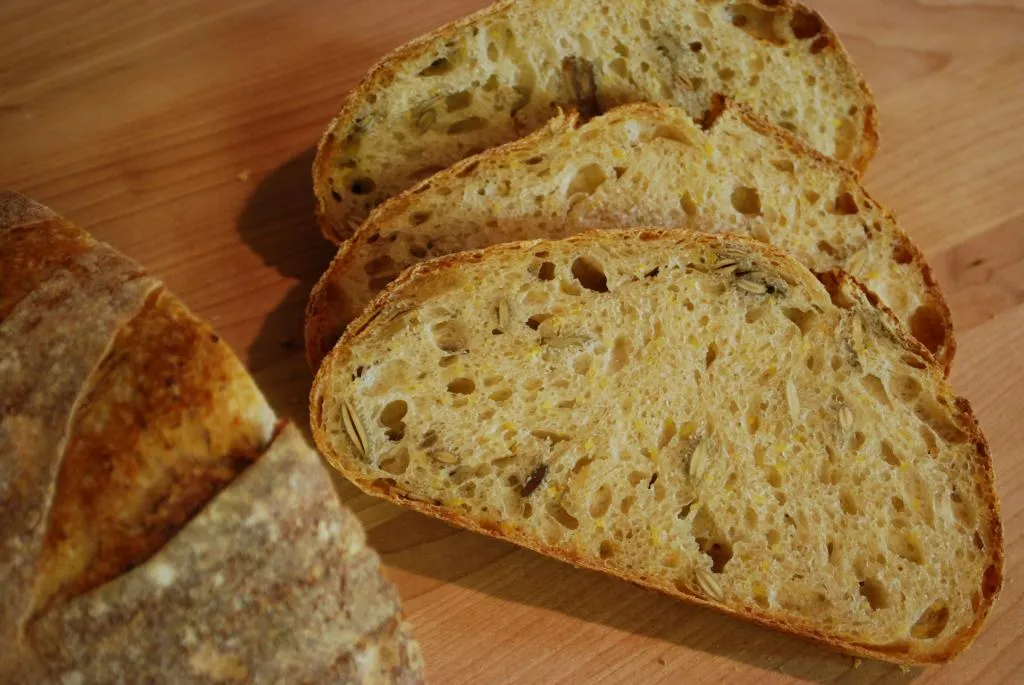
I haven't made this bread in a long time but it is a real treat, and gets devoured as treats tend to do.  The precise formula doesn’t really matter so much with this bread – any light sourdough will do - it is the addition of polenta and pepitas (aka, pumpkin seeds, “polenta pepita” is just more fun to say) that makes the magic.  The combination is featured in Tartine Bread with the addition of rosemary and corn oil but I’ve never tried it that way.  I like the versatility of this herbless version.  A little cranberry sauce on a toasted slice really sings.

 Marcus


Day One-

Build starter and ferment for 8-10 hours.

Prep the polenta – mix with boiling water and leave to soak 8-10 hours. Use plenty of water, the excess will be discarded before the polenta is added to the dough.

Day Two-

Lightly toast the pepitas if desired.  Allow time to cool before adding them to the dough.

Drain the polenta.

Mix flour, water and polenta.  Autolyse 20 minutes.

Add the starter and salt.  Knead about 2 minutes to incorporate

Stretch and fold about every 15 minutes until the gluten is developed.  Add the pepitas on the second or third round.  I think I did five rounds of S&F, but this varies depending on the flour so I go by the feel of the dough rather than a set number.

Total bulk ferment was about 4 hours at 76⁰F.  Final ferment was about 2 hours.

Bake at 450⁰F for 45 minutes total.  Steam the first 15 minutes.


wassisname's picture
wassisname

Where does the time go?  In the considerable time since I last managed to get a post together I have mostly been baking one bread over and over.  So here it is: a big ol’ rye.

This bread is all about keeping it simple – nothing fancy here.  It is about 30% whole rye, about 70% hydration (depending on the flours), shaped into one big round.  It is scaled to be just within the capacity of my Bosch Compact mixer and just fit on my baking stone (there have been some close calls with the stone for sure).  The final dough weight is a little over 2 kg.  The only downside to the big loaf is that it takes hours to completely cool!

The process:

Build the starter using 375g whole rye four, 375g water and 45g starter.  Mix it all up and let it ferment 12-16 hours at room temp.  This fermentation time could be shorter I suppose, but I like a tang to my sourdough ryes.

For the dough use all of the starter, 900g bread flour, 500g water and 23g salt.  This gets mixed for 10 minutes on speed 1.  I stop the mixer 3-4 times to scoop the dough out and flip it over so that it all gets worked. 

The dough gets a bulk ferment of 3-4 hours at 75⁰F with a stretch and fold at about the 1 hour mark.  After shaping one big round the final fermentation usually takes another 2-3 hours.

The loaf is baked at 450⁰F with steam for 15 minutes then finished at 420⁰F for 45 minutes.

And that’s it.  This bread freezes very well so I end up with at least a couple weeks’ worth of sandwiches.  I have added a handful of flax meal or nuts on occasion just to liven things up, but I always come back to the basic bread and am never disappointed (Well, except once when I knew my starter was in a funk but baked anyway… the chickens ate very well that week).

Marcus

wassisname's picture
wassisname

This mixed-starter sourdough has become my favorite style of light-ish sourdough.  It has proven itself capable of standing up to my "creativity", and that alone counts for a lot.  The rye flour takes some of the chewiness out of the crumb and prefermenting it lends the flavor of the bread a distinct tang.  If sour isn't your thing then this probably isn't the bread for you.  But, it really works for me.   1/3 whole grain gives it some substance and 70% hydration keeps it easy to work with.  I started the dough in the mixer, just until it came together, then kneaded by hand.

Under the influence of the aforementioned "creativity", I baked one of the loaves with the seam-side up.  I wasn't sure it would be a good idea, but in the end there was little difference between the two loaves.  If anything, the seam-up loaf had a somewhat better crumb.  The scored loaf was scored a little too cross-wise and wasn't able to expand as much.

Seam-Up

Seam-Down

Adjustments for next time:  I think I will take 30 minutes or so off of the bulk ferment time and add it to the final ferment.  Also, one fold instead of two - the dough was already pretty tight, but because it was kneaded by hand I gave it the second fold.  I think I would have been better off without it.  Lastly, the whole wheat starter was more ripe than I would have liked, even with the salt in it.  As the nights get cooler into autumn that should become less of a problem.
Oh, and now that it is officially autumn the next batch will probably be loaded with seeds! 

On a side note:  The trouble I go through for a decent loaf of bread is nothing compared to what I'll put up with to grow a few good vegetables.  I decided to expand the garden a bit and began prepping the ground for next season.  The soil here is dismal so "prepping" generally means digging a big hole and filling it up with something better than what was there originally (except with grapes, grapes just love it).  The only thing worse than the soil is the chalky, volcanic rock underlying the whole neighborhood.  I've been surprisingly lucky in placing my vegetable beds... until now.  There was no getting around this one.

Anyone have a stick of dynamite handy?  I'll be back in the kitchen working on my next bread!

Marcus


wassisname's picture
wassisname

I gave up on this bread completely not so long ago. The dough always started out OK, but by the end of the bulk ferment it would be extremely slack and sticky, and by the time it went into the oven it was essentially a puddle. 

After several attempts it became clear that it was simply not going to work so I trashed the paper copy and deleted the spreadsheet and that was that.  Two days later I happen across this Farine blog post and learn that teff flour will do awful things to bread dough (of this fact I have become keenly aware) unless it is cooked a bit first.  So simple!  I would not have thought to try that in a million years.  (I had forgotten about theTFL thread on this subject I had read.  During this whole process my computer was having some kind of disagreement with the TFL site and wouldn't let me look for help here.  It's better now:) ) 

So I gave it another go and, hey, it's a loaf of bread this time!  Still not the strongest dough, it is manageable at least. 

Now that I have a starting point it's time to start tinkering and asking questions.  First off, I wonder if adding the flax meal to the scald is helping, hurting or having no effect?  I will likely leave it out next time.  I think I forgot to add the salt to the scald, so that's another change to try next time.

 The hydration felt pretty good, I don't think I  would go any higher.

The mixing... the dough was pretty slack by the time I shaped, so I can't decide if I want to try being gentler next time or try to develop more strength.

Fermentation time was, I think, at about it's maximum.  I imagine the overnight scald helped speed things up - another reason I'm thinking about leaving the flax out of the scald next time.

So many questions, can you tell I think this bread could be better?  Still, it's pretty good.  There's an extra sweetness and nuttiness in this bread that works for me.  Definitely one worth tinkering with.

Marcus


wassisname's picture
wassisname

County Fair 2012!  The prospect of a few blue ribbons is all the excuse I need to take a day off work and spend it baking instead.  Actually, I'd be happy to ditch work and bake bread with no excuse at all but that might worry people…  

I managed to put together six different breads from four different doughs this year. 

To cover the "French Bread" and "Herb Bread" classes I made a very simple crusty batard and a rosemary and olive oil bread.  Both were straight doughs with an overnight bulk ferment in the refrigerator for scheduling purposes.

For the "Sourdough" class I made, well, sourdough.  This one was pretty basic with 5% whole wheat and 5% rye.  I used the same dough with sesame, sunflower and pumpkin seeds to enter as an "Other Bread".

I made a 65% whole wheat sourdough for the "Whole Wheat" class then threw some walnuts into the other half of the same dough and called it a "Specialty Bread".

And the judges went for... the 3 seed sourdough, giving it  Best of Show Bread honors.  Sweet! The other breads earned three first place ribbons and two second places. 

The lesson I learned this year was simple:  looks matter.  The quality of all the breads was more or less the same and some of the breads were even made from the same dough, but it was the fanciest loaf that got the top prize and the ugly loaves (the plain sourdough was really not much to look at) dropped to second place.

This isn't the best photo, but the one on the right was the winner, the one one the left... not so much.

 These are random photos of early versions of some of the breads since I couldn't cut into the one's that actually went to the fair.  I think the final versions actually turned out a little better.


I'm already looking forward to next year.  Bring on the rodeo and kettle corn! And support your local county fair!

Marcus

wassisname's picture
wassisname

 First, the starter story, aka I never thought it could happen to me.  My starter has been serving me well for a couple of years.  It would get sluggish from time to time when I wasn’t giving it enough attention but it always bounced back after a couple of feedings.  Then one week it didn’t bounce back.  It failed to raise the starter I was building for that week’s bread and then failed to raise the bread.  I’ve never had a loaf just completely fail to rise like that so the following week I gave the starter some extra feedings and expected it to bounce back as usual.  Except that, once again, it didn’t.  I made my build for the week’s bread anyway and it behaved the same as it had the previous week.  I didn’t want to throw it out so I spiked the final dough with instant yeast and went ahead with the bread. 

 At this point I had to admit that I had a serious problem so I set out to revive my starter.  It has always been fed whole wheat flour and kept at around 75% hydration.  Feedings happened 2-4 times per week and its downtime was spent in the refrigerator.  But something was very much off.  I tried more feedings in the proofer, I tried small inoculations, I tried high hydration, I tried a fresh bag of flour, but the result was always the same: a few bubbles, a little expansion, but ultimately a slack, sticky dough that smelled distinctly of freshly cut grass.  Some people like the smell of freshly cut grass – I am not one of those people.  I don’t like the smell of freshly cut grass when it’s coming from freshly cut grass and I really don’t like it when it’s coming from my starter.  Along with this new smell I noticed the complete absence of the old, acidic smell. 

 At first I took comfort in the fact that at least I was getting a consistent result.  That’s better than having my starter go into a full death spiral, right?  Then I got to thinking about the biology of it all (at least the bit I’ve managed to pick-up from hanging out around here) and came to the conclusion that my new and consistent result was not such an encouraging sign after all.  What does it mean when the acidity appears to be gone, there’s a new smell, and I get the same result no matter how I feed it?  Sounds like my starter environment has changed and it’s making some new critters very happy.  Drat! 

 I couldn’t bring myself to start over completely but I came close (maybe I even did, who knows). I scooped the old starter out of its container and left what was stuck to the bottom where it was.  I made a small amount of thick batter from those remains, whole wheat flour and pineapple juice to create an acidic environment that would make the good guys happy and the bad guys go live somewhere else.  When the batter was bubbly (about 12 hrs later) I repeated the treatment.  When that was nice and bubbly I switched back to water and kept feeding it about every 12 hours, gradually bringing the hydration and inoculation percentages down.  A few days later there was the old smell!  Wonderfully sour and fruity!  What a relief!  And, best of all, it is once again doing a very nice job of raising my breads

 All this would be for nothing if I didn’t learn something along the way.  I think I did.  I think I got a little too casual with my trusty starter.  Somehow I got into the habit of using smaller inoculations when feeding and that, combined with a lazy habit of cutting short the fermentation time, led to a shift in the population and then a shift in the environment.  This may have opened the door to whatever it was that took over my culture.  Or maybe not, but I’m going with it.  Whatever the actual cause, I have learned my lesson and do solemnly swear that henceforth I will not take my starter for granted and will be more attentive to its condition.

And now the bread...

This happy accident was meant to be a lighter, softer, more kid friendly version of my usual crusty sourdoughs.  Apparently old habits really do die hard because in the end I made a bread very much in my usual style.  I was surprised that the addition of olive oil didn’t have a greater effect on the finished loaf, especially the crust.  I guess I need to turn down the heat next time if I want the crust to be less… crusty. 

 I was aiming for an even, tender crumb, but didn’t quite hit the mark on that either.  The oil certainly had a tenderizing effect, but I think it needed a little more mix time as well.

 But my criticism of this bread only applies to what I had meant to achieve.  Leaving my intentions aside, I must say I really like this bread!  The flavor is excellent, and all the more rich and complex because of the olive oil.  I may be “accidentally” baking this loaf more often.

 Marcus

Pages

Subscribe to RSS - wassisname's blog