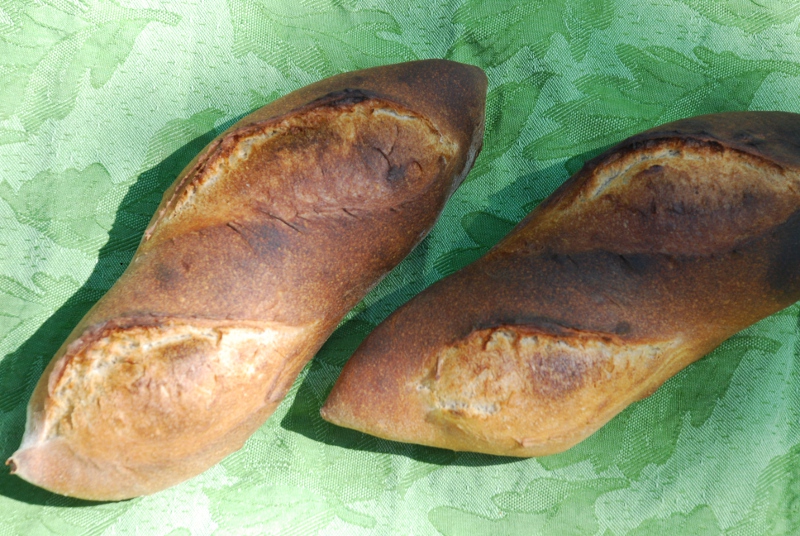
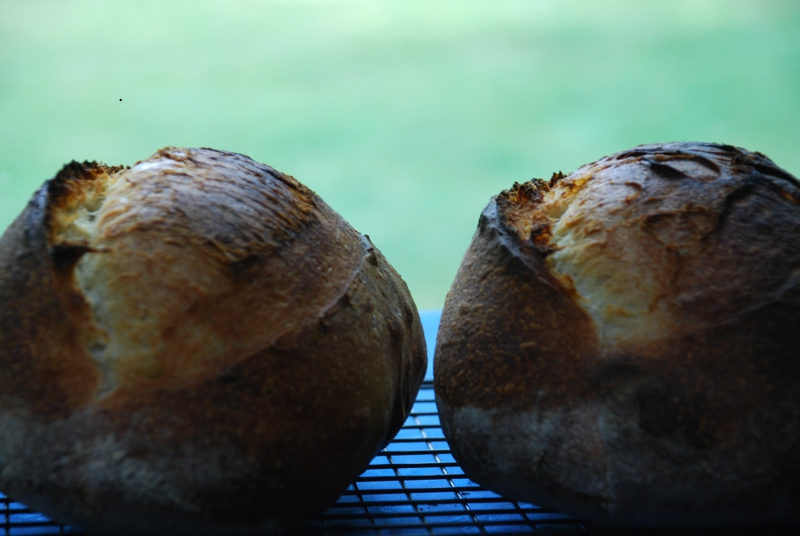
The Fresh Loaf

A Community of Amateur Bakers and Artisan Bread Enthusiasts.

varda's blog

varda's picture
varda

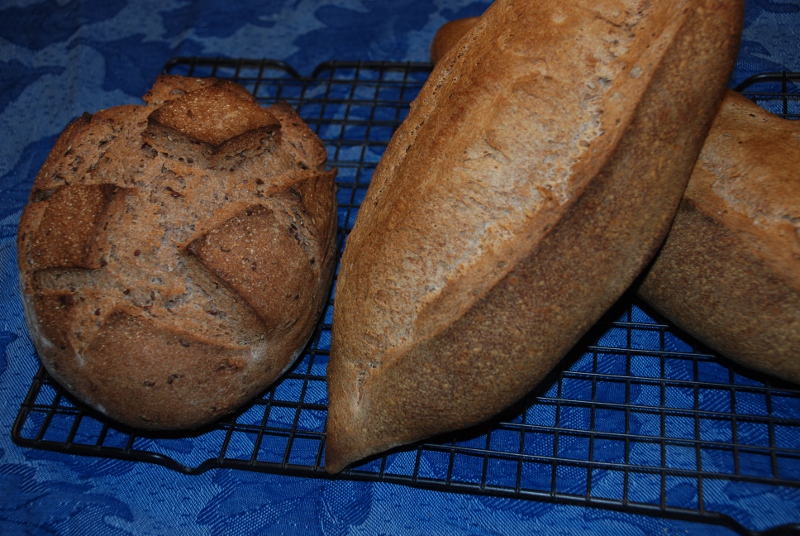
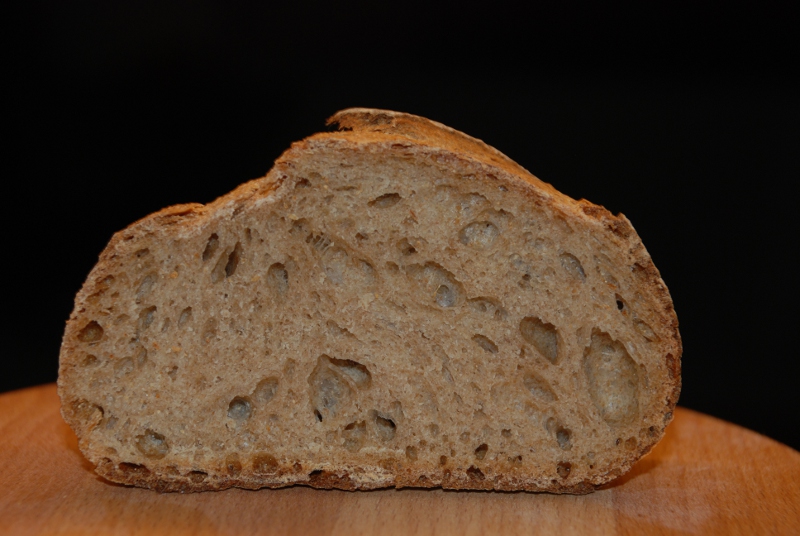
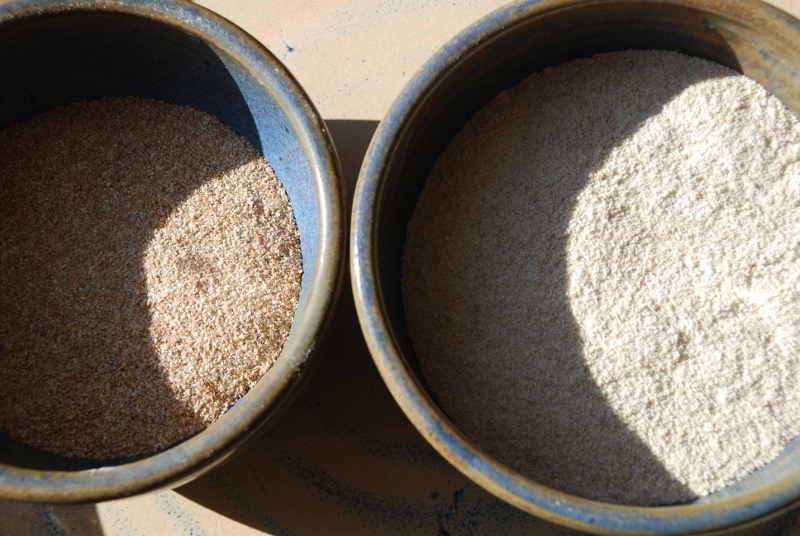
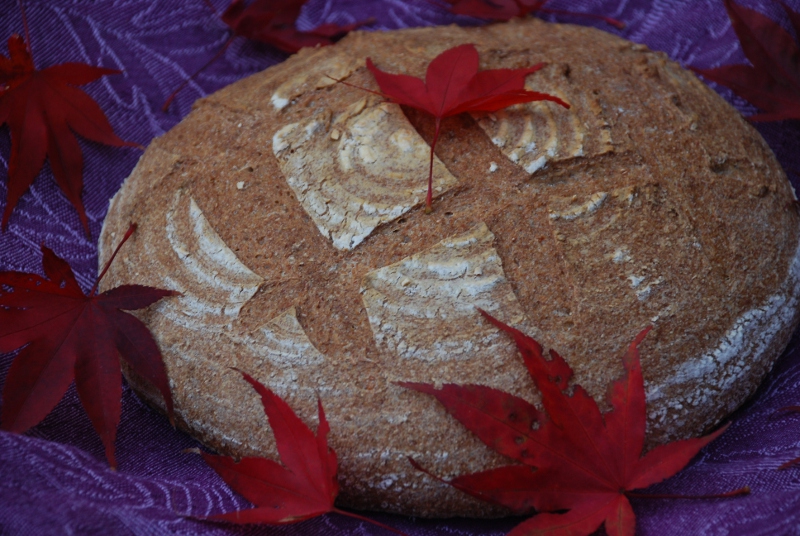
I didn't do much holiday baking this year mostly because I have had my focus firmly on bread and flour, and the infinite variety that flour, water, salt, and yeast can create.   For my last post of the year, back to my learning bread - the bread that I made over and over and over again for a year before I went on to other things.   Of course what's the fun without variation.   This one is made with a mix of KA AP flour, White Rye, and High Extraction flour.  
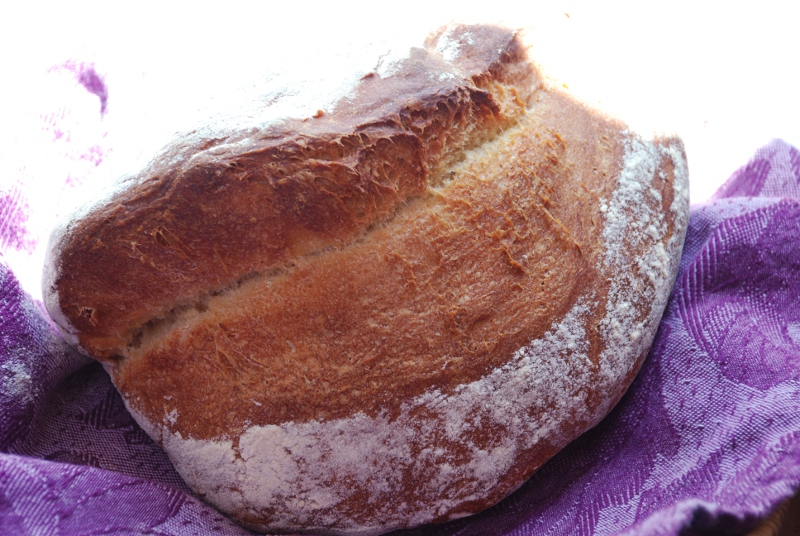
The White Rye for reasons I don't understand gives oven spring a boost.  

The High Extraction flour, while containing a fair amount of bran, does nothing to reduce the lightness of the crumb.  

The crust is crisp and crackly.

I thank all of you out there for helping me to learn how to bake, and also for sharing all your wonderful creations.   Here's to a happy new year of baking in 2013!


Starter


Seed

52

1st feed

2nd feed

Total

Percent

KAAP

30

48

95

173

95%

Whole Rye

1

2

5

8

5%

Water

20

35

69

124

69%


306

5.8


Final

Starter


Total

Percent

KAAP

116

158


274

43%

Whole Rye


8


8

1%

High Ex

250


250

40%

White Rye

100


100

16%

Water

320

114


434

69%

Salt

11


11

1.7%

Starter

280


26%


1077


Starter factor

0.92


Mix all but salt and starter by hand


Autolyse 30 minutes


Add starter and salt


Mix various speeds in mixer for around half hour


note that 16g of KAAP were added during the mix


S&F on counter immediately after mix


Rest 10 minutes


S&F on counter  


Rest 10 minutes


S&F on counter


BF 1.5 hours


Cut and preshape


Rest 15 minutes


Shape into batards and place in couche


Proof for 3 hours


Slash and bake at 450 for 20 minutes with steam


20 minutes without


varda's picture
varda

Recently Andy posted about some breads he baked with flours that his neighbors had brought him the Watermill on Little Salkeld.   One of the flours was Maslin described as a mix of wheat middlings and rye.    The Watermill used a bolting process which screened wheat into fine flour, middlings (described as a gray coarse flour) semolina, and bran.   My interest was piqued as I have just become fascinating with milling and sifting flour, so I decided to see if I could generate middlings from wheat berries and use it to create a Maslin flour loaf.   Andy posted very clear instructions which I followed as closely as possible altering only for differences in the flours and a retard to accommodate schedule.    I have not baked with flax seeds since I first started baking, and then just threw them into the bread without knowing that they benefited from a good soak.   Andy's formula included them (or linseed which I think is the British term) and thus so did mine.    My loaf had a great spring in the oven, and came out with a complex but subtle flavor that I think is a feature of combined rye and wheat breads, enhanced greatly by the flax seeds.   I may come to wish that I had easier access to this flour than hours of milling and sifting, as I would love to bake this loaf many times.   

It seems to me that this picture makes the bread look pretty dense but it really isn't.   I wouldn't even call it hearty.   The flavors are just too subtle.  

Of course middlings are supposed to be a byproduct of the milling process rather than the main event.    So as a result of screening out the middlings, I had a lot more of what I'll call Golden Flour.    This is the most refined flour I've been able to create with the technology at my disposal, and it is far from white, having a fair amount of very fine bran in it.    So I made a couple of loaves from that.   It has a lot of flavor, and is much more rustic than a white loaf despite the fineness of the flour.    I am guessing that this flour would be similar to the high extraction flour many people post about here.    Since I haven't tasted that, though, I can't be sure. 


Here are formulas and directions.

MASLIN LOAF

12/16/2012


Starter


Seed hydration

63%


KAAP

94%


Whole Rye

6%


5:00 PM

9:30 PM


Seed

40


KAAP

23

47

200

270

95%

Whole Rye

1

3

11

15

5%

Water

15

35

140

190

67%


476

11.6

Soaker 1


Soaker 2


Middlings

137


Flax seeds

30


Water

137


Water

90


Salt

4


12/17/2012


Final

Starter

Soaker

Total

Percent

KAAP

0

119


119

27%

Whole Rye

0

7


7

2%

Medium Rye

186


186

41%

Middlings


137

137

31%

Water

0

84

227

311

69%

Salt

4


4

8

1.8%

Flax seeds


30

30

7%

Starter

210


28%


798

178%

Starter factor

0.4


Make soakers at 5pm 12/16/2012


Water is cool from tap


Mix all at 8:30am (150g medium rye) - 5 minutes to incorporate

Then 10 minutes - speed 1 and 2


Add more Medium Rye to make dough cohere (36g)


Mix 8 more minutes


BF for two hours


Shape into fat batard, place in basket


with parchment sprinkled with bran across length (not sides)

and loaf floured


Place in refrigerator at 11:15


Remove at 3:30


Proof for 90 minutes


Place on peel, spritz, and slash


Bake at 450 for 20 minutes with steam


13 minutes without


GOLDEN LOAVES


Final

Starter

Total

Percent

KAAP


130

130

22%

Whole Rye


7

7

1%

Golden

460


460

77%

Water

315

92

407

68%

Salt

10


10

1.7%

Starter

230


23%


1015

170%

Starter factor

0.5


Starter from previous


Mix all ingredients for around 15 minutes speed 1 and 2

BF for 2.5 hours with 2 S&F on counter


Cut and preshape


Rest 15 minutes


Shape into batards


Place in refrigerator at 12:10


Remove at 3:40


Proof for 2 hours 20 minutes


Place on peel, spritz, and slash


Bake at 450 for 20 minutes with steam


14 minutes without


I decided to soak the middlings overnight, as they had been quite coarse in another bread.   This seemed to soften them up a bit.   I was going to do half and half middings and medium rye, but my milling and sifting process didn't cooperate so I used slightly more medium rye.    When I started mixing the dough came together immediately, but them fell apart completely and just stuck to the edges of the bowl.   After trying to pull it together, I finally added some more medium rye, which did the trick.  

Here are my milling and sifting notes:

Mill coarse, Sift in #24


Mill leavings coarse, sift in #24

Mill leavings medium, sift in #24

Mill leavings fine, sift in #24

Remove leavings which are bran

Sift flour in #30


Remove leavings which are bran

Sift flour in #55


Mill leavings at medium


Sift in #55


Mill leavings at medium fine

Sift in #55


Mill leavings at fine


Sift in #55


Leavings are Middlings


Sifted flour is Golden


Berries

670


Golden

460

69%

Middlings

137

20%

Bran

51

8%

Loss

22

3%

I am guessing that my middlings are probably quite different than Watermill middlings.   I am unable to separate middlings and semolina and don't think I want to because then my quantities would be too small.    The term middlings, however, doesn't seem to be terribly precise:   see here.   So I am thinking I'm within my rights to call it such.    I was quite surprised to see that middlings are looked down on as a food source even though that's where the nutrients are.    The article says that they are being considered as a source of bio-fuels, because of course it's better to put the nutrients in our cars than our bodies.  

varda's picture
varda

Lately I have been baking with flour home-milled from hard red winter wheat from Upinngil Farm in Gill Massachusetts.     I have also been experimenting with sifting the milled flour to achieve different results, and after reading about bolting - see Andy's post and note below - with bolting as well.   My first attempt at bolting using a knee-high nylon didn't go well.   The less said the better.    Then I realized that cheese cloth has a fine mesh and might possibly be well suited for the task at hand.    So I have been playing around with using cheese cloth to bolt fresh milled flour, without much good baking results.   

Today, I came back to it and made another attempt.    I decided to use my regular white starter, rather than working with a whole wheat starter, which adds another layer of complexity.   And also constrained the process by determining that I would only use the Upinngil whole wheat for the final dough.   

I proceeded as follows:  

1.  Mill 514 g of wheat berries at medium setting

2.  Sift with #24 wire strainer

3.  Mill what is caught in the sieve at fine setting

4.  Sift with #30 wire strainer

This process removed 50g of bran.

5.   Place flour on top of a square of cheese cloth and form a bag by folding up corners and securing with a twist tie

6.  Shake, bounce, bump, etc. into a wooden bowl.    (Note this step takes awhile.)

At the end of this process I had 226g of golden flour with only tiny flecks of bran in it, and left in the cheese cloth was 226g of a coarse flour / semolina mix.  

I decided to make two loaves - one with the more refined flour, and one with the less refined flour.  They both came out quite breadlike.

The one with the refined flour was a bit better behaved than the other.

I would say both tasted good with the second loaf with a much more rustic, coarse crumb.

Here are the formulae:


Starter builds


12/7/2012


2:30 PM

9:30 PM

Total

Percent

Seed

29


KAAP

16

47

95

158

95%

Whole Rye

1

3

5

9

5%

Water

12

34

67

113

67%


280

9.7

12/8/2012


Final

Starter

Total

Percent


KAAP


71

71

24%


Whole Rye


4

4

1%


Bolted Upinngil Tier 1

226


226

75%


Water

149

50

199

66%


Salt

5


5

1.7%


Starter

125


25%


505


Factor

0.45


Final

Starter

Total

Percent


KAAP


71

71

22%


WR


4

4

1%


Bolted Upinngil Tier 2

226


226

69%


Med Rye

25


25

8%


Water

182

50

232

71%


Salt

7


7

2.1%


Starter

125


23%


565


Factor

0.45


I mixed the first dough for 10 minutes, and the second for 20.    It was necessary to add a bit of medium rye to the second dough to make it adhere.   I was very worried about over fermenting and proofing these loaves so I erred on the side of under-doing it.    I fermented the first loaf for 2 hours, and the second for 1.5 hours, both with two stretch and folds.   Then proofed each of them for only 45 minutes.   They were baked together at 450F with steam for 20 minutes, and without for 25.  

Note:   Bolting is an old (say 17th century) method of refining flour by passing milled wheat through successively finer and finer cloth mesh tubes.   See for instance http://www.angelfire.com/journal/millbuilder/boulting.html%C2%A0%C2%A0   So technically I have done a hybrid of metal sifting and cloth bolting, as I only have one cloth mesh size.  

[Addendum:  For those of you who think that milling, sifting, and now bolting is too messy, please note that only 13g of flour was missing in action.    I'm sure it will be all cleaned up in the fullness of time. ] 


varda's picture
varda

Sometimes good things are right in front of you, or a bit off to the right under "Also on the Fresh Loaf."   The other day I was nosing around, when I clicked through an image that had intrigued me for awhile, and discovered JMonkey's version of a desem whole wheat loaf.   Reading through it, it all seemed so simple, even though Desem has lurked in my brain as something very strange and mysterious.    So I took a dab of my ordinary white starter and built it up over three feedings with fresh milled whole wheat, at low hydration, and matured in a cool but not cold environment.    Then made a loaf, roughly following JMonkey's numbers, but not his times (I followed the dough's times which were different.)    As I have no cloche, I baked for the first time in a year or more in my dutch oven.    I find it difficult to get the dough in the DO gently enough, and manhandled it a bit in the process (just like JMonkey apparently.)   Since I was never able to manage a preheated DO without burning myself, this time I placed the dough into an unheated DO and then into a preheated oven.  

The aroma of the dough while fermenting was strong yet strangely sweet and very pleasant.   The finished loaf didn't come out looking anything like JMonkey's and of course I have no idea if I captured his taste either.   

I will say that this bread makes for very hearty eating.   I just had a slice, and don't know if I'll have room for dinner.   The bread itself is almost overwhelmingly whole wheaty to my taste, but seems very much the staff of life.  

I know, particularly in light of Eric's untimely passing,  that bakers come and go on this site.   I believe that I started participating on this site some time after JMonkey stopped contributing.   Yet here he has taught me about desem and I appreciate his help.    Of course I wouldn't even have been aware of this type of bread had it not been for Phil's wonderful baking efforts

Formula and method:

Seed hydration

71%


KAAP

95%


Whole Rye

5%


5:00 PM

4:00 PM

4:00 PM

10:00 AM


Seed

16


KAAP

9


9


Whole Rye

0


0


Whole Wheat


25

50

150

225


Water

7

14

30

90

141

60%


375


Final

Starter

Total

Percent


KAAP

0

9

9

1%


Whole Rye

0

0

1

0%


Whole Wheat

500

225

725

99%


Water

410

141

551

75%


Salt

13


13

1.8%


Starter

375


32%


1298


Used freshly milled medium course flour to feed starter


Used garage and just inside garage door to mature starter


Temp varied from 42 to 62F


Grind wheat berries at fine.


Mix flour and 350g water and autolyse for 1 hour


Mix in salt, starter, and rest of water


Mix for 40 minutes at speed 1 in compact Bosch


Rest 15 minutes


S&F on counter


BF 30 minutes, S&F on counter


BF 30 minutes, S&F on counter


Shape into boule and place in brotform with floured paper napkin at base


Proof 1 hour 15 minutes


Spray top, slash and place in Dutch Oven


Bake in preheated oven (cold covered DO) at 450F for 40 minutes


top on, 18 minutes with top off.


varda's picture
varda

I have been doing multiple bakes with home-milled sifted flour and it's nothing if not a learning experience.    My initial attempt at tempering was a fiasco.   All I could think of when I heard the word tempering was that somehow the wheat berries must be heated to very high temperatures to strengthen them.   Only a few seconds of thought though, is all it takes to realize that that is ridiculous.   But I was still surprised to learn that tempering when it comes to wheat means letting it absorb enough water to achieve a small measure of malting, and reach a desirable level of moisture.   

Easier said than done.   I tried heating a sample of berries at low temperature for several hours to see what their moisture content was.   See the strategy described by Michael here.  Then I added the requisite amount of water to the berries I intended to bake with and stored in a closed container for 2 days while the berries absorbed the moisture, shaking the container whenever I passed by.    I knew that I needed to be careful not to use overly moist berries in my Komo mill.    Fortunately the owners manual gives a handy rule of thumb.   Smash a berry with a spoon on the counter.   If it cracks with a nice snap, it's dry enough.   If it just kind of smashes, it's too wet.   Unfortunately after it seemed that the berries were dry, they smashed.   I had to dry them out for a whole day to get them to crack again.    When they got back into a crackable state, they had lost all the water weight that I'd put into them.   Furthermore the bread I made with these tempered and redried berries was flavorless.   

So presumably my berries are moist enough as it is, and don't need water added.   This still leaves the question of whether I'll get good enough bran separation during milling without going through the tempering step.    But for now at least I've put tempering on hold.  

For my next few bakes, I tried a milling and sifting approach as follows.   Mill berries coarsely.   Sift.   (I used a roughly #24 strainer - that is 24 holes per inch.)   Remill what is caught by the sifter at medium coarse, and sift again.   Remill the leavings again at medium fine and sift again.   Remill the leavings again at fine and sift again.   Stop.   The flour and bran in the picture above resulted from this approach.   While the bread I baked with this approach was a lot tastier than the one with the mis-tempered flour, I still felt that a lot was left to be desired.   

Today, I went out and got more sifting ammunition.   A roughly #30 strainer, and a roughly #40 splatter screen.    I also changed my approach to milling and sifting.    In addition to remilling the leavings and resifting, I decided to progressively sift the flour.     So I milled the berries at medium, then sifted in the #24 strainer and set aside the leavings.    Then sifted the flour in the #30 strainer and set aside the leavings.   Then sifted the flour in the #40 strainer and mixed all the leavings from the three sifts together and remilled at medium.   Then went through the 3 siftings again of the remilled material and added to the flour.  

The flour I got from this process was lighter and silkier than the other approach.    The bad news is that I started with 350g of berries and got only 170g of flour, a less than 50% extraction rate.    That meant that to get a full bake, I had to add a lot of other flour, which I did.     So the flour from the Upinngil wheat berries ended up at a quarter of total flour.    To throw yet another wild card into the bake, I hadn't prepared starter in advance, but I had some leftover rye starter from a bake a few days ago in the refrigerator, and I decided to use as is.   However, not knowing how potent it was I threw in some instant yeast.   

Of course any bread I got out of this was just in the interests of science (aka hacking around with milling and sifting.)   And here is what I got.   Mild and pleasant, but just another step along the way toward something or other.  


Final

Starter

Total

Percent


Whole Rye


146

146

23%


Sifted Upinngil

171


171

26%


KA Bread Flour

329


329

51%


Water

352

119

471

73%


Salt

14


14

2.2%


Yeast

8


8

1.2%


Starter

265


1139


Grind 350g hard red wheat berries at medium


Sift in #24 sifter.   Sift resulting flour in #30 sifter.


Sift resulting flour in #40 sifter.


Regrind all the leavings at medium.


Redo the three part sift.   This left me with 170g silky


golden brown flour. 


Mix all ingredients in mixer.   When all ingredients incorporated mix at speed 2 for 20 minutes. 


BF 1.5 hours until dough is double.  


Cut and preshape.   Rest 15 minutes.


Shape into batards.  Proof 1 hour.   Coat with bran/semolina mix.

Slash and bake at 450 F with steam for 20 minutes, without for 25 minutes


Addendum:   Andy's recent post about bolted wheat flour from an operating watermill, led me straight to google to look up bolting.   Well bolting is sifting, but it has an interesting history as I found in this article -  http://www.angelfire.com/journal/millbuilder/boulting.html   There is a lot of interesting stuff in this article but one of the things that struck me is that much of sifting has been done with cloth rather than a wire mesh.    Which leads me to wonder if that would be a good strategy for the home miller.   Would a nylon or silk stocking work?    Has anyone tried it?   

varda's picture
varda

I'm back with new tools.    Ever since Andy (ananda) started posting about baking with local wheat, I've had it in the back of my mind.    However, local in my case means New England, which isn't exactly known as the American bread basket.    In fact I more or less assumed that Massachusetts wheat was an oxymoron.    I did however, keep my eyes open, and found several farms in the area that grew wheat.    The closest however, were not that close, and I had no mill, and, and, and...  But time goes on and new opportunities arise.    With my birthday coming up, my DH asked me what I wanted and I said a mixer.   I picked out a fancy one and was ready to pull the trigger, when I realized that I simply didn't need such high capacity, and would do quite well with a much more modestly priced model.   That meant that I had "saved" a lot of money, so my husband decided to throw in a mill.    With a new mill coming, I needed wheat.   In fact I needed Massachusetts grown wheat.  

I called a friend and convinced her that she absolutely needed to drive west with me to see the leaves (and incidentally buy wheat.)   She agreed that was absolutely necessary, so the other day we went west.    That is 3/4 of the way across Massachusetts to the little town of Gill, where lies a farm called Upinngil, which sells its own wheat.    I tried calling beforehand to see what they had available, but no dice - they didn't answer.    When we got there, true they had 50 lb sacks of wheat in their store, but they were soft red winter wheat, and hard white winter wheat, neither of  which were what I had in mind.   One of the nice women there said that I should come back in two weeks.    That was hardly possible, as my first trip out there had already strained the limits of practicality.   Fortunately at that moment in walked Mr. Hatch, the farmer.    Told of my plight, he said, no problem.   I have some hard red winter wheat out at the cleaner (not the cleaners).   I'll just drive over to the field and pick some up for you.   Phew!   So with a 50 pound sack of wheat in my trunk, mission accomplished.   And yes, the leaves were lovely as well.

Yesterday the mill and the mixer (Bosch compact) arrived and needed to be put to use.   So I got my starter going, and today started milling and baking.   Not knowing my mill very well yet, I milled pretty coarse, and wanting to get to know the wheat, I decided to make all the flour in the final dough my fresh ground whole wheat.      This meant over 75% coarsely ground whole wheat, which is not something that I'm all that familiar baking with, as I usually keep whole grains to 30% or below.   

I have just cut and tasted, and who knew that Massachusetts wheat would be so good.   Mr. Hatch said that he had been growing it as feed for 20 years, but only in the last 10 has he started selling it to bakers who are interested in local foods.    He also told me that a CSA near me makes regular trips out to his farm for milk, cheese, etc.   So it may be that in the future, I won't have to make the trek if I can meet up with them.  

In any case, I think my whole wheat baking needs work, and I am excited to learn more.

The third new tool I used for this bake was a single edge razor for scoring, taking a tip from breadsong.   I love the control it gives.  

Of course that's not quite as exciting as the KoMo Fidibus 21  shown here resting after it's first milling.


Here's to local farms:

and local wheat:

I used my WFO today probably for the last time of the season.    Now I need to wrap it up tight so it can get through Sandy unharmed.

And finally, I'll close with the a bit of Autumn splendor:  first Tartarian Asters (over 7 feet tall)

and mums which can't really compete with the leaves this time of year:

Update:  Just changed the title of this post from ...freshly ground... to ...freshly milled...   It ain't coffee after all.

varda's picture
varda

Learning to make bread is full of milestones - some large, some small.   For the last few months I have been trying to get pointy ends on my batards.    This seemingly modest goal has eluded me.   No matter what they looked like after shaping, by the end of proofing it was back to rounded ends.   Gradually though, I've been adjusting my shaping, and today - drumroll please - pointy ends!    This is solely an aesthetic pursuit, with no impact whatsoever on the taste of the bread except, I suppose,  for the end pieces themselves which have a nice crunch to them.   

The bread itself (apart from the ends) is a 23% medium rye sourdough, 65% hydration, baked in my WFO.    I changed my process today by placing a pan with water and a soaked towel into the oven just before loading the loaves.  

It made a tasty afternoon snack with just the smallest possible pat of butter. 

varda's picture
varda

I haven't had a chance to comment or post lately due to difficult circumstances.   I have been reading and enjoying people's posts from time to time and regret that I haven't had a chance to comment on them.    Today I finally had time to uncover my Wood Fired Oven and bake.    I gave it a long firing since I haven't used it since a brief hot spell in March - then baked a couple of durum loaves.    It was hot, too hot and when I came out to check the loaves after 25 minutes, they were done, done, done, with a bit of char to boot.  

I have been frustrated lately with the raggediness of my score openings, and thought that it probably was a function of air flow in my gas oven.   Despite fiddling this way and that, I wasn't able to fix the problem to my satisfaction.    Today, I think I confirmed that it is oven related, as I was much happier with the result in the WFO.   

I only sprayed the loaves with water before loading and didn't put a steam pan in the oven.  

And here's the crumb:

Formula and method:

Seed hydration

67%


King Arthur All Purpose

95%


Whole Rye

5%


1st feeding


Total

percent

Seed

32


King Arthur AP

18

143


161

95%

Whole Rye

1

7


8

5%

Water

13

100


113

67%


282


Feeding factor


8.8


Final

Starter

Total

Percent


King Arthur AP

0

137

137

21%


Whole Rye

0

7

7

1%


Durum

300

0

300

47%


KA Bread Flour

200


200

31%


Water

334

96

430

67%


Salt

12


12

1.9%


Starter

240


22%


1086

169%


Starter factor

0.9


Mix all but salt - autolyse for 1 hour


Mix for around 5 minutes with salt


Bulk Ferment (BF) 1 hour 5 minutes


Stretch and Fold


BF 55 m


Stretch and Fold


BF 45 m


Cut and preshape


Rest 20 m


Shape and place in couche


Proof for 1 hour 25 minutes


Slash and spray with water


Bake in very hot WFO for 25 minutes


varda's picture
varda


Some time ago, I attempted many times to follow Franko in making a high percentage durum loaf with low hydration and shaped by a simple fold - in fact an Altamura style bread.   I was never altogether satisfied with my progress, and finally set it aside and focused on other baking.    While I stopped trying to make an Altamura style loaf, that doesn't mean I stopped baking with durum - in fact my regular rotation (that sounds more formal than it is) includes medium percentage durum loaves like Hamelman's Semolina (p. 171 of Bread) and Sylvia's pugliese.   I think this regular baking has made me more comfortable with durum, and I stopped looking at it as a crazed and evil beast that required a lot of fuss and nonsense to get right.    That more relaxed attitude led me to throw together a loaf that I realized just in time for shaping had many of the characteristics of the Altamura style bread that I had tried so hard to master.   So I folded and proofed and baked and voila, the best Altamura style loaf that I've yet managed to produce.    There's a lesson in here somewhere but I'm not entirely sure what it is.

I used an entirely passive method of dough development.    First I fed my regular starter with durum flour and water, and immediately refrigerated it for around 20 hours.   Then I mixed all ingredients until dough formed a shaggy mass for a couple minutes only, and then refrigerated for 24 hours.   Then I let warm on counter for around four hours,  then pressed out slightly (hardly at all) folded over and proofed for around 50 minutes, then baked for 20 minutes with steam and 35 minutes without at 400F.    I had no idea when I cut into it what to expect,   but here's what I got:

Altogether a happy result from a casual approach mostly forced by time constraints.     And yes it's tasty - the good taste of durum shines through.

Formula:

5/11/2012


Seed hydration

66%


KAAP

95%


Whole Rye

5%


5:00 PM


Seed

100


KAAP

57


57

36%

Whole Rye

3


3

2%

Durum

0

100


100

62%

Water

40

66


106

66%


266

2.7

5/12/2012


Final

Starter

Total

Percent


KAAP


57

57

9%


Whole Rye


3

3

0%


Durum

500

99

599

91%


Water

330

105

435

66%


Salt

12


12

1.8%


Starter

263


24%


1105

168%


Starter factor

1.0


varda's picture
varda

Today,   I made a tiny little leap to no where in particular by teaching a small class to make bagels.    Since people (including me) had limited time I did a few practice rounds, taking note of the times, so we could fit in everything, including a potluck lunch, into a 2 hour period.

Despite experimenting this way and that in my practices, I decided to faithfully follow Hamelman in most regards except for a couple of simplifications.   I was pleased that this approach seemed to work.   I had started a batch of six bagels the night before and refrigerated, and we started with mixing up a second batch of six, then finishing the first batch.   This was done in time (ok, a little early) to cut, weigh, roll and shape the second batch, which the students took home to finish.   

These were not bakers (bar one) who were familiar with the use of a scale, much  baking with yeast, or what not.    Everything went well, though.   People had fun, and we had a nice lunch.   Phew!

The finished product

I brought the ham

Rinsing the bagel (in lieu of ice water)

Ready to eat with plenty of treats


Pages

Subscribe to RSS - varda's blog