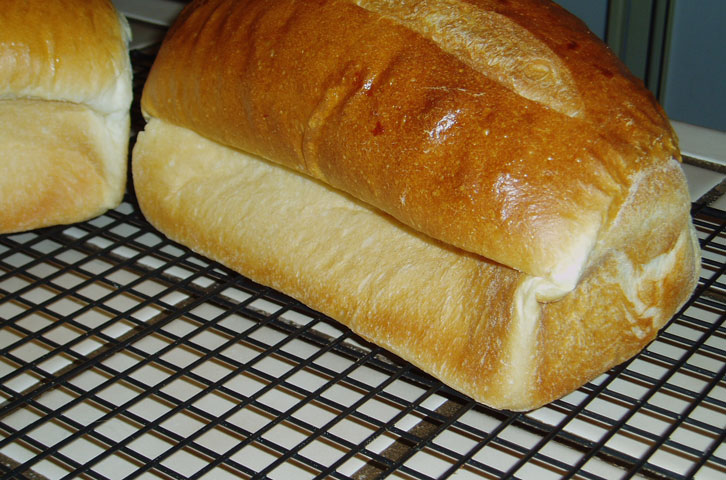
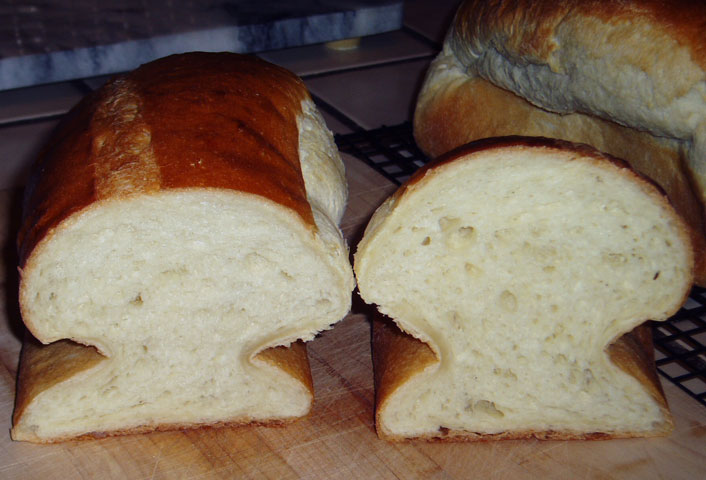
The Fresh Loaf

A Community of Amateur Bakers and Artisan Bread Enthusiasts.

OldWoodenSpoon's blog

OldWoodenSpoon's picture
OldWoodenSpoon

Last night brought the fourth in this series of attempts to bake a proper loaf of this wonderful tasting bread.  In short, this bake offered only incremental improvement over previous efforts, but the essential problem still remains unresolved.  In this bake one of the two loaves promptly caved in upon removal from the baking pans for cooling.  This happened within 60 to 90 seconds of removing the loaves from the pan.  It happens quickly enough that you can watch the sides pull in.  In this bake, however, only one of the loaves did this.  That might be progress.

The changes for this bake were as follows:
1)  No malt at all this time.  I dropped the malt because I do not have non-diastatic malt on hand, although it is required by the formula.  There is considerable discussion of the topic of malt in the posts on my prior bakes if you want to catch up there.
2) King Arthur All Purpose flour (11.7% protein)  I concluded, correctly I think, that this is not a flour issue but I made the change to clear up a troubleshooting checklist item.  Other bakers (see previous posts) have produced excellent loaves of this bread with other flours.
3)  More careful attention to tracking dough temperature.  The initial target dough temperature of 78F was achieved after combining all the ingredients in the initial mix.  I was surprised at the "friction factor" input by my Bosch mixer though, and ended up with a final dough temperature going into bulk fermentation of 91F.  With a 14 1/2 minute mix that's almost a degree per minute.  It ended up much higher than I expected, and proves I do not use my mixer very often.  If I did I'd have been more aware of this beforehand.  In the end I don't think it mattered.
4) A thorough degassing of the dough by hand kneading several strokes on an unfloured board after 40 minutes of bulk fermenation that doubled the dough.  The dough doubled again compared to the initial post-mix volume in another 35 minutes.
5) Aggressive degassing prior to shaping, and shaped by tightly rolling up the dough and sealing only the bottom seam, tightly.
6) I preheated my oven for 45 minutes at 375F prior to loading, and reduced to 350F immediately upon loading.  I also verified my oven temperature as accurate prior to loading.  My oven holds the temperature set on the control panel.

Observations:
The first and biggest point that I noticed, when rounding for the bulk rise, was that this dough seemed drier and stiffer than in previous bakes.  I wished I had added more water to loosen it up, but it was, I thought, too late by then.  This was even more apparent at the degassing during bulk, and I really paid for it in trying to shape the dough.

Shaping, especially trying to pre-form the dough into the requisite rectangles prior to rolling up, was made difficult by the lack of extensibility in this dough.  It was very like working with a big, heavy rubber band.  I could stretch it out, with difficulty, but it would pull back immediately if I let go.  It was very difficult to pre-shape, even after a 30 minute rest after dividing.  (Is this a result of holding out the malt, even the wrong type?)  Due to the dryness of the dough it was also difficult to seal the seams.  After finally getting the bottom seams to seal I elected to just leave the ends open.  I really missed the silky suppleness of this dough in previous bakes.

Final proofing took longer, as I expected, due I'm certain to the degassing and second bulk rise.  Instead of taking 45-60 minutes, these were not ready to bake until 75-80 minutes after shaping.  I proofed these on a bookshelf waist high and a few feet from the wood stove.  The thermometer on that shelf read 75F for the entire time period (good wood stove!).  This is the same place I proofed attempt #3 the previous evening.

Here is the pictorial record:

Shaped, panned and ready for final proof.

Proofed and ready for the egg wash and slash.

This shows the relative positions in the oven, and the uneven spring/shape and orientation.

Finished loaves.

The cross-section shows some much larger holes in the crumb than were present in previous bakes.  It also makes clear that the sides of this loaf caved in, one more than the other, once again.  This cave in only happened on one of the two loaves though.  This shot does not show it, but this loaf also had some side-wall compression expressed in a doughy strip just inside the crust, but not as much as previous bakes.  The other loaf looks quite nice, and I will gift it to a neighbor.  We have plenty, trust me.

So, some forward progress is made, but not a lot.  The dough did not seem dry during the mix as I checked the gluten development, but it certainly was apparent when I tried to round the dough for bulk fermentation.  I am unsure about why this dough was so elastic.    I think that if I can resolve those issues I can do a better job of shaping and so better control the spring of the loaf.  The degassing and second rise in bulk fermentation seems to have controlled the oven spring.  I think this bake produced far more normal spring in the oven than any of my previous attempts.  Thanks go to MiniOven and Andy for that!

I will bake this yet again, but not until next week.  I have other commitments for the next few evenings, and I need a break too.  Perhaps just some time to reflect and back up out of the leaves will give me a more productive view of the forest on this one.  I think I will bake some sourdough this weekend, just to do something different as well.

Thanks for stopping by!
OldWoodenSpoon


OldWoodenSpoon's picture
OldWoodenSpoon

I baked this recipe for the third time tonight, and I am still scratching my head.   For this iteration I made the following adjustments:

1)  Reduced the malt to 10 grams, based on Eric Hanner's parallel bake comments and results here.
2)  Reduced my mixing time to 10 minutes to reduce the level of dough development.
3)  Added a wire rack to the middle of my oven to avoid baking directly on my quarry tiles.

The results are strange, to say the least, and certainly not "right" yet.  Here is a pictorial tour:

After 10 minutes the dough still seems fairly well developed, but it is certainly much less so than the previous iterations.

This blurry shot shows the dough at the very beginning of bulk fermentation.

Here is the dough 45 minutes later at the end of bulk fermentation.  I may have let it go just a bit too long.

Divided into 2 loaves of 521 grams each, shaped and panned,  and ready to proof.

After 45 minutes they were proofed to show above the top of the pan.

Here are the panned, slashed and egg-washed loaves in the 350 F oven (that really needs a good cleaning so please ignore that if you would).  Note that the loaves are even, there is good clearance all around, and the slashes are down the center.  I am using conventional heat, not convection, so the fan at the back is not in use.  From here it gets really strange.

These loaves baked for 35 minutes.  I tested the internal temperature of the one on the left at 25 minutes, and stuck my big thumb into it getting it out of the oven.  That is why it has the big dent in the end.  It was not up to temperature yet so I put it back in the oven for 10 more minutes.  After a total of 35 minutes the internal temperature was 207F. 

The loaves rose unevenly in the oven, or so it appears to me.  The slashes now appear to be off center, and the outer edges of the loaves are taller than the inner edges.  This could be from weak shaping, or from uneven temperature, or from something I have not thought of.  They also have the same caved in side profile (see the next photo) that the previous bakes have shown.

I have not yet cut a loaf, so I do not know what the crumb looks like, or if there is a compressed doughy line up the inner or outer sidewall of these loaves.  I do expect to find one, but I will do that in the morning and post it back here then.

Edit on Tuesday, 11/8/2011:  Crumb shot added below.  This is the less distorted of the two loaves posted above.  There is an only-barely-visible compressed doughy line up one side of this loaf, and the crumb is a little less airy and insubstantial than previous bakes.  The largest holes seem to be smaller than in previous bakes.

My next steps are going to be to buy some true All Purpose flour, remove my baking tiles entirely for the next bake, and recheck the temperature of my oven in several locations to make sure I am still getting even and accurate heating.  It was accurate and consistent (as much as can be expected from a home oven) just six months or so ago, but this project requires re-verifying everything.  I will also consider modifying the shaping from that commended by the authors.

Thanks for stopping by.
OldWoodenSpoon

OldWoodenSpoon's picture
OldWoodenSpoon

After last night's poor results on the Vienna Bread recipe from Inside The Jewish Bakery, I received some excellent tips and advice.  I wasted no time putting them to work tonight in a fresh bake.  Unfortunately I am still not getting it right.  I have the same result, albeit less severly, in this next bake. 

The essential change in this bake over my first was to change to a lower protein flour.  This bake was done with 100% unbleached Pendleton Mills Morebread flour, which is right at 12% protein and 0.55 ash content according to the specs in their technical booklet.  The dough took slightly less time to form a window pane, and the house is warmer today so proof times were closer to those prescribed in the book.  I also baked these to a slightly higher internal temperature (208F) than the called for in trying to get them properly colored up on the crust.  When the crust color seemed right, the IT ended up being high. 

Here are the latest results:

These loaves started to contract almost immediately upon unpanning them.  I rotated them over onto their sides at the first indication of trouble, and the contractions predominated on the "top" sides after that.  Thus the "hourglass" is lopsided in the cross section on these.

It is interesting that the compressed, doughy patch is on the side of the loaf that is not sunken in.  The sunken in side does not have that doughy, compressed effect.  Also, the crumb seems to be pretty uniform across the cross section, with considerable openness, indicating vigorous activity.  That may be contributing to the problem.

The flavor in this bread is, again, very good.  The crumb is light and tender, but still with a good "bite", even with the reduced strength of the flour.

I will bake this yet again once I find some quality flour that is below 12% protein.  Also, based in part on the information provided in response to my blog post on the previous loaves, I will  consider reducing the yeast in the next batch if further reducing the strength of the flour does not solve this.  I always get explosive response from instant yeast, and I seem to have to reduce it in nearly every formula I bake with it.  This one seems headed in the same direction, but I will stick to varying only one thing at a time.  More baking for me that way!

Thanks for stopping by.
OldWoodenSpoon

OldWoodenSpoon's picture
OldWoodenSpoon

I baked two loaves of Vienna Bread from Inside the Jewish Bakery tonight, and have a problem I have not seen before with pan breads.  Since pictures are worth a thousand words, here they are:

and the crumb shot:

These loaves went together without a hitch, using my stock Pendleton Mills Power bread flour.  I mixed the dough in my Bosch.  It took 13 minutes to get to a nice window pane.  Bulk rise went about 1 hour and 15 minutes due to the cold day and cold kitchen.  Same for final proof going about 1 hour and 30 minutes after shaping and panning.  The oven preheated for an hour with stones in place, and the bake took 30+ minutes to get the internal temperature up to 204F.   I took the loaves out of the oven and unpanned them onto my wire rack and went back to the movie.  When I looked in on them in about a half hour, I saw what you see.

The sides and ends of the base of these loaves all collapsed inward at the mid-line up the panned section.  If you look at the background loaf in the crumb shot you can see evidence of a "breakout" that would indicate the loaves could have proofed even a bit longer.  As the crumb shot itself shows, the loaves have a distinct hourglass figure now that they are fully cooled.  The crumb is light, with many holes of varied size, yet there is also a puzzling doughy patch up just part of just one side of this loaf.  I am assuming, but can't actually know, that this was the "inside" of the pan, toward the center of the oven and about 6 inches away from the other loaf, baked at the same time.  Given that the loaf made 204F in the center, this is a complete puzzle to me.

I ate a piece of the sample above, and aside from that doughy patch, it tastes excellent, is well done, tender and soft in the crumb with a nice "chew" to it.  I don't understand the collapse, and if you have and idea what causes this, I'd love to hear them.

Thanks for stopping by.
OldWoodenSpoon

OldWoodenSpoon's picture
OldWoodenSpoon

A couple of days ago David G. posted this recipe in his blog here.  Being a chocoholic that refuses recovery or treatment, I could/would not resist the temptation to indulge.  First, though, I must point out in my defense that I have never baked a biscotti before.  Ever.  They came out well enough to rapidly become an endangered item in the kitchen though!

David mused in his original blog post that he thought these would be better with as much as 3/4 teaspoon of chipotle chili.  My wife and I both enjoy the heat, and neither of us has ever had chocolate with chili before, so I used a scant teaspoon.  Well, more like a fat 3/4 teaspoon, of chipotle.  All I can say is, "I gotta do this again!".

The heat of the chili just trails off the back of the bite, and does not persist overly long, but it is there and lends a lingering tangy tail to the chocolate flavor.  I also used the Hershey Special Dark chocolate chips, but had to settle for the plain old Hershey Dark Cocoa I had in the cupboard since the grocer did not have the special dark cocoa powder on the shelf.

Never making a biscotti before, I did not know what to expect.  I certainly did not expect the dough to be so sticky, and I wonder what it really should be like.  It also took twice as long as the recipe prescribes to bake to the first stage where I could cool and cut them, and they took twice as long as well in the second stage to dry them out/crisp them up.  My oven temps are spot on because I test a couple of times a year, and I have no trouble with bread timings.  I just think I made some kind of mistake, or should have added more flour, making these up.

If you like chocolate, you will really love these!  Try them if your waistline will stand it.  Mine won't, but I went for it anyway!
OldWoodenSpoon

OldWoodenSpoon's picture
OldWoodenSpoon

I have been quiet on TFL, mostly, for several months, posting a comment in a thread only rarely, and not taking/making/having time to post any of my baking.  Life has been good, but very busy, and so has work.  Good, and very, very busy.  What time I've had free I've not wanted to spend in this same chair, and at the same computer, where I make my living all day (and night too, sometimes), but I have still found some time to bake.  Not a lot of time, especially last spring and summer, but some.  I can proudly say, however, that no "store bread" has come into this house in two years.  :)  I'm not going to recap  it, or even describe it, but this collage of selections from the last  6 months or so fills in some of the gaps.

There was more, but the evidence all disappeared.

In addition to some baking, one of the things that has soaked up much of my free time has been the completion of my wood fired oven (Denzer style), which has reached a successful near-end milestone.  I have the oven completed, and everything left to do is for looks.  Well, looks and protection.  After the bad outcome from my 2010 effort, which you can see in my blog posts here I put it under wraps for the winter, and took up the project again this summer after things dried out.  I finally was able to get it successfully completed, except for the final finishing strokes, earlier this October.  Here is another collage that tells an abbreviated version of that saga too.


 I've been able to bake in it three or four times so far, and the first fire and first bake are both at the bottom right of the collage.  Based on my limited experience at it so far I know it is going to be a challenge to get to where I can reliabely and predictably produce quality bakes from it.  Heat management and timing are everything, as those with much more experience than I will confirm.  I am hoping that it will not get so wet around the oven this winter that I cannot get to it to bake.  I really hate to think of having to leave it wrapped again all winter when it is so nearly completed, and fully capable of sustained baking.  

I am really looking forward to a little more personal time this fall and winter, and hope to be able to post some of the lessons I expect to learn about managing a Denzer-style oven.  There is much more information available on this topic for an Alan Scott oven, but even then there is not an overabundance.  I'll at least be able to share my mistakes in hope of saving others from making them!

It feels good to be coming back, and I look forward to sharing with you all.  Until then, thanks for stopping by.
OldWoodenSpoon

OldWoodenSpoon's picture
OldWoodenSpoon

I went looking for a recipe that would use up some whole wheat and bulgar grain I accidentally mixed up.  I did not find that recipe (yet), but I did stumble upon this variation on Hamelman's Five Grain Levain posted by MadAboutB8 on her blog recently.  Thank you Sue!  As a result, I got distracted into this recipe, but since I had no sunflower seeds I substituted some raw pumpkin seeds we had in the cupboard.  I used Pendleton Mills Power (bread) flour, with home-milled hard white winter wheat for the whole wheat flour.  I used steel cut oats and BRM Flax Seeds.  The home-milled flour is always thirsty, so I ended up adding about 15-20 gm of extra water to the mix to get a good hydration level.  Everything else went according to Sue's recipe adaptation.  I did not retard this dough so I did include the yeast, but I only used 1/2 teaspoon (the formula calls for 1 tsp) because I seem to have explosive luck with instant yeast.  This bake was no different in that respect, and the dough came along right on schedule, even in our cool 67F-68F temperatures.

I made two round loaves, shaped in willow baskets.  I baked them sequentially in my La Cloche at 455F.  As you can see below, one loaf got away from me just a bit and over proofed a bit when the kitchen warmed up while the first loaf baked.

The loaf in front is the slightly over proofed loaf, which I sliced for the crumb shots. While clearly over proofed from external appearance it did not seem to suffer at all internally.

The crumb in this bread is moist and tender, and has excellent flavor.  It is not at all heavy, which I feared after soaking all the seeds and whole grains for 16 hours.  My wife mentioned, three different times, how much she likes this bread.  That's a new record, so I know this bread has made a good impression.

I continue to really enjoy the results that my La Cloche clay baker provides.  It has helped this bread to have a nice thin crust that is crisp yet chewy, and (IMHO) very appropriate to this bread.  It makes it a little hard to slice evenly though with the crumb so tender.  Here is a closer look at the crumb of this bread.

I expected the seeds to be more pronounced, but I was pleased to find that there is a homogeneous flavor that the seeds do not dominate.  Instead of any mouthful having a single prominent flavor there are any number of small individual bursts of taste from wheat, bulgar, oats, flax seeds, pumpkin seeds, crust.  It tastes great and made a fine accompaniment to a robust beef stew.

This bread has moved Hamelman's "Bread" to the top of my birthday/father's day gift list.  If only half the other formulas in the book are as good as this one (in it's original form), it will keep me busy for a long time.

Thanks for stopping by
OldWoodenSpoon

OldWoodenSpoon's picture
OldWoodenSpoon

Twelve days ago I posted this topic about my troubles with an all white flour version of my successful whole wheat and rye starter.  Since then I have been nursing that starter with multiple daily feedings, and keeping it quarantined from my other starter to avoid cross-contamination.  Based on research, and excellent direct advice, the issue was diagnosed by David Snyder and Debra Wink (Thanks to both of you!) as thiol degradation and I proceeded to try to "feed through it".

I started out by stepping up the interval but maintaining the 1:1:1 (s:w:f) ratio I had been using.  That proved too hectic, and I could not count on getting even the brief mid-day work break I needed to stay on schedule.  Even though I work at home, I seemed to end up on the phone for an hour starting just before the starter should be fed.  It felt like I was not going to be able to make it work that way so I increased the food supply by going to a 1:3:3 ratio and reduced the frequency to every 12 hours.  I also reduced the initial inoculation from 30 grams to 10.  I thank Eric Hanner for his valuable input that led me to this action.

I was able to maintain the 12 hour interval successfully, and true to Debra Wink's assurance, on the 10th day things changed.  I did not know what I was looking for, but Debra was right:  when it happened it was obvious.  What I noticed first was a difference in the matured starter when it was time for the next feeding.  The viscosity of the "discard" was lower and it was much less sticky as well.  It dropped off my spatula almost of it's own accord into the discard jar and left the spatuala mostly clean.  Previously I had to scrape and wipe and eventually wash the spatula to get the stuff off.  The other change was the volume in the jar.  While the bad bugs were in charge there was little loft to the mature starter, even after 12 hours of obvious activity.  After the change it started nearly tripling in 12 hours. 

I decided to try some loaves, with high hopes for something better than the results pictured in the original post linked above.  I made another batch of dough by exactly the same formula and approach as outlined in that post.  Because I was not certain where it was going to end up I took pictures at many of the steps, starting with the dough made up, without the salt, and resting for autolyse:

After adding the salt and completing the first set of stretch and folds in the bowl:

I did a total of 3 sets of stretch and folds in the bowl, and here is the dough after the third set:

The original batch of dough that led me here in the first place had broken down almost completely by the time I got this far.  Results this time are obviously worlds better.  I decided to do a stretch and tri-fold on the bench to get a bit more development, (and because I wanted to get my hands on it and in it to reassure myself it was going to hold together!) so I stretched it out:

and then I folded it up:

At this point I knew I had a dough that was holding up well, with a smooth and supple consistency that had me quite excited, shall we say.  I put it into a dough bucket, let it ferment on the bench for about 30 minutes and then put it in the fridge to retard till I could bake it, what turned out to be some 20 hours later.  Here it is just before going in to retardation:

and again after the retardation, some 20 hours or so later:

I let this rest on the bench for an hour to take some of the chill off, then preshaped:

and then (45 minutes later) final shaped and put them to proof:

I failed to take a photo of the proofed loaves before baking them, but once ready I baked them sequentially in my La Cloche ceramic baker, at 525F for 7 minutes under lid, turned down to 475 for 5 minutes under lid, removed the lid and baked for 17-20 minutes more, until done.  Both loaves were baked to internal temperatures of roughly 205F-207F.

So, after all of that, I pulled these out:

and the crumb:

I found that I am so accustomed to my "other" sourdough that includes both a home-ground whole wheat flour component and a dark rye flour component that on first encounter this bread tasted somewhat bland to me.  As we worked our way through that first loaf though I began to detect subtle flavors that brought the bread to life for me.  It is still a much milder flavored bread than "my" sourdough, but it is also a very pleasant flavor that goes well with sandwiches, and as toast or french toast at breakfast.  Also, because it is almost entirely All Purpose flour, I find it almost too soft and fluffy in the crumb.  This also makes the crust somewhat insubstantial, and I will start increasing the bread flour to gradually work up to a crust and bite that is more pleasing to us.

It has been a rewarding journey, and it was nice to "win the battle" with that whatever-it-was nasty that took over my starter.  Interestingly, although I did have to significantly modify how I was feeding my starter in order to get to this point, I did not have to reduce the hydration.  I maintained the original 100% hydration in this starter all the way through, even to now.  Having gotten this far, though, I think I will split the starter into this original and a lower, perhaps about 60%, hydration version so I can experiment with the different flavors they produce.  The mildness of the flavor of this 100% hydration version may make the differences easier for me to pick up on my unsophisticated palatte.

I want to thank everyone that contributed advice on this issue.  The expertise shared, and the spirit of generosity with which it is so readily shared, here on The Fresh Loaf is a true blessing.  You are helping to make me a better baker.

Thanks for stopping by
OldWoodenSpoon

OldWoodenSpoon's picture
OldWoodenSpoon

I love beer breads, so when I saw the Team USA formula featured in Crust and Crumb (Reinhart) I had to try it. 

Reinhart points out that this formula is a bit unusal because it utilizes two distinct preferments (three, actually, as Reinhart says in the notes, when you include the beer).  It uses a firm starter made up from a barm as well as a pate fermente (old dough).  I used Beck's beer, which I had on hand instead of an amber ale.  I made the barm/firm starter and pate ferment from scratch using the formulas in the book. I also roasted my own diastatic malt powder to deactivate the diastase enzymes since I do not have non-diastatic malt on hand and don't have much call for it.  Toasting worked out just fine, but I was not prepared for all the smoke.  (Maybe I over-toasted it just a bit.)

I baked this bread with Pendleton Mills Power, home-milled hard white winter wheat, and Wingold Dark Rye flour.  I substituted 1 ounce of coarse rye meal for an equal amount of rye flour.  I found the formula produced too dry a dough on just the water called for (1/2 Cup) and had to increase that to roughly 1 1/4 Cup total.  Some of this is probably due to the home-milled whole wheat flour, which I find to be pretty thirsty in all cases.  More of it is probably due to the coarse rye meal.  The dough balanced out at a very nice texture with the additional moisture and my old Bosch mixer never broke a sweat on the four-loaf load, even with the several extra minutes of heavy work it had to put in while I adjusted the hydration.  Total mixing time came out close to 13 minutes.

After fermenting, degassing and fermenting again I shaped the dough into free-form oval loaves and proofed them in pairs on parchment.  They were scored and baked in pairs on parchment on my baking tiles under a roasting pan lid preheated with the oven to 475F.  I misted the loaves liberally before loading them into the oven, and again just as I lowered the roasting pan over them.  I found baking times somewhat shorter than called for in the book, but that is expected given the shape I used.  Boulles would probably have taken the prescribed amount of time.

This formula produces four loaves of bread.  I could not find a pleasing way to fit all four into my basket, so here are three of the four.

The crumb looks like this:


Calling this "beer" bread has a point, in that the addition of a nice fully hopped brew should add an additional flavor dimension of hoppy bitterness that is subtle and enhancing rather than strong and overpowering.  Perhaps I should have gone and bought the amber ale called for and drank the Beck's with lunch.  In any event that flavor dimension was not very prevalent in these loaves.  They are good, but I think these would be more accurately called whole wheat and rye.  I accept responsibility for that, for both the beer selection, which weakened that flavor component, and for the inclusion of the rye meal, which gave the bread a stonger rye flavor.  I'm certain this combination of divergences does not do justice to the original flavor.  The beer does add a softness to the crumb however, that is an excellent offset to the chewiness (IMHO) of bread flour.  The crust is not a crispy french bread crust that shatters when you cut into it, but has a very agreeable chewy bite that is also very flavorful.  Overall this is better than average bread, and I will make it again.  Next time I will get the proper amber ale and leave out the rye meal to see what difference it makes.

Thanks for stopping by
OldWoodenSpoon

OldWoodenSpoon's picture
OldWoodenSpoon

from my sourdough starter problems, I switched to commercial yeast breads for the weekend.  I've had "Crust and Crumb" out from the bookmobile for a while now, and thought these Peppery Polenta Crackerbread sounded good.  Turns out they are quite good!

I baked them whole rather than cut up into individual crackers, thinking we might use them as wraps.  They are supposed to get tender and flexible if you mist them lightly and let them stand for 5 minutes.  We have not tried it yet, but they break up easily into cracker-sized bites for dips too.

The secret to getting these to turn out as crackers is to roll them thin.  When you think you have them as thin as you can get them, let them rest, and then roll them thinner yet.  When you finally get down to where the whole fennel seeds must compress to go any thinner, give them one more pass, then bake them. 

Coarsely ground black pepper, uncooked polenta meal and whole fennel seeds give these crackers an interesting and complex flavor.  Garnishes of paprika, carroway seeds and sesame seeds, alone and in combinations, lend still more flavor variety.  The polenta gives them a nice crunchy bite to go along with the cracker crispness, and being rolled so thin you never get a whole mouthful of any one flavor.  They provide plenty of flavor though, even served with just plain cream cheese.  See Peter Reinhart's "Crust and Crumb" for the full recipe.

Also out on loan from the bookmobile, I have George Greenstein's "Secrets of a Jewish Baker", where I found a formula for Potato Bread.  I have always liked potato bread, and my wife prefers bread with "substance", so I baked the 3-loaf build of this formula on Sunday evening.  The book notes that potato bread dough is always "a little sticky".  I only quibble with the "a little" portion of that statmement.  The dough was quite sticky, and took generous dustings of flour on the board to get it into shape.  I should have added a tiny bit more flour as the dough was very loose in addition to the sticking, even after fermentation.  I also adjusted from the active dry yeast in the formula to instant yeast, and then went still shorter yet since my instant yeast breads seem to explode on me. It must be my water or something because I need to reduce the yeast even more next time.  This dough was a rocket-riser, and was ready quite early.  The results, however, are quit acceptable, in both flavor and appearance.

I baked three loaves, but one was already cut when the pictures were taken.  I used two 8" x 4" pans and a 9" by 5" pan, all baked together on tiles on a low shelf.  It took the full 50 minutes prescribed to get them all done, with the larger pan needing a few extra minutes.  The third loaf provides the crumb shot.

I think when I cut the yeast even further the crumb should close up a bit more and give me the solid and substantial texture I expect of potato bread. The crust of these loaves is pleasantly crispy and provides plenty of structure to support the moist and tender crumb I got here though.  The crumb almost has to be tender thanks to enrichment with potato, butter and milk (powder).  It made tasty toast this morning with butter and jam, and wonderful grilled cheese sandwiches for dinner.

These bakes went pretty well, thankfully, and so went a long way toward calming my nerves, frayed by my sourdough starter woes.  Nothing like some success as a restorative.  It makes for good eating too!

Thanks for stopping by.
OldWoodenSpoon

Pages

Subscribe to RSS - OldWoodenSpoon's blog