The Fresh Loaf

A Community of Amateur Bakers and Artisan Bread Enthusiasts.

davidg618's blog

davidg618's picture
davidg618

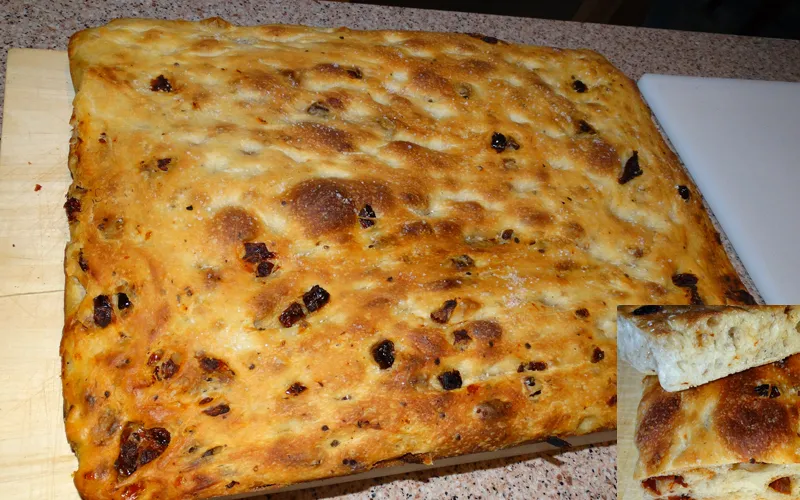
I've posted other examples of my 72% hydrated Foccacia.

http://www.thefreshloaf.com/node/33820/sourdough-focaccia

This time I incorporated 3/4 cup of diced sun-dried tomatoes. These tomatoes, imported from Italy, are sold by BJ's. They are preserved in olive oil, and infused with capers, peppers, wine vinegar and other spices.

I incorporate a third of the tomatoes in each of three S&F before bulk fermenting overnight at 54°F in my wine cooler.

Super tasty! Great eaten alone, or as sandwich bread with raw onion and fresh tomatoes, salmon patties, or grilled portobella mushrooms with red pepper aioli.

David G


davidg618's picture
davidg618

Tonight's dinner was a white sauce pizza. Mornay sauce made with Peccorino Romano, fresh Mozzerella, Baby Spinach sauteed in garlic-infused olive oil and balsamic vinegar, fresh asparagus tossed with garlic-infused olive oil and tarragon, and Feta cheese.

Our pizza dough is a simple 50/50 mix of semolina and AP flours, water, olive oil and salt. We make enough for three pies, divide and freeze two rounds, using the remaining round immediately for that evening's pie. This crust was the thawed third round of the last batch made a couple of weeks past.

Baked at 500°F for nine minutes.

Delicious!

David G


davidg618's picture
davidg618


Five years ago (April 25) I discovered The Fresh Loaf, and started this journey. Prior to then I’d frequently baked yeasted breads, and a modest spectrum of other baked goods. I’d bought a bread-maker—A Zo—and soon after quit, for the most part, buying supermarket bread. I continued to purchase loaves from local bakers, Deli Rye most frequently; and, while still working, loaded up with airport sourdough every time I passed through San Francisco.

I was content—well, almost content.

Over a couple of decades I’d tried half-a-dozen times to make sourdough bread at home. Every time mediocre, early successes were followed by dismal failures, and a neglected, smelly culture—sometimes rainbow colored with molds—long lurking in the depths of the refrigerator.

Mentored by TFL experts—you know who you are—to whom I will be forever grateful, during the first two years, I read a lot, experimented a lot, and had more successes than failures. And all the failures were edible.

In July of 2011 I could no longer deny a major failure was eminent.

My sourdough starter was slowly going belly-up. I tried to save it, but gave up after a time, and turned to TFL’er, Debra Wink, for help. With day-by-day guidance she led me back to having a robust, viable starter. She also suggested an alternate maintenance plan (for a refrigerated seed starter). I followed her advice, and now, nearly three years later, I am still enjoying the same culture’s robustness and dependability.

The experience got me thinking in broader chunks about my bread making. I’d started with a vague goal: I wanted to make “better bread”. I defined “better” with three parameters: good flavor, appropriate crumb, and pleasing eye-appeal. They are listed in priority order. Somewhere along the way a meta-parameter had unconsciously crept in: Consistency.

My conscious goal became make “better” bread consistently.

I can happily say I’ve reached a point in time when I can, with reasonable safety, say I’ve met my goal.  

Insanity is often defined as “doing the same thing over, and over again, and expecting a different outcome.  I assume the opposite is also true: “doing the same things consistently, and expecting the same outcome is sane.”

My TFL blog is, in the recent past three years, peppered with arguments for developing a personal, disciplined process(es) for baking breads. Discipline, in my opinion, begins with consistency: in ingredients, in procedures, in time and temperature, and also attitude.

This morning, while building a small amount of levain, not for baking but to merely replace my refrigerated seed starter—no baking this week, the freezer is full—I thought it worth a blog entry to focus on starter maintenance, and levain building (manipulation).

With the back-story complete, here’s what I do with my seed starter—consistently.

• 24 hours before dough making: Build 1; 40g seed starter @ 100% hydration, 20g each Flour (KA Bread Flour) and filtered well water. (2:1:1) Ferment at room temperature (72°F – 76°F)

• 16 hours before dough making: Build 2: All of Build 1, 40g flour and 40g H2O. Ferment at room temperature.

• 8 hours before dough making: Build 3: All of Build 2, 80g flour and 80g H20. Ferment at 82°F.

I make three sourdoughs routinely: a 10%:45%:45% (Rye: AP: Bread flours mix) @ 67% hydration, a Mostly White (only 5% Rye) at 67% to 72% hydration, and a 50% Whole Wheat:Bread flours version @ 68% hydration. All use 250g of ripe 100% hydrated levain. Which leaves 70g of ripe levain from the three Build process

10/45/45 Sourdough


Mostly White Sourdough


50%Whole Wheat Sourdough

I feed 50g of the remaining levain 1:1:1 with Bread flour and water, and completely replace the previous week’s seed starter. (Divided equally into two jars. I’ve always been a belt-and-suspenders, risk-avoiding guy.)  I refrigerate this mix immediately. Total replacement was Debra Wink’s suggestion. Previously, I’d been feeding a measured amount of the residual seed starter. This may have contributed to (caused?) the earlier failure.

This discipline, along with 15 hours of retardation at 54°F, yields consistent performance regardless of the flour mix, or hydration. I divide and warm the chilled, retarded dough for one hour at 82°F, shape the final loaves, and return them to the proofing box (82°F). Proofing invariably takes 2 hours and 15 to 20 minutes. I bake at 450°F, with steam for 15 minutes, and without steam until internal temperature reaches 208°F to 212°F—typically 8 to 10 more minutes for 1 lb. loaves and 12 to 15 more minutes for 1.5 lb loaves regardless of dough type or hydration percentage.

Variations on the theme:

• I’ve built a Rye Sour beginning with the same seed starter, but now replaced every week to ten days; otherwise same process: surplus Rye Sour for baking is fed at 1:1:1 with Whole Rye and stored in the refrigerator.

However, I build Rye levain at 60% hydration for the first 16 hours (Two progressive builds @ Room Temp.) and 100% Hydration at 82°F for Build 3.

• My wife is not a sour, sourdough fan. Consequently, I focus sourdough builds on yeast, not bacteria development. (82°F is the sweet spot for yeast development).

• When I want more tang, I let builds 1 and 2 go 12 to 16 hours fermentation. If I want even more I push build 3’s temperature to 90°F.

I thought this blog might stimulate other TFL’ers to share their personalized processes leading to their successes.  The emphasis is on how we achieve succeed.

Happy Baking,

David G


davidg618's picture
davidg618

Let's face it: you can look at a Google's worth of Baking Powder Biscuit recipes, and with the exception of small variations in flour, shortening, and liquid ratios they are pretty much carbon copies of each other.

Here's the one I've finally settled on after baking a few hundred buttermilk biscuits with small tweaks in the flour: shortening ratio.

-------------------


Buttermilk Biscuits

Ingredients:

480g             All-purpose flour (4 cups)

4 tsp            Baking Powder

½ tsp             Baking Soda

2 tsp            salt (10g)

85g            Unsalted butter, chilled and cubed

85g            Lard*, chilled and cubed

1-½ cup Buttermilk (368g)

Directions:

Preheat oven to 425°F/218°C.

Combine dry ingredients and wisk to distribute evenly.

Using a pastry cutter, or two table-knives cut in chilled butter and lard until shortening is reduced to pea size and smaller.

Add buttermilk and combine just until dough forms a rough ball. Let dough rest for 10 to 15 minutes to hydrate the flour.

Turn dough out onto floured surface. Fold dough, gently, 4 or 5 times and  roll dough ¾ to 1 inch thick. Cut biscuits, without twisting cutter. Place dough rounds on a parchment-paper lined sheet pan. Reshape dough scraps as necessary to complete.

Bake** for 18 – 20 minutes until tops are golden brown.

Makes 12 to 14, 2-5/8 inch diameter, dough rounds.

* Leaf lard is preferred, but natural lard can be substituted. Commercial hydrogenated lard can also be used, but substituting with all butter shortening may be a preferred choice.

**Some convection ovens dry out baked goods unevenly (baguette loaves, and rolls especially).  If you’ve experienced uneven oven spring when baking multiple, lengthy, or distributed rolls baking in “Convection” mode, consider using conventional “Bake” mode alternately.

-----------------------------

My primary purpose for writing this post is to defend a much maligned fat: Lard. The 50/50 mix of butter and lard yields bicuits with a balanced buttery, wheaty flavor and surface crispness that survived freezing. I've recently acquired 2 kg of leaf lard. I generally reserve this extraordinary shortening for pastry doughs and shortbread cookies only, but this time relinquished 85g for our "go to" baking powder biscuits. The difference, compared to a batch made with butter only, is incredible. Leaf lard is pricey, and difficult to find but worth the search and cost if your passionate about flaky pie crusts, and pastries--and, of course, biscuits.

davidg618's picture
davidg618

My wife scans King Arthur's recipes about once a month. She found this recipe recently, and asked me to bake them. I've learned not to say "No", but I was afraid she would be disappointed. I've not been very successful making scones in past times. They'd come out dry and dense. Consequently, I've not made them in years.

I was pleasantly surprised with these. Despite the liberal amounts of bacon and cheddar in the mix the scones are light, delicate and full of flavor, much like a well-made biscuit. I think the doubled amount of baking powder--1 tablespoon in two cups of flour--is the reason, and I'll take some of the credit for not mishandling the dough.

Here's the link to the recipe.

http://www.kingarthurflour.com/recipes/bacon-cheddar-chive-scones-recipe

David G

davidg618's picture
davidg618

This is the second time I've baked a high percentage rye bread. The first was Hamelman's Volkornbrot; I wasn't elated with the result. ( http://www.thefreshloaf.com/node/14991/christmas-baking-blisters ).  That was four years ago.

Lately--happy with my progress with sourdoughs, baguettes, challah and deli rye, and motivated by a number of other TFL'er's seemingly annual flurry of activity with Borodinsky rye Ioaves I thought I give it a go.

I read at least two dozen postings from favorite mentors (ananda, varda, Elagins, and hansjoakim to name a few); I searched other food blogs. I paused feeling intimidated. First of all, I didn't have all the right ingredients--malted rye, and blackstrap molasses specifically. I know where I could get malted rye, but it's a hundred-eighty miles round trip to the nearest homebrew shop that stocks it. I hadn't the slightest idea (other than buying online) where I might find blackstrap molasses.

Secondly, although I frequently use coriander in BBQ rubs, and pastrami crusts, I've never used it to flavor bread. I wasn't certain we'd like it. However, we love adding the flavor of Caraway seeds to Deli Rye.

I wanted to bake when the mood struck, not a week or more from now.

I recalled reading Borodinsky is always 80/20: Rye/Wheat flours in one of the many references I perused.

This bread is based (tightly) on Hamelman's 80% Rye with a Rye-Flour Soaker, in Bread.

I made some changes, but not many. I scaled the formula to produce 2kg of dough; enough for a 13" Pullman pan. I also substituted 115g (4.0 oz) of cracked rye berries for the 6.4 oz. of Whole-Rye flour in the soaker. (I had the rye berries on hand, and wanted to use them.) And lastly, I added 2 tsp. of Caraway seeds, 2 Tbls. of barley malt, and two Tbls. of ordinary Mollasses.

All other ingredients and ratios were as published. I built the Rye Sour in the prescribed manner, bulk fermented and proofed the dough at the recommended temperatures, and baked at the oven temperatures directed. Trusting the strength of my Rye Sour's yeast I did not use any optional commercial yeast. The finished paste filled only slightly more than half of the pan's height, but proofing expansion and oven spring pushed the loaf above the top of the pan.

I rested the loaf for 36hrs before tasting it. (I just couldn't wait any longer!).

The flavors are intense. The rye is immediately present on the palette, the Caraway shows itself moments later: not in-your-face, but not timid either. There is a lingering after taste I think is a melding of the barley malt syrup and the molasses; it has a bit of sharpness.

When I first cut into the loaf the center of the crumb felt slightly sticky. I feared the crumb would be gummy. Much to my delight the crumb's mouthfeel is moist but not  gummy. It is chewy, but doesn't have the springiness I find in wheat doughs, i.e., baguettes and sourdough, nor in the higher wheat percentage deli rye. An ocassional rye berry fragment offers a momentary crunch.

The crust is hard, and thicker than I would prefer. You can see the top of the loaf is partially charred (There is no burnt taste). I think this is due to the relatively high initial baking temperature, 480°F and the excess sugars from the malt syrup and the mollasses.

I've cut the loaf into four equal pieces, and froze three of them. I'm thinking this bread will stand up to my favorites for open-faced sandwiches: sardines and onion with Dijon mustard, home cured and smoked salmon, and pastrami with spicy mustard. I'm open to any other suggestions.

I'm ordering some rye malt, and blackstrap mollasses online. My next attempt will be an "authentic" Borodinsky but not soon. I've made a deal with my wife; I won't bake this style more than three times each year--she's not embracing its intense flavor.

David G

Added Monday, January 6

Monday's lunch

Sardines (water packed), onion, celery, salt, pepper (50/50 mix Tellicherry and Szechuan), mayo, and Dijon mustard on bite size, thin sliced toasted Rye with a pinch of paprika for color. De-light-full!


davidg618's picture
davidg618

to share with  family and friends. Two traditional: Welsh Cakes, and Date-nut Pinwheels, and two newer: Chocolate-Chocolate chip-Chipotle-Hazelnut and Ameretta-Almond Biscotti. Thirty dozen total.

Happy Holidays to all,

David G

davidg618's picture
davidg618

But I I'm putting it in my blog because I don't want to forget this day.

First, although, like most, if not all of you, I have a passion for baking. With such a passion, only a fool would not be a member of TFL.

My passion, however, spills over into other domains. I am an unabashed Foodie. For example, two days ago I tested a brine-cured ham I am preparing for Christmas. It was perfect: ready for smoking. I celebrated with a glass of our home-vinted 2009 Barolo.

Since finding TFL four years ago, I've searched the web for other food-related websites with the same flavor, the same sense of community evoking the same feelings of being among friends and neighbors. 

I'm still searching. 

Today I came close:

 http://www.saveur.com/article/blog/2013-Best-Food-Blog-Awards-Winners

At least checkout the top winner: http://notwithoutsalt.com/

I've not checked out any in depth, but I have perused the the first four winning blogs enough to suggest they are worth examining, and worth passing on to likeminded folk. They are as literary, or at least journalistic, as they are culinary. I'll check them all out before the first of the New Year.

David G

davidg618's picture
davidg618


About four months ago, satisfied with my progress with wheat breads, I decided I’d give rye breads a go. Within the week I had reviewed Hamelman’s (Bread) comments on rye flour’s idiosyncrasies, Ortiz’s (The Village Baker) near deification of Pain de Seigle, and developed a respectful fear of rye’s dreaded “starch attack”. In earlier days I’d made singular attempts at Volkenbrot and, while test baking for ITJB, Kornbroyt: each a dense-crumbed rye; both tasty, but not the rye bread I was looking for.

Encouraged by its praise, and perhaps in memory of our recently passed fellow TFLer, Eric, I tried Eric’s Rye. I loved it—http://www.thefreshloaf.com/node/32600/attempt-1st-erics-rye—but it too wasn’t the rye I sought.

I took a trip down memory lane.

I grew up in Scranton, PA during WWII, and the following fifties. In my eighth year, the war nearly won, my father took me on my first trip to NYC: the Big Apple. My father’s love of baseball would rival any current-day Boston Red Sox fan. In those days, with proper planning, you could see a Dodger’s game Friday, a Yankee game Saturday and catch a Giant’s game at the Polo Grounds—sometimes a double-header—on the way home Sunday. My dad was a great planner.

I believe I tasted Rye bread for the first time that summer in a near-Broadway bar—the “Silver Dollar”. It was 1944, but it still offered a free lunch. I had a ham sandwich on rye bread: probably old-style NY Deli Rye. That was the rye I was searching for.

I researched more than a handful of NY Deli Rye recipes and formulae. I was surprised and disappointed to find most called for white rye: a flour many TFLer’s warned me lacked flavor, and I’d experienced first-hand making Greenstein’s (Secrets of a Jewish Baker) Jewish Rye.

I started experimenting substituting Whole Rye Flour for White Rye flour. Initially, using commercial yeast, making straight doughs. I made little ones (not photographed) and big ones—a two pounder is featured above. Update: 27 Dec. 2013 We cut this bread for post holiday ham sandwiches. I've added this crumb shot.

The flavors were good, but not there yet. I’ve made some with caraway seeds, some without.

It was time to try Rye Sours.

I ignored all the books advising starting a Rye Sour from scratch. I am the happy owner (parent?) of a reliable and robust sourdough seed starter, faithfully refreshed weekly. Starting with ten grams of my old faithful, in three 12 hour builds, I made my version of a Rye Sour feeding only with Whole Rye. It now rests, in the fridge,   beside its white-flour mother, it too refreshed weekly. 

I made only little ones: 1 lb. or 1.5lb.

Yesterday I gave a neighbor, in thanks for mounting a bat house on our barn, a loaf from the most recent batch. That I’m willing to share is a sure sign the flavor’s getting real close to what’s wanted. [pic

Finally, also yesterday, I did a side-by-side bake using the formula I’ve settled on: one loaf straight dough--chevron slashes--and one loaf converted for Rye Sour--straight slashes--keeping the flour ratio, liquid, salt, vegetable oil, and milk powder identical in each.  I used 2-1/4 tsp. of commercial yeast in the straight dough, and added 1 scant tsp. of commercial yeast to the Rye Sour version. I make the Rye Sour with two, twelve-hour builds and reason the natural yeast population has passed its peak. All dough handling, and baking was as identical as possible. The straight dough loaf proofed earlier than the Rye Sour version; consequently, the loaves were baked serially.


The straight dough exhibited slightly more oven spring, otherwise I don't see any other difference.

My wife encouraged this comparison. “If the straight dough tastes as good as the sourdough version why go to the extra trouble?” was her argument. However, while she consumes sourdough breads with relish, she still is wary. Occasionally, the “tang” in my sourdoughs reach beyond her taste tolerance. I think this was the real motive for her encouraging the taste test.

Post-bake (and 24 hours aging) I set up a blind tasting for her.

No surprise to me, the Rye Sour version won! It's mouth-feel is slightly chewier, but that's not the tie breaker. It's flavor  pops; the straight dough not so much. Their both keepers, but we'll be baking the Rye Sour version most often.

Next rye steps: In past browses I’ve come upon Scandinavian recipes for herb or spice flavored rye breads, but I hadn't kept a bookmark. If you have a favorite in this category, please share it with me.

David G


davidg618's picture
davidg618

We love pecan sticky buns. We nibble at them for breakfast, lunch, mid-afternoon snacks, and dinner dessert--not all on the same day, mind you.

Until today I've baked sticky buns in 9" x 13" pans, or 9" x 9" pans. Regardless of which I chose the center bun or bun(s) would remain incompletely baked and doughy when the perimeter bun's were perfectly done.

Reducing the size of the pan to 9 x 9 didn't solve the problem, merely  minimized it. Our convection oven didn't solve the problem. For a number of years I've done my best to balance over-baked in the perimeter and doughy in the center.

A couple of years ago I bought a three cavity pan from Chicago Metallic specifically designed to bake three contrasting lasagnes simultaneously. I didn't buy it to make lasagne. I've never used it to bake lasagne. I bought it as a relatively inexpensive pate and terrine mold.

Today I used it to bake three rows of pecan sticky buns.

It worked perfectly. I checked the final internal temperature of a random half-a-dozen buns. The temps were nearly identical. No more doughy sticky buns!

Hurrah!

David G

Pages

Subscribe to RSS - davidg618's blog