The Fresh Loaf

A Community of Amateur Bakers and Artisan Bread Enthusiasts.

eatalready's blog

eatalready's picture
eatalready

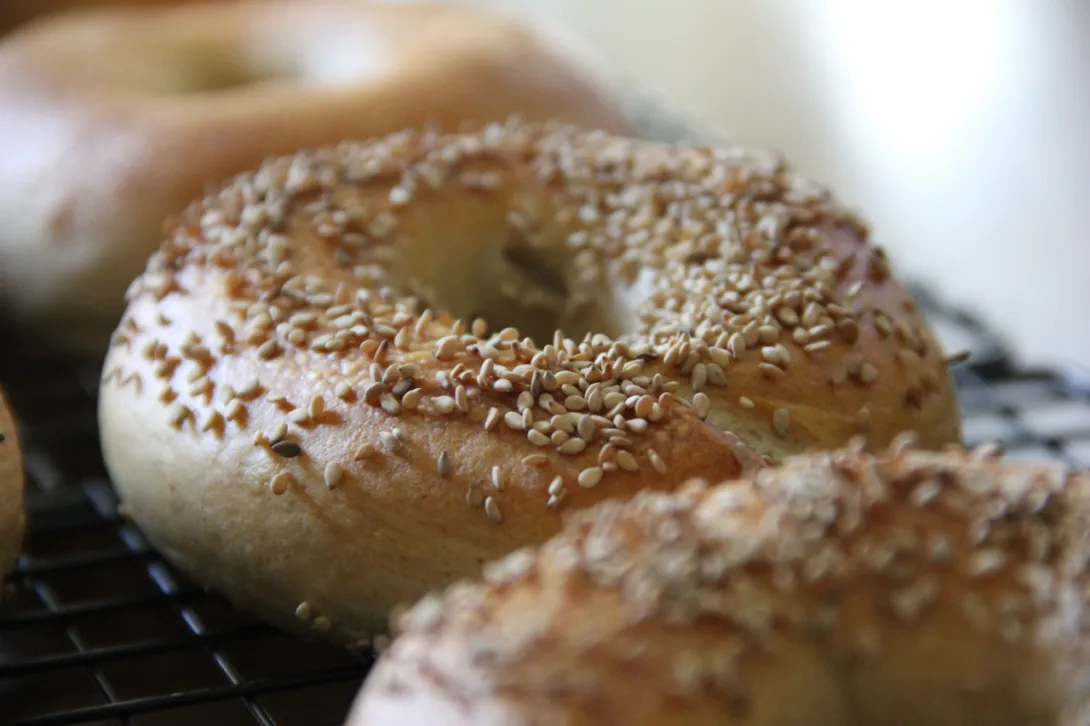
Bagels are one of my most favorite things to eat.  They are so versatile, so forgiving; they go with anything — from smoked white fish to jam — and never complain.  You can eat them by themselves just fine or slather with butter or cream cheese, and you’ve got yourself a meal.

IMG_3898

New York style bagels were completely novel idea to me after jumping over the pond.  Growing up, we had bagels that were slightly sweet, dense and dry, not chewy, and not crunchy, more pretzel-like. They also were thinner and had larger holes.  I loved our bagels (called boublick, BTW), fully convinced that they were the best and the greatest thing, that is, until I tried the New York style bagels in America.  Mmm… I was instantly hooked.  You can’t confuse NY style bagels with anything else, and those chilled bagels from the dairy aisle of your trusted supermarket don’t count as bagels, so please don’t even start, I am talking the REAL ones — the crunchy on the outside and distinctively chewy on the inside, plump and beautiful numbers, sprinkled with… well… anything in the world, from kosher salt to crunchy onion bits.

NY Style Bagels -- Wild Sourdough Version

For a long while, my Sunday lunch of choice was a toasted sesame bagel with plain cream cheese, topped with smoked white fish (chunk, not salad) from Goldberg’s Bagel & Deli.  It had a slice of tomato on it, a few green olives and a half sour pickle on the side… I am drooling just thinking about it.  Second favorite, of course, was a classic lox-n-bagel combo, with red onions, tomatoes and capers.

Imagine my despair when we moved to this cozy little town, only to find out there are no bagel shops within a hundred mile radius.  No, that dingy place downtown doesn’t count as bagel place, and no, Panera Bread isn’t an authoritative source of true bagels either.  Sure, they are freshly baked bagels, but they are not the right kind.  They are made with yeast only, impregnated with enhancers, conditioners, emulsifiers and flavor imitations, passed through a machine to shape them and then… and then… [chin quivering]… they are steamed [falling apart, wailing] before baking.

NY Style Bagels -- Wild Sourdough Version

So yeah, this is how we’ve been living for the past three years now, in this dark and bagel-less world. I’d rather not eat bagels at all than succumb to dubious charm of rubbery and sticky mass-produced imitations.  I learned to do without, but then I got into bread baking… So it was only a matter of time before I started dabbling in bagel-making.

At first, I tried to chase that unforgettable soviet bagel recipe.  I found a few good ones, and even though they did come quite close to my memory of them, they still weren’t exact replicas.  Then, I stumbled upon Peter Reinhart’s version of NY style bagels and tried it in its original form (yeast only).  I think I screwed something up the first time, and wasn’t very pleased with the outcome.  Bagels came out too dry and flat, possibly due to using the wrong kind of flour, or maybe because my yeast was old and lazy.

NY Style Bagels -- Wild Sourdough Version

Then I read a bit more and found that yeast sponge could be substituted happily with wild sourdough for added flavor, and I decided that this may be the way to go, since I keep sourdough starter in my kitchen at all times.  I did purchase a batch of white barley malt and a bag of bread flour, because I wanted to stay as true to the recipe as possible. The rest was history. It all came together very well and paid off tenfold. The bagels turned out perfect!  They had it all — the satisfying crunch, the just right amount of chewiness without pulling your dentures out, the distinctive malty flavor, and oh the looks, the gorgeous glossy looks!  They also keep quite well, can be frozen raw or baked, and the recipe is so simple that it will scale like a charm, if necessary.

NY Style Bagels -- Wild Sourdough Version

The recipe may seem lengthy, the process spawning two days. However, if you look closely, it’s quite plain to see that it will flow very well with your busy schedule.  Say, if you scale the bread starter on a Friday morning, you can go to work and forget all about it, then make the dough batch in the evening, refrigerate overnight, which is the proper way to deal with it, and boil and bake bagels on Saturday morning, which won’t take long at all.  The actual hands-on time is very minimal.  By the time your oven is fully heated, the boiling part will be done.  And after that, it only takes 20-25 minutes to bagel bliss…  It will all be worth it in the end, when you and yours will sit down in front of still warm heap of bagels, inhale the aroma, slice those bagels open, toast (or not, if you are a purist), slather with cream cheese and sink your teeth into the crunchy and chewy flesh. Ahhhhh….

NY Style Bagels -- Wild Sourdough Version

I triple dog dare you to try this, just to see how easy it is to get an amazing freshly baked bagel right in your home.  Once you try, you’ll never purchase the grocery store chilled abomination again.  Moreover, in time you’ll find that a batch of from-scratch home made bagels makes a perfect thank you gift or a token of love for your friends and family.

Peter Reinhart’s NY Style Bagels, Wild Sourdough Version

Yields 12 standard size or 24 mini bagels

Wild Sourdough Sponge:

  • 500 g (4 cups) bread flour
  • 500 ml (2 cups) non-chlorinated water
  • your ripe 100% hydration wheat sourdough starter

Final Dough:

  • 1000 g (5 cups) of sourdough sponge (above)
  • 4 cups bread flour, divided
  • 2 tsp barley malt or 1 tbsp malt barley syrup
  • 3 tsp salt
  • 1 tsp dry yeast
  1. Make the sponge: This is a great way to refresh your starter and make a sponge for bagels at the same time. Mix whatever quantity of wheat starter you have with the water. Whisk until foamy. Add flour. Mix thoroughly until all lumps are gone. Scrape the sides of the bowl with a spatula. Cover loosely with plastic or lid and leave for at least 6-8 hours.  Sponge is ready when very foamy and stretchy, and when 1 tsp of starter dunked in a glass of cold water doesn’t sink.  If you are working office hours, this portion of the process is best done in the morning, one day before you want bagels. Go to work, by the time you are back the starter should be ready.
  2. Make the dough: Measure out 5 cups (or weight 35 oz) of the starter sponge. Reserve the remainder of the sponge for other projects.
  3. Combine starter, salt, malt, yeast and 3 cups of flour in a bowl and mix together until they form a ball.
  4. Adding the remaining flour in batches, 1/4 cup at a time, continue kneading the dough until all added flour is fully absorbed.  Keep adding flour until the dough is tough and non-sticky, but still smooth and elastic.  Sometimes it takes a bit less flour, sometimes more.  If you notice tears or “stretch marks” in the dough, add a few drops of water to remedy that and stop the addition of the flour.
  5. Continue kneading the dough by hook or by hand until it’s fully smooth and elastic. It will still be quite tough. It will take about 10 minutes by hook or 15 minutes by hand to get to that stage.
  6. Immediately divide the dough into 12 (or 24) equal parts.  Standard size bagel will be about 4-1/2 oz (130 g) when raw.
  7. Shape each portion of the dough into a ball, and then shape it into a roll, much like a bratwurst sausage.
  8. Cover all rolls with a damp towel and let them rest and relax for 20 minutes.
  9. Line a baking sheet or a board with parchment.
  10. Shape the bagels: Wrap each roll around your fingers, overlapping the ends right under your index finger.
  11. Press the ends together with your thumb and index finger, place your open palm with dough on it onto the table and roll back and forth a few times, allowing the ends to fuse together.
  12. Place the bagels as you shape them on the lined baking sheet or board. Cover with plastic and let rise 20 minutes.
  13. After 20 minutes, perform the float test. Fill a medium bowl with cold water. Put one of the bagels in the bowl. If the bagel floats within a few seconds, it’s ready. If not, dry the sacrificial bagel off with a towel and return it under the plastic for another 15-20 minutes. Repeat the test.
  14. Once bagels are ready, place them, still covered with plastic,  in the refrigerator and leave overnight or up to 36 hours. Do not skip the refrigeration step: it is necessary for flavor and texture development.
  15. Boiling and baking: once you are ready to bake your bagels, preheat the oven to 500F. Prepare a board or a tray lined with a clean and dry dish towel for wet bagels to rest on. Line up your bagel toppings at this time. Get your slotted spoon or skimmer ready.
  16. Place a wide pot filled with water on a stove and bring to a boil. A regular soup pot will fit 4 bagels at a time, which is great.  Once the water is boiling rapidly, add 1 tbsp of baking soda to the pot, to increase the boiling. Leave the heat on high to ensure rapid boil at all times.
  17. Remove bagels from the fridge and carefully lower them 3-4 at a time into the boiling pot. Boil bagels for 1 minute on each side, turning them once with the slotted spoon.
  18. Remove bagels from the pot and line them up on the towel. Sprinkle bagels with toppings now, as they are the stickiest at this point. Proceed with the remaining bagels, until all of them are done and sprinkled.
  19. Transfer bagels onto the parchment lined baking sheet.
  20. Bake for 20-25 minutes, or until they are evenly browned on all sides.  Some ovens are not baking evenly, so you will have to watch for that, and rotate the baking sheet mid-baking.
  21. Cool bagels on rack until manageable and enjoy. Allow bagels to cool fully before storing them in plastic.
  22. Bagels can be frozen after step 14 (overnight ripening in the fridge) or after they are fully baked and cooled.  If you are baking bagels after freezing them, thaw bagels for 1 hour prior to boiling them.
eatalready's picture
eatalready

Borodinsky bread is my childhood staple food.  We had it practically every day and never grew tired of it. The aroma, the well balanced sweet and sour, the substantial “meaty” crumb and thin glossy crust — should I go on listing all the wonderful things that put this loaf in the bread hall-of-fame?

Nowadays, it seems that every dark rye bread sprinkled with caraway or coriander seed claims the name Borodinsky.  I tried those sorry numbers from stores that carry Russian foods… Half of them are too dry and too fluffy, others are missing that signature tang that only wild sourdough can lend, others still, generously “enhanced” with chemicals resemble very little of the bread we used to eat instead of chocolate.

Over the years, I’ve seen scores of recipes of Borodinsky and, having tried more than enough of them, came to a grim conclusion that the true Borodinsky has become a myth, an urban legend, an elusive unicorn — many claim to have seen one, but none actually delivered the goods.  However, I knew that somewhere out there in the world of used books, there should be an old school formula from soviet bread factories, a so called GOST (Government Mandated Standards) recipe, or even an older one, which, if done right with good ingredients and a bit of careful planning, could yet bear the right results.

Making 100% Rye Borodinsky Supreme

I was right.  There are still some serious bread enthusiasts, both in Russia and otherwise, who dug up the old textbooks and technologies and rendered very good step-by-step instructions accompanied by beautiful photos explaining the process in modern terms and in great detail. Some even dared to adapt for available flour types in each country via many a trial (and, no doubt, some error).  Exciting!

Now to the business of the actual Borodinsky.  Majority of us who grew up with Borodinsky, consumed the part rye/part wheat bread.  It was delicious and we loved every bit of it.  There is, however, a version of Borodinsky of a higher grade, called “supreme”, which is 100% rye.  It blends whole rye and white rye flours in 85/15 proportion.  No wheat to be found. The formula of that bread is cited in the book by Plotnikov called 350 Varieties of Bread (4th Edition, 1940). Some of the formulas in the book existed before government standards were established (1939).  See, many GOST formulas were streamlined for mass production, sometimes simplified, cheapened, etc., while many of the pre-GOST formulas upheld the old school best traditional methods and standards of bread making, thus yielding superior (albeit more labor and time consuming) bread.

Making Red Rye Malt Flour

Sprouting organic rye berries to make red rye malt

Making Red Rye Malt Flour

Final product — red rye malted flour, milled moderately fine

When I stumbled upon the pre-GOST formula, and soon thereafter a detailed blog post with illustrations, I was beside myself. The only thing that stood between me and 100% rye Borodinsky loaf was red rye malt, more precisely, the lack of the above.  Now, that one I still can’t get over.  Possibly due to differences in product naming, and partly due to the fact that I can’t reliably get the true organic red rye malt anywhere in quantities less than 100 kilo (190 lbs), I finally decided to make red rye malt flour at home.  I entrusted myself to the detailed set of instructions I found on this site (THANK YOU!!!), and made my first batch the other day.

Making 100% Rye Borodinsky Supreme

I have to say that the aroma that permeated my house during the roasting process has brought back some serious childhood memories, and for that alone I will be forever grateful.  It also brought the first promise of true Borodinsky in the future, because it smelled exactly like our USSR bread shops filled with still warm unwrapped bread loaves.

Anyway, I am getting distracted here, as my bread is almost done baking and the entire house is now smelling unbearably beautiful.

The process is quite lengthy, but the actual hands-on time is minimal. Good ‘ole “good things come to those who wait” has never been more true (well maybe beat by the famous Pumpernickel). The most important thing here is to plan your pre-baking stages, so that they don’t disrupt your busy schedule.

My impression of the bread: for me it turned out a bit sweet and under-salted, even though I weighed everything quite precisely. The aroma and visual appeal were definitely there. The crumb and crust are both as I remember them. Thin, slightly crunchy crust and substantial, lightly moist, uniformly porous crumb. Color is about milk-chocolate shade. I feel I could have given it a bit more rise and it could be baked at a higher temperature — the top didn’t come out quite as dark as it should be, but the bread was at 180F throughout and baked uniformly through.  I will definitely try this recipe again with the above adjustments.  Overall, I would wholeheartedly recommend this formula, especially if you like your bread with a touch of sweetness.  It passed the ultimate test of schmaltz with cracklings and coarse salt, the sweetness of the loaf was just perfect for this.

References/Sources:

- Detailed blog post with superb step-by-step photo of rye+wheat Borodinsky 1939 version (in Russian) http://registrr.livejournal.com/16193.html

- Blog post with excellent photos  of 100% rye Borodinsky Supreme (in Russian) http://mariana-aga.livejournal.com/152489.html

Borodinsky Supreme

Makes a small loaf in a 1-1/2 quart (1.4 liter) pan.
From start to finish (with some steps going simultaneously) – 14-16 hrs

Step 1: Rye starter

Refresh your 100% hydration rye starter (6-8 hrs), you will need 125 g of it

Step 2: Scalding (5-6 hrs)

  • 200 g boiled water at 150F (65C)
  •   50 g whole rye flour
  •   25 g red rye malt flour

Step 3: Pre-ferment  (3-4 hrs or until doubles or more)

  • all of the scalded batch
  • 125 g refreshed starter
  • 125 g whole rye flour
  • 125 g water, room temperature

Step 4: Final dough — soft and very sticky (30-90 min bulk fermentation or until doubles or more)

  • all of the preferment
  • 200 g whole rye flour
  •   75 g white rye flour
  • 5 g salt
  • 30 g sugar
  • 25 g molasses (I used Blackstrap)
  • 2.5 g ground coriander (best if freshly ground for more intense flavor)
  • 0.5 g dry yeast activated in 75 g water and 3 g sugar (20 minutes)

Step 5: Shaping and final proofing (60 min or until tops the pan)

Grease 1.5 quart loaf pan. Pack the dough nicely into corners at first and then the rest. Smooth over with wet hands. Cover with plastic and let rise until reaches the top of the loaf pan.

Step 6: Flour washing (1 min)

Mix 1 tbsp AP flour with 50 ml water, shake well. Brush the bread right before setting into the oven. Sprinkle the top sparingly with whole coriander or caraway seed, if desire

Step 7: Baking (60 min)

Preheat to 400F (200C). Bake 60 minutes.

Step 8: Kissel (custard) washing (1 min)

Mix 1 tsp corn or potato starch with 150 ml water. Bring to a boil.  Brush the bread as soon as it finishes baking. Remove the loaf from pan and cool on rack.

Flour wash before baking and custard wash after baking are needed for creating that famous beautiful glossy, almost lacquered looking crust on top of the loaf, which also prevents the bread from going stale too fast.

eatalready's picture
eatalready

You probably know by now that finding the right kind of flour is a very important task.  Using predictable, good quality flour is key in getting predictable, good quality bread loaves day after day.  The task becomes doubly challenging if you are trying to stay away from mystery wheat, GMO, bleached, bromated and “enriched” goodness that’s being sold in most stores.  King Arthur flour, which is the golden standard for home bread baking,  has its line of unbleached and even organic flours, but purchasing them at a grocery store in two-pound increments is ridiculous and expensive. Even purchasing on sale, you’ll pay an arm and a leg, and if you decide to stock up, well… you kitchen cabinets and top of the fridge can only stretch so far, not to mention that minor factor of flour getting stale. You go online and find the flour cheaper, but then you get slammed with unforgiving shipping fees and after all said and done, you may find yourself at square one.  Unless…  unless you are willing to step out of King Arthur range and venture into a mysterious world of other brands.  Other brands are tricky; you may find mixed (if any) reviews here and there, so you have to try them out in both gluten development and consistency.

Wild Sourdough Challah

I decided to step out the King Arthur circle and did, indeed, venture into the wild world of other brands.  What’s more, I ordered a multi-pack option off Amazon, and paid no shipping (hip-hip-hurray!).  The flour arrived in two days, and last night, as I ran out of all of my default bread flour, I decided to try it out.  I gave it the ultimate test and tried a wild sourdough challah recipe.  Wild sourdough means less (or none at all) commercial yeast, slower rise, superior flavor and sometimes unpredictable results, so there you go.

Wild Sourdough Challah

The flour I tried is Great River Organic Milling Company 100% Organic Bread Flour.  The label says that this flour is made of hard winter red wheat, it retains germ, but was lightly sifted for bran reduction, and it’s perfect for white yeasted breads. Hurray!  First thing I noticed was the color of the flour — the familiar super white silky look was gone, and I was looking at lightly beige powder that wasn’t all silky, but still quite finely milled. I had my concerns when I put it in the mixer bowl, and I started having even more concerns when I started mixing. Upon hydrating, the flour turned deep beige in color, almost like whole wheat flour, and the dough mixture was quite shaggy at first.  I won’t lie to you, I was down right worried that this flour may not be able to do the trick.  However, I was very much impressed when it started developing gluten and became very stretchy and quite classically smooth and silky upon completion of the kneading cycle.  It took about 7 minutes to get it to that point, and from then on, it was all a smooth sail.

Wild Sourdough Challah

The dough proofed for 3-1/2 hrs or so. I didn’t get this violent rapid rise out of it, but that didn’t bother me at all.  Slow and steady wins the race to good flavor.  Then I braided the challah and left it under plastic for 1 hr for final rise, egg-washed.  Again, it didn’t increase in size too dramatically, but what I got instead was a beautiful bloom in the oven.

Wild Sourdough Challah

The loaf turned out very well, with all the “beigeness” gone. The crumb does have this slightly off-white tone to it, but both in texture and flavor the loaf is just what it is supposed to be.  What I did notice this time, which was very prominent, is the absolutely stunning aroma during baking.  I am not sure if it’s the flour or my sourdough starter, but the challahs I baked before never smelled this heavenly.

Wild Sourdough Challah

Makes 1 loaf

  • 300 gr (1-1/2 cups) wheat 100% hydration sourdough starter
  • 300 gr (2-1/3 cups) organic bread flour (I used Great River Organic Milling Company 100% Organic Bread Flour)
  • 35 gr (2-1/2 tbsp) olive oil
  • 35 gr  (3 scant tbsp) sugar
  • 10 gr (2 scant tsp) salt
  • 1 egg + 1 egg yolk (reserve the whites for egg-wash)
  • 1/2 tsp dry yeast (optional)
  • sesame seed or poppy seed for sprinkling
  1. Use fully active starter, which means it should be bubbly, not flat. Feed the starter about 4-6 hours prior to using in this bread
  2. Mix all ingredients in a bowl until well incorporated and hydrated through.  Leave for 20 minutes to soak.
  3. Knead with a hook attachment in a mixer for 6-8 minutes, or 8-10 minutes by hand, until the dough turns silky smooth and elastic. Depending on your flour and the consistency of your starter, you may need to add a bit of lukewarm water to soften the dough.  Try doing this in the beginning stages of the kneading.
  4. Transfer the dough into a greased bowl, cover with plastic and let rise slowly for about 3-4 hours, or until dough is at least doubled in size.
  5. Transfer the dough onto a lightly floured surface, divide it into 3,4, or 6 pieces, depending on how you want to braid your challah. Roll each piece into a log and let rest for 20  minutes under plastic.
  6. Braid your challah as desired, tuck in the ends.  There are plenty of videos on various braiding techniques, fascinating!
  7. Transfer challah loaf onto parchment lined baking sheet.
  8. Lightly whisk the reserved egg white and, using a brush, glaze the entire loaf, including the sides and ends, with the egg wash.
  9. Cover the loaf with plastic and let rise for about 1 hour. Egg-wash the loaf again after rising, and sprinkle with seeds.
  10. Preheat the oven to 375F.  Bake challah for 25-30 minutes, turning 180 degrees once half way through the baking, to ensure even browning. Challah is done when it’s evenly rich brown all over.
  11. Cool challah on rack for 1 hr and enjoy.

Wild Sourdough Challah

eatalready's picture
eatalready

If you’ve been following my blog, you should know very well by now that I am a big fan of home made bread.  I’ve been baking my own wild sourdough bread for a few years now (thanks to my friend Rimma, who showed me the light), wrote about it plenty, and took some pretty decent pictures.  I own about 97 per cent of the currently published good books on artisan bread making (ok, let’s not exaggerate here, it’s more like 93 per cent at the most), and my kitchen, though it has been minimized and downsized in the last two years significantly due to the interstate move, has nonetheless seen a steady increase in various bread making equipment — from proofing baskets, to flax couche (never to be moistened, god forbid!), to parchment, to loaf pans, to grain mill, to cast iron combo… you get the picture.  But, you know, for a true junkie no amount of junk is ever enough.  So today’s post is about my latest acquisition.

Semolina+Sesame+Spelt+Sourdough bread in a stone baker

Semolina+Sesame+Spelt+Sourdough bread in a stone baker

I happened to participate in a staging of our church’s community “garage” sale.  I must admit that I had never before taken part in anything of that sort, so I was quite overwhelmed with both the amount of stuff to be sold and the effort that went into setting this whole thing up.  I am not going to get into too much detail about the event itself; suffice it to say that it took us four full days (volunteer helpers were coming and going in shifts) to get everything ready.  It was a lot of work.

Semolina+Sesame+Spelt+Sourdough bread in a stone baker

One of the perks was the opportunity to see the goods before they became available to public, sort of by invitation only pre-sale.  I had to exercise incredible restraint to keep from buying stuff: we are constantly on a look out for things to get rid of in my house, for the space saving sake, so bringing more stuff would not be wise.  And I held off quite well for the whole three days!  But then the day four came and, as it turned out, someone hauled in a whole truckload of household goods the night before.  We ran out of space in the main hall, so the new arrivals were piled in the spillover room, largely unsorted.  And I just had to go looking… You see, I am a selective pack rat.  I don’t buy things just to have them in vast quantities, and for the most part I only keep what I need.  But when it comes to cooking (both books and wares), I am as good as any hoarder.

Semolina+Sesame+Spelt+Sourdough bread in a stone baker

I found a bunch of stuff which in my past humongous-kitchen-with-many-many-half-empty-cabinets life would be considered as good as sold on the spot.  But in my two years of living small, I have learned to be wise.  I have learned, for example, that single purpose items, such as that pretty dip and chips tray which cannot double as anything else, have no place in my kitchen. And no, I don’t really need that amazingly shaped cookie cutter, and that asparagus pot with a steaming basket1. I was crying on the inside, considering and rejecting one item after another, when I saw this thing of beauty.  I didn’t know yet what exactly I was looking at, but my gut sense was strong, and it told me that it had something to do with bread making. Oh yeah! This was it — the covered loaf pan.  The stoneware pan.

Semolina+Sesame+Spelt+Sourdough bread in a stone baker

You see, I have mastered the covered bread baking in my cast iron combo cooker. It works beautifully on round loaves.  But I have a 14″ proofing basket for Italian style long loaves, and I could never get a nice loaf done without a cover, because other steaming methods just don’t work as well.  Not until now — this stoneware thing held a great promise, and it was the exact size of my proofing basket — a match made in heaven.  And now, my friends, it’s officially time for drooling — this loaf pan was marked at ONE buck.  And I bought it.  And the next day I had to leave to see my family in NYC, so I didn’t get to try it out for another week…

Semolina+Sesame+Spelt+Sourdough bread in a stone baker

I baked the 4S bread which I made and posted about a while back.  The anticipation was tremendous.  I had to look up several things about the stoneware baker. I found that it was, indeed, a very good one.  It had a fancy name, and with fancy name of course came a pretty fancy price.  I totally lucked out! It had no cracks, no fractures, and was reasonably clean inside and out.  Yes, time for that second drool.  The bread came out absolutely superbly shaped.  The bloom was beautiful, almost magical.  The crust was hard at first, and chewy and crackly later.  We got a very tall, very well rounded Italian style loaf of Semolina+Sesame Seed+Spelt+Sourdough bread. Perfection!

Semolina+Sesame+Spelt+Sourdough bread in a stone baker

Semolina+Sesame+Spelt+Sourdough bread in a stone baker

Best buck ever spent, guys!  Oh, and in case you were wondering how I suddenly justified a single purpose item purchase, it can double as regular clay pot.

1 – in case you were concerned about the fate of that asparagus pot, I bought it. I can never cook asparagus well in my small pot, and we planted 25 bushes of three varieties of asparagus this year, so I plan on eating lots of it, it’s my favorite vegetable. So much for not buying single purpose items.

Subscribe to RSS - eatalready's blog