The Fresh Loaf

A Community of Amateur Bakers and Artisan Bread Enthusiasts.

Angelica Nelson's blog

Angelica Nelson's picture
Angelica Nelson

If it's too off topic, my apologies, but it's irresistible. 

How to kneed from r/aww
Angelica Nelson's picture
Angelica Nelson

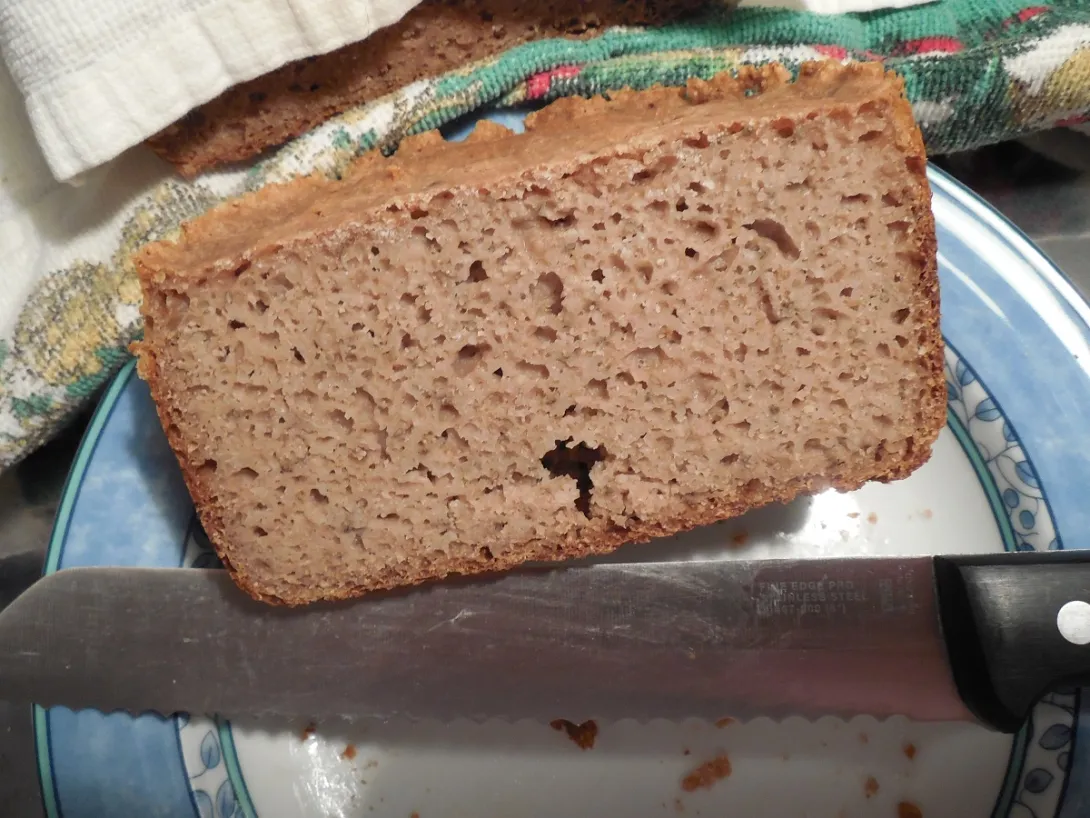
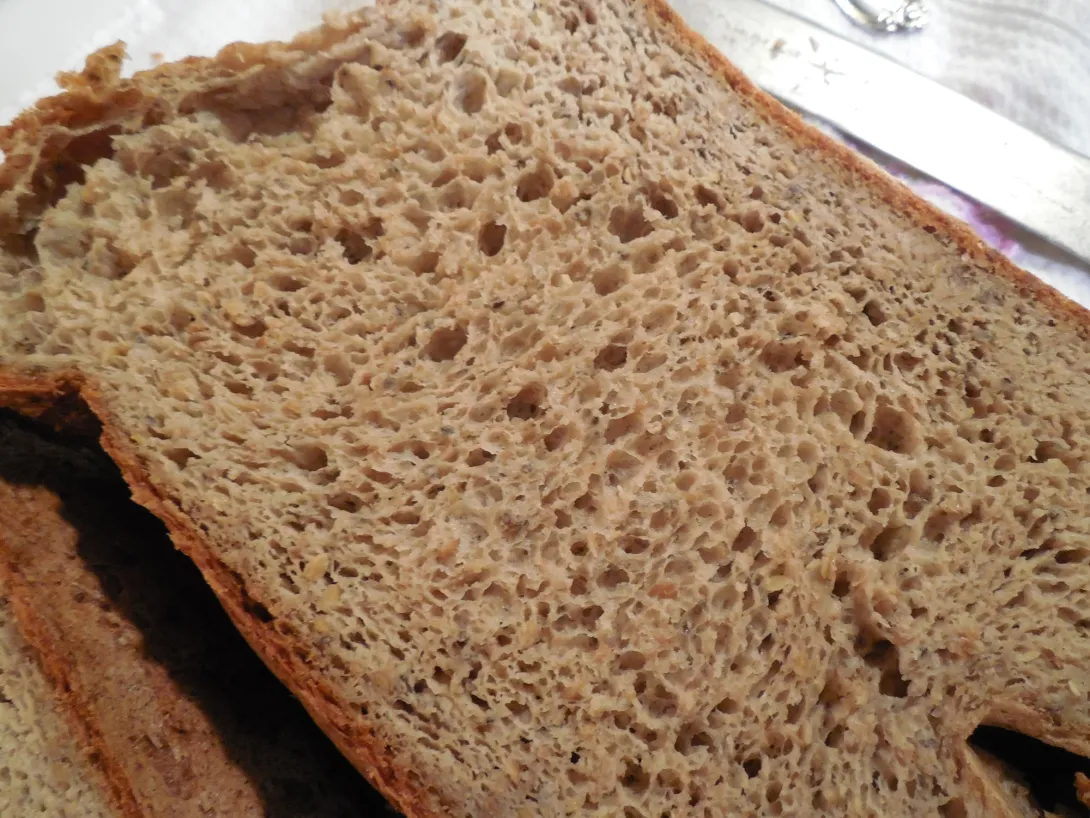
This experiment worked out very well.  It's an everyday bread that I'll be using. It has no egg, only milk, and is suitably simple to use even if you're retired and aren't up for a kneading session.  Most Celiac diagnoses happen after mid-life, so my series is meant to empower everyone to make their own bread, even if they're limited in mobility.  My focus is on nutrition and simplicity.  Please comment and tell me what you think.  There is more detail in the article I'm linking to, but the recipe is reprinted here with a picture of the crumb. The texture is very similar to a classic rye bread.  Which shouldn't be surprising, I baked many a rye loaf when I was able to eat gluten.

Link:  https://www.nixgluten.com/2020/02/gluten-free-whole-grain-rice-buckwheat.html

The big surprise is that processed starches weren't needed to make a very nice bread machine bread that's gluten free. I always suspected that.  Now here's the proof. 

So far it hasn't lasted longer than two days, to check for staling. :)  It doesn't even stick tot he knife when you cut it.  I had a problem with that when I was using egg as a protein network. Not that those breads weren't delish, but this is more recognizably bread and less like a cake that tastes like bread.

Rice and Buckwheat Bread with Chia Seeds

A great tasting gluten free bread, equally good with stew or as french toast.
Allergens: Contains Milk

Equipment:
West Bend 1-3 lb Hi Rise Bread machine --  Whole Wheat Cycle 2.5 lbs, Dark Crust
Vitamix 5200 with Dry grind attachment


Baker's percentages and grams are used. Excluding soaker, 100% hydration.

Soaker:  30g chia seeds + 70g water (set aside for 5-10 min to thicken)

400g rice flour (I fresh ground mine,  this is a good one)
200g buckwheat flour (I fresh ground it, this is a good one)
600g whole milk  (100%)
15g vinegar (2.5%)
15g oil  (2.5%)
15g turbinado sugar (2.5%)
1 packet Rapid Rise yeast (or Bread Machine yeast, or Instant Yeast, these are the same)
    *that's 7g in a packet or around 1% also
6g guar gum (1%)  with the chia also, you don't need much of this
6g salt

Combine, flours, guar gum, and salt in a bowl and set aside.

In the Bread machine container, add milk, sugar and soaker.

On top of the milk mixture, put the flours mixture.  Don't stir.  Make a hole or channel in the top, and put the yeast there.

Along the side, slide in the oil and vinegar, just before starting the machine.  That is to say, set the settings for the machine, pour in the oil/vinegar, and press Start.  Since we're using milk and vinegar, I'd rather not take a chance at curdling the milk.

My machine takes 3 and 1/2 hours for the whole wheat cycle. Don't open it in the last stage of rising and baking, it can collapse, otherwise, feel free to scrape the sides down in earlier stages if you feel it needs it.  But it shouldn't need that. This dough works pretty well, hands off.

Important Note:  Using a thermometer I've noticed that the bread in a bread machine doesn't always get to fully cooked temperatures.  This is even more important when you're baking gluten free.  So either use a thermometer that can monitor the temperature and beep when it's at 210 degrees F in the center of the loaf, or do what I do....  leave it on Keep Warm after it's finished for another 45-60 minutes, then cool on the countertop for another 2-12 hours.  All this is before slicing. It will be worth the wait.  

Angelica Nelson's picture
Angelica Nelson

Multigrain Bread Machine Experiment 7


Whole wheat cycle 3 lbs dark crust  + 45 min baking cycle (207 *F baking alarm)
For oven baking:  the equivalent is baking at 350*F for approximately 1 hour 45 minutes.

100g ground flax seeds   2/3 cup
50g chia seeds                 1/4 cup
40g collagen                   1/4 cup

----  190g "GF soaker" flours total, about 1 1/3 cup
------------% soaker flour: 22%  (of total flour)

115g coconut flour            1 + 1/3 cups
 250g Namaste flour         2 cups
150g almond flour            1 + 1/2 cups
150g ground buckwheat   1 + 3/4 cups

---- 665g  total dry flours, about 6 2/3 cups
----------  855g  total all flours

15g salt
14g 2 packets Instant Yeast, mixed into dry flours
70g sugar

---- these don't count toward liquid or flour

150g water 2/3 cup  , heated in microwave 30 sec, to mix with sugar
690g water, 3 cups, to mix with "GF soaker" flours
200g eggs 4 large
70g oil 1/4 cup
20g vinegar 2-3 tsp

---- 1130g all liquids

Hydration:  132%  !!!  (I can hear baking pans falling to the ground all over the Midwest.)
              I pushed the hydration all the way to 169% which is close to the hydration of a "levain" but the result is longer and longer baking time without any visible benefit. It doesn't ruin the bread but there's not much point in it either. 


Grind flours that need it (flax, buckwheat)

Measure and combine flours, with salt and yeast.

Measure and combine soaker ingredients.  Add 690g warmed water (about 110*F) and mix very well. You may need to use a food processor if it clumps up.  Beat some air into it.

Beat eggs, oil and vinegar together.

Warm  the water for 30 sec in microwave. This is to hot for yeast, but it will cool when it's mixed with the other ingredients. For instance, in this recipe, you don't need to warm the eggs. When the liquids mix together, they will be just lukewarm.

Assemble the paddles in the bread machine pan.  To avoid spills, fill the pan with all ingredients except 1/2 of the flour mixture while it's out of the machine.

Start the cycle and add the rest of the flour in batches over the next 5 minutes.  When needed, help the machine to mix.  Once the bread is mixed, this recipe doesn't have many other problems, except baking time may need to be extended.

Use a thermometer with an alarm for best results, it may take a long time to get the bread up to 205*F or higher.


===========================

Ideas and suggestions welcome :)


Angelica Nelson's picture
Angelica Nelson

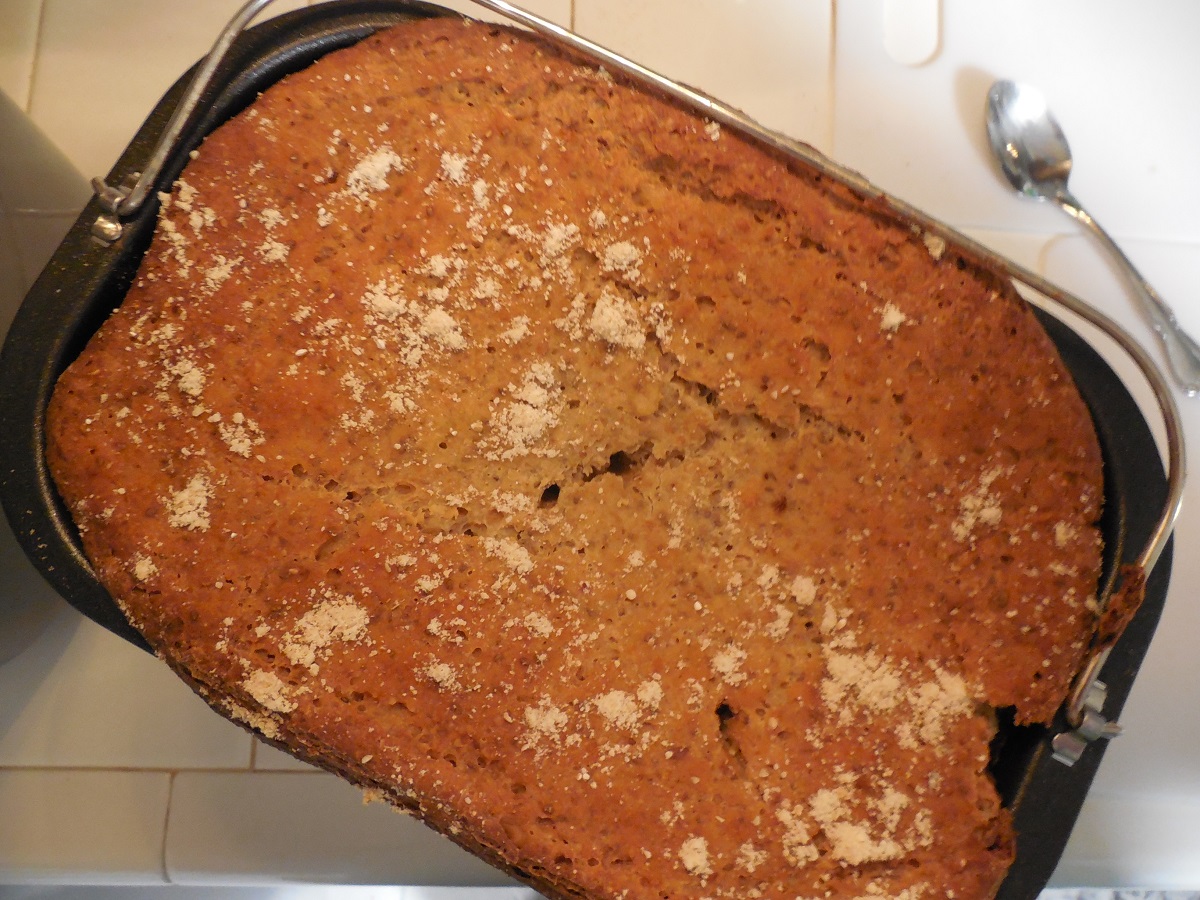
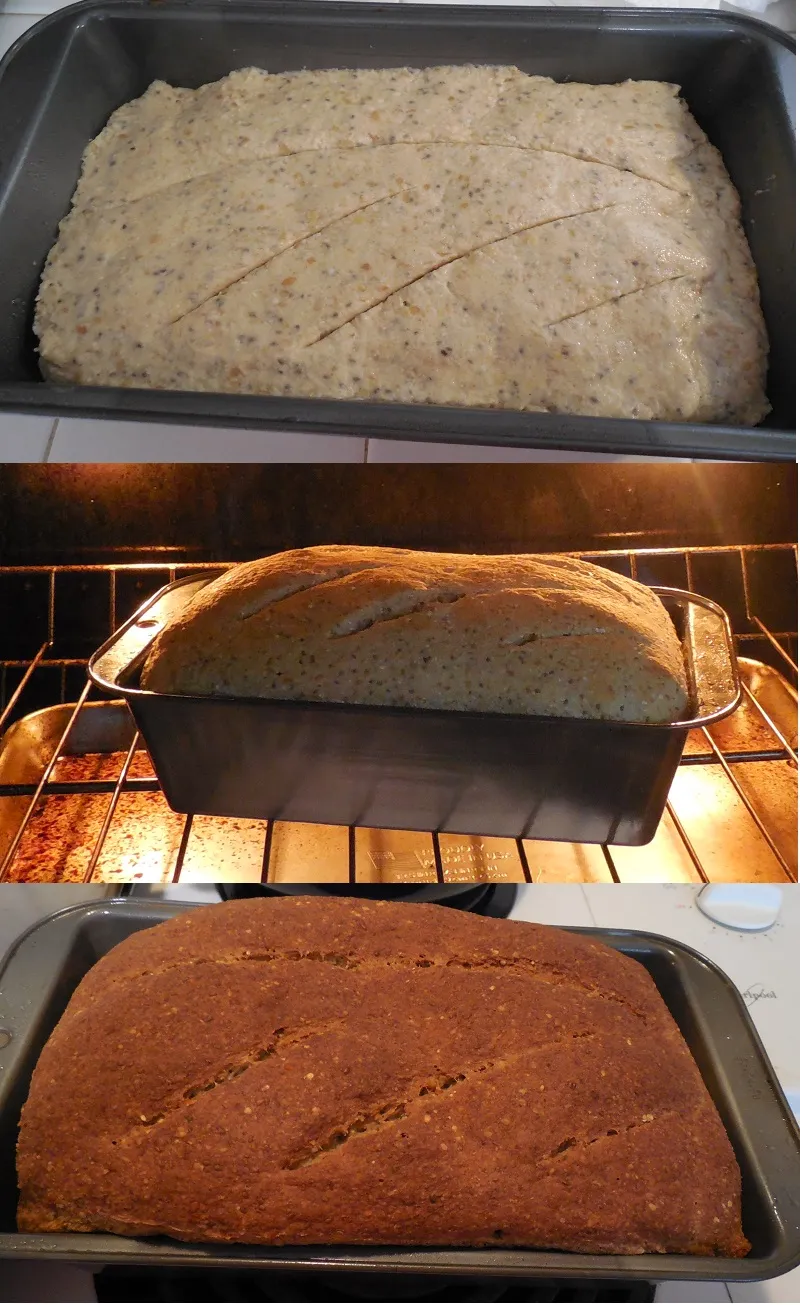
During baking there was a nice oven rise but it shrinks by the end of the baking time.  I'm guessing it's because of water loss. 

This bread recipe is gluten free and I've read before that the shrinking of bread after baking happens a lot more in gluten free bread making.  I've never seen anyone explain why this is, though.  It just is.

If this was a wheat bread and this happened, what would be the reason?  Too much yeast?  Too much water?  I'd like to do what I can to minimize it.  Maybe if I added bean flour?  I have some mung beans that I could sprout, mash and add to a bread recipe.

Here's the size of the bread after complete cooling, and the crumb structure (which is really nice for a GF bread).  The recipe is here:  https://www.nixgluten.com/2019/11/substantial-sandwich-bread-recipe-part-5.html

Angelica Nelson's picture
Angelica Nelson

There are many reasons why I want to make a bread machine work in my life.  I've baked bread the long way and I love to do that. But my spine no longer wants me to stand up straight, and I get winded just walking the length of my house.  Kneading is fun and I love it, but it hurts now.  Bending over is a roulette of dizzy spells.  So having something on my counter that requires no reaching for parchment paper and pans, no preheating of oven and bending over to load/unload it, no kneading, etc... that's helpful right now.  When/If I recover, I'll go back to something more active.

There's another reason. People with Celiac disease already have enough issues with food.  Why make them go through the ritual of baking the long way when a machine could actually fulfill the duty with only a small loss of quality?  Gluten free bread is around $8 a loaf right now, near me.  It can be as much as $11 if it's an "artisan" loaf.  I've paid $15 for a local baker's truly wonderful loaf of gluten free bread.  I don't begrudge anyone the profits, but I can't do that forever. Hardly anyone can. 

And there's another reason still.  As people get older, the chances of latent Celiac genes becoming active increases.  In the US, 1 in 133 people has Celiac already active. But that says nothing about how many people have the genetics.  And because it's one of those things that activates, the elderly are the largest group of people with Celiac.  The elderly have the greatest need for gluten free, yet they can least afford it.  And the difference between baking bread the long way and using a bread machine could make the difference for someone. 

And another reason:  Not everyone tolerates xanthan gum.  But if you eat gluten free, it's hard to avoid it.  Only by baking for yourself can you fully avoid it.

So having a decent bread machine is important to a certain group of people.  That's why I'm dedicated to finding a way to get along with a bread machine, even though it does things like you see in the image above.  I literally couldn't find any advice for that sort of problem anywhere.  I puzzled it out by watching youtube videos until I saw someone do what I did and realized why that crater had formed.  But it should never have formed at all. 

I think people deserve better equipment than this.  I ended up kneading that dough by hand and that's the whole purpose of having a bread machine in the first place.  I don't expect artisan results, but I do expect that I can at least avoid the kneading part if I buy an appliance designed to do that. And maybe it's a pipe dream, but I also expect a decent manual that tells you the timings of  the kneading and rise portions of each cycle, so you can plan what you want to use.

The full blog entry is here: https://www.nixgluten.com/2019/11/the-great-gluten-free-bread-machine.html

Angelica Nelson's picture
Angelica Nelson

I've been experimenting with a new bread machine and gluten free.  And it hasn't turned out too badly so far.  There's a series I'm going to keep up until I feel like using the bread machine has become "routine" at https://www.nixgluten.com/2019/10/the-great-gluten-free-bread-machine.html There's also a part 2 so far.  Here are some pics from the experiment.

Cinnamon Raisin bread:

My frist experiment cinnamon raisin bread


Shrinkage over 90 min after baking

After baking shrinkage over 90 min

I'm breaking all the rules of using a bread machine and exposing both success and failure.  Comments are welcome here or there.

My goal is to stop paying thru the nose for gluten free bread, which I need.

Update

Recipe

Gluten Free Every Day Bread Machine Experiment 2

Ingredients:

Uh, I meant Flax :)


1 cup Namaste flour, gluten free, organic (this is the starchy flour)
1 cup Bob's Red Mill Almond Flour  (Not Organic, I can't afford that, heh)
1/2 cup  BRM buckwheat  groats, ground in a coffee grinder  until it's flour

1/2 cup flaxseed, divided in two parts and ground
2 Tbsp chia seed
2 Tbsp psyllium seed powder

1 and 1/2 cup water and 2 tsp salt in a large bowl
3 eggs

1/2 cup water (warm)
3 heaping tsp sugr
2 1/4 tsp yeast

Steps:

Yeast


Combine warm water, yeast and sugar and stir.  Allow to become slightly frothy.  This time I didn't let it form a thick "head" because I just wanted it awake.

Prepare the "gluten free sponge" by combining half of the flax seed, the chia seed and psyllium powder with the 1 and 1/2 cups of water and salt.  Stir vigorously until some bubbles are incorporated. Beat 3 eggs into it.

Measure the flours and have ready.

Place paddle in bread machine.

Add the warm water/yeast mixture.

"Gluten Free Sponge"

Add the conditioners/gels mixture.

Add the flour mixture.

Set machine on Dough Cycle and watch at first to be sure it combines properly.  Help the machine mix if needed.

If remembered, remove the paddle after the second mixing, and before the second rise gets going.

If the dough has risen to the top edge of the pan by the end of the Dough cycle, you may proceed to Baking the dough with the "Bake" cycle.

Allow the bread to stand for at least 1 hour, best is 3 hours.  Then slice and enjoy!

I wrap the bread in cloth for one day, then store what's left in Tupperware in the fridge. 


Flavor:  Superb, it smelled even better several hours later.  Only sourdough would be a better flavor than this.  And buckwheat gives such a nice warm flavor.


Uses:  Works equally well with jam, or sausage and mustard. 


Believe it or not, there's still room for improvement in this loaf. It fell because it formed a popover type of top. That's cute in a pastry but not so cute in bread.

Subscribe to RSS - Angelica Nelson's blog