If you've ever made French bread at home, you've made pizza dough. Traditional, DOC (Denominazione de Origine Controllata) designated pizza dough from Italy contains nothing but flour, salt, water, and yeast.
The dough at most neighborhood pizza joints contains a few more ingredients. Fats are added to make the dough more supple, and sugars are added to feed the yeast and give the bread a touch of sweetness.
I suggest that home bakers begin with a simple, versatile pizza dough recipe like the one below. Once you've got that under control you can experiment to find something more to your liking.
Realize that you are going to give your pizza a lot more TLC than the employees at most chain pizza places do. If teenagers working at Dominos for 6 bucks an hour can make a decent pizza, you shouldn't have any problem doing it yourself at home!
A Versatile Basic Pizza Dough
This is the Neo-Neapolitan Pizza Dough from Peter Reinhart's American Pie. It is a low-yeast, slow-rising dough with enough suppleness to make it easy to work with. I find it to be the most versatile dough recipe I've come across.
At the end of this article I will talk about how to modify it to better match your preference in pizza dough style. But, first things first:
Combine all of the ingredients in a large mixing bowl and stir vigorously with a wooden spoon or mix in an electric mixer. After you've combined all of the ingredients, set the dough aside to rest for 5 minutes. Stir again for 3 to 5 minutes, adding more water or flour if necessary. Generally speaking, you want the dough to be wetter and stickier than your typical bread dough. It should be dry enough that it holds together and pulls away from the side of the bowl when you mix it, but it doesn't need to be dry enough to knead by hand.
Divide the dough into 4 pieces. Place each one into an oiled freezer bag. I just squirt a couple of sprays of spray oil into the bag. You can also brush the outside of the dough with olive oil and then place it into the bag. All that matters is that you be able to get the dough out of the bag later.
If you aren't going to bake them that day, you can throw the bags into the freezer. They'll stay good in there for at least a month. The evening before you intend to bake them, move the frozen dough balls to the refrigerator to thaw.
If you intend to bake them later that day, place the bagged dough balls in the refrigerator. Remove them from the fridge and let them warm to room temperature an hour or two before you intend to bake them.
Remember that, as a baker, time is your friend: longer, slower rises at reduced temperature result in better tasting bread. But sometimes you don't have the luxury of time - that is OK; this dough will still work well if only given an hour or so to rise at room temperature. Allowing pizza dough to rise is more about giving the yeast time to bring flavors out of the wheat than it is about leavening. Most of the leavening occurs when you put the active dough into the hot oven, so you don't need to wait until the dough balls double in size.
Surely you can prepare the dough an hour before baking, can't you? That'll give you time to make the sauce, grate the cheese, and get the oven hot. Speaking of which, it is time to put together a sauce.
Getting Saucy
Once again, there are a million different pizza sauces. If you already have one you like, feel free to stick with it. Or consider doing something totally different, like using pesto or barbecue sauce instead of a tomato sauce.
I throw this recipe out because it takes under 3 minutes to make and is quite good. Once again, it is from Peter Reinhart's pizza book.
Stir everything together. If the tomatoes are too chunky, break them up with your fingers.
Fresh tomatoes or herbs can be substituted for canned tomatoes and dried herbs. The fresh tomatoes don't even need to be cooked first, since the time in the oven baking is enough to cook them.
Shaping
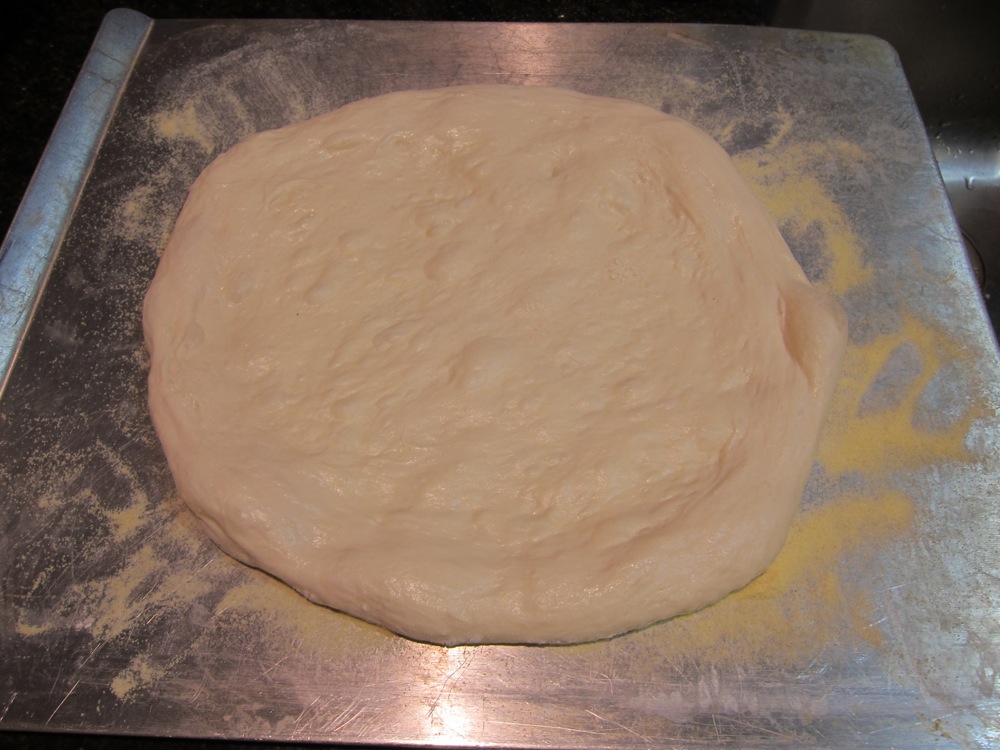
I am not experienced enough to do the whole "throw the pizza into the air" thing. My technique for shaping the dough is extremely simple. I pick up a ball of dough and gentle stretch it into a circle. Once I've got a circle four or five inches across, I hold it up by the edge and, while rotating it, let the weight of the rest of the dough pull it down to stretch it out.
When I start feeling resistance in the dough, I set it down on a lightly greased plate to rest for 5 or 10 minutes. Then I pick it up again and stretch it a little thinner before lying it down to add the toppings.
I like to stretch my dough quite thin, until it is almost transparent. If you like thicker pizza dough then, obviously, don't stretch it out so much.
You can use rolling pin to shape the dough. Doing so results in a more uniform dough with numerous small holes. I personally like the dough to be thinner in the center than the edge and to have a thicker, bready crown full of large irregular holes around the outside. This effect is difficult to achieve with rolling pin, but if that suits your taste then go for it.
Topping and Preparing for Baking
Before you put the toppings on the dough, you need to know on what surface you intend to bake the pizza. If you have a pizza stone, it should be put in the oven and getting hot (450 or 500 degrees) by now. If not, the back of a cookie sheet works fine.
If you are going to try transferring your pizza from one surface (like a peel or a cookie sheet) to another (like a hot pizza stone), I strongly recommend using parchment paper under the pizza. Particularly if you are going to add a lot of toppings to the pie: the extra weight pressing down tends to make the dough stick to the surface you dressed it on. You could also try to sprinkle corn meal or semolina flour on the surface hoping that will be enough to let you slide the dough without sticking - in my experience, though, it rarely is; I've had many pizzas end up looking like roadkill because they wouldn't to come off the peel smoothly. I've cut the number of swear words I use in the kitchen in half just by springing for a 5 dollar roll of baking parchment and placing a piece of it under the pizza. I just grab a corner of the paper and tug it into place when it is time to slide the pizza into the oven. Much, much simpler.
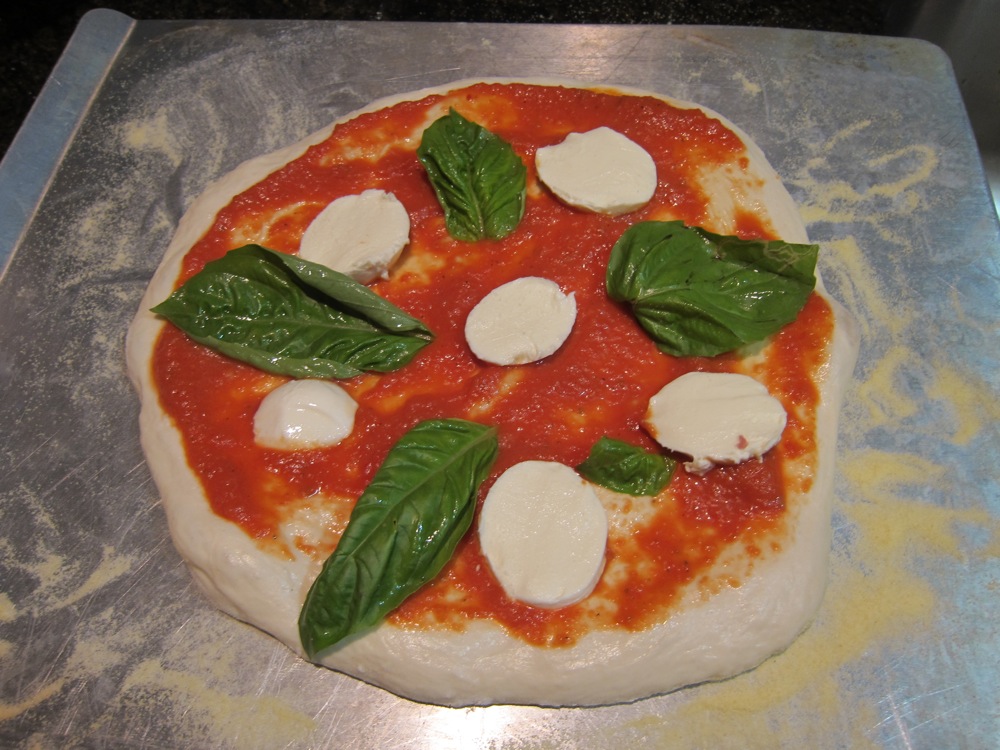
Whatever surface you decide to dress the pizza on, sprinkle it with corn meal or semolina flour and spread the dough over it. Add the sauce, the grated cheese (typically mozarella and parmesan, but there is no reason you can't improvise), and toppings.
Baking
As I mentioned earlier, most of the rise you get from pizza dough actually happens in the oven. Professional pizza ovens are much hotter than home ovens. At home you typically want to make pizza at the highest temperature that your oven can safely handle, like 450 or 500 degrees. Baking on a pizza stone will give your dough a little more pop when it gets in the oven but it is not necessary to make good pizza.
If not the lowest shelf, then the second to lowest is probably the best place to bake your pie. You want the pizza to be as close to the heat source as is possible without burning. But every oven is different, so adjust accordly.
Place the pizza in the hot oven, close the door, and let it bake for 5 minutes. Check it every minute or two until the cheese is melted and the dough looks baked. In my oven with the size pizzas I make, I bake them for 7 to 9 minutes.
Pull them out, slice them, and eat!
The Pizza Spectrum
As I mentioned, there are dozens of dough recipes for the endless different styles of pizza. The most traditional recipe includes nothing but flour, yeast, salt, and water. Adding a little bit of oil makes the dough more supple so that it can be stretched easier and is softer to the bite. Adding a touch of sugar gives the yeast something to snack on. And more yeast can be added to guarantee a rise even for heavily topped pies.
Some general recommendations, based on a couple of the more popular styles of crust:
Any of the other techniques you've learned for baking bread can be adapted for pizza: sourdough, the sponge method, including whole wheat flour, even grilling, which I will write about when the weather warms up. So use your imagination!
If other folks have dough recipes they've had good experience with, I'd love to have them share them below. Please specify what style dough it makes.
The dough at most neighborhood pizza joints contains a few more ingredients. Fats are added to make the dough more supple, and sugars are added to feed the yeast and give the bread a touch of sweetness.
I suggest that home bakers begin with a simple, versatile pizza dough recipe like the one below. Once you've got that under control you can experiment to find something more to your liking.
Realize that you are going to give your pizza a lot more TLC than the employees at most chain pizza places do. If teenagers working at Dominos for 6 bucks an hour can make a decent pizza, you shouldn't have any problem doing it yourself at home!
A Versatile Basic Pizza Dough
This is the Neo-Neapolitan Pizza Dough from Peter Reinhart's American Pie. It is a low-yeast, slow-rising dough with enough suppleness to make it easy to work with. I find it to be the most versatile dough recipe I've come across.
At the end of this article I will talk about how to modify it to better match your preference in pizza dough style. But, first things first:
The Dough:
Makes 4 10-inch pizzas
5 cups all purpose flour
1 Tablespoon sugar or honey
2 teaspoons salt (or 3 1/2 teaspoons kosher salt)
1 teaspoon instant yeast
2 Tablespoons olive oil
1 3/4 to 2 cups room-temperature water
Combine all of the ingredients in a large mixing bowl and stir vigorously with a wooden spoon or mix in an electric mixer. After you've combined all of the ingredients, set the dough aside to rest for 5 minutes. Stir again for 3 to 5 minutes, adding more water or flour if necessary. Generally speaking, you want the dough to be wetter and stickier than your typical bread dough. It should be dry enough that it holds together and pulls away from the side of the bowl when you mix it, but it doesn't need to be dry enough to knead by hand.
Divide the dough into 4 pieces. Place each one into an oiled freezer bag. I just squirt a couple of sprays of spray oil into the bag. You can also brush the outside of the dough with olive oil and then place it into the bag. All that matters is that you be able to get the dough out of the bag later.
If you aren't going to bake them that day, you can throw the bags into the freezer. They'll stay good in there for at least a month. The evening before you intend to bake them, move the frozen dough balls to the refrigerator to thaw.
If you intend to bake them later that day, place the bagged dough balls in the refrigerator. Remove them from the fridge and let them warm to room temperature an hour or two before you intend to bake them.
Remember that, as a baker, time is your friend: longer, slower rises at reduced temperature result in better tasting bread. But sometimes you don't have the luxury of time - that is OK; this dough will still work well if only given an hour or so to rise at room temperature. Allowing pizza dough to rise is more about giving the yeast time to bring flavors out of the wheat than it is about leavening. Most of the leavening occurs when you put the active dough into the hot oven, so you don't need to wait until the dough balls double in size.
Surely you can prepare the dough an hour before baking, can't you? That'll give you time to make the sauce, grate the cheese, and get the oven hot. Speaking of which, it is time to put together a sauce.
Getting Saucy
Once again, there are a million different pizza sauces. If you already have one you like, feel free to stick with it. Or consider doing something totally different, like using pesto or barbecue sauce instead of a tomato sauce.
I throw this recipe out because it takes under 3 minutes to make and is quite good. Once again, it is from Peter Reinhart's pizza book.
The Sauce:
1 28oz can crushed tomatoes
1 teaspoon dried basil
1 teaspoon dried oregano
1 Tablespoon garlic powder or 4 or 5 cloves of crushed garlic
2 Tablespoons red wine vinegar or lemon juice, or a combination of the two
salt and black pepper to taste
Stir everything together. If the tomatoes are too chunky, break them up with your fingers.
Fresh tomatoes or herbs can be substituted for canned tomatoes and dried herbs. The fresh tomatoes don't even need to be cooked first, since the time in the oven baking is enough to cook them.
Shaping
I am not experienced enough to do the whole "throw the pizza into the air" thing. My technique for shaping the dough is extremely simple. I pick up a ball of dough and gentle stretch it into a circle. Once I've got a circle four or five inches across, I hold it up by the edge and, while rotating it, let the weight of the rest of the dough pull it down to stretch it out.
When I start feeling resistance in the dough, I set it down on a lightly greased plate to rest for 5 or 10 minutes. Then I pick it up again and stretch it a little thinner before lying it down to add the toppings.
I like to stretch my dough quite thin, until it is almost transparent. If you like thicker pizza dough then, obviously, don't stretch it out so much.
You can use rolling pin to shape the dough. Doing so results in a more uniform dough with numerous small holes. I personally like the dough to be thinner in the center than the edge and to have a thicker, bready crown full of large irregular holes around the outside. This effect is difficult to achieve with rolling pin, but if that suits your taste then go for it.
Topping and Preparing for Baking
Before you put the toppings on the dough, you need to know on what surface you intend to bake the pizza. If you have a pizza stone, it should be put in the oven and getting hot (450 or 500 degrees) by now. If not, the back of a cookie sheet works fine.
If you are going to try transferring your pizza from one surface (like a peel or a cookie sheet) to another (like a hot pizza stone), I strongly recommend using parchment paper under the pizza. Particularly if you are going to add a lot of toppings to the pie: the extra weight pressing down tends to make the dough stick to the surface you dressed it on. You could also try to sprinkle corn meal or semolina flour on the surface hoping that will be enough to let you slide the dough without sticking - in my experience, though, it rarely is; I've had many pizzas end up looking like roadkill because they wouldn't to come off the peel smoothly. I've cut the number of swear words I use in the kitchen in half just by springing for a 5 dollar roll of baking parchment and placing a piece of it under the pizza. I just grab a corner of the paper and tug it into place when it is time to slide the pizza into the oven. Much, much simpler.
Whatever surface you decide to dress the pizza on, sprinkle it with corn meal or semolina flour and spread the dough over it. Add the sauce, the grated cheese (typically mozarella and parmesan, but there is no reason you can't improvise), and toppings.
Baking
As I mentioned earlier, most of the rise you get from pizza dough actually happens in the oven. Professional pizza ovens are much hotter than home ovens. At home you typically want to make pizza at the highest temperature that your oven can safely handle, like 450 or 500 degrees. Baking on a pizza stone will give your dough a little more pop when it gets in the oven but it is not necessary to make good pizza.
If not the lowest shelf, then the second to lowest is probably the best place to bake your pie. You want the pizza to be as close to the heat source as is possible without burning. But every oven is different, so adjust accordly.
Place the pizza in the hot oven, close the door, and let it bake for 5 minutes. Check it every minute or two until the cheese is melted and the dough looks baked. In my oven with the size pizzas I make, I bake them for 7 to 9 minutes.
Pull them out, slice them, and eat!
The Pizza Spectrum
As I mentioned, there are dozens of dough recipes for the endless different styles of pizza. The most traditional recipe includes nothing but flour, yeast, salt, and water. Adding a little bit of oil makes the dough more supple so that it can be stretched easier and is softer to the bite. Adding a touch of sugar gives the yeast something to snack on. And more yeast can be added to guarantee a rise even for heavily topped pies.
Some general recommendations, based on a couple of the more popular styles of crust:
- Thin and Crackery - Add less (or no) oil. Try using some high protein bread flour, like one out of five of the cups. Stretch the dough extremely thin. Bake it on a pizza stone or as close to the heat source as possible without burning it.
- Thick and Chewy - Substitute milk for half of the water. Add more oil or shortening to the dough. Increase the sugar and the yeast by half again. Don't roll the dough out so thin. Bake it up a shelf or two in the oven so that it can bake longer without burning.
Any of the other techniques you've learned for baking bread can be adapted for pizza: sourdough, the sponge method, including whole wheat flour, even grilling, which I will write about when the weather warms up. So use your imagination!
If other folks have dough recipes they've had good experience with, I'd love to have them share them below. Please specify what style dough it makes.
Comments
Hi Elagins - this is really going back in time. Where did you get your Taiwan pizza stones? What brand is it?
Thanks for sharing.
CarboKing
Hello,
I saw your post and wanted to ask about the super peel. This is the first time I'd ever heard of it and wonder why its so spectacular.
I recently received a peel (14x16) metal sheet with wood handle. It seems to work fine for me. Very similar to what was used at a pizza restaurant I worked at some years ago and baked hundreds of pizzas and hot sandwiches using this kind of peel without any problems.
But when I use the peel, I use parchment paper rather than cornmeal for a smoother transport to the oven.
I think this peel I received only cost about $20 through Amazon.
So it brings me back to my question of... What makes the pizza peel so much better? (and I'm not trying to sound disrespectful or anything.) I'm just curious.
Thanks,
Tory
Hello!
I'm new to baking. Maybe the answer is clear, but when you use parchment paper under your pizza when the pizza is on the peel, do you remove the parchment paper when you put the pizza in the oven? Do you just pull it out or do you leave it in? Thanks!
Gingit
Depending how hot your oven is will tell you when to remove the parch. Example; 550F, remove parch after 99 sec, that's my way. Otherwise when the parch gets very dark/brown lift pie with large spatula and pull out parch.
Jim
Floydm-dinner was to be seared tuna and a salad...we now have pizza dough in the fridge...I blame the picture!! Too good to pass by.
Thank you..I think....
Hi all--
I'm really enjoying the site! I'd been searching all over for instructions for using the sponge method since watching Aston Brown bake on a pizza stone, and I'm find the recipes here are inspiring.
I have a pizza crust recipe I've developed that has a lot of ingredients in it, including fresh garlic, honey, and herbs:
http://www.gourmand2go.com/pizza_crust.html
As you can see from the first pic, the focus of the pizza is the crust, and it's quite filling. At the bottom of the page is a recipe for yeastless crust with buttermilk, which is handy when you have less time and also makes a thinner, crisper alternative.
Let me know how it turns out if you decide to try it!
I've just found a great book on peppers written by a publisher: <i>The Pepper Harvest Cookebook<i> by Barbara Ciletti. It includes a Marinara Pizza Sauce which I haven't yet tried, but intend to.
5-6 lbs. ripe tomatoes, chopped
2 purple or red bell peppers, chopped
1 cayenne chile, or 1 1/2 tsp red pepper flakes
1/2 cup sugar
3 tbls salt
1/2 cup fresh oregano
5 cloves garlic, chopped
Combine ingredients in large saucepan and simmer over medium-low heat 35-45 minutes, or until bubbly. Stir to prevent sticking.
When mixture reaches desired thickness, pour into hot, sterilized jars leaving 1/4 inch headspace. Screw lids and rings tightly and process 20 minutes in boiling-water bath.
Yield: 5 pints
I think I'd be inclined to use the tiny jam jars so I wouldn't have left-overs from one or two pizzas, but at least the hot chili will discourage mold growth if kept in the frige. I'd also like to try roasted jalapenos and pure with a hand blender toward the end.
Gourmand2go
I made this tonight instead of finishing up the corned beef and cabbage. My wife and daughter loved it and the crust was perfect. I used 1 cup of King Arthur Italian style flour and 4 cups of AP as called for. The other thing I did outside of the recipe is before I top the pie, I bake the shell for about 3 minutes completely clean. It started to raise like focaccia but even with multiple toppings it didn't get soggy on the bottom center. My wife paid me the ultimate complement when she said "you made it look so easy". Which of course it was. Our last attempt was more entertaining since the dough was more like rubber. This was nice and smooth and easy to work with.
Thanks Floyd for all you do!
Eric
Hi Floyd! Just wanted to report that the pizza turned out the best yet! It was exceptional from my perspective. So the technique part helped and the PR recipe was terrific!
I think I need to make a tweek to the sauce because my canned tomatoes were pretty watery. If I used Del Monte again, I will probably drain them first before squishing them (I used the diced tomatoes) so they were a little wet. But the flavor of the crust was awesome.
Crisp on the outside and tender on the inside. By the time I baked the second pizza, the dough was so supple. I'm learning that term should really be extensible.
Thanks again for this step by step guide, Floyd!
Cheers!
I try to avoid developing brand loyalties, but I have to admit, the best and most consistent pizza sauce that I have made so far has been with 6 in 1 brand tomatoes. Of course some sort of labor intensive, home-grown, organic something or other would be better. However, I have found that a can of 6 in 1, with all your favorite herbs in a one quart mason jar with lid makes a very good sauce in just minutes. Nothing extra to clean, not much of anything to prep. You don't even need a spoon! Just put in all the ingredients, tighten the lid and shake. In fact, if you make the sauce ahead of time, you can use dried herbs and allow the sauce to mellow and mix, and the sauce will actually be nice and deep with plenty of flavor. That makes it about a 2 minute sauce! And it is already in a jar, so if you don't use it all, you can just pop it right in the fridge.
-Loafer
Has anyone cooked P. Reinhart's dough (thanks Floyd for the recipe) on a grill? Do you just do the standard cook one side, flip, cover in olive oil, toppings, place back on grill?
Thanks
SD Baker
PS, made the dough on the Cooks Illustrated homepage. If you don't have an account, it's a free link at the moment. Approx 90 min rise time. Taste was great, but my pizza dough spreading skills could use some work. The sticky dough was hard to roll, so the hand method worked ok - just not round. Artisan Pizza?
One lesson is that wetter doughs are probably pressed/worked better OFF the peel..had some sticking on the peel after I put pressure on the dough.
Oh.. don't forget to place the toppins on the 1st cooked side! Made that mistake once. One side gets VERY cooked if you don't.
Fewer toppings seems to work better given the relatively quick cooking time.
I am experimenting with adding wood chips to increase the smoke flavor.
What a great summertime project!
SD Baker
We used to have a Weber that just took wood or charcoal and we cooked everything on it, always using wood, but I never made pizza, darn it. Wish we had that Weber still, I'd try it. It would be hard to get the heat just right I guess. Would take some experience. Thanks for your post. weavershouse
When I do pizza on the grill, I just skip the stone and grill right on the grate. With or without wood chips, it turns out nice and smoky flavored.
Nancy
Lately I haven't even been soaking the chips in water for short cooking foods. I just throw a small handfull on the back grate. If they are too small, they will fall through the grate.
SD Baker
I've been studying pizza making for about 6 months and after a lot of trials and recieving great advice, I learned a few tricks that may be helpful to you. With these tips, I finally made what I felt was a true NY pizza.
I buy my cheese from a local pizzeria. It is a brand called Grande. They sell it to me already grated for $6 a pound. To my knowledge you can only buy it through a commercial food service and it is a fabulous cheese. They say they mix it with a little grated provolone, but I have not. My pizzeria shared with me the importance of using part skim mozzarella cheese. They said it has more moisture in it and that makes the cheese melt more freely than whole milk mozzarella.
Another very tasty spice to put into your sauce (in addition to garlic, oregano, basil, sugar, salt and pepper) is fennel. Several of the pizza chef's I've corresponded with say they use it. I did and it gave the sauce that little flavor that made it taste just like a delicious NY pizza. Note, some chefs only use basil and some only oregano. Some don't use pepper. Others use only red pepper, not black. I just needed to find the recipe for the sauce that suited my taste.
I bought the stone that goes into your gas BBQ. It was about $80 if I remember correctly. I fire up the BBQ on high as I begin to assemble my pizza. I put the dough, after shaping it, onto a pizza screen that I bought from our local restaurant supply company (only a few dollars). I know Williams-Sonoma sells it, but you can Froogle it and find it cheaper.
Then when assembled I put the screen in the BBQ on the stone, close the lid and lower the heat down to medium. The use of the BBQ to bake the pizza was an incredible find.
Just about 3 minutes later the pizza is perfect.
Key to a great crust is to let it sit in a platic bag coated with olive oil in the refrigerator for 3-4 days. It makes a significant difference. You can use either a basic french dough recipe, or add some sourdough starter to the dough and it tastes even better. One basic french bread recipe will make several pizza's depending on the size of the pizza (i.e. three to four 12inch pizzas).
Also, the BBQ fires up to over 900 degrees, which is what you really need to bake an amazing pizza. My home oven only goes to 500, and until I bought the BBQ stone, I never could get the pizza quite right. I also didn't know before to let the dough develop flavor in the refrigerator. It helps the sauce too to sit in the refrigerator for 2-3 days.
The chef's also taught me to drizzle a little olive oil over the cheese and sprinkle with oregano. This was another step that gave the pizza a much more authentic NY taste.
Finally, there are several pizza chefs who you can correspond with who love to share information on their passion. It is a lot of fun to write them and learn about their techniques. There are also some good DVD's out there that I've enjoyed watching. They also gave me some additional insights around perspectives on flour and favorite millers as well.
Hope these tips are helpful.
This is the recipe for crust and sauce that my mom has used as long as I can remember (I'm 40) and it's delicious. It makes a crust in between thick and thin - what I think of as 'homestyle'. I've used the dough for quick focaccia in a pinch, mix in some herbs and sun-dried tomatoes and sprinkle with caramelized onion and fresh parmesan. The sauce is tangy and not too thick. Hope you enjoy it!
I'm planning to try the recipe above and see how they compare. I'd like to be able to make a thin, cracker type crust and might try to modify Mom's recipe to this effect. I'll keep you posted!
Apryl
Mom’s pizza recipe
Crust (makes 2)
Mix:
1 package active dry yeast
1 cup warm water
Let stand 10 minutes to dissolve
Add:
1 tsp. salt
½ tsp. sugar
2 Tbsp. olive oil
3 cups unsifted flour
Knead in bowl until smooth and elastic. Place in oiled bowl to rise. Let rise 1 hour in warm location.
After dough has risen, roll in oil and spread on pizza pan. Bake 10 minutes at 400° F. Top with sauce, cheese, and desired toppings. Bake an additional 20 minutes or until cheese is bubbly and golden brown.
Sauce (enough for 4 pizzas – may be frozen)
28oz can tomato sauce
6 oz. can tomato paste
1 medium onion, finely chopped
1-2 cloves garlic, depending on taste
1 tsp. Italian spices
1 tsp. sugar
Mix all ingredients in saucepan, and simmer 1 hour.
Love the crust recipe and stuck completely to it the first two times, but after that it was a free for all. LOL My additions to the recipe were 1/4 c. of leftover sourdough starter to give it a little added taste beings we sometimes make the dough at the last minute, about 4 hours before we need it. We also like parmesan cheese in our crust, Italian seasoning and garlic salt. I add a T. each of the parmesan and Italian seasoning and replace half the salt with garlic salt. Just thought I would share.
Blessings,
Lydia
Made the dough last night and this afternoon let it warm up on the counter. This evening my 4 year old daughter and I piled cheese, sauce, olives, broccoli and vegi meatballs on top and then folded each one in half.
I baked them on preheated pizza stones (used parchment paper to slide them in) and they came out crispy and chewy - perfect. Will make some more to freeze for our next pizza night.
Sharon
www.thebraidedloaf.com
I made this again tonight, and it was the best ever so far. One tomato sauce/mozzarella pizza, and one pesto/mozzarella/sliced tomato pizza.
Also, I substituted about 3/4 c. of whole wheat flour for the same amount of white, and liked it a lot. It's interesting how little whole wheat flour you need to add to give it a whole new taste and texture! And I added an extra half-teaspoon or so of yeast.
Perfect! I did some mental math and realized each pizza cost me about $2.00 to make. How can you not love it?
Thanks so much; I'm ever so happy making my own pizzas these days....
Around here we are real pizza junkies......if it was against the law they would have put us under the jail by now. I guess you crave what you grew up on and we both grew up in NYC eating the famous Patsy's for all of our lives. Now living in the south they have nothing that compares with it, so for years I tried to get something even close to it. Finally I did and the photos are the result. I have a HearthKit in my oven and it stays there all the time. To do the pizza I make the dough at least 24 hours ahead and portion it out into balls, then it sits very nicely in the fridge until the next evening. The oven gets pre-heated to 550 for at least a half hour, then it gets turned on Hi Broil for at least 10 minutes, then back to 550 bake. I take as many dough balls as we will be using out of the fridge about one hour before we plan to eat to allow them to warm up. For sauce I typically use one 28 ounce can of san marzano tomatoes,well drained then coarsely chopped with about a tablespoon or so of fresh oregano, 1/2 teaspoon of crushed red pepper and a pinch of sugar if the tomatoes taste a little bitter. The dough is stretched very thinly and topped with about 1/2- 3/4 cup of the sauce, then sliced deli part skim mozzarella is put on top followed by any other topping we are in the mood for. If the oven is hot enough they cook in about 5-7 minutes, depending on how well done we want them.....we are I guess a little odd in that we like them charred. If I am making some to bring over to the grandkids I don't bake them as much and when they decide they want some their parents re-heat them on a Pizza Pizzazz, they come out tasting as if they had just been freshly made. I guess the light bulb in my head is still too dim to be able to figure out how to put in the pictures here. If my son connects into my PC tomorrow night I will see if he can show me how to manage to do the photo posting. mattie
http://s139.photobucket.com/albums/q314/mattie405/
I am so hoping that this works and the link to some pictures can be clicked on.
Nice pics. mattie...everything looks very tastey....nice job....have you tried the crushed S.M. tomatoes! I love them and so easy to spice up for a quick and easy very tastey sauce!
Sylvia
Sylvia, thanks for the compliments. There is only one local place that carries the SM tomatoes and they usually only keep one in stock, either whole, crushed or diced. These last ones were whole, next time I go buy they might only have the crushed in stock. The manager told me that people just don't want to pay the price for them and I am pretty much one of the only customers who buy them so they may not even get any shlf space too much longer. When I go buy them I usually get them in groups of at least 10 cans because I know one day when I go they won't be there anymore. mattie
Okay....In "Bread Baker's Apprentice, the Neopolitan dough calls for a choice of 'high-gluten', 'bread', or 'all purpose' flour. Using the "pain a l' ancienne" technique.
In "American Pie", the Neopolitan dough calls for 'all purpose' flour using a slightly different technique.
The "Neo-Neapolitan" at the top of the page calls for 'all purpose', and the "Neo-Neapolitan" in "American Pie" calls for 'high-gluten', or 'bread' flour.
Presently, I have the Neo-Neapolitan with 'all purpose' working in the fridge from last night. I also used a little milk.....
After making some thin neopolitans, that were bubbly and crisp(!)...a touch chewy...I've decided I'm not so crazy about really thin pizza. I'm trying for bubbly, crispy, not too thin, and soft on the inside....maybe not possible, but it's worth my effort to try.
The first two photos are the thin neopolitans that were a bit too chewy for me, but very crispy, flavorful, and good bite. The third is two doughs I threw together and kneaded a bit when I removed from the fridge. You can see this pizza's diameter is the same as the first two, but much thicker (a bit too thick)...bubbly, crispy, good bite, and the inside was softer to chew....maybe kneading the last time when I removed from the fridge. Let's see if I can get the photos in the right order..... :)


..... are absolutely wonderful! I especially like the 2nd one, looks like I will be making pizza tonight after all!
Thanks for sharing!
cheers,
ivy, ny
If you want a slightly chewy, thicker crust try the Sourdough version from American Pie.
--Pamela
I've given up on my sourdough pizza crusts.....I'm die-hard for sourdough bread, but sourdough pizza crust doesn't work for me.....The first pizza crust is usually good, but the sourdough pizza dough doesn't perform consistently when stored in the freezer for me....the yeasted pizza doughs actually perform better after spending a little time in the freezer for me....
I'm thinking the eventual answer will be 'all-purpose' flour....and changing up the technique a little....I had good luck with the last pizza when I kneaded it a little when I pulled it from the refrigerator. ....still crusty and crisp, and it seemed to soften the inside noticeably.
Hubby bought me a new small pizza oven this week, goes to high temps (800) and works nice for us. Pre-heats in less than half the time the big stove oven does and cooks a nice pizza, should save a few $$ on energy costs to have our favorite food. This was the first pizza from it, I have to make smaller balls of dough as it doesn't bake a large sized pizza as the big oven does, this little oven makes about a 12-13 inch pie, has 2 cooking chambers and now has a permanent place on the counter, the chambers have stones in them and can be heated independently from each other. The longer we had it on the quicker that the subsequent pizzas were coming out as the heat in it really built up. mattie
Is it this oven from Hammaker Schlemmer? Cheaper than a stand mixer.
Thats the one! Great little oven...........it hasn't produced a 90 second pizza yet but as the heat builds I imagine it would be possible on subsequent pizzas in a long pizza making day. We are very pleased with it so far and we've only had it a few days so far. I imagine it will be more cost effective to use over the cost of heating up our big oven. mattie
I use this recipe for my "backup dough" when we have company and I need to make multiple pizzas. I have even taken the dough from freezer to the peel (via the microwave on 30% power to defrost it) in less than 15 minutes in a pinch. I normally like to use Artisan 5 minute fridge dough for pizza, but my current batch went bad tonight so I pulled my last frozen dough from the freezer and in 15 minutes had my dough. Here are the prebaked and baked pics from tonight:
This one had bottled spaghetti sauce (Barilla Marinarra), Vadalia onions, fire roased red peppers, pepperroni and a 4-cheese blend of mozzarela, provolone, romano and parmesan. Delicious! BTW, I use a peel with cornmeal dusted parchment paper for all of my pizzas. That way I can load them up and safely get them to and from the oven.
Here in Taiwan we get big bags of fresh basil at the wet market for only about 30 US cents, and I can never finish using one before the leaves start wilting and turning dark. Here's a great way to not only preserve the basil for future use at a moment's notice, but also an excellent way to incorporate it evenly through a pizza dough:
Wash a large amount (many cups) of fresh basil, shake or spin dry, then pick the good leaves, and place in a blender. Add just enough good quality olive oil to blend into a pesto-like paste. Pour into a dedicated ice cube tray, and freeze. Once well frozen, transfer to a freezer-weight zippered bag for storage.
When making pizza dough, simply thaw as many cubes as needed to substitute for any olive oil in a recipe. Your dough will have a heavenly basil fragrance. The cubes are also a convenient way to have basil and olive oil ready for other recipes.
That's a great idea. Thanks for posting it.
--Pamela
I grow my own basel. At the end of the season, I harvest it and make pesto with basel, olive oil, garlic and pine nuts (but no cheese) and freeze it in ice cube trays, as dragonbones does. I then store the pesto cubes in Ziploc freezer bags for use during the rest of the year.
BTW, my favorite sauce for pasta is one I had with tortelloni in Como, Italy in 1984: Mix 1 cup of Bolognese sauce with 3 T of pesto (1 or 2 frozen pesto cubes). Serve with grated cheese over pasta. Try it. It's totally amazing. Note: Add the pesto at the last minute. If you heat it too long, you lose the wonderful aromatic flavors of the basel.
When I first had this sauce, I loved it so much I went back to the same restaurant for 3 consecutive nights to eat it.
David
Once again, great minds...
I use the freezer pesto for sauce, but since I aways seem to have fresh ricotta hanging around the house, I mix it with ricotta, additional olive oil, and some grated parmesan (no cooking required). Toss with the cooked pasta and a little pasta water. Yum.
I've done a similar sauce to yours for pizza when I start to run low on the tomato sauce. Yes. Very good...