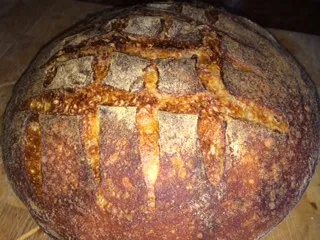
Baked another Tartine loaf with increased hydration, looking for the perfect crumb (which, of course, can never be achieved!) We had this loaf for lunch with my husband's sister and her husband, Bob the baker from England. They leave today, so we enjoyed lunch outside in the California sun. Bob gave the bread passing marks. They return to Liverpool (and a bit of rain) this afternoon. They did have rain here and in Las Vegas during their visit.
We enjoyed the bread, and I will continue my experiments in hydration. I believe I may try a WW recipe next.
- CAphyl's Blog
- Log in or register to post comments
You say "increased hydration." Did you increase it over what Chad specifies?
David
David: Here is the variation of Chad's recipe that I used. I increased the water by about 100 grams at #3. Because the dough was wetter, I did the turns about every 45 minutes and did them longer than the 3-4 hours that the recipe suggests. I may have done the turns for double that time. Thanks for asking. Phyllis
Tartine Country Bread
Make the bread:
1. To make the leaven: Discard all but 1 tablespoon of the starter. Feed the remaining starter with 200 grams of warm water, 100 grams of whole wheat flour, and 100 grams of bread flour. Let the mixture rise overnight at room temperature. When it’s ready, the leaven should have risen slightly, float in room temperature water (test a small piece; you can still use this piece in the final dough), and smell like overripe fruit.
2. In a large (huge, actually) bowl, mix 700 grams of water and 200 grams of the leaven. (The remainder of the leaven is the starter that you’ll store and feed regularly.) Add 800 grams of bread flour and 200 grams of whole wheat flour; stir until the flour is evenly moistened. The dough won’t be smooth. Let it rest for 25 to 40 minutes while the gluten starts forming, the flour starts hydrating, and the flavor starts developing.
3. Add 20 grams of salt and 50 grams of water to the dough, and squeeze the dough to mix them in. This dough isn’t kneaded; instead, fold it a few times by using a dough scraper to scoop up one side of the dough and drape it over the rest of the dough.
4. Allow the dough to ferment for 3 to 4 hours and give it another few turns every 30 minutes. This takes the place of kneading. Be more gentle with the turning toward the end of the rising time. The dough is ready when it’s slightly increased in volume and is full of air bubbles (which will be visible on the sides if you’ve used a clear container).
5. Turn the dough out onto floured surface or a damp kitchen towel. Divide it into two portions. To shape each one into a round, cup your hands over the top of the dough and rotate the dough around on the counter. Cover the rounds with a damp towel and set them aside to rest for 20 to 30 minutes.
6. To increase the surface tension of the dough, ensuring that the bread rises up and not out in the oven, perform a series of folds. Working with one ball of dough at a time, stretch it out and fold it over several times, eventually ending up with a neat square. Cup your hands around the dough and rotate it on the counter to smooth the surface again.
7. Transfer each round to a floured towel-lined bowl or basket with the seam facing up. (Actually, I prefer to use an oiled bowl, covered with a damp towel. If you want to freeze the dough, transfer it to a ziptop bag sprayed with nonstick spray and store in the freezer. Let it defrost overnight in the refrigerator before continuing with the recipe.) Let rise for 2-4 hours at room temperature or, for maximum flavor, overnight in refrigerator.
8. Half an hour before you’re ready to bake the bread, remove the dough from the refrigerator. Place a Dutch oven and its lid on the middle rack in the oven and heat the oven to 500 degrees. When the oven is hot, turn the dough out of its bowl onto a floured work surface or a damp kitchen towel so that the seam is down. Use a very sharp or serrated knife to cut four intersecting ½-inch deep slashes in the dough, forming a square of cuts. Carefully place the dough into the heated Dutch oven; cover the pot with its lid and transfer it to the oven. Immediately reduce the oven temperature to 450 degrees. Bake 20 minutes, then remove the lid and bake 20-25 minutes longer, until the bread is deep golden brown and an instant read thermometer inserted into the center of the loaf reads about 205 degrees. Remove the bread from the pan and cool on a wire rack for an hour before serving.