My kids' God Mother came to visit. It was a relaxing Friday night drink on the balcony. The night was clear and the breezes were cool. Autumn has finally arrived.
The cool night reminded me of my visit to New Jersey, the USA, to see my junior high school friend in the fall of 1997. We were so close back then in school that she often came home with me after school. My Mother would feed her and they would speak a dialect between them that made me a foreigner. Several years after she finished her masters in economics, she became a top currency trader with an intuition for market movements, something that could only be born with, not learned. I could not remember what the circumstances were that the live recording of Bee Gees "One Night Only" tour was playing on her big screen TV in her New Jersey home. The concert was held in November of that year in Las Vegas to celebrate Bee Gees' songs starting 30 years before. It brought back both of our memories then. The very, very first English song that I have ever heard when I was in my teens was a sound track by Bee Gees from a 1971 movie "Melody."
To this day, Bee Gees remains one of my favourite music groups. Bee Gees has nothing to do with my T110 Miche, except that the "One Night Only" CD was what was playing on my tea room B & O when I was uploading the bread photos below. This miche is close to everything I wanted in a miche. The flavour is better than that of my Gerard Rubaud miche. The only imperfection from my own standpoint is that it should have been ready in day time to allow me to take better shots without relying on my kitchen halogen lights that cast an unnatural yellowish tinge on all crumbs.
[b][u]Stats of this miche [/u][/b]
- 100% stone-ground organic T110 flour (including the flour in the starter)
- 250 grams of 65% starter (last fermentation 6 hours at around 25 ºC)
- Total dough weight 1.5 kg and overall hydration 75%
- Bulk fermentation 3 hours with 5 sets of double letter folds (at around 25 ºC)
- Pre-shape, rest, and shape (1/2 hour)
- Final proof 2 1/2 hours (at around 25 ºC)
- (Total fermentation time from time-off mixing to just before baking was 6 hours.)
- Baked at 245 ºC under cover for 35 minutes and without cover for a further 20 minutes
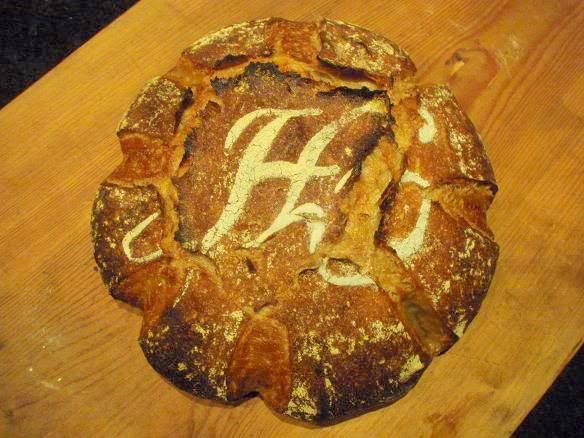
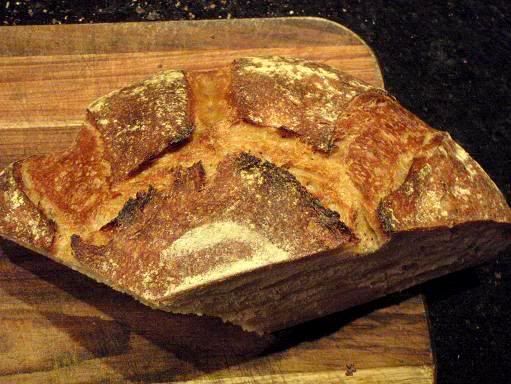
The big H in Edwardian script stencil is my Father's initial
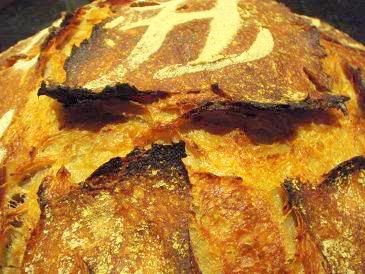

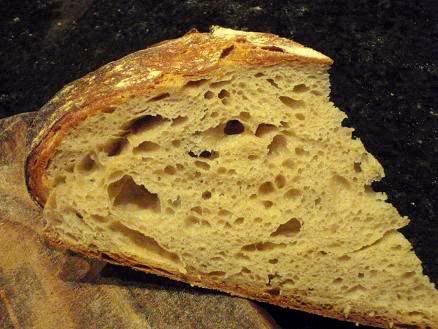
[u][b]Oven spring and crust colour[/b][/u]: This miche was baked under a giant stainless steel bowl, and so no steaming was required. The stainless bowl was not pre-warmed. This miche had one of the best oven springs I have ever had, risen about 50 - 60% from the proved loaf. The covered baking method (and this include the Römertopf and le cloche baking) seems to guarantee better oven spring. I seem to have better crust color, too, with this baking method since the bread is being steamed by the moist generated by itself. (If a dough is over-proved, however, no baking method can guarantee oven spring or crust color. From my experience, nothing can save a dough that is over-proved; but the flavour would still be good.)
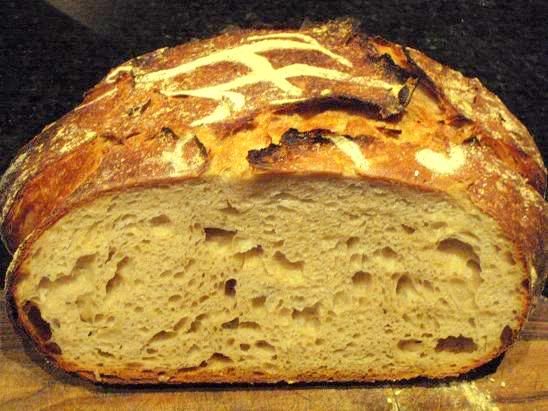
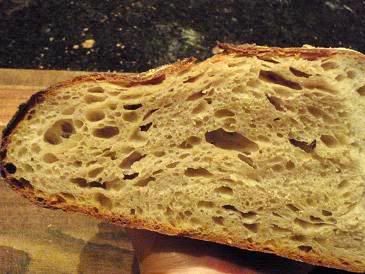
[b][u]Volume[/u][/b]: This miche has very good volume as can be seen from the high cross section above. Volume comes with good gluten development and dough strength. As I was under the impression that French flours tended to be soft and not needing as much hydration, I mixed the dough to 69% hydration at the start. However, I wanted to have a medium soft dough consistency and, at 69%, the dough felt very tight, so I added 3% more hydration each time and did that twice, ending at 75% total hydration. This in effect became a double-hydration method, normally used in wet dough to build up strength. The volume is also attributable to the tight pre-shaping and shaping that I gave to this dough. The bulk dough was completely flatten out before being pre-shaped and shaped.
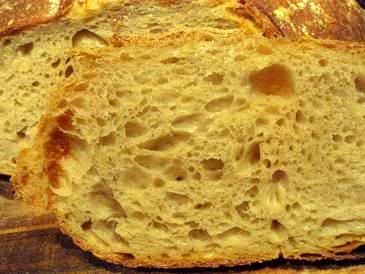
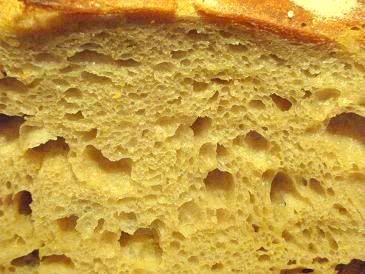
[b][u]Texture[/u][/b]: The texture of this miche is soft and spongy. It has a yielding structure. All cells are aerated. Many of the miches I made in the past, while good flavoured, had somewhat hard texture, with or without open crumbs. I noticed that, when a portion or all of the flour in my miches was whole grain flour, the texture tended to be (ever so slightly) tough. With this miche, I was very pleased with the very spongy and yielding texture. I could only attribute it to the special French T110 flour used in this miche. It would not be attributable to anything in particular that I had done.
[u][b]Flavour[/b][/u]: I do not consider myself to be sensitive to subtle nuances of tastes and flavours. This T110 miche is my very first miche with T110 flour. Still, at the first bite, a "rich" flavour hit me. I had had no prior experience with T110 flour. It is as if there is a whole lot more in that small morsel that I took that was [b]invisible[/b] to my eyes. The ingredients in my miche were strictly T110, water, and salt, so I really couldn't work out where it was from initially. The "rich" flavour is different from that of the Gerard Rubaud miche that I made where 3 types of whole grain flour were added. It appears to me that the "rich" flavour may have come from the special French traditional stone-milling method where the germ and the aleurone layer are mixed into the T110 (and T80) flour. For some basic information of aleurone layer, please see here and here. I am not interested in science more than I need to. I am a baker and I try to adapt to whatever flour I have and try to bring out its best the way I know how. All that I can say is this T110 flour is very special.
![]()
![]()
[u][b]Translucent crumb[/b][/u]: I had the most translucent crumb in this miche than all other bread that I made, combined. When I get translucent crumb, to me, it is like the cells have been fermented to perfection. Mini Oven once commented that the translucent crumb seems to occur more often with retardation, long fermentation process and/or wetter dough. However, this dough does not fit into any of the above. The only thing I can think of is that, before my starter went through the last leg of fermentation (6 hours), it sat in the refrigerator for 9 hours. What happened was, it was 9 pm when I fed my starter its last meal. Rather than risking it over ripen, I moved it into the refrigerator and brought it out again to room temperature the next morning at 6. I don't know if this, together with the 6 hour refreshment and 6 hour dough fermentation, resulted in the translucent crumb. I am more inclined to think that the crumb is because of the T110 flour.
![]()
![]()
The last photo of the night:
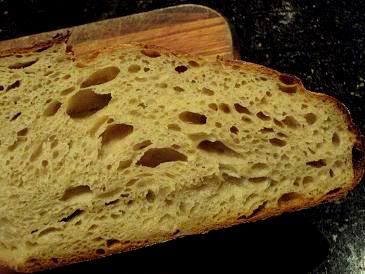
We had about half of the miche that night and the rest, sliced, was stored in the freezer. Yesterday morning I decided that I really would like to have a day-time shot of the crumb to compare. So here it is. The crumb colour is of a very pale brown without any specks whatsoever.
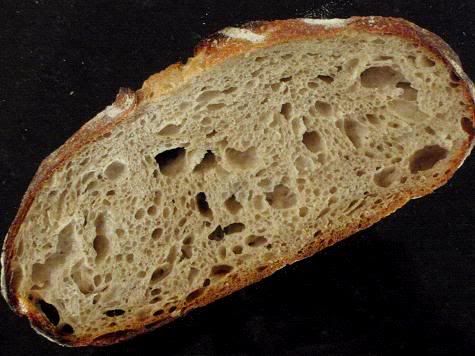
Same crumb as in the 4th photo from the top
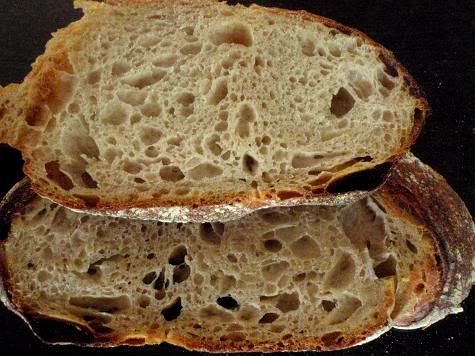
Same crumb as in the photo to the left , below the 4th photo from the top
For your information, following is a shot of this T110 flour that I used. Next to it is my normal bread flour, for comparison.
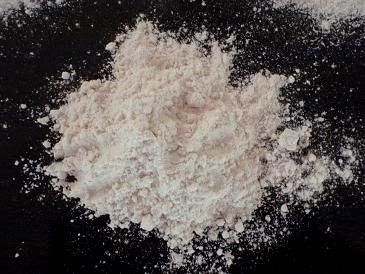
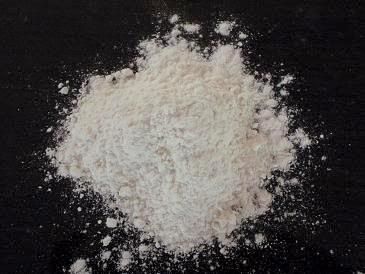
T110 flour Bread Flour
An article on flour, brought out by hansjoakim elsewhere, says the extraction rate of T110 is 88 - 90%. As you can see above, the bran is so very finely ground that it is undistinguishable.

Early fall morning fog?
Shiao-Ping
- Shiao-Ping's Blog
- Log in or register to post comments
Shiao-Ping, this bread is speaking to me saying "Make me" LOL
Gorgeous
Shiao-Ping,
I would just love if you would sometime do an instructional with pictures on how to do your lovely stenciling and slashing for your miches. They are such a work of art.
Doc Tracy
Hi Doc Tracy
Stenciling is really not that hard, but if you never start, you're never there (tautology!). You need to have your stencil ready before you do anything. The stencil is preferably done on a slightly hard piece of paper.
The procedure I follow is this:
(1) place the dough on the peel
(2) place the stencil on top of the dough
(3) shake bread flour (never rice flour, too loose) over the stencil
(4) remove the stencil carefully (or you might let loose some flour sitting on the paper)
(5) slash the dough
(6) load the dough into the oven
(7) bake!
[u]On slashing[/u]: I have now learned to slash the dough with a very FAST, clean motion. The slashes on this T110 miche were done with my plastic knife (for sculpting food objects, not that I have ever done plastic arts). The slashes took no time to complete, but the planning for where the slashes would go happened way before the stenciling. My daughter saw me slashing the dough; she said, "Mum, that is very aggressive." And, that is right. If you are wishy-washy, your slashes will never be clean-cut.
[u]A tip on stenciling[/u]: If your proved dough has very good volume and is pointed (I mean, not flat) where you want to place your stencil, you can press the stencil slightly against the surface of the dough, so there is no gap in between the stencil and the dough. If there is a gap, then when you shake the flour over the piece of paper, your stencil won't be [b]sharp[/b].
Shiao-Ping,
I would just love if you would sometime do an instructional with pictures on how to do your lovely stenciling and slashing for your miches. They are such a work of art.
Doc Tracy
Looks fantastic as always Shiao-Ping!
Pardon me, but what is so special about T110? Is it a high extraction flour but of a different name?
I don't know if high extraction flour is the American answer to the French T80 / T110 flours. There is a wealth of information ove the internet. Look this basic information here.
So inspiring.. great Job Shiao!!
I believe stone milled flour of a Good harvest grain will result in great bread, consistantly.
I only wish i could be near to you. Only to be a tester of your receipts!!
The crumb just seems to push thru the screen. It looks soft and spongy, and offering the promise of an attractive and enjoyable experience! That wedge is an outright invitation!
Wow!
If you say it's the flour, then by golly, It Is The Flour!
Such a beautiful bread Shiao-Ping. Crafted by your able hands the T110 seems like the perfect flour.
Eric
There exists flour as well as technique and you embrace them both.
Your discription of the flavor was mouthwatering. What a lovely flour so full of flavor...I wish I could taste your loaf. The crumb and crust are gorgeous. Steaming undercover is hard to beat for the homebaker. The slashes gave a lovely and different shape to your boule...your stenciling looks like you've become quite handy with your Zip-O knives, I mean X-Acto ; )
Sylvia
Your description of the flavor really makes me want to try French Flours my self.
I seem to recall you shared your flour source once before, but I cannot recall in which topic. Can you share it again, please?
David
Hi David
This morning I've found another on-line supplier from Amazon.fr:
(1) [u]La Ruche des Passions[/u]:
http://www.laruchedespassions.com/boutique/fiche_produit.cfm?ref=Farinbioblet110&type=168
The one that was on my previous post is:
(2) [u]Naturel-Discount[/u]: http://www.naturel-discount.com/
Shiao-Ping
David
The crust and stencil on your miche are truly beautiful! You've created art and bread at the same time, and your photographs round out the trinity. You have a very lucky family!
Larry
Again, you show me your talent Shiao-Ping.
Giovanni
Shiao-Ping the bread looks wonderful. I love the openness of the crumb and you said it was full of flavor. That is a bread that can't be topped. There was a suggestion that I was going to tell you a while back but forgot to, that was to try covering your bread while baking. One of your pictures looks like there is a little burn to the crush. Somewhere I heard that a dark crust brings out more flavors. I noticed that you took the bowl off with 20 minutes left to cook. I did a lot of experimenting with the amount of time to leave the cover on a baking bread and found I like removing the cover 15 minutes before the bread is done. You might try that sometime and see what happens.
Thank you for the suggestion. I will definitely try it next time. Say if you have a 1 - 1.25 kg. dough, you bake it 35 minutes under cover, and 15 minutes without the cover. But what if you have a very large dough, say 2 kg., and want to bake it for say 70 minutes in total, do you bake it 55 minutes under cover and 15 minutes without cover?
Shiao-Ping
Yes I currently cook my 1-1.2 kg breads for 30 mins under the cover and 15 mins without the cover. The temperature is 460° F or 238° C. I just checked the temperature in your formula seems I should check the temperature of my oven. I did 50 mins for a loaf a while back and thought it was just a bit to long, I like 45 mins total time.
My 2.2 kg loaf is cooked for an hour at 460°F and the lid is taken off at the 45 min mark. This is my 100% Whole Wheat that is 100% hydration cooked in a cast iron roasting pan. I use the bread for my lunch and have been baking it for over a year. When I first started making it I tried all shorter times of leaving the lid on and noticed the top of the dough was still wet when I took the lid off. One day I got distracted and forgot to take the lid off until the 45 min mark and noticed the dough had fully risen and was dry. The loaf that came out that time looked great compared to the other ones. When I was taking the lid off earlier I would get tears in the loaf because the loaf was still rising do to the oven spring. Those are my observation and the guidelines that I bake by.
I checked my oven temperature today and was shocked. When the oven is set at 460° F the temperature in the oven went from 449° F to 494° F. That is a pretty big range. The bread is turning out just fine so I can't complain. I wonder if the fluctuating temperatures have any impact on the outcome of the bread.
had been your nice bread!
It is very interesting that your bread came out nicely with [b]45 minutes covered[/b] and 15 minutes uncovered during baking and that it browned nicely inside the cover. I will definitely try it next time. Thanks.
Shiao-Ping
I am not joking but I often get beginner's luck. Very often I did something very nicely the first time, but the second or third time I tried harder and the result wasn't as good. I am not kidding.
Shiao-Ping
This looks wonderful. I remember that you live in Brisbane (not far at all from where I live, it seems) and was wondering if you had any problems with Quarantine Australia when getting the flour sent to you from France ?
The shipper will declare the contents and as long as they are sealed, the Australian Customs will examine them and release the goods once they are satisfied that the goods will not "contaminate" Australian agriculture and wild life.