There is a bakery in my neighbourhood called Baker's Delight which is a chain all around Brisbane. They have a bread with a surface that looks like mottled skin of a tiger and it's called Tiger's Bread! It looks most unusual and every time I walked past that bakery I wondered how it got that spotted skin on top.
A week ago I received my "Special and Decorative Breads" by Alain Couet and Eric Kayser, which apparently is a text book for bread chefs in France. I was going over the pages. I don't read their recipes, I just love looking at the photos. And, wouldn't you know? - there it is, Mottled Bread, on page 34, which is also called Pain Marin Tigre! This bread originates from Holland and Northern Germany. The mottled surface is due to an easy technique where a semi-liquid dough is brushed on the top of the loaves right after the dough is shaped for proofing. This semi-liquid dough is similar in consistency to a sponge starter. It's almost like the bread has two layers going into bake. I see this technique quite frequently in Japan.
Now, the yellow semolina flour that I ordered from King Arthur Flour arrived yesterday after two weeks been with the Australian Customs. They are really tough (I mean, the Australian Customs). A three pound bag cost 3 dollars but the DHL across the Pacific Ocean was many times that, which I could accept, but the Australian Customs... they stressed me out.
Anyway, I was rejoicing the arrival of this golden semolina flour and wondering what I should make it into. Whatever it was, I thought I'd better get my starter ready. So, before bed last night, I refreshed my SP's starter. This morning I was thinking, how about Golden Semolina Sourdough with Garlic Corn? Plain semolina sourdough doesn't interest me enough. I thought the color and the sweetness of corn go well with yellow semolina, and the texture would provide an extra dimension to the soft sourdough crumb. As for the garlic, well, caramelised in olive oil, it is a combination that Chinese love. All this musing turned out to be academic as I couldn't get to the shop early enough! I needed to start the first fermentation by 8 am because I had a walking planned.
As I was driving home from my walk, it came to me - why not Mottled Golden Semolina Sourdough? Now, I felt excited.
My 100% sourdough had not risen very much when I got home at around 10:30 because today was a very cool day, 19C (66F). I gave it a stretch & fold and moved it to a sunny spot in my balcony. The dough felt very soft; I knew there and then that I would need to give it a couple more stretch & folds to strengthen it. At 1 pm, it doubled (after 5 hours of bulk fermentation). I checked its temperature with my digital IR thermometer - 23C. I moved it back indoors because it's ready to be shaped. I prepared the semi-liquid solution for brushing. I divided my dough into 4 pieces, and shaped them into rods; brushed the semi-liquid dough on top of all of the rods and placed them on baking paper resting on my counter top. At 2 pm, I turned on my oven to 230C (450F). After 2 hours of final proofing, at 3 pm, all 4 rods went into the oven. Here are the pictures of these mottled 100% sourdough breads:

[color=blue]Mottled Golden Semolina Sourdough[/color]
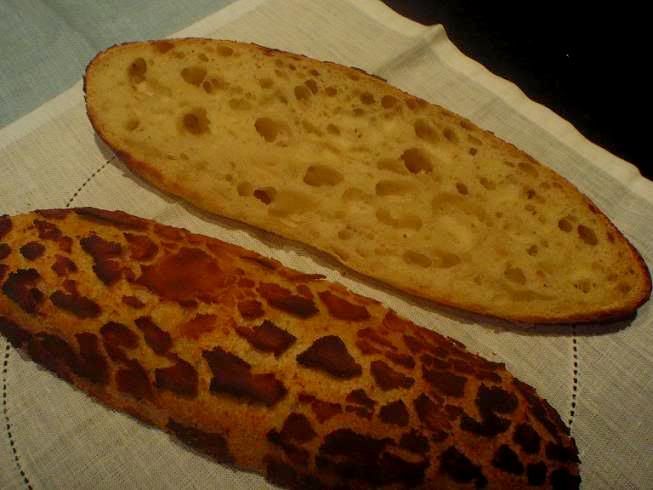
[color=blue]The crumb[/color]
I am pleased. The crumb is very open. The flavor is exquisite. And the mottled crust? It is paper thin and soooo crispy. I never knew I could feel satisfied so easily. While I was preparing dinner, the moon has risen... from the east....

[color=blue]Moon light in my balcony[/color]
Shiao-Ping
- Shiao-Ping's Blog
- Log in or register to post comments
both the bread and the view! The bread looks like something I've seen called tiger bread. Is it the same idea? The technique sounds the same.
Again, lovely pictures,
Marni
Shiao-Pin, you never cease to amaze me! Such determination and creativity! I have the feeling you could recreate any bread you set your mind to make but mostly what I love in your work, besides your technique, is the fusion of East and West. To the best of my knowledge, you are bringing something utterly new to this community and we are all the richer for it. You are teaching me to open my eyes and my mind to new combinations of ingredients and methods and I find it very exciting as it opens up endless possibilities and opportunities to be inventive, in the spirit of what I have heard many experience bakers say: "Even after a lifetime of baking, I learn everyday. So go ahead and experiment. A whole world of techniques and flavors is still yours to discover". Thank you!
This mottled bread is amazing. I never saw anything like it... And such crumb!
Hi, Shiao-Ping.
I love how you have related your whole thought process as you developed this bread. They look spectacular!
I have made sourdough semolina bread with a more standard formula, but I would love to have yours. Would you share it?
David
oh, please share the recipe! it sounds like something I'd make right away! your bread is amazing.
TeaIV
When I saw your Tiger bread I immediately thought, "That looks like Dutch Crunch bread." Dutch Crunch, referring mostly to the crust, is a type of bread that is unique to the San Francisco Bay Area. I wouldn't be surprised to learn that it is related to your Tiger bread since we have a large Asian population here.
Lovely bread and photos. Thanks for the wonderful write-up.
--Pamela
I've never seen Tiger Bread before...you have made them a work of art! Beautiful! Please, would you write out your formula? I'm expecting a Semolina order to arrive soon!
Sylvia
Shiao Ping:
Good job!
Yippee
I would LOVE to share my semolina recipe and the recipe for the semi-liquid dough. I will do the write-up tomorrow. Until then, thank you everyone for ALL your kind words. It's been really fun.
Shiao-Ping
no, thank YOU! I can't wait to make this, probably next week (I've been baking a lot lately, and I'm getting a little plump, so I need to pace myself)(but it's not like my family is complaining).
thanks, TeaIV
Shiao-Ping,
Another marvelous post. Looking forward to trying your creation.
Eric
Shiao-Ping:
Wouldn't you be able to find it locally? How's the selection of flours available there? Would you be able to get your hands on Japanese flours?
Yippee
Hi Yippee,
I'm in Australia as well, and our flour availability is extremely poor IMHO.
cheers
JJ
THE NIGHT BEFORE BAKE DAY (AFTER DINNER)
75 g active starter @75% hydration
50 g rye flour
50 g strong white flour
75 g water
I made sure that my starter was very active. The night before bake day, I refreshed my starter as per the above quantities. The next morning, my starter tripled. With a total weight of 250 g at an overall hydration of 75%, that means there is 143 g flours and 107 g water (ie, 250 divided by 1.75 = 143, being the flour; 250 - 143 = 107, being the water).
ON THE BAKE DAY
(1) FOR THE DOUGH
240 g Golden Semolina Flour (from King Arthur Flour)
124 g strong white flour
226 g water
20 g honey
a very small pinch of vitamin C
10 g salt
I aimed to have a final dough weight of around 860 g and dough hydration of 69.5%. I wanted my starter to be equal weight of semolina flour to compensate the fact that semolina flour is a somewhat inferior flour in terms of stand-alone taste. For that reason I also used honey (NOT sugar) to add a bit of refinement into the taste of semolina flour, but not too much that it is easily discernible.
I worked back to get my flour requirement: 860 divided by 1.695 = 507 being total flours I would need; subtract 143 that was already in the starter and 240 that I wanted for semolina, that gave me 124 as the weight for my white flour. Next, for the water: 860 minus 507 = 353 being the total liquid requirement; subtract 107 that is in the starter and 20 honey, I got 226 as the extra water that I needed to make up the hydration.
METHOD
I first mixed my starter with water, then added all of the other ingredients (except salt), mixed well, autolysed for 20 min, then put salt in and mixed again at low speed until combined; total mixing time was no more than 5 - 6 min.
By 8 am, the dough was placed in a lightly oiled container for first fermentation which lasted 5 hours until 1 pm when it doubled in size. During that time I stretched and folded the dough 3 times. I actually took the dough out and gently stretched and folded them in the air with my hands. (Depending on your room temp, you may not need 5 hours.)
Half hour before the dough was done its bulk fermentation, I prepared the semi-liquid solution for brushing as below.
(2) FOR THE SEMI-LIQUID DOUGH FOR BRUSHING
40 g rice flour
44 g water*
4 g yeast (this is not a typo)
4 g sugar
4 g oil
3 g salt
* Note: the ratio of water to rice flour in "Special and Decorative Breads" is 90 to 100 (ie, 90% hydration), but I find this consistency impossible to brush onto the surface of my shaped dough, so I increased it to 110% hydration. We all know what a 90% hydration dough looks like and feels like. Actually I found that even at 110% hydration the semi-liquid dough was still hard to apply.
A word of caution: Try not to increase the hydration to much more than 110%. I was being smart and ruined 2 out of the 4 doughs with a very running solution - the mottled effect just didn't show up. That was why there were only 2 breads in my photo instead of 4!
In theory, this semi-liquid solution can be used on top of any bread dough you fancy. The breads can be round or long loaf or any shape you like.
Once the semi-liquid solution was prepared, I divided my dough into 4 pieces and shaped them into rods. I shaped them only once because I didn't want them to be too tight. I wanted the oven expansion.
Now, here came the tricky part. I placed the shaped rods seam side down on a big piece of baking paper, leaving room between them so they didn't touch one another. Then, using my Chinese calligraphy brush, I applied the semi-liquid dough onto all of the exposed surface of the rods. It wasn't easy because, as you brush your shaped dough, you don't want to depress it; you want to be as gentle as possible. A very soft brush helps. The surface seems uneven once you've done the brushing; but that is OK.
It was not possible to cover the doughs with a towel directly because their surface was wet! I placed rice bowls all around the edges of the baking paper so I could drape a big piece of cloth over the whole thing. Then, with the "paint" on, the shaped rods went into second fermentation for 2 hours until 3pm. They didn't rise much more, maybe another 50% only. An hour before that, I turned on my oven to 230 C (450F).
To load all 4 rods onto my baking stone measuring 34 cm x 34 cm, I cut open the baking paper so I could slide each individual rod onto a peel, then from the peel to the baking stone. Then, I poured a cup of cold water into my lava rocks sitting at the bottom of the oven. I saw the rods expand before my eyes within a minute or two. It was most amazing to watch. I guess the wet "paint" on the surface of the dough meant that there was a lot of moisture generated internally and that helped the oven spring tremendously. I saw the rods literally doubled in the oven.
I turned the oven down to 210 C (410F) after the first 12 minutes because they were just browning too quickly. You do have to watch them. They were baked a further 15 minutes.
And, that is it! Done. My husband said my breads are mottled breads, but they ain't tigers breads! My daughter also said leopards have spots but tigers don't. Tigers have stripes! Well, I don't know. But I do know tigers and leopards originate from Asia. Perhaps the Dutch saw leopards in 16th century when they were sailing around the world and mistook them for tigers. Do you think artists and bakers are the most exact people you've ever met?
Shiao-Ping
p.s. Hi Yippee, I have since been able to source yellow semolina flour from my local flour stores. I am still learning about flours and maybe many flours are alike but just different names. There aren't Japanese flours here that I know of.
Thank you Yozza, your fomula for the semi-liquid dough (or should I say "paste") is quite similar to the one I have in "Special and Decorative Breads" by A Couet and E Kayser, p 34 - 35. The mottled bread in the book is a commercial yeasted bread (which takes less than an hour for first fermentation and 1 1/2 hours for proofing).
Thank you again.
Shiao-Ping
Hi,Shiao-Ping
Thank you for all your helps and recipe, now I can try they on my off day, Thank you so much.
wan ping
This is so beautiful. I have dough on the go now. Was a little worried at first as the dough was so wet, but after 30mins when I added the salt it felt much better. I hope I can do your recipe justice. My topping paste will be sourdough only as I don't want to use commercial yeast.
Hi Giraffe, I hope your sourdough comes up the way you wanted.
Mine did not work at all. Loved the dough...no crackling topping.
Used this from another baker as I did not want to use instant yeast.
50g(100% rice flour) - added 20g more as felt it was too thin
20g (40% mature starter)
5g (10% brown sugar)
1g (1% salt)
2.5g (5% oil)
80g (150-170% water)
Got your white Chia seed recipe underway too! Though using black seeds as I don't have white. Thank you for your recipes!