Like many people, I found TFL in my quest to learn how to make sourdough. I had a starter going and was sure I had killed it. The advice I found here gave me the knowledge and confidence to make a starter that I've been using for months now, with ever-better results.
Although there is a wealth of information here, there was no one source that detailed the method I used, which was based on Reinhart's "barm" in BBA. Now that I have succeeded in making several starters, I've been thinking about making a video tutorial to walk through the process step-by-step, day-by-day. My own experience and that of others here has taught me one thing: sourdough starters don't read baking books, so they don't know how they are "supposed" to behave. I could have been spared the angst, the wasted time, and of course, pounds of precious flour, if only I had known what to expect and what to look for.
I don't have the technical part of video-making worked out yet, so I have decided to do a tutorial blog. This will be a real test, as I am trying out a modified starter that I haven't made before. It's still based on Peter's starter, but I have altered the amounts, and possibly the times, to suit my own fancy. If all goes well, I will end up with a more reasonable (i.e., much smaller) amount of starter, and I will get there with much less wasted flour.
So here goes:
Day 1:
Ingredients: 1/3 cup rye flour and 1/4 cup water
For the flour, I use stone-ground rye. Nothing special, just what I got from the grocery store. My water is tap water run through a filter. Before I had he filter on my sink, I used bottled drinking water.
Mix the flour and water in a bowl. It will be thick and pasty, kind of like the oatmeal that's left in the pot if you don't come down for breakfast on time.

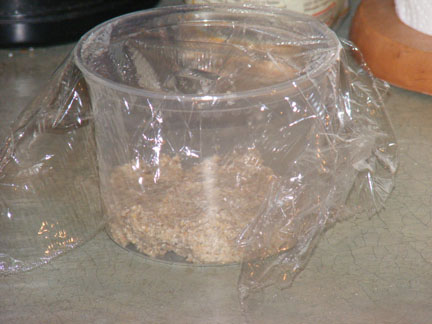
Once all the flour is mixed in, put it in a pint-sized or larger container and cover with plastic wrap. Leave it out on the counter.
And that's it for today.
Day 2:
Ingredients: 1/4 cup unbleached AP, bread, or high gluten flour; 1/8 cup water
There should be little, if any, change in the culture from yesterday. Again, I'm not really particular about the flour. I would just recommend staying away from bleached flour. I am using AP flour for this batch.
Mix the flour, water, and all of the starter from yesterday in a bowl. It will still be thick but a little wetter than yesterday.
Put it back in the container (no need to wash it), press it down as level as you can get it, and mark the top of the culture with a piece of tape on the outside of the container.
Put the plastic wrap back on top, and you're finished.
Day 3:
Ingredients: 1/4 cup unbleached AP, bread, or high gluten flour; 1/8 cup water
Around Day 3 or 4, something happens that puts terror in the heart of the amateur sourdough maker: they get a whiff of their starter. When you check your starter on Day 3, you may notice a strange, and not at all pleasant, odor. And unless you know better (which you will now), you'll swear something is drastically wrong. In fact, I would venture to guess that that smell has been the ruin of more amateur sourdough growers than anything else. It's an acrid, sour, almost rotten smell, and it's perfectly normal. And rest assured, your new baby sourdough starter will soon outgrow it. So, take heart, and press on.
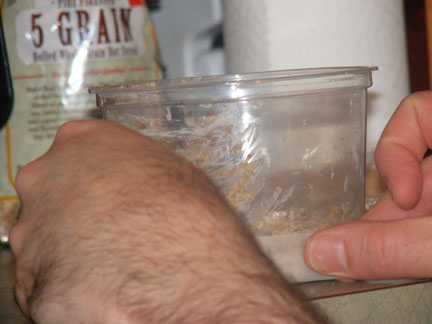
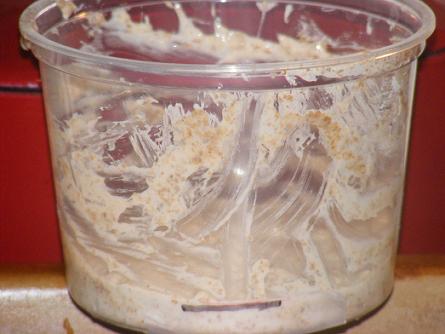
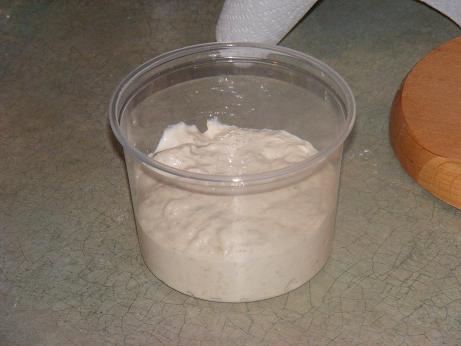
You may also notice that your starter has begun to come to life. It probably won't grow a lot, maybe 50%, but you will start to see bubbles, like these:
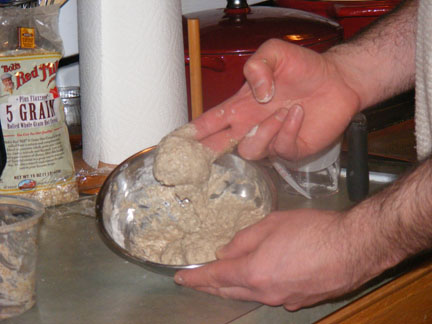
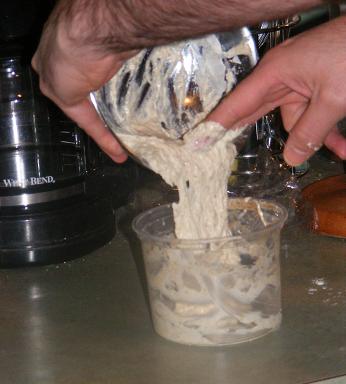
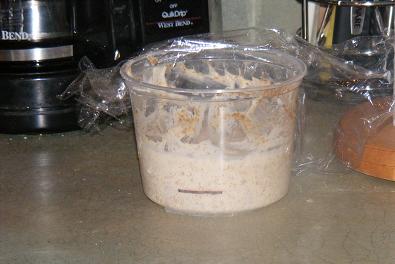
Regardless of the amount of growth, stir down your starter, throw out about half (no need to measure, just eyeball it), and mix the rest with today's flour and water. You will get a slightly more doughy-looking mass:

Once it's well mixed, put it back in the container (still no need to wash), pat it down, and move your tape to again mark the top of the starter.
Put the plastic wrap back on the container, and take the rest of the evening off. You worked hard today.
Day 4:
Ingredients: 1/4 cup unbleached AP, bread, or high gluten flour; 1/8 cup water
And now, a word about measurements. If you bake regularly, or even if you've just been nosing around baking sites for a while, you are no doubt aware that the ingredients in most artisan bread recipes are listed by weight rather than volume. I measure by weight for my baking and for maintaining my sourdough starter.
You might wonder why, then, am I using volume measurements here? Two reasons: first, I have tried to make this starter as simple to follow as possible -- no special tools, no monkeying around with the scales, just a couple of measuring cups and a bowl. And, when it comes to starting a starter, the measurements aren't as critical as when you actually go to bake with it. So for now, we're just using measuring cups.
Today is another one of those days where novice sourdough starter makers often lose heart. Your starter is now coming to life, and like most living things, it kind of has a mind of its own. Up until now, we followed the clock, making our additions every 24 hours. Now, we will be letting the starter dictate the timeframe.
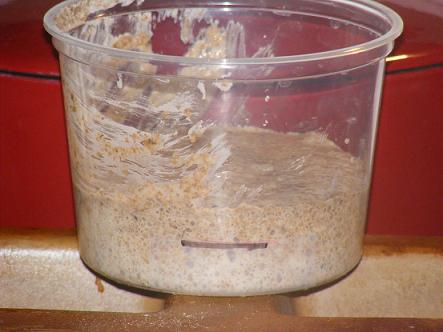
Before you do your Day 4 additions, you want to make sure your starter has at least doubled. If it doubles in less than 24 hours, you should still wait until the 24 hour mark. If it takes more than 24 hours, be patient. Let it double. It may take another 12 or 24 hours, or it may take longer. Again, be patient. It will double. Just give it time. Eventually, you'll end up with a nice, bubbly starter:
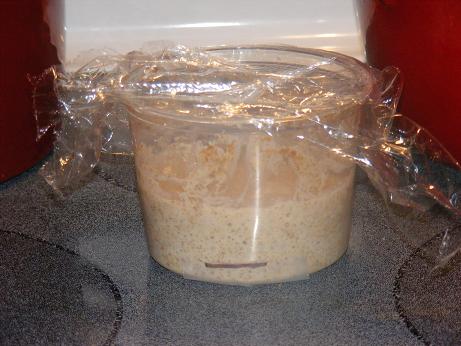
You can see that mine more than doubled. But I still waited for 24 hours. Once it doubles, throw out half of the starter, then mix the rest with the flour and water, and back into the bowl it goes:
Replace the tape and plastic wrap. Then wait for it to double. It could take as little as 4 hours, or it may take more than 24 hours. This time, you can move on to Day 5 at any point after doubling. It's OK if you let it more than double; it's also OK to move on right when it hits the double mark. So, hurry up and wait.
Day 5:
Ingredients: 3/4 cup unbleached AP, bread, or high gluten flour; 1/2 cup water
Once your starter has at least doubled, it's time for the final mix.
Combine flour, water, and 1/4 cup starter in a bowl and mix well. Transfer to a clean container with room for the starter to at least double.
OK, one last time, cover with plastic wrap and let it sit on the counter until it gets nice and bubbly. Don't worry so much about how much it grows, just so that it's bubbly looking. This will probably take around 6 hours, but, again, don't stress about the time. Let the starter tell you when it's ready.

When your starter gets bubbly, pat yourself on the back: you are now the proud parent of a bouncing baby starter! Put a lid or other cover on your container and put it in the refrigerator. Let it chill overnight, and you can begin using it the next day.
Day 6 and beyond:
By today, your starter is ready to use. The flavor will continue to develop over the next several weeks to month, so don't be disappointed if your first few loaves aren't sour enough for you. I would still recommend beginning to bake with it right away, especially if you have never made sourdough bread before. That way, you can hone your skills while your starter develops its flavor.
Feeding your sourdough: If you keep your sourdough in the fridge, you only have to feed it about once a week. And you can minimize your discards by keeping only what you need and feeding it when you want to bake with it. I recommend a 1:1:1 (starter:flour:water) feeding, which means each feeding includes an equal amount, by weight, of starter, flour, and water.
Start by weighing your starter, subtracting the weight of your container. Then add an equal amount of flour and water directly to the container. So, for example, if you have 100 grams of starter, you would add 100 grams each of flour and water. If you feed your starter right out of the fridge, as I do, warm your water to lukewarm (90 - 100 degrees F). After you mix in the flour and water, leave it out on the counter for a few hours, then put it back in the refrigerator. It's best if you feed your starter a few days before you intend to bake with it.
To illustrate, here is an example of my feeding routine, starting with the Day 5 starter and assuming that I finished making the starter on Friday night:
- Saturday morning, I take out what I need to bake bread (2/3 cup using my normal sourdough bread recipe) and return the rest of the starter to the refrigetator.
- Wednesday of the next week, I get out the starter, weigh it, and add equal amounts of flour and water in a 1:1:1 ratio, as outlined above. My goal here is to build up as much starter as I need to make bread on the weekend, and enough left over for my next build. It's OK if I have more than I need to bake with. If I don't think I'll have enough after a 1:1:1 build, I will increase my ratio of flour and water, maybe to 1:2:2 or 1:1.5:1.5. In that case, I will let it sit out until it almost doubles before returning it to the fridge, which might take a bit longer, as I'm using less starter relative to flour and water.
- Friday night or Saturday morning, I again take out what I need to bake with and return the rest to the fridge, to be fed again mid-week.
This is just an example of how I keep my starter. You can feed yours more often if you bake more than I do. It's also OK to let it go more than a week between feedings. If you do that, though, you might want to feed it a few times before you bake with it.
So, that's it. Hopefully I've unravelled some of the mystery of sourdough starters and given you the confidence to try one yourself. Good luck, and let me know how it works out for you!
- gaaarp's Blog
- Log in or register to post comments
...Good job.
I hope this turns out to be a very good thread of shared thoughts.
This is exactly what I wanted...a way to not waste so much flour. I have since seen a couple other folks on here that have small batch starter methods. I am looking forward to seeing how yours does ! Hope it does really well ! c
Thanks. I'm having fun with this, and it's really going like gangbusters. I think next I'm going to experiment with a no-waste starter. Maybe I'm crazy, but it just might work.
Less than a month ago, I made my first attempt at a sourdough starter. I used a one quart jar, and on day two, it overflowed the top. I poured some off, and stirred it a few times, too, to deflate it so it wouldn't overflow, again. From the next morning on, it seemed to be a goner.
I've still got the organic rye and bottled water in the kitchen, so count me IN!
Thank you! Sweet post(s).
Johnster, I think everyone who has tried sourdough starter has at some point thought they've killed their starter. That's the part where I feel the books or other instructions fail. They tell you what your starter should be doing each day, but in my experience, the starter doesn't always cooperate. However, it usually comes around if you are patient and courageous enough not to give up.
You are doing this in such a way that it is not out of reach for those of us that have not pursued sourdough baking. I started baking yeast breads in 1978 and have done so on a weekly basis since then. But I don't do sourdough. By the time I get to the end of the inst. on blogs and in books I am bleery eyed. Thank you ...of course we HOPE this works....:) Caroline
Caroline,
Thanks for the kind words. What you've described was exactly my intent. I, too, have baked for years but was totally intimidated by the thought of sourdough. And the first time I tired it, I read the instructions over and over, and still doubted myself. I trashed a perfectly good starter because it wasn't behaving like the book said it should. But I kept trying, and now I have a very healthy starter that I've been baking with for a few months.
My new starter is going like gangbusters. It's ready for the final "Day 5" treatment. Give the sourdough a try and let me know how it goes.
Phyl
Two questions - thank you for this very interesting and helpful presentation by the way. After reading bread books for so long you are giving me the inspiration it takes to try my own sourdough! Since baking is such a science, I hope these questions aren't too simple...
I couldn't find "stoneground" rye at whole foods or my grocer. I am trying it with Arrowhead Mills Organic Rye. Is that a problem?
Secondly, is it ok to put it in a large ball preserve jar with a screwtop lid, rather than using plastic wrap?
Anna,
Your starter should be just fine with the rye flour that you purchased. The real issue is that it is whole rye flour, which will carry a higher amount of yeast spores that you want in your starter than will a similar quantity of light or white rye flour. The whole rye also brings additional nutrients to the party, since none of the bran or germ have been removed from the flour.
A lidded jar like you describe will work well as a container for your starter. You want to have ample headroom for the starter to expand as it ferments, a big enough opening that you can get the starter in and out of the container easily (plus for ease of cleaning the container), and a closure that prevents moisture loss (and drying of your starter) while keeping out unwelcome guests or odors. Just don't screw the cap down tightly enough to seal it; the fermenting starter will produce enough CO2 to pressurize a sealed container.
Paul
Although you say the starter should be fine I am a little concerned that I will not be able to maximize the flavor potential by using plain rye flour. I will continue with this and keep searching for the whole grain stone ground rye.
Actually Paul, The grain I am using is whole grain I just noticed. No need to search afterall...
Anna, glad you found the right rye. The rye flour doesn't actually do much for this starter in the way of flavoring. After the initial mix using rye, you switch to wheat flour, so you end up converting your starter to a wheat starter. You can convert it back after you have it going if you need a rye starter (there are threads about that around TFL if you search for "rye starter"). The purpose of the rye in this starter, as Paul points out, is to give the starter a kick, as rye has more yeasty beasties in it than AP or bread flour.
Found a bottle of water and already had Hodgkins Mill Rye in the pantry. So off we go. My very first ever sourdough/wild yeast starter. I am documenting with photos too...so we can compare notes. Thank you for creating a recipe that is so accessable. c
Gaarp,
Can we add the feed material directly into the plastic container that has the starter? Just trying to cut the number of dishes I have to wash.
Absolutely. Just make sure you get it well mixed. For my maintenance starter, which I keep in a similar container, I weigh the starter, tare the scale, add the flour, tare again, and add the water. I used the bowl in the turotial so I could more easily show the texture of the starter.
Oh, and for the record, I only washed the bowl once. Since I was using it every day, I just rinsed it and left it sitting out on the counter.
Just a quick follow up to the blog. I baked my first loaves with Edwina (OK, I've finally given in and named my starter -- once you get to keeping multiples, you have to have some way to keep them straight). My wife had asked for a bread with sunflower seeds, so I made a soaker with sunflower and pumpkin seeds and Bob's Red Mill 5-Grain Cereal. The bread rose beautifully and actually had more sour flavor than I imagined it might. My wife says it's the best bread I've made yet.
don't leave us hangin'here ! It is day 3 and I just did the tossout and added the new ingred. So far it is exactly as you said it would be. It is bubbly and light and has a distinct "perfume" :) I am very pleased. I have taken pics of each day for the record. My baby she is a growin' ! Thank you , Caroline
Here is a picture of my first sourdough with the new starter that I created doing this blog. For this bread, I followed Reinhart's Basic Sourdough Bread recipe (BBA), but I added 1/2 cup each of sunflower and pumpkin seeds and Bob's Red Mill 5-Grain Cereal.
After 2 tries the same thing happened to me. Attempt #1 grew mold. Instead of throwing out attempt #2, 2 days ago (after day 5), I fed it 1/4 C AP, 1/8 C flour. First I tasted it - it tasted sour so I figured something must be right. Well it more than doubled in 24 hours. After it doubled for 24 hours I let it sit one more day because I didn't have time to deal with it - and I just fed it 1/4 AP, 1/8 water. Tomorrow I am going use the instructions for day 5.
Good luck - I am encouraged again.
Day one : Went well. Or as well as day one can go!
Day two : Got great results. Rose nicely and those tell tale bubbles were there. Looked exactly like your tutorial.
Day three : Taking its time. Gas bubbles didn't appear after a few hours like the first two days and thought overnight something should happen. The only sign of anything "working" the next morning was the clingfilm was steamed up however no bubbles or rising yet.
Here's my question.... I cannot go onto day four till it's come to life and risen by 50% however long it takes. And I can only do it in the evening. By tonight if it's not ready, even if it's ready by tomorrow morning, I will not be able to go onto day 4 till tomorrow night. So basically either it's ready or it has to wait another 24hours come what may. Should I wait too long will it spoil? And also, will it bubble over?
Between researching online and in books I haven't found the article that gives me the confidence to try making a starter until I found this entry! I am new to this site and so far I love it! I am completely new to sourdoughs and seeing this day by day process (with pictures) and instructions with feeding, makes me think I can pull this off. I am going to start this tonight and hopefully next weekend I'll be able to make my first loaf.
Love your article, and very helpful. I've got an old starter that I've kept up for over 15yrs now and thought I'd try different types of starters. I've perpetuated a regular white flour starter with my culture and also started a 50/50 whole wheat and white flour starter. My problem is that the wheat starter is so very sour and more like a batter consistency as opposed to the sweet sour and super strength of the white starter. Is it possible to have a more wheat content in the starter or should I continue with what I have used before, which is mostly white with a hint of rye and wheat
?
Thanks! I love your simplified approach. I successfully made my first starter and am putting it to use making Quantum's bagel recipe. I even split the starter mid week, fed and shared with a coworker. I gave him the links to TFL and this tutorial, so he can make it, bake it or break it on his own.