The Fresh Loaf

A Community of Amateur Bakers and Artisan Bread Enthusiasts.

Recent Blog Entries

chuppy's picture
chuppy

This is day three of my starter and I think it's on the way to becomming bread.


sourdough starter

chuppy's picture
chuppy

This is my daily bread I enjoy making for the family.

TinGull's picture
TinGull

Made this over the past couple days and was delightful. Very soft crumb and flavorful too. I used Floydm's recipe which was just lovely. I will start the poolish again tonight to bake off tomorrow afternoon. I want to have this one all the time!


TinGull's picture
TinGull

This bread was from a starter that was tickled with a little molasses (a question from a previous comment...and got me thinkin' it might taste nice) and it was tastyyyyy!  The bread didn't spring like I would have wanted it to, but none the less made for some tasty bits to slop up pasta sauce :)


I just used KA bread flour, water, salt and some molasses. 

pmccool's picture
pmccool

I dug my starter out of the refrigerator on Thursday and started refreshing it without a clear notion of what I would use it for, although some type of rye bread sounded good.  Even though it had been 2-3 weeks since it was last used, it bounced back quickly and I had enough by Friday evening to start two different batches of bread.  After browsing through recipes, I decided on the NY Deli Rye from Reinhart's BBA and a sourdough Dark Rye from the new KA Whole Grain cookbook. 

However, before I could get started on either one, my wife asked whether I remembered that "we" were going to make some lemon-blueberry scones for her women's retreat at church the next day.  I confessed that I did not, but since she was about to leave to go do some setup work for the retreat that "we" would get right on it.  After looking at the recipe, I saw that the end product would probably be delicious but it wouldn't be a scone.  It called for melting the butter and stirring it in with the rest of the wet ingredients, rather than cutting it (cold and solid) into the dry ingredients.  I also saw that it would require about 4 batches to yield the required number of servings.  After assembling all of the ingredients within easy reach, I got to work on the first batch.  The dry ingredients called for:

2 cups AP flour

1/3 cup sugar

2 teaspoons baking powder

1/2 teaspoon baking soda

1/4 teaspoon salt

The wet ingredients included:

8 ounces lemon yogurt

1 egg, lightly beaten

1/4 cup butter, melted

1 teaspoon grated lemon zest

After mixing the dry ingredients, stir in the wet ingredients just until everything is moistened (it's better to stop when things are still a bit lumpy).  Then gently fold in 1 cup of fresh (or thawed frozen) blueberries, trying not to crush the berries.  Spoon onto a greased baking sheet (yields 12-15 scones/biscuits) and bake in a 350F oven for 15-18 minutes.  Remove from oven when they flecked with brown, remove from the baking sheet and cool on a rack.  

In my case, as soon as one batch went into the oven, I started working on the next batch.  I was very grateful to have my scale on hand, since the yogurt came in 6 ounce packages, instead of 8 ounce packages as they used to.  Score another one for the marketing geniuses who tell us that they are doing us a favor by selling us a smaller package at no additional cost!  Remember (here in the U.S., anyway) when coffee was sold in 1-pound increments and you could but a 1/2 gallon container of ice cream?  Aack!  Okay, end of rant.

Because of the butter and sugar content, these tend to spread out as they bake.  The finished scones/biscuits are softer and more cake-like than traditional scones or biscuits.  I'm not sure what would happen if the solid butter were cut into the flour mixture, as is more traditionally the case for scones or biscuits.  It's possible that the resulting dough might be too stiff to allow easy incorporation of the berries. 


With the scones out of the way, I turned my attention to the bread.  First, I chopped and sauteed the onions for the NY Deli Rye and then set them to cool.  Then I prepared the soaker for the Dark Rye.  That called for rye flour in a pumpernickel grind, which I have not been able to find locally.  So, I dumped an equal weight of flaked rye into the food processor and whirled that I had a coarse rye meal.  The recipe called for soaking it overnight in strong coffee but I'm not a coffee enthusiast, so I opted for water instead.  If I had had some dark beer in the house, I would have used that.  By the time the soaker was, well, soaking, the onions had cooled enough to start the preferment for the NY Deli Rye.  Once that was assembled, it went into the refrigerator until I was ready for it on Saturday.  After that, it was time for some serious dish-washing.


On Saturday, I started the day with some errands (including buying a new lawnmower, but that's another story).  After returning to the house, I took the NY Deli Rye preferment out of the refrigerator so that it could begin to warm up.  Then I got to work on the Dark Rye, combining the soaker with the rest of the ingredients.  The recipe writers apparently have a warped sense of humor, since they direct you to knead the dough until it is "smooth and elastic".  Give me a break!  This is rye bread!  Anyway, I kneaded it (including some stretching and folding) until it was, um, well, more elastic than it started and about as smooth it could hope to be.  It was still thoroughly sticky, of course.  Setting that aside for the bulk ferment, I moved on to the NY Deli Rye.  Since I have made this before, it didn't take long to have it pulled together and ready for it's bulk ferment.  I set both doughs on the counter immediately above the dishwasher to take advantage of the heat coming from that, so both were ready for shaping a little sooner than normal.  I baked the NY Deli Rye first, since it was ready first (it had been spiked with a little yeast), in bread pans.  I also put the stone in the oven to preheat while the NY Deli Rye was baking.  When the NY Deli Rye came out, I slashed the boules of the Dark Rye and set them to bake on the stone, with steam.  They had very little oven-spring, preferring, instead, to spread sideways.  As a result, they are rather low; maybe 1.5 to 2 inches thick at the highest point.


The NY Deli Rye is consistently delicious.  The Dark Rye is also very good.  The molasses flavor over-compensates for the sourness of the soaker, leaving the finished bread just slightly sweet.  Had I used coffee instead of water in the soaker, the coffee's bitterness might have reduced the sweetness.  Since I don't like coffee, I think the tilt toward the molasses flavor is a good thing.  The sweetness will be a good foil for savory accompaniments like ham or corned beef or cheeses or pickles.  I'll definitely make it again. 


All in all, a good weekend for baking.  And, since I already have bread in the freezer, I had gifts for a neighbor's birthday.

riles's picture
riles

Looking for a dairy free recipe for homemade grissini - preferablly wholegrain.  Made in the true artisan way - each one hand formed into a long thin stick.  I want to server these standing upright in a tall glass as part of a cheese and antipasta spread I'm doing for Easter?  Can anyone help? 

sqpixels's picture
sqpixels


I made Naan Flatbread and I made it with sourdough! It was very exciting! Although not really true or accurate, because I don't think there's sourdough in Naans. The sourness usually comes from the yoghurt - which I realised at the last minute I forgot to buy so I used sourdough starter instead. I've been scouring through the internet the past week for Naan recipes because it was my Dad's Birthday over the weekend and he loves flat breads, so I thought I'd make him Naan. And I stumbled upon the blog entry of Il Forno and there I learnt how Naan was made with the help of Julia Child. I know, it's not really authentic or Indian made but still I think it's a good start.


The final taste was beautifully sourdoughy. Haha - not quite Naan in flavour but it was very yummy. It was crispy, very nicely chewy on the inside and I loved the texture inside that was created by the sourdough. Most rewarding even if I actually failed to make Naan. Next time I will remember the yoghurt. 


Sourdough Flatbread
Makes 11

1½ Cup Lukewarm Water
1 Cup Liquid Sourdough Starter
2 Tbspn of Olive Oil
1 Tbspn of Salt
1 Tsp Active Dry Yeast
900g Bread Flour

Chopped Garlic
Sesame Seeds
Poppy Seeds


Mix all ingredients (half the flour) in a bowl of a sturdy mixer until well combined. Autolyse for 20 minutes. Knead the dough and add in remaining flour a little at a time for about 10 minutes until a smooth elastic dough is formed.

Transfer dough in an oiled bowl and cover, leave for half hour at room temperature and refrigerate overnight (I left it in the fridge for 2 days).

On the day of baking, remove dough from fridge and let it de-chill for an hour. Divide dough into 150g portions. On a well dusted surface, roll the portions out until about 0.5 - 1 cm thick. Sprinkle water over flattened dough and sprinkle desired toppings. Cover and leave to proof for 2 hours.


Preheat oven at 250C and place baking stone on the centre rack one hour before baking.

Gently transfer dough to a well dusted peel or the back of a baking sheet. Gently pull and stretch dough out, and make several pricks with a fork in the dough. This is because, the dough will puff out like a pita and so the pricks allow air to escape.

Bake for 6 minutes. Remove from oven and place on cooling rack to cool for a few minutes. Serve warm.


JMonkey's picture
JMonkey


I don't think I've every baked this much in a weekend, and, to be honest, I didn't intend to. All I aimed to do was bake for

  • The family that bought two loaves from me at the church fund-raiser service auction in November
  • The annual church dinner and talent show
  • My family's weekly bread

Er ... ok, I guess I did intend to bake that much. I just didn't realize it.

The loaf above is about to be delivered by my daughter Iris and I to a family a few blocks away. It's a loaf of Hammelman's 40% Caraway Rye (yes, I used white flour), though I made it a bit bigger (about 2 lbs instead of 1.5) and didn't bother with baker's yeast. I just let the rye sourdough do its work.

Alas, no pictures of the crumb -- that would have been rude.

The next loaf on the agenda was white sourdough.


I used the NY Times / Sullivan St. Bakery method, though I used sourdough starter instead of yeast, mixed it at about 72% hydration instead of 80% (if I go that wet, it always sticks like Elmer's), let it sit for just 12 hours before folding, and then went the extra step of shaping it into a boule. As always, it turned out well.

Again, my apologies for the lack of a crumb photo -- I snapped this shot at the church dinner, and a friend who saw me shooting it said, with a look usually reserved for that crazy old guy at the corner who screams about bugs and scratches himself: "Er, you take photos of your bread?"

I stammered something about it being for a bread message board, but I don't think that made me sound any less crazy. Cutting into the loaf and lovingly photographing the interior was too humiliating to contemplate at that point, much less actually perform, so I put the camera away. The crumb wasn't as open as the masterpieces that Mountaindog regularly pulls out of her oven, but it was light and open enough.

This morning was the big day. I had some rye starter left over, so I thought I'd bake a couple loaves of whole wheat 40% rye sandwich bread, in addition to my usual whole wheat sourdough sandwich loaves. Plus, I still had to deliver a loaf of whole wheat cinnamon walnut raisin bread to the auction family and, if you're going to make one loaf, why not make two?

Unfortunately, when I woke up this morning, I felt like someone had stuffed my head with very thick mayonaise. I courageously made the sourdough blueberry muffins my daughter had requested, but after breakfast my wife said, "We're skipping church, I'm taking Iris to her friend's birthday party and you're going back to bed." So I did. I slept until 1pm.

When I awoke, I felt much better (thank you, Mucinex!). Good enough to knead up three batches of dough.

The night before, however, I'd taken a sourdough pizza doughball out of the freezer and put it it the fridge to thaw, so, just before Iris and I left to go to the playground around 4pm, I turned on the oven. Iris ran - literally - all the way there (about half a mile - pretty good for 3 years old), and we made raspberry-raspberry jam muffins (there are no other ingredients, or so I'm told).

When we got back, I made this "heart-shaped" pizza for my wife. Aren't I sweet?


You didn't buy that line, did you? Actually, I fumbled a bit with the peel. A happy fumble, all the same.

After dinner, I popped the cinammon raisin loaves in the oven. Near the end of their bake, I started making a shaping tutorial video and got interrupted by the oven telling me to get those loaves outta there!


Here's Iris and I sprinkling cinnamon-sugar over the buttered loaves.

A couple of hours later, the rye was ready to pop in the oven (no photo -- I put them in the freezer before realizing I'd not taken a photo) and, shortly afterwards, the sourdough sandwich loaves, which rose very nicely.


Next weekend, I think I'll just stick to something simple like just one loaf. Of course, if you're making one loaf, it's not much more trouble to make two. Also, if I'm feeding my rye, I may as well use it somehow -- hate to throw some away ....
george's picture
george


Hi, arrived in Auckland yeaterday 31 March.

Today is Sunday and started maknig some sourdough bread this morning. Am giving some bread making lessons to Shireen's friend this afternoon. 

bwraith's picture
bwraith

In Search of a Good Miche Version (2)
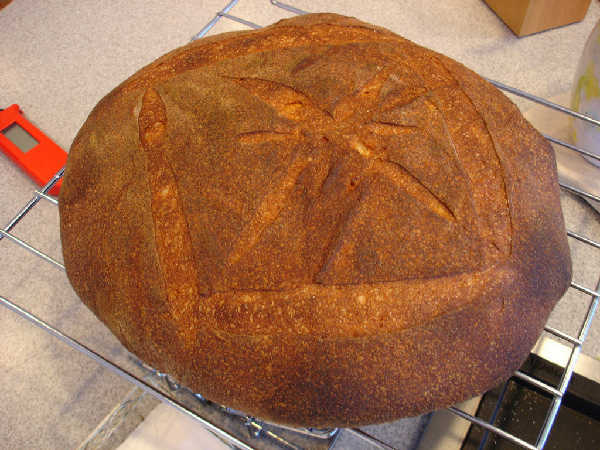
 Mixed Flour Miche (2)

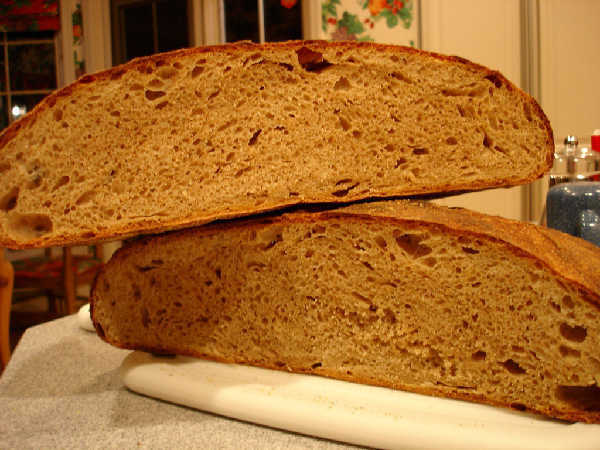
 Mixed Flour Miche (2) Crumb (a)Mixed Flour Miche (2) Crumb (a): Mixed Flour Miche (2) Crumb (a)
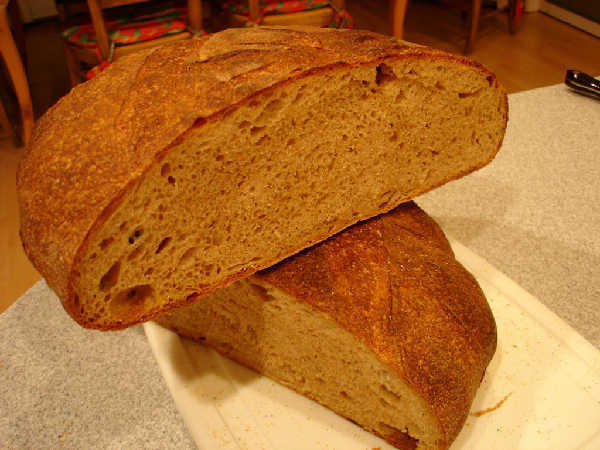
 Mixed Flour Miche(2) Crumb (b)Mixed Flour Miche(2) Crumb (b): Mixed Flour Miche(2) Crumb (b)

Mixed Flour Miche (2): Mixed Flour Miche (2)

Mixed-Flour Miche: Loosely based on BBA Miche and Hamelman Mixed-Flour Miche.

I did a new slightly different version of the miche in my first blog entry about this recipe. I have a spreadsheet showing the recipe and percentages.

I have some photos of my process, but it is from the original blog entry, not for this specific bread. However, the process was the same other than as noted below.

Many, many thanks to JMonkey, SourdoLady, Zolablue, Mountaindog, Floydm, and numerous others. My results on this and other recipes are much better because of the great ideas I've found in the various blogs, postings, and lessons here.

Mixed-Flour Miche (2) as in version (2): Loosely based on BBA Miche and Hamelman Mixed-Flour Miche.

There is a "firm starter" that is built from white poolish-like starter as in the BBA "barm" version (50/50 by weight using breadflour and water), which is retarded overnight and included in the dough which is baked the same day.

The recipe I've been doing lately has evolved from the BBA miche recipe to be more like the "Mixed-Flour Miche" in Bread by Hamelman. My objective has basically been to have a high whole wheat content, but use sifted flours to get a less coarse crumb. I have also mixed red wheat and white wheat flours as well as tried some spelt trying to come up with a flavor that is not too "grassy" or "nutty". I find the taste of 100% white wheat bread to be a little too bland, whereas using too much red wheat seems bitter in a way I don't like.

As a result, I've ended up mixing various flours in an attempt to get something that is mostly whole wheat with some of the coarser bran sifted out and partly red wheat, partly white wheat for flavor.

The recipe showing in the photos above is as follows, and is loosely based on both the BBA Miche and the Hamelman "Mixed-Flour Miche" in Bread.

For the firm starter:

  • 7oz "BBA style barm" (100% hydration bread flour starter)
  • 4 oz KA Whole Spelt Flour
  • 3 oz KA Organic Whole Wheat
  • 2 oz KA Bread Flour
  • 4oz water

Mix/knead ingredients for about 3 minutes to get a fairly firm not very sticky dough. Place in container and let rise to about 2x in volume - about 3 hours. No extra punch down and additional rise at this point, compared to original recipe. Place in refrigerator overnight.

The difference in the firm starter above from the version (1) recipe is I substituted 4 oz Whole Spelt and 2 oz KA Bread Flour for 6 oz Golden Bufallo Sifted Red Wheat Flour. The objective was to get a more mild, less sour flavor. I also only let this rise for 3 hours, rather than 5 hours in version 1. This bread tasted better to me. The sour flavors that seemed a little too strong, as noted in the original blog entry, are more mild and complex this time, with no subtle excess of sour dominating the after taste of the crumb.

For the dough:

  • 3 oz KA whole spelt flour
  • 8 oz Golden Buffalo sifted red wheat flour (Heartland Mills)
  • 3 oz KA Organic Whole Wheat
  • 8 oz sifted white wheat flour (Homestead Grist Mill)
  • 7 oz Sir Lancelot High Gluten flour
  • 3 oz KA Rye Blend
  • 29.5 oz water
  • 3/4 tsp diastatic malted barley flour
  • 24 grams salt (about .8 oz) (2 grams less than in the first version)
  • Firm starter from day before.

The overall difference from the previous recipe is just a small decrease in red wheat flours, and less spelt flour in the dough, since I have more spelt flour in the firm starter. Also, the hydration is a little higher, about 83% from more like 82% in the previous recipe. Also, I used water on my hands and on the kneading surface instead of flour, instead of the flour that was used in the first recipe (based on some recommendations from the WW gods on the site), so that may account for a significant difference in the wetness of this dough. I imagine that could contribute an additional 1% difference in hydration.

Cut up firm starter and cover with towel to allow the pieces to lose their chill.

Autolyse: Mix all but salt and starter in bowl until the ingredients form a uniform shaggy mass. Allow to rest for 30 minutes.

I decided to use less of an autolyse, based on some advice in Raymond Calvel's book, "The Taste of Bread" which seems to indicate that letting the autolyse go on too long may take away from bread flavor.

Mix and knead dough: Push the pieces of starter into the dough and sprinkle with salt. Use a "frisage", i.e. use the heal of your palm to push the ingredients out along the table, so that all the lumps become mixed. See the Danielle Forestier video on the Julia Child video site. Mix/knead for 5 minutes to form a supple, fairly soft dough. I grab an end, lift it from the table, stretching it from the other end, which is stuck to the table. Then, toss the middle sideways and drop the end back down against the end stuck to the table, which forms a fold. Then, do the same thing from a quarter turn of the dough, i.e. grab an end at a right angle to the end you grabbed before. The total hydration of the entire overall dough is 83%, so it is relatively soft at the beginning. Place in a container to rise.

Fold the dough every 30 minutes: The total bulk fermentation time was 3.5 hours. I was folding it using the technique in Hamelman's Bread, i.e. (very roughly) turn the dough out on a bed of flour top down and gently spread it out/push out some of the gas. Then pull out and stretch one side of the dough and fold it toward the center. Do the same for the other three sides. Put the dough back in the container with the top up and the seams down. I folded 3 times, then let it rise for the rest of the time.

This time I folded every 30 minutes instead of every 60 minutes, and I only folded 3 times instead of 4 times. The result was a much more slack dough after completion of the bulk fermentation. This time, because of the higher hydration of this version, I probably should have folded at least one more time to get a dough that would hold its shape better. This dough spread out a little too much. It had good oven spring, so that compensated to some extent, but overall I wished it would hold its shape better than it did. Next time, I may reduce the water slightly and fold a little more to get a better shape.

Shape into boule: Form a boule not too differently from the folding technique above, except it is more of a gathering in of the edges of the dough and pinching them together underneat to stretch the top of the dough. Let the boule relax for 10 minutes to seal the seams underneath. Flour a couche very lightly with rice flour and place in 8 quart steel mixing bowl, and then place the dough in the couche seams up.

This time I tried to use mountaindog's recently blogged techniques for shaping the boule "right side up" instead of my previous upside down technique. I also allowed the relaxation of the boule for 10 minutes this time. The only gotcha I suffered was that the dough didn't come out of the rising bucket properly because it was still fairly gloppy - not enough folding of the more hydrated dough. As a result, the dough ended up lopsided, and a couple of the seams from the folding were slightly visible on the top of the dough after the final proof. I slashed through it, to not so gracefully hide that - oh well, next time I'll do better. This time, I did an additional fold after turning the dough out on the table, as it seemed quite gloppy. I need the fold to get to the point where I could form the boule.

Final Proof: Allow to rise for about 2 hours.

Last time, I think the final proof went on too long - 3 hours, and that probably contributed to slightly excessive sour flavors I wasn't so happy with. Also, I think it was long enough that the oven spring wasn't that great. This time, the flavor was very good, at least I thought so. The flavor of this one is complex, slightly sour only, with a cool, light, moist crumb. Although the gloppy dough did spread out, it also had decent oven spring, so the overall shape was slightly flatter than I wanted but not a huge disappointment.

Place on parchment: Place parchment on an upside down baking sheet or a peel and flour with coarse corn meal. Invert the bowl with the dough onto the parchment and pull away the bowl. Gently pull away the couche, which works great with the rice flour on the couche. Slash as photos show. I very lightly spray water on the dough with a pump pressure spray mist bottle.

When I placed the dough on the parchment paper this time, it spread out alarmingly, but was not a disaster. I realize that I need to fold the more hydrated dough one or two more times.

Bake: Preheat oven to 500F well before this point, like an hour before. Use various steaming techniques as described many places for home ovens. Drop temperature to 450F after about 5 minutes. Bake at 450 for 10 minutes, then rotate loaf and drop temperature to 400F for another 15 minutes. Then rotate and drop temperature to 375F. Continue to bake until internal temperature is about 208F.

This version had great flavor. I think this is partly because of the more mild starter, which used spelt instead of more red wheat flour. Also, I fermented for less time at all stages this time, which seems to have helped remove the slightly too sour after taste of version 1. I think the oven spring was better because of more hydration and less folds earlier. The crumb was a little more open for the same reason. Next time, I want to use slightly less hydration and one or two extra folds to make the dough a little stiffer - closer to version 1.

Pages

Subscribe to Recent Blog Entries