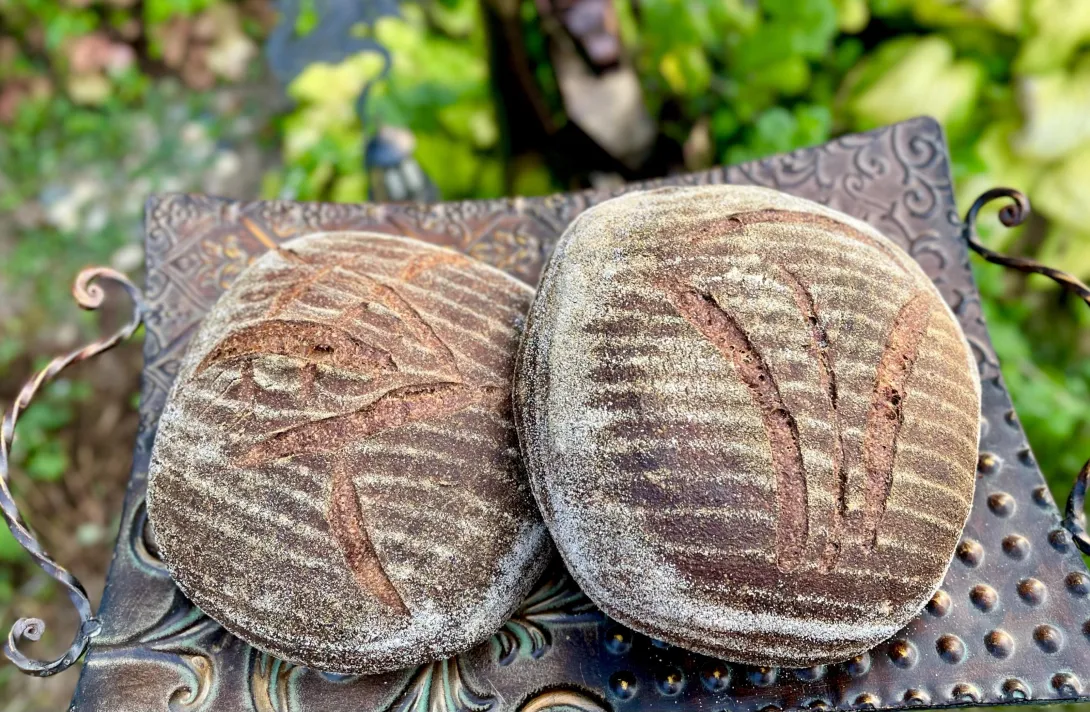
The only store-bought flour used in this bake was the small amount from the seed starter to make the levain. I wanted to use as close to 100% fresh-milled flour as I could. Barton Springs Mill, Butler’s Gold whole wheat berries, and Blue Hopi corn were used in this bake. The results were pretty good. The dough fermented a little too long during bulk, and there was not much oven spring or refrigerator rise either.
I used my new, smaller-sized square bannetons, and I could have definitely used more dough in each basket. Next time, I will up the overall dough amount.
I decided to do a scald, which provides added plasticity to the crust and crumb. It also tends to make the crumb softer. I used a combo of fresh-milled whole wheat and Hopi Blue corn flour.
The fresh-milled flour for the main dough was milled in my Mockmill 200 and sifted once with a #30 drum sieve, and re-milled at the finest setting. The scald flour was milled only once at the finest setting.
I used my Ankarsrum to mix up the dough and oven-baked it on a baking stone with steam.

Formula


Levain Directions
Mix all the levain ingredients together for about 1 minute and cover with plastic wrap.
Let it sit at room temperature for around 6-7 hours or until the starter has almost doubled. Either use in the main dough immediately or refrigerate for up to 1 day before using.
Scald Directions
Pour boiling water over the flour and mix until incorporated. Cover and let cool to room temperature. I put mine in the refrigerator to let it cool quicker.
Main Dough Procedure
Note: I use an Ankarsrum Mixer, so my order of mixing is slightly different from than of using a Kitchenaid or other mixer. Add all the water to your mixing bowl except the 70 grams of water. Add all your flour to the bowl and mix on low for a minute until it forms a shaggy mass. Cover the mixing bowl and let it rest for 20 – 30 minutes. Next, add the levain, scald, salt, honey, and the remaining water (as needed), and mix on medium-low (about speed 3) for around 12 minutes until you have a nicely developed, smooth dough.
Remove the dough from your bowl and place it in a lightly oiled bowl, and do several stretch and folds. Make sure the dough is as flat as possible in your bowl/container, and measure the dough in millimeters and take the temperature of the dough as well. Based on the chart from http://www.thesourdoughjourney.com, determine what % rise you need and make a note. If you have a proofer, decide what temperature you want to set it at and what rise you are aiming for. If the dough is fully developed, you don’t need to do any stretch and folds, but if it’s not, do several sets 15-20 minutes apart. (See time and temperature for this bake in the formula.)
Once the dough reaches the desired bulk rise, pre-shape and let rest for 15-20 minutes. Finish shaping and place in your banneton, bowl, or on your sheet pan, and cover it so it is pretty airtight (note: I just read a post that suggests it is not necessary to cover the dough when refrigerating it. I have not tried this yet, but that is the way most professional bakeries do it, and they do have dedicated retarders for dough). This dough is very sticky, so make sure you use plenty of rice flour in your banneton or bowl to prevent it from sticking.
When you are ready to bake, an hour beforehand, preheat your oven to 540°F and prepare for steam. Let your dough sit at room temperature while the oven is warming up. When ready to bake, score as desired. Prepare your oven for steam. I have a heavy-duty baking pan on the bottom rack of my oven with 1 baking stone above the pan and one on the top shelf. I pour 1 cup of boiling water into the pan right after I place the dough in the oven. I then lower the temperature of the oven to 450°F for a miche or 455°F for smaller individual loaves. Bake until they are nice and brown and the internal temperature is at least 205 – 210°F.
Take the bread(s) out of the oven when done and let them cool on a baker’s rack for as long as you can resist.


- Isand66's Blog
- Log in or register to post comments
Nice effort using WW. I find it difficult to get a lot of oven spring with WW. Did the 50g of corn provide much flavor?
Tony
I would have gotten more oven spring had I built my starter up in 2 feedings. As it was I refrigerated it over night after it peaked so that didn’t help either.
It’s hard to tell how much the corn flour contributed to the flavor. I think it did add a subtle earthy flavor to the overall bake but without trying the same formula without it I can’t be sure.
Thank you for your comments.
Happy baking!
Ian
Your scoring was really elegant. How do you get those flour stripes?
Nice open crumb, too
The flour stripes are from the wicker banneton I use. I add rice flour to the basket before add the shaped dough.
Thanks again for your comment.
Happy baking.
Ian
Thanks for the answer. I use rice flour all over my banettons and on the doughs so that the loaves don't stick to the banetton when I flip it over above the peel. And I always use parchment paper on the peel because I'm not confident of the loaves sliding off the peel cleanly on to the baking stone.
I learned the hard way that it’s easier and safer to use parchment paper and I never looked back 😆
Surprisingly simple formula for an Ian loaf! They look great and yes more dough in those bannetons would be good as you said.
Benny
Sometimes the simplest are the hardest. Using fresh milled presents its owns challenges. It was a pretty good outcome all things considered and I’ve been grilling slices all week to go with dinner.
Thanks for checking in as always.
Happy baking ,
Ian
Nice loaves Ian. That is a really good crumb for wholewheat! Nice score patterns, very eye catching. I bet these were delicious!
Michael
I was very happy with the crumb on these and the taste.
Appreciate your comment Michael .
Happy baking.
Ian
A very Ian loaf with classic scoring. I'm loving these square loaves - very charming. Beautiful and very impressive crumb for the flour profile.
Thank you for your kind words.
I need to use more dough in each banneton next time but even so they still came out nice. Very tasty as well.
Best regards.
Ian