German Pumpernickel HALF-SIZE
Adapted from: https://www.thebreadshebakes.com/2014/08/baking-traditional-real-german-pumpernickel-bread/
SPOILER: didn't work for me
NOTE: consider sprouting rye kernels
NOTE: for all mentions of cracked rye, use your judgement about using medium to fine milling based on the consistency you desire
INGREDIENTS
Preferment
- 25g rye sour starter
- 175g cracked rye
- 175g water
Scalded Rye Berry Soaker
- 100g rye berries
- 100g boiling water
Cracked Rye Soaker
- 75g cracked rye
- 75g water
Additional Ingredients
- 275g cracked rye
- 75g water
- 11g salt
- 60g maple syrup
- butter to grease pan
METHOD
Day 1 Noon/early afternoon
- Prepare preferment and cover 16-24 hours
- Prepare scalded rye and cover overnight
- Prepare rye soaker and cover overnight
Day 2 Morning
- 11.30am -
- Add 500g water to scalded rye berry soaker
- bring to a boil and simmer ~1 hour until soft
- 12.30pm -
- Strain scalded rye berry soaker, discarding water (or save the water for another bake!)
- Set aside to cool
- 1pm -
- In a large bowl combine
- 350g of preferment
- boiled scalded rye berry soaker (cooled)
- cracked rye soaker
- additional cracked rye (275g)
- water (75g)
- salt (11g)
- maple syrup (60g)
- mix by hand until dough sticks together well, comes away from bowl easily
- 1.45pm -
- grease pan
- place dough into pan and flatten so half full
- cover pan
- 2pm -
- proof 3 hours or until dough visibly rises near top of pan
- 4.30pm -
- Preheat oven 150°C (300F)
- 5pm -
- Brush dough with water
- wrap pan in foil or oven bag to keep steam inside
- place pan on bottom oven rack
- bake ~14 hours subject to next step
- 6pm -
- Reduce oven to 120°C (250F)
Day 3 morning
- 7am -
- After baking, turn off oven
- leave bread in oven for 1 hour
- 8am -
- remove loaf from pan
- wrap loaf in kitchen towel
- let loaf rest 24 hours
- happycat's Blog
- Log in or register to post comments
Now I don't have to do the math. I am working on converting starter to rye and will begin once I'm sure the yeasties are happy.
Great. I started sprouting rye today so I will be catching up.
I'm happy to share the space here to capture our two tries at it -- up to you of course.
I'm in Vancouver so we can compare! Just don't let anyone from the *real* east coast hear that I called Toronto the East coast. We'll call it "east of the rockies!"
:-)
It's a term I see and hear a lot in Michigan, which is surrounded by the Great Lakes.
Paul
David that is great that you shared this formula for others to bake. May I ask, where are you sourcing your rye berries from? I don’t recall seeing them at bulk barn. Without a mill how do you think I could make the cracked rye? Would a food processor do it or a coffee grinder?
Benny
Hi Benny
I get them off Amazon. We have Prime so shipping is free. For some reason they are cheaper off Amazon than from Yupik directly.
https://www.amazon.ca/Yupik-Organic-Rye-Kernel-1Kg/dp/B078JG4JHW/ref=sr_1_3?crid=3GTEOJ0MRQ99E&keywords=yupik+rye&qid=1642281512&sprefix=yupik+rye%2Caps%2C109&sr=8-3
I have a Porlex hand crank coffee grinder. I can open up the setting to make coarse chops pretty fast.
My experience with my Kitchenaid food processor is that it won't work on grains. It will spin them around nicely but only make a bit of dust without cracking the grains. That's after I sharpened the blade, too. It's necessary to crack the grains and then a food processor (mine anyway) can break them up.
For a little coffee mill, their motors are pretty delicate but should be ok if you keep to small portions and pulsing the motor. The coffee mill will break up grains quite easily in contrast to my food processor.
Thank you for that information David, super helpful. For some reason I never thought to look for rye berries on Amazon. So only doing small amounts at a time a coffee grinder might be OK, good to know. Now I might be able to start down the road of doing a few more rye recipes for which I didn’t think I could without the rye chops.
For a bread that's baked for a very long time at low temperatures I wonder if a slow cooker might be a good option. The only downside I can think of is a slow cooker might generate a too much moisture but perhaps by baking it in an enclosed loaf pan does away with that.
Might work well. A quick Google search shows that people are making bread in them.
Wrapping the loaf in a slow cooker bag (oven bag with opening on long side) might solve the moisture issue
Unfortunately mine's trapped in another city or I'd have played with it for all kinds of things :(
For those following along, my rye grains are now sprouted and are now drying in my dehydrator.
Sprouting
I bought 1kg Yupik organic rye kernels from amazon.ca
I dumped them into a big plastic cashew container
I used elastic to secure cheesecloth single layer over the top
I filled the container with tap water and cover it with a box and placed in a cool space for 4 hour soak
then I drained it and repeated the following for a further ~24 hours
They were sprouted after around 27-30 hrs
Very exciting, thanks for taking us on this journey with you.
and the pre-ferments and soaks are happening. Should be interesting.
Great! You are ahead of me :)
My 100% rye starter was ready today.
My sprouted rye was dry last night. Today I chose this consistency for "cracked rye" (6 clicks loose on a Porlex manual coffee mill). The recipe said medium or fine cracked rye. This was my guess. I milled the whole 525g I would need. Good arm workout.
NOTE: my sprouted rye is not super dry. I mean, in the past I have toasted some in an oven which made it brittle. In contrat when the dried and not toasted version is milled it can get crushed/flattened bits vs shards of bran
Here is the cracked rye soaker (rye plus room temp filtered water). It's pasty and takes some mushing around.
Here is the cracked rye levain (rye plus room temp filtered water and my rye starter). It's also pasty and takes some mushing around.
The third piece was scalding whole rye kernels. No pic. I wanted to cover it up and hold in the heat. It's just kernels and boiling water.
Next step will be tomorrow :)
Today I checked in with my soakers... wow. What a sweet delicious aroma.
I boiled the scalded kernels for an hour and drained them (I kept the drain water and plan to use it in another bake). A sample kernel mashed easily on the back of a spoon.
Here are all the pieces to the puzzle: from top left, salt, additional cracked rye, maple syrup, filtered water. From bottom left, cracked rye levain, cracked rye soaker, scalded and boiled kernels.
In a large bowl, I folded i gredients with a spatula until well-combined into a creamy kind of dough that held together and came away from the bowl. I greased a pan with butter and spread the dough in flat. The recipe says to only half fill... oops. Let's see what happens after 3 hours proof.
After the proof, this gets wrapped in foil and an oven bag and then baked for a looooooong 14 hrs.
I think I milled my rye more coarse than you did. I never got anything that I would describe as close to "creamy" when I was mixing. It held together, barely because of all the dense grain. It will be interesting to see what happens.
My cracked rye levain and soaker were both a bit creamy. Not sure if it's finer milling and/or sprouting which would presumably shift starches into sugars a bit. My milling of sprouted rye creates fine powder plus broken sheets of bran. My mill is a ceramic conical burr. I imagine yours is a flat surface.
Did your rye soakers smell sweet?
Looking forward to your baked loaf!
My soakers smelled sweet, it was really interesting. I have a Komo Fidibus mill, so flat surface yes. This is my soaker before it went into the mix. When it said cracked, I did just cracked, it ran through the mill really fast.
Yum! Husband thinks it's perfect, and I think it's pretty darn tasty. Nice and moist, caramelized. I feel like it's a little bit too sour (probably that overnight retard) and could use more salt, but it's a hearty dense delicious loaf. Will definitely do this again, his comment "yum, where is the liverworst?"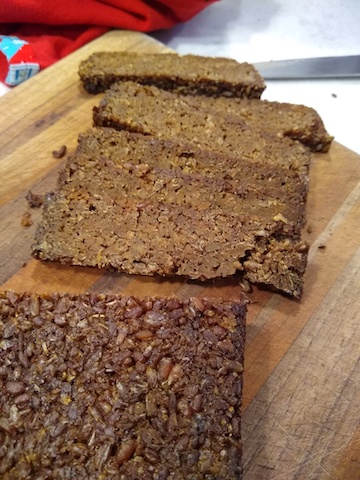
Congrats! Glad it worked for you.
However, I’ll have to part company with your husband on the liverwurst topic. ;-)
Paul
Didn't rise a lot... the pan is tapered though. Despite recipe proof of 3 hrs I went for 7 hrs in case it would help.
BEFORE
AFTER
Foil wrapped then oven bag wrapped and tied with a cut portion of oven bag,
Then into oven 300f 1 hr then 13hrs at 250f
I suppose one could also line the pan with the bag and put the dough inside the bag and tie it shut or put a metal buro clamp onto it.
Hi Mini
Very true. It would have to proof in the bag in the pan but that might well be a smarter idea to keep in moisture!
After 14 hours baking plus one hour rest in the oven turned off, here's the loaf.
During baking we could smell the aroma and I was concerned that I was losing moisture.
When I unwrapped it, however, there was plenty of moisture beading on the inside of the aluminum foil.
I'd hoped for a bigger loaf but maybe I overproofed it yesterday hoping it would go higher.
I realized sometime after starting the bake that I had forgotten to brush the dough with water before sealing it up... :( doing too many things at once last night!
Wrapped in a tea towel and now needs to rest 24 hours.
Some nice aromas around me right now. Kind of sweet and spicy.
Looking forward to your tasting notes. It looks well baked.
Thanks Benny
Yeah, I like the colour of it and the aroma. The pan almost smelled like a spice cake.
If this works, I'd be interested in tweaking baking temperature and time as it seems the "authentic" version is way longer than this.
I think you did the right thing filling the pan as you did, I listened to the only fill half way instruction and ended up with two very short loaves.. Oh well, will be great for appetizers, hubby says smoked fish and pickled onions.
Image

I wasn't sure about filling, but Benny has mentioned to people a few times about tapered containers having way more volume at the top.... so I figured it would be ok.
Hope you share a crumb shot and tasting notes. I'll post tomorrow.
Mine's a brick. Difficult to slice.
Thick, dry crust on bottom. Outside of loaf is unpleasantly chewy/crusty/crunchy. Worst bits are probably where flakes of bran dried out.
However... moist in the centre of the loaf. Mild sour.
I wrapped it in a plastic bag. Maybe it will soften up.
Nothing about this makes me want to try it again.
If it doesn’t, cut off the armored bits and grind them for use as altus in a future bake.
There have been a couple of instances where I’ve brushed a very hard rye crust with boiling water just after the bread comes out of the oven. It seems to soften the crust as it cools.
Paul
Thanks for the tip on the boiling water. I'll have to remember that one.
Yes, this will be altus for sure. I'm going to dig into more info about how to do it,
I just bought a big pack of yeast and I look forward to making life easier for awhile :) I'll cannibalize this loaf for added flavour.
Paul
24 hours later, I took your advice and cut off all the "armored bits" (sides and bottom) and crumbled them into a bag for altus. I think they will be a rich source of flavour for other bakes.
The remaining block had softed a bit on the top. With the "bitterness of disappointment" dissipated overnight, I was able to enjoy what remained. A mix of sour, sweet, and a pleasant chew. I can see how this loaf would have been quite nice if it had been sealed up better.
Thanks for the comments!
One doesn't have to slice conventionally. First cut the loafes in half across or in thirds and stack on ends to cut. Horizontal slices instead of vertical ones. :)
She says fill the pan halfway then proof until near the top of the pan. Her photo appears to show it has nearly doubled. I don't see how she gets that. What is holding the gas?
Gary