So what exactly is the best way to proof? Keep the loave moist with a spray of water once in a while or cover them with damp or lightly wet towels? Or just let the surface crust form?
When proofing your dough you will want to keep it in a warm (room temperature - I like something in the range of 75 degrees), draft free area. Place it in a bowl that has been lightly coated with oil and cover the bowl with a towel or plastic wrap.
I personally invert a large old plastic (underbed) drawer over my proofing loaves on my counter - it works fine even though it doesn't actually "touch" the loaves nor form a "really tight seal" at the edges.
I've heard that oiled Saran Wrap is commonly used ...but I've not used it myself very much. I personally find anything that actually touches the loaves -even though it works just fine to prevent a crust- to be more of a cleanup hassle than I want.
I've also heard that old shower caps work pretty well, but that's mainly for bulk rising rather than proofing.
I've had some bad experiences with wet towels, with the water evaporating resulting in the temperature being much lower than desired.
Besides being a major pain to do, I suspect the misting would mess up the loaves hydration level and/or make slashing unnecessarily difficult.
Before I had sealable fermenting/proofing containers, I used cling wrap & non-stick spray - still do on smaller batches of dough - and I've never encountered a mess. In fact, I can often re-use the cling film.
I use sealable containers like this one:
and have zero issues with skin forming.
BTW, you don't want skin - not as nice a product if you get it.
I just happened back to this page and saw that this question was unanswered, so I'll answer it. The proofing containers used by Foodslut (above) are available from King Arthur Flour either in the catalog or on their web site.
I went to bed bath and beyond for some supplies (Mainly a 4 cup pyrex). I found an airtight container for my 3lb bag of flour and found this nice 40 cup container
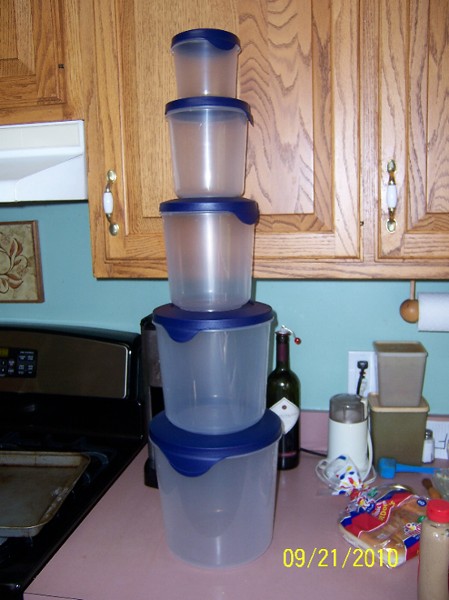
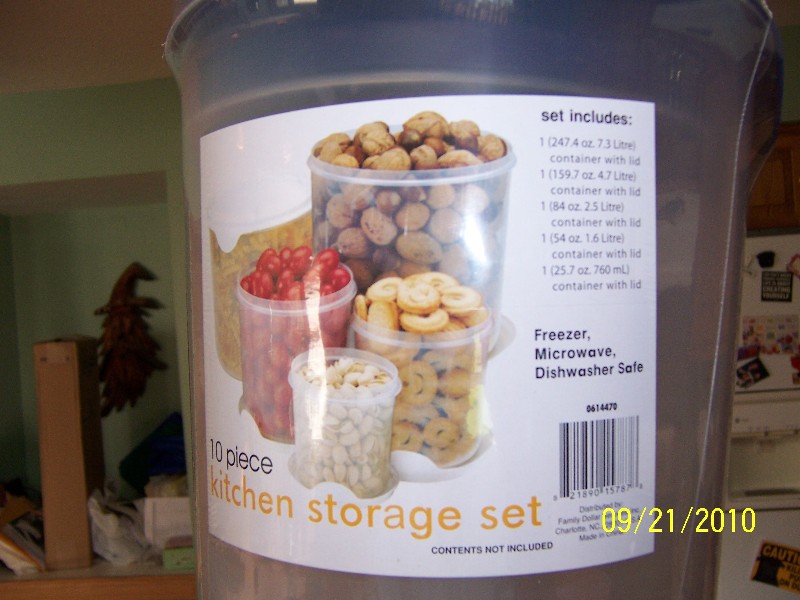
I've been looking for more than a year, for a proofing container or two that would be suitable for different sized batches of dough, and affordable. I'm happy to report that I've found the perfect thing. This is a set of 5 containers ranging in size from over 7 litres to just over 3/4 of a litre. They are at Family Dollar stores and cost $6.99!!! The lids are airtight and rising dough will pop the lid, so I've used a sewing needle (or straight pin) to poke a tiny hole in the very center of the lid, where the indentation from the injection molding process is. This allows the gas to escape but is small enough to prevent drying of the dough surface. Here they are:
The largest one holds almost a full 7 pound box of milk bone dog biscuits!
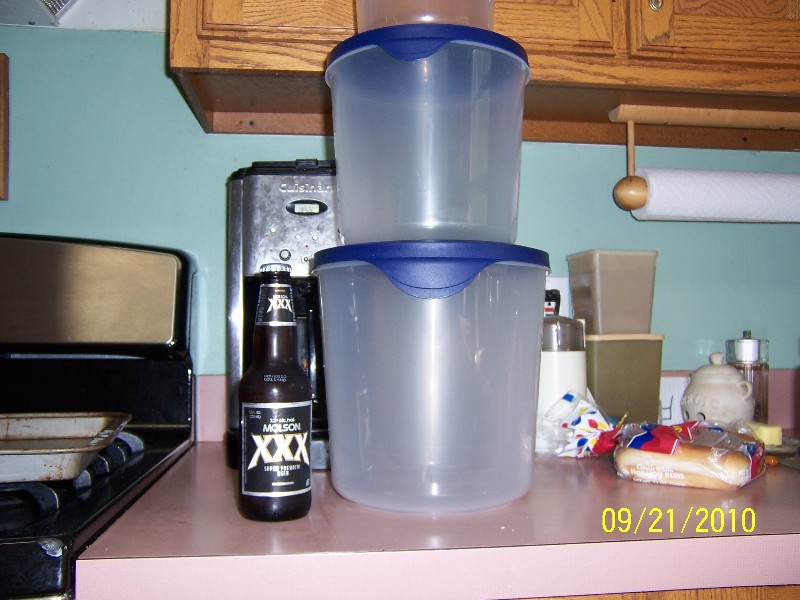
This will give you an idea how large the two largest containers are. I use the 2nd and 3rd largest ones for proofing most frequently.
I don't always use oil in the container. When I don't I use a simple scraper that is very effective. I bought it a long time ago but it looked so cheap I didn't even use it for months because I assumed it would not be very effective. I was wrong and it works marvelously to clean the sides of a smooth bowl or other container. I think it cost 75 cents.
At the San Francisco Baking Institute they suggest that you oil a bowl very generously (they use "Vegelene" spray, but any spray will do, or even just oil). Don't skimp - it shouldn't be dripping, but there needs to be enough oil to keep the dough from sticking, and to coat both sides of the dough. Once you plop the dough in the bowl, flip the dough over once, so the exposed side has a little coating of oil. Then cover the bowl tightly with plastic wrap. Or use a proofing container with a lid.
Okay the recipe that I am using from Calvel says to proof after you divide and shape your loaves. What you are talking about looks more like the dough rising stage?
I suspect this is just a matter of unfamiliarity with some admittedly confusing terminology.
Typically bread dough rises at least a couple times.
For the first (and sometimes second too) rising, there's just one piece --the entire ball of dough, and after the rise has ended the dough is destined for further manipulations: this is called "bulk rise". Often this is done in a straight-sided container to facilitate knowing when it's done -- recipes often say "let rise until doubled" or "let rise until tripled".
For the last rising though, the dough has already been separated into pieces and formed into loaves, and after the rise has ended the dough is destined to go in the oven: this is called "proofing". This is done when it "feels" right (often the finger-poke test is used) -- too short and the loaves won't expand to their full potential; too long and the dough gets so bubbly and jiggly that it may "deflate" (pop:-) if even slightly mishandled, and when baked the crumb looks funny, often either with all the big holes in one spot or with a "flying crust".
("proofing" in this sense of bread lingo has --as far as I know-- nothing to do with the similarly named "proofing" of old-style active dry yeast ...it just happens to be spelled the same)
According to Hamelman and other professional bakers, the first stage of fermentation is called the bulk (primary) fermentation. The dough also ferments during the bench rest, after being divided and prehaped, then the final fermentation (proofing) takes place after the loaves are shaped.
DiMuzio notes that the main purpose of proofing is to reinflate the loaves to an appropriate level before baking.
But no one seems to know the origin of the term "proofing." Maybe because it's quicker to say than "final fermentation"?
Anyway, it helps to know the terms just for clarity.
Alrigth I looked up the poke test for the final proofing and I will give that a try. I also have another question. Everytime I mix up my dough I seem to never have it at a point where I can handle it without it sticking to everything. By the time I finish kneeding it and adding sprinklings of flour to keep it from sticking to my hands when I am kneeding, it is very tough and not silky.
I have found that when I let the mixer do the kneeding it comes out much better but it still is often to sticky to handle. What am I doing wrong?
By the time I finish kneeding it and adding sprinklings of flour to keep it from sticking to my hands when I am kneeding, it is very tough and not silky.
By adding flour, you're changing the hydration of the dough.
Try lightly spraying your work surface with oil and then lightly oiling your hands. Or do the same with water.
Or forget about all that kneading, except for the initial mix. Do a few S&Fs (stretch and folds). Check out the videos by Mark Sinclair of the Back Home Bakery in the TFL videos tab.
Lightly press raw dough with a floured finger. If the indententation quickly disappears and the dough springs back, it needs more proofing time.
If the indententation remains without springing back at all, it's overproofed.
If the indentation springs back about half way, but still can be seen, the dough is ready to be scored and baked.
What's helpful is to mix a batch of dough, then divided it into three parts. Shape them into rounds and experiment with the proofing, allowing one to overproof. Feel the dough at the various stages.
You can always make bread crumbs with the overproofed one. ;-)
When proofing your dough you will want to keep it in a warm (room temperature - I like something in the range of 75 degrees), draft free area. Place it in a bowl that has been lightly coated with oil and cover the bowl with a towel or plastic wrap.
I personally invert a large old plastic (underbed) drawer over my proofing loaves on my counter - it works fine even though it doesn't actually "touch" the loaves nor form a "really tight seal" at the edges.
I've heard that oiled Saran Wrap is commonly used ...but I've not used it myself very much. I personally find anything that actually touches the loaves -even though it works just fine to prevent a crust- to be more of a cleanup hassle than I want.
I've also heard that old shower caps work pretty well, but that's mainly for bulk rising rather than proofing.
I've had some bad experiences with wet towels, with the water evaporating resulting in the temperature being much lower than desired.
Besides being a major pain to do, I suspect the misting would mess up the loaves hydration level and/or make slashing unnecessarily difficult.
Before I had sealable fermenting/proofing containers, I used cling wrap & non-stick spray - still do on smaller batches of dough - and I've never encountered a mess. In fact, I can often re-use the cling film.
I use sealable containers like this one:
and have zero issues with skin forming.
BTW, you don't want skin - not as nice a product if you get it.
foodslut. where did you get your proofing container? Sure looks nice.
I just happened back to this page and saw that this question was unanswered, so I'll answer it. The proofing containers used by Foodslut (above) are available from King Arthur Flour either in the catalog or on their web site.
I went to bed bath and beyond for some supplies (Mainly a 4 cup pyrex). I found an airtight container for my 3lb bag of flour and found this nice 40 cup container
http://www.snapware.com/W-405027.html
Lets see how it holds up this weekend. The only question I have is should I be very airtight for proofing or almost airtight.
I've been looking for more than a year, for a proofing container or two that would be suitable for different sized batches of dough, and affordable. I'm happy to report that I've found the perfect thing. This is a set of 5 containers ranging in size from over 7 litres to just over 3/4 of a litre. They are at Family Dollar stores and cost $6.99!!! The lids are airtight and rising dough will pop the lid, so I've used a sewing needle (or straight pin) to poke a tiny hole in the very center of the lid, where the indentation from the injection molding process is. This allows the gas to escape but is small enough to prevent drying of the dough surface. Here they are:
The largest one holds almost a full 7 pound box of milk bone dog biscuits!

This will give you an idea how large the two largest containers are. I use the 2nd and 3rd largest ones for proofing most frequently.
I don't always use oil in the container. When I don't I use a simple scraper that is very effective. I bought it a long time ago but it looked so cheap I didn't even use it for months because I assumed it would not be very effective. I was wrong and it works marvelously to clean the sides of a smooth bowl or other container. I think it cost 75 cents.
Looks like a great find. The photo and the label shot covers it all.
Thanks for posting.
At the San Francisco Baking Institute they suggest that you oil a bowl very generously (they use "Vegelene" spray, but any spray will do, or even just oil). Don't skimp - it shouldn't be dripping, but there needs to be enough oil to keep the dough from sticking, and to coat both sides of the dough. Once you plop the dough in the bowl, flip the dough over once, so the exposed side has a little coating of oil. Then cover the bowl tightly with plastic wrap. Or use a proofing container with a lid.
Okay the recipe that I am using from Calvel says to proof after you divide and shape your loaves. What you are talking about looks more like the dough rising stage?
I suspect this is just a matter of unfamiliarity with some admittedly confusing terminology.
Typically bread dough rises at least a couple times.
For the first (and sometimes second too) rising, there's just one piece --the entire ball of dough, and after the rise has ended the dough is destined for further manipulations: this is called "bulk rise". Often this is done in a straight-sided container to facilitate knowing when it's done -- recipes often say "let rise until doubled" or "let rise until tripled".
For the last rising though, the dough has already been separated into pieces and formed into loaves, and after the rise has ended the dough is destined to go in the oven: this is called "proofing". This is done when it "feels" right (often the finger-poke test is used) -- too short and the loaves won't expand to their full potential; too long and the dough gets so bubbly and jiggly that it may "deflate" (pop:-) if even slightly mishandled, and when baked the crumb looks funny, often either with all the big holes in one spot or with a "flying crust".
("proofing" in this sense of bread lingo has --as far as I know-- nothing to do with the similarly named "proofing" of old-style active dry yeast ...it just happens to be spelled the same)
The TFL Handbook has a [url=http://www.thefreshloaf.com/handbook/appendix-glossary][u]glossary[/u][/url], which is helpful to those unfamiliar with baking terms.
According to Hamelman and other professional bakers, the first stage of fermentation is called the bulk (primary) fermentation. The dough also ferments during the bench rest, after being divided and prehaped, then the final fermentation (proofing) takes place after the loaves are shaped.
DiMuzio notes that the main purpose of proofing is to reinflate the loaves to an appropriate level before baking.
But no one seems to know the origin of the term "proofing." Maybe because it's quicker to say than "final fermentation"?
Anyway, it helps to know the terms just for clarity.
Alrigth I looked up the poke test for the final proofing and I will give that a try.
I also have another question. Everytime I mix up my dough I seem to never have it at a point where I can handle it without it sticking to everything. By the time I finish kneeding it and adding sprinklings of flour to keep it from sticking to my hands when I am kneeding, it is very tough and not silky.
I have found that when I let the mixer do the kneeding it comes out much better but it still is often to sticky to handle. What am I doing wrong?
By adding flour, you're changing the hydration of the dough.
Try lightly spraying your work surface with oil and then lightly oiling your hands. Or do the same with water.
Or forget about all that kneading, except for the initial mix. Do a few S&Fs (stretch and folds). Check out the videos by Mark Sinclair of the Back Home Bakery in the TFL videos tab.
Lightly press raw dough with a floured finger. If the indententation quickly disappears and the dough springs back, it needs more proofing time.
If the indententation remains without springing back at all, it's overproofed.
If the indentation springs back about half way, but still can be seen, the dough is ready to be scored and baked.
What's helpful is to mix a batch of dough, then divided it into three parts. Shape them into rounds and experiment with the proofing, allowing one to overproof. Feel the dough at the various stages.
You can always make bread crumbs with the overproofed one. ;-)