David Snyder was kind enough to point me to Susan at the Wild Yeast. I couldn't do his two recommendations because I have no mixer, so after lurking around Susan's web site, I thought I'd give her Norwich Sourdough a try. It called for the use of a mixer, but I mixed the ingredients by hand. This recipe is adapted from Hamelman's Vermont sourdough.
Susan's instructions were easy to follow, and I followed her steps to the letter...well almost. I overlooked a few things which may have contributed to the final product being less than perfect. Entirely my fault. But as a first attempt, I was tickled pink.
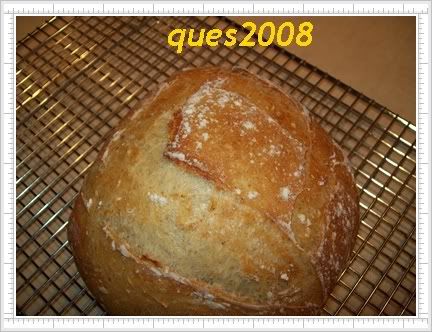
Here's what came out of my oven last week:


I reduced Susan's recipe by half so that if I ended up with a fiasco, I wouldn't feel so guilty about wasting that much flour. She said to shape into a loaf, but I was forced to form a ball instead because the dough was very wet. It was difficult to handle; to my surprise, it still was unmanageable after a 12-hour fermentation/retardation in the fridge. On hindsight, I should have remembered Susan's advice to hold back on the water. Next time I'll add the water gradually and not in one fell swoop.
The taste was excellent. The sourdough flavor was there all right, and I'm glad I gave my starter the TLC it deserved. I started the culture on the 17th of December but deliberately left it in the fridge for a whole month before using it. I had read some posts that sourdough novices won't taste the sour with their first bakes, but for this first attempt, I'm glad the flavor came out - firing on all cylinders!
Another mistake: I didn't take out the pan holding the water for steam after 12 minutes as Susan instructed. I left it there for all the 35 minutes and while I liked the color, I probably would have obtained a fuller, richer brown if I had taken the pan out.
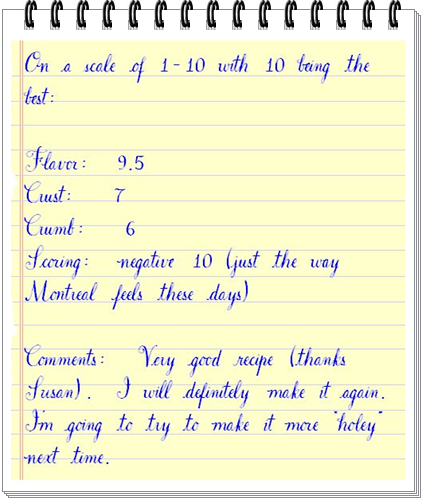
So, if I were to produce a report card for this initial try, it would look like this:

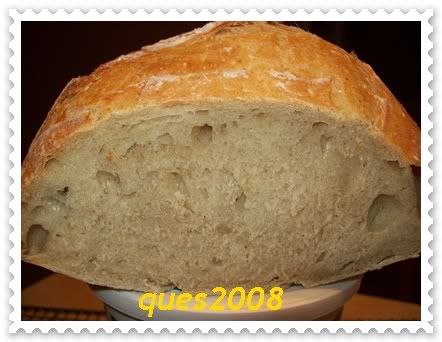
The crumb had a chewy, dense texture. I'm going to aim for a lighter crumb with more holes.
And this is where I ask TFL's sourdough experts for some help/advice:
a) should the stretch and fold technique really replace the standard 10-minute kneading that I normally do for sweet rolls, yeasted breads and others? My impression is that the folding and stretching should be done gently, but I stumbled upon Richard Bertinet's youtube here, and he was slapping that dough around. If dough could talk, it would scream "ouch"! Has anyone tried his method? He recommends this for sweet dough. He teaches in Bath, England. Here's the link to that video: http://www.gourmet.com/magazine/video/2008/03/bertinet_sweetdough: Can his method be used for sourdough?
b) holes: are they the result of stretch and fold or high hydration, or both? Stretch and fold - the way I understand it - is primarily to trap the gas, hence creating those holes. Is this correct? And then I read somewhere that it's the high water content that brings about more holes. So the wetter the dough, the more holey the bread becomes?
I welcome your opinions!
Next time I make this recipe, I must:
a) pour the water gradually
b) take out the steam-generating pan after 12 minutes
c) learn David's scoring techniques pronto!
Anything else to add to my to-do list?
- Anonymous's Blog
- Log in or register to post comments
I have heard and participated in few discussions about the stretch and fold technique, and although I am a firm believer of the 10 to 15 minutes kneading I think I will try the stretch and fold method next time I bake bread. I will just have to wait and see how it turns out.
http://www.ourwholesomehomes.com
Hi, ques2008.
Susan adapted Hamelman's formula for "Vermont Sourdough" in making her "Norwich Sourdough," as you probably know. Making it as a boule rather than a bâtard is not an issue. It's your choice.
If you want to hand knead it, the stretch and fold technique is fine. It might even be superior to machine mixing, if done right. From the photo of your crumb, I think you under-kneaded, though. You might use the stretch and fold in the bowl technique followed by a couple stretch and folds on the board for better results.
To get the crumb you want, both higher hydration and adequate gluten development are helpful. I think the latter is more the issue in your case.
I hope that helps.
David
thanks for your input.
so is a very wet dough common for sourdoughs? and to stretch and fold, should I do it in 4 separate sessions? susan's recipe said to do the stretch and fold at the 50th minute and then again at the 100th minute. That's 2 stretch and folds.
But if adequate gluten development is the aim, i think i might have to increase the frequency of the stretch and fold.
thanks, as usual, for your guidance, david.
sharon (ques2008)
Hi, sharon.
Sourdough breads were all the breads there were until the introduction of commercial yeast. There is no particular upper or lower limit on hydration for sourdoughs as distinct from other breads.
Susan's recommendation for stretch and folds assumed initial machine mixing. My reference was to hand mixing. See this: Hamelman's “Stretch and Fold in the Bowl” no-knead technique and this: no-knead video for clarification on this technique.
David
i'll watch those videos shortly!
yes, I too am a firm believer in the 10-15 minute kneading, but I thought that for sourdoughs - belonging in a different genre of bread - the stretch and fold would produce a better crust and crumb.
i can see a whole slew of trial and error sessions here before I get it right.
sharon
Don't stress about the kneading, you did fine. These pics show a loaf that resulted from a dough that has been developed well enough, no matter how it was mixed, to have been able to handle a longer final rise before baking. See how it just explodes from your slashing but has a kind of condensed in the middle hole structure? It just wasn't quite ready is all. The other thing I would note is you only need a cup or so of boiling water to steam with, you should not have to take it out at all, it should just evaporate completely. Any more steaming than what you get from that will give you that kind of rubbery soft pale crust in your pictures.
appreciate your comments. and the 1 cup of water for steaming makes a lot of sense. i'd hate to think what could happen if i accidentally tipped a pan half-filled with scorching water!
yes, i guess there's no need to try to over-analyze things. i'll take one sourdough at a time and enjoy my adventures - whether they be successes or failures.
sharon
thanks for your comments. Dang! Yes, I should have checked the internal temp of my bread. You must have noticed the "undone" part of the slice underneath! i'm feeling guilty because I realized there were a few things I should have done.
susan's norwich sourdough is wonderful. i will probably use it as my base - and from there innovate on it like the experts.
thanks, ruth for your comments, much appreciated!
sharon
The best path from the flour bucket to your table is of course the one that you have followed before with success. Learn to make one type of bread and learn it well, and make it your base bread. The one you have chosen is itself a variation of J.H's Vermont Sourdough, which is what I use as my base also. Probably one of the simplest of sourdough recipes, but with the slightest innovation becomes something new and wonderful each time. He had good reason to put three simple variations of the recipe in the book, as what is best learned from these is the potential of what you can do with the basic recipe in your own kitchen. I think I have been baking with it over four years now and it just keeps getting better, as yours undoubtably will too.
that's very encouraging, hutchndi. i'll do the slow dance with sourdough. one formula at a time.
so nice to know that you've also adopted this recipe as a base recipe!