The Fresh Loaf

A Community of Amateur Bakers and Artisan Bread Enthusiasts.

T. Fargo's blog

T. Fargo's picture
T. Fargo

No Knead Spelt and Rye Bread (77% hydration)

Poolish:

  • 50 g Spelt Flour
  • 50 g Dark Rye Flour
  • 50 g AP flour
  • 165 g Water
  • 6 g bread yeast

Mix with dough whisk, cover loosely and set aside, room temperature for 2 hours or until active.

Dough mix:

  • 300 g Bread flour
  • 50 g Spelt
  • 50 g Dark Rye
  • 50 g Molasses
  • 5 g Ground Caraway seeds
  • 11 g Kosher Salt
  • 110 g warm water
  • 100 g Whole milk

Method:

Combine dough mix and Poolish, autolyze for two hours and then refrigerate overnight.  Remove from fridge and allow to rest 2 hours.  Sprinkle dough with flour and remove to floured bench.  Stretch and form into ball and then place in heavily floured Banneton to proof until doubled.  Sprinkle with cornmeal or polenta and then turn onto parchment lined pizza peel.  Place on baking stones in preheated 450°F oven and add steam (1-1/2 Cup boiling water in steam tray) for 15 minutes, then reduce heat to 425°F for 20 minutes, or until instant read registers 205° to 208°F.  Rest on wire rack until cooled.

T. Fargo's picture
T. Fargo

Food Porn: No Knead Spelt and Rye Sourdough (75% hydration)Article Photo

Ready for sandwiches. A close, elastic crumb, with just enough moisture.

SOURCE

   This slightly sweetened rye loaf gets a nuttiness and boost of nutrition with a dose of Spelt flour.  It is most excellent with ham salad, Reuben sandwiches, BLT's or simply just toasted on its own.  This bite of food porn has a dark chewy crust, odoriferous of toasted malts, caraway and caramel.  The crumb is a moist, elastic and tightly gathered.

Did you know Caraway is referred to as Persian Cumin?  Excerpt from Wikipedia:

The etymology of caraway is complex and poorly understood.

Caraway has been called by many names in different regions, with names deriving from the Latin cuminum (cumin), the Greek karon(again, cumin), which was adapted into Latin as carum (now meaning caraway), and the Sanskrit karavi, sometimes translated as "caraway", but other times understood to mean "fennel".[6]

English use of the term caraway dates back to at least 1440,[7] and is considered by Skeat to be of Arabic origin, though Katzer believes the Arabic al-karawya (cf. Spanish alcaravea) to be derived from the Latin carum.[6]

Caraway is called zīreh (زیره) in Persian.


No Knead Spelt and Rye Sourdough (75% hydration)

Levain:

  • 50 g Spelt Flour
  • 50 g Dark Rye Flour
  • 100 g Sourdough Starter (fed)
  • 115 g Water

Mix with dough whisk, cover loosely and set aside, room temperature for eight hours or until active and bubbly. (Starter Substitute: 50 g AP flour, 50 g water and 6 g Red Star Active Dry yeast)

Dough mix:

  • 300 g Bread flour
  • 50 g Spelt
  • 50 g Dark Rye
  • 50 g Molasses
  • 5 g Ground Caraway seeds
  • 11 g Kosher Salt
  • 200 g warm water

Method:

Combine dough mix and Levain, autolyze for an hour and then retard overnight.  Remove from fridge and allow to rest 2 hours.  Sprinkle dough with flour and remove to floured bench.  Flatten, fold in thirds, flatten and fold in thirds again.  Pinch seam at bottom, then tuck down sides to form loaf on parchment sprinkled with a bit of cornmeal or polenta.  Cover with a large enough bowl and rest / rise for 1 hour.  Brush risen bread with water, slash with knife or bread lame.  Place on baking stones in preheated 450°F oven and add steam (1-1/2 Cup boiling water in steam tray) for 15 minutes, then reduce heat to 425°F for 20 minutes, or until instant read registers 205° to 208°F.  Rest on wire rack until cooled.

 Check out this article on Newsvine.

T. Fargo's picture
T. Fargo

  Hello all at TFL!  Having spent years in the employ of restaurateurs before making my way into food grade manufacturing and facility maintenance supervision, I have had to learn the importance of Food Safety and Food Defence.  My resume includes knowledge of; FSSC (a global food safety initiative system), HAACP, FDA allergen awareness, Food Defence and AIB certification controls.  

   I am proud to work for Plastipak Packaging, Incorporated.  We are the number two worldwide leader in flexible packaging and one of Europe's largest recyclers of PET plastics (Luxpet).  Chances are you have one of our plastic bottles in your home right now, whether it represents any one of our myriad of customers for Beverage, Consumer Cleaning, Food, Industrial and automotive, Personal care, Preforms, bio-based plastics and specialty products.  We exist because our customers exist.

 But enough about that:  I'm hear to remind us all of our duty to food stewardship.  It keeps us and our loved one safe.  

  On my journey through time and space, I have been unlucky enough to have had food poisoning twice, and let me tell you if you have never had food poisoning, you are blessed.  It is an absolute horror to have colors of liquid emanating from your body that would make a color wheel cry, at velocities approaching warp factor 3 with a 102°F fever.  Do you know how hard it is to barf a cracker?  The shivers and bone ache, like being in a vice shaped of my own person, squeezed by the weight of a ship not unlike the Titanic is enough to sink anyone's spirits to unfathomable depths - but what's more is being afflicted with a love for food and not being able to enjoy it.  It's akin to Beethoven's loss of hearing - a cruel and fickle punishment of nature, and yet it could have been avoided.

  I must admit a contributor here, Mini Oven, inspired my post with a comment about refrigerator temperature.  I thank her for such musing.  Thank you Mini Oven.

  The FDA recommends a temperature of <40°F (4.4°C) for refrigerated food storage. While there are complicated temperature rules to receiving and shipping foods of various types, there are general rules of thumb for safe home food storage under refrigeration.  The simplest of which is to actually put a thermometer in your refrigerator.  It's so common sense, but I must ask... Do you have a thermometer in your refrigerator?  

   Being a baking forum and understanding the important nature of your baking medium we know how important it is whilst we cook food, but it is so much more important for the food we store it.  Statistics even show that 27% of homes in the U.S. have 2 refrigerators, and if food is improperly stored in both of those, the risk of contracting a foodborne illness is twice as high (duh, right?).  To complicate things, if we crowd or refrigerators with leftovers that aren't cooled to below 40°F within two hours of cooking, we run the risk of uneven cooling.  A refrigerator works on a basic principle of recirculated air.  Block that air and what is blocking it gets cold while what needs the cold stays at an improper temperature, at least until equilibrium is attained.  Equilibrium may take even a few days (depending on mass requiring cooling and the temperatures above 40°F contained therein, cooling capacity or heat exchange, gain, relative humidity, et.al.), and since bacteria can set in at under 20 minutes, it's not worth waiting for.  Keep your refrigerator clean and evenly spaced.  If it's getting crowded it's time to cull that side of asparagus you didn't want to waste or haven't gotten around to repurposing in soup.  Frugality must give way to basic health decisions.

  The Goldilocks Zone for a refrigerator is at 35°F or 1.6°C.  This gives a fluctuation upward of 5°F and still leaving food in a liquid state, and 3°F from freezing.  And a brief word on freezing, your freezer should be a 0°F (-17.7°C) or less.  So please take that instant read thermometer you use to check you poultry, beef, pork, bread or fish for food safety and place it in your fridge.  If you see more that 40°F, you know what must be done.  Make cleaning it a regimen once a month.  Label your freezer goods with a Sharpie, the date they went in or should be used by, and when in doubt, throw it out.

  Oh, and don't think meat is the only thing that can make you sick.  The first time I got ill was from a bad tomato.  

 I tell you this as a former sufferer of foodborne illness.  You don't want to go through the pain.  You don't want loved ones to go through the pain... or worse.

  Use these links for more information:

http://www.fda.gov/Food/ResourcesForYou/Consumers/ucm253954.htm#strat

http://cooking.stackexchange.com/questions/4529/what-temperatures-should-i-keep-my-refrigerator-and-freezer-set-at


T. Fargo's picture
T. Fargo

  Hello all at The Fresh Loaf.  Here is yet another installment I have written from another site I use and share valuable information.  I am happy to share with you all and welcome your input.  This it the article written after putting my big boy bread britches on, sucking it up... and buying a book.  

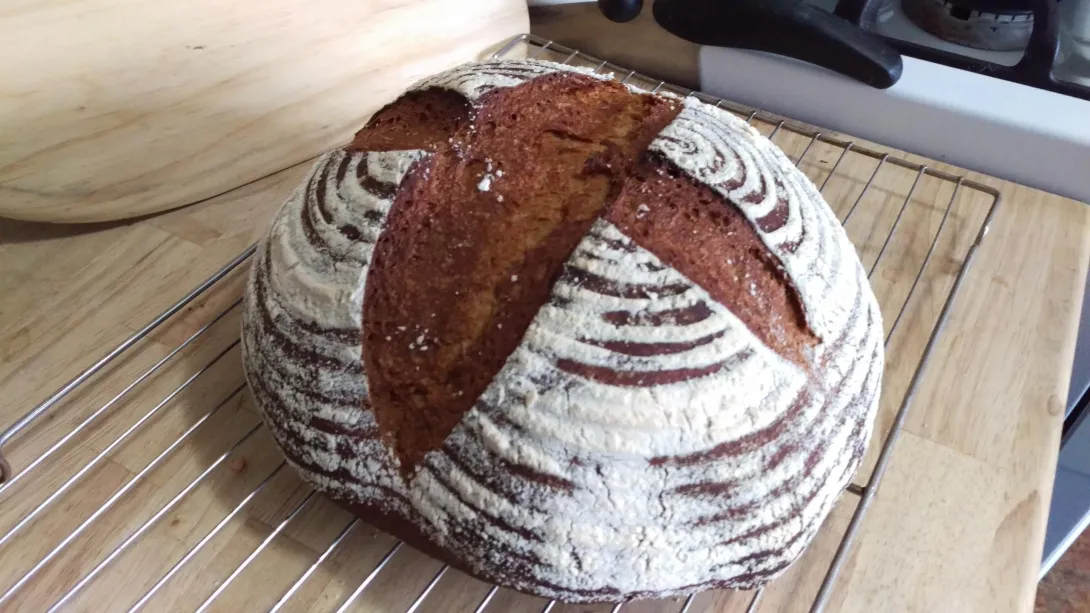
The Quest for Better Bread part 2 (and book review)

Article Photo

French Baguettes cooling on the wire rack. Click the Source button for full screen view.

SOURCE

 Part 2 of my quest...

 Back in July, I posted an article about my search for better bread.  The kind of bread Europeans take for granted, and they should, as it is also a great source of pride and staple of every day meals.  In that article, I stated how I was going to study how to flesh out creating a flour similar to the flours used in Europe, as the wheat there is much different than the wheat grown in the United States.  After a couple of brief experiments using the traditional methods of bread baking and playing with different flour mixtures in an attempt to create something similar, I threw in the powdered towel and decided to seek knowledge from new sources.

Article Photo

The recommended book cover screenshot.

SOURCE

  So, I traipse my phalanges across the keyboard to Amazon and start searching.  I settled upon a book I purchased for my Kindle, that has opened a door to a whole new world of really good bread.  The bread I have baked now approaches that of the old world and I am delighted to share the results of my journey with my fellow Newsviners.  For those who want to bake their own bread, I would like to suggest the book The New Artisan Bread in Five Minutes a Day by Jeff Hertzberg MD and Zoë François.  The authors explain the science and technique used to create fantastic loaves like the article cover picture of Baguettes I baked this Sunday morning, 13 September, 2015.  The basic recipe is only four ingredients and the dough lasts up to two weeks in the refrigerator.  It is actually recommended to let it stand in the 'fridge for at least a day to make the dough easier to handle as this recipe and technique relies on a much looser dough than traditional recipes.

The master recipe from the book in standard and metric:

Standard measurement for four (approximate) loaves

  • 3 Cups Lukewarm water
  • 1 Tbsp yeast
  • 1 to 1 1/2 Tbsp Kosher salt
  • 6 1/2 Cups All Purpose flour

  It is suggested to measure flour in a measuring cup no larger than 1 cup and sweep across the top with a knife.  The two cup containers lead to the flour getting pressed together.  This could potentially make your dough too dry for this method.  I prefer the metric weight measurement as it is more accurate regardless of altitude and easier to multiply or divide as needed.

Metric measurement (preferred):

  • 680 g lukewarm water (or 680 mL)
  • 10 g yeast
  • 17 to 25 g Kosher salt
  • 910 g All Purpose flour

Method:

  In a large container, such as a 1 gallon Rubbermaid bowl, mix the water and yeast until dissolved.  Use a dough whisk or wooden spoon to stir in the salt and flour until well combined.  No need to knead!  Set aside with lid loosely fit for two hours to rise.  Refrigerate or use to start forming loaves right away.

Article Photo

Loaves on the rise. The baguettes are ready in 20 minutes, the Rye loaf on the Pizza peel takes about 40 minutes.

SOURCE

   I refrigerated the dough for my first batch three days to develop a more yeasty flavor, the hallmark of a great bread.  This method allows you to have dough-ready-to-go for up to two weeks (WOW!).  I can't give away all the recipes or secrets by the authors, so if you want to know more, please support Jeff Hertzberg MD and Zoë François and buy their book.  

They even have a website: http://www.artisanbreadinfive.com/

Youtube videos too:

Make artisan bread in just 5 mintues of active time. Recipe from our book The New Artisan Bread in Five Minutes a Day.


Article Photo

Rye dough waiting to get formed into a loaf. This can stay in the fridge a week or so, and will develop a more sourdough flavor as it does.

SOURCE

 Having this new found knowledge has fueled my desire to experiment with other recipes included in the book.  I purchased some dark Rye flour and used the Rye bread recipe / method included in the book.  I was skeptical as to how my loaf would turn out compared to the picture in the book, and (pause for dramatic effect...) was quite pleased with the results.

Article Photo

Rye cooling on parchment. I eagerly await to cut into this. Click Source for full size picture.

SOURCE

This sentence intentionally left here for no purpose, or was it?  Who knows.

   Now this wouldn't be an episode of food porn without a picture that make you want to eat your monitor, so I went ahead with a German menu plate of Paprikawurst and a Swabian dish called nasser Kartoffelsalat or a wet potato salad I have shown in a previous episode of Food Porn.  I hope you have something to catch the drool and don't short out your keyboard...

Article Photo

Rotwurst Teller von Fargo. I told you it looked good. It tasted good too.

SOURCE

   The Paprika sausage is a pork sausage I made from porkbutt and contains fennel, salt pepper, a touch of cayenne, a boatload of paprika and Chianti.  Paprikawurst is a popular spicy sausage eaten in Germany.  It has a less fatty content than sweet or hot Italian sausages, and a slightly more toothy texture.  The redolent flavor of paprika is punched with the cayenne, leaving a satisfying smolder on your palate that may break a sweat on your brow, or sniffle a little.  It is a savory bite and paired with the creamy Yukon potatoes in the salad and sweet Rye loaf and beer garden mustard (Düsseldorf style), it simply cannot be beat.  My wife and I enjoyed this with a quaff of Toasted Head Chardonnay, which lent a slight smoke to accompany the grilled wurst.  Upon finishing this delectable course, I turn my thoughts back to the amazing loaf I created, with a little help from a couple of enthusiastic pedalers of Bread Porn.  I am grateful they did not keep that secret to themselves.  I was happy to have spent the dough (insert eyeroll here) on their tutorial book.


  I would like to thank my Newsvine friends, Effie, Leboswky, and Nigel for baking bread and sharing it on this venue.  Special Thanks to MinnieApolis for the idea of a book review.

 And since this is a quest we are all on, here are the links to better bread articles posted on NV recently:

Effie's Spicy Sriracha Bread

Effie's French Bread Blowout Baby

Lebowsky's Spicy Balls *a Dave's Best of winner*

Lebowsky's Classic Baguettes recipe review by Chef Gandolf

Lebowsky's Nebulae Raisin Bread

T's Quest for Better Bread part 1

This episode of Food Porn is dedicated in loving memory of Gandolf.  A lovely baker, charming squeaker, and all around funny fellow that will be remembered for his amazing antics and anti-stressing goofiness. I raise a glass of water to you and have leftover pizza crust to munch on, just for you.


T. Fargo's picture
T. Fargo

My journey begins here, where I began to experiment with flours.  I really don't know much about bread at this point in my writing, but sure have fun learning and making my necessary nistakes mistakes. 
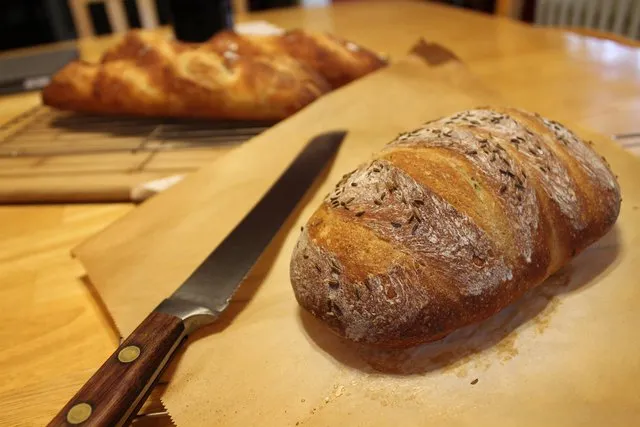
The Quest for Better Bread: Part 1 Article Photo

Weizen Brotchen - German everyday wheat rolls.

  Give us this day our daily bread.  The good stuff, please.  If you don't know the "Good Stuff", it is a crying shame and I pity you.  Although, your ignorance may be bliss, as every expat from Europe in America is looking for the bread that reminds them of home.  Whether it is a crusty baguette, an Italian loaf, Challah bread, or a chewy Naan... it just seems impossible to bake here without spending the money on imported European flour.

WHY?

 The short answer is the flour here in the USA is higher in protein than the flour in Europe.  While flour in the USA is measured by its gluten content, the flour in Europe is measured by its ash content, or what's left after it's burned.  So, old world recipes tried here are doomed from the get go.  The comparison of flours is apples to oranges, and "All Purpose" (AP) flour is abysmal for yielding a good loaf.  So too is "Bread" flour, which is even higher in protein and gluten content, and would send a person with Celiac disease into a swollen ankled, bloated, anemic fart-fest followed by days of constipation.  When it comes to good bread, less protein is more, um... better. 

The 'soft pretzel' sucks.

 If you are the type of person that needed the crust cut off of your wonder bread, just stop reading this now.  It's going to get ugly for you.  The lead-in notwithstanding, I'm not going to get into proper pretzels now, but the crust will be a topic.  You can't get a crispy crust with too much protein in the flour due to Amylase (an enzyme that breaks down starch into sugars) and Glucose forming a sticky bond and trapping moisture on the molecular level.  Since "crispy" usually means "dry" this is not what good bread wants or needs.  

Let's be frugal about this...

 While anyone can easily whip out their credit card and start shopping for proper European flour for bread (such as German type 405 or Italian Tipo 00) to solve this issue, the expense is not one I'm willing to justify.  While 1 Kilo (2.2 lbs) of flour for $11 USD is on par with the finished crappy-product per loaf, it does not include the time and energy spent creating the satisfying loaf, roll or Amuse-bouche.  I have decided to use one recipe and adjust until I get it perfect, after all - that is what scientific approach is.  Control the variables and observe, then eat your work.  Okay, the last bit is a bonus... maybe.

 This recipe is a WEIZENBRÖTCHEN recipe I gleaned from a blog online here. Please, drop by and visit the inspiring article.

The recipe:

  • 500 grams flour (Tipo 00)
  • 10 grams salt
  • 300 ml warm water
  • 4 grams sugar
  • 8 grams yeast
  • 40 grams oil

 For my first batch I substituted flours to lower the gluten & protein content as follows: 100 g cake flour (Pillsbury), 100 g wheat flour (King Arthur), 300 g AP flour (King Arthur).  Let's look at the method, which is one of the variables I will not change:

Method:

  •   Day 1- PLace the warm water, sugar and yeast into mixing bowl and stir a bit.  Place all other dry ingredients into separate bowl and whisk together.  After yeast proves out (10 minutes or so), add oil and turn mixer with dough hook to medium low speed.  Incorporate flour slowly.  Dough should be sticky after 2 minutes of run time, but yielding from the edges.  if stiff, add water 1 teaspoon at a time to soften a bit.  Knead or mix for another 4 minutes on medium speed.  Remove from mixer to floured board and stretch flat, then fold in thirds.  rotate 90 degrees and repeat.  With lightly oiled hands, place into bowl to rest for ten minutes, then repeat this process three more times for a total of 40 minutes rest and fold.  Place into lightly oiled bowl or container, cover and refrigerate overnight.


  • Oh look, a picture!
Article Photo

Rising to the challenge? We shall see.


  • Day 2- Remove from refrigerator to floured board, divide into 12 even pieces.  Stretch tightly forming into balls, making sure to seal the bottom.  Brush with egg wash and dip into seeds if desired.  Place on parchment on baking sheet.  Allow to rise until doubled, about 2 or so hours.  Preheat oven to 430° F with a steam pan in the bottom (empty) and middle rack ready for the bread.  Place rolls into the oven and pour 1 cup (or so) boiling water into steam pan.  Shut oven immediately.  Bake 9 minutes, turn and bake 9 more.  When time is up, turn off oven, crack door open and let rolls remain for 10 more minutes.  Remove and cool.

Results:

   After cooling for 10 more minutes, the heavenly smell wafting through the house led me to the butter dish.  Cutting the first sesame covered roll in two, I smeared with anticipation.  The inside is chewy and the overall texture was soft.  The salt is balanced with the flour.  It is too soft.  The crust was not a thunk when tapped, nor a flake dropping off.  No crunch.  A ho-hum dinner roll, far from the expectation of old world glory.  Bake, er... I mean back to the drawing board.  

T. Fargo's picture
T. Fargo

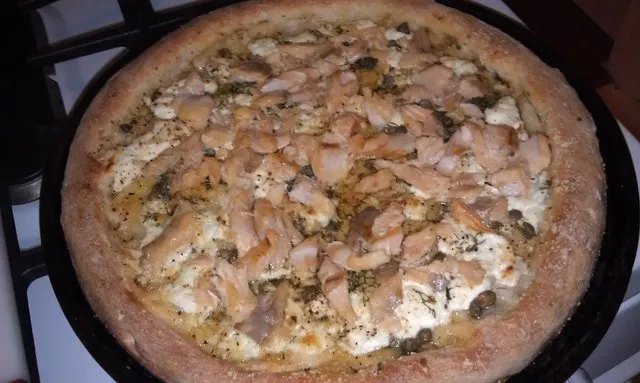
  Hello my friends at The Fresh Loaf.  T here with another idea for you to try with your favorite pizza dough.  This article was written back in 2012 and I have since become a much better bread baker, but don't be surprised that I used Store bought Pizza dough *GASP*!!  I hope you enjoy!!


   I had a chance to score myself some salmon from a friend of mine, Rick. The caveat was I had to cure and smoke half of it for him as payment for the half I could keep, which is not a bad deal for both of us. He delivered 10 or so rather large chunks of salmon he caught from lake George that I cured with salt, pepper, brown and white sugar for 3 days in my second refrigerator. I smoked it at 160 degrees until the internal temp came to 145 and then vacuum paked it after cooling. I delivered his half and kept mine for a rainy day. Unfortunatley, the rainy day turned into Hurricane Sandy, to which at this point of the story I send my regards to the people whom are still struggling through the strife it has created. My heart goes out to you all.

Article Photo

Caper appreciation 101. Class is in session.

 My wife and I indulged in a mixed plate dinner including the salmon earlier in the week, but there was much left over that I had to use up. The following is the result of a little brain-storming that turned out to be very satisfying. You must realize that smoked salmon goes quite well with bread and cheese, as well as wine. These items gave rise to an idea: Pizza.

 I did not have time to make my own dough for this recipe, so I stopped at my local market and purchased some fresh dough, which is in my opinion, excellent pizza dough. After streaching the dough into my favorite seasoned pizza pan, I put a few tablespoons of garlic infused olive oil around the dough. Followed by some farmer's cheese chunks, capers, fresh dill and dried basil. I topped it all off with some parmesean cheese and a few twists of black pepper. Into a 450 degree oven for about 10 minutes, until the crust was just about done, then removed to add the flaked salmon. I returned the pie to the oven to finish the baking for about 5 minutes more. I served it with some lemon wedges, sour cream and dill dressing and a pungent blue cheese kicker.

Article Photo

Wedges of love, lemon and cheese.

 The flavors are strong and smokey with a crunch from the crust and a punch from the garlic oil and salty capers. I paired it with an old vine Zinfandel from Lodi California called Gnarley Head, which runs about $10-$12 a bottle depending on your source. I recommend this wine because it has the backbone to stand up to the strong flavors of this pizza.

 I hope you will give this a try in the future. I know I will make this again, as it was a surprisingly good combination of flavors in a classic presentation. Although it was a pizza, it wasn't your garden variety type and a "not for kids" preparation. Definitely Food Porn worthy!

T. Fargo's picture
T. Fargo

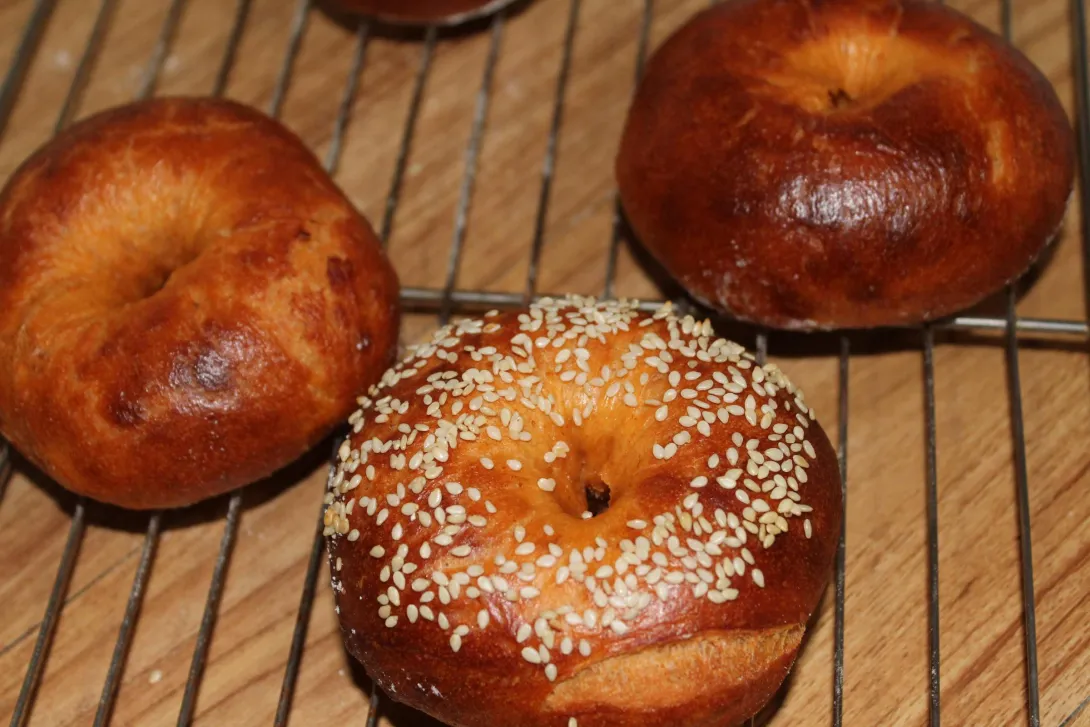
  Hello all at thefreshloaf.com and thank you for allowing my participation on this extraordinary site.  The following article is one I wrote on another site, using their format and must admit that I'm taking a shortcut to copy and paste it here in the interest of saving time.  Though it is my first here, it is a continuance of several articles entitled Food Porn:_____ (fill in the blank with object of culinary desire).  I am eager to share this recipe I developed for Sriracha Bagels, due to the lack of them on the market and my love for the spice (explained within).  Enjoy!

  The saga of Sriracha continues into this episode of Food Porn, as I take on spicy Sriracha bagels.  And it's not about putting Sriracha on something as it is about putting the flavorful hot condiment in something.  Bagels - Just the thought for New Yorkers conjures a morning ritual from the Bronx to Staten Island.  According to Wikipedia, the bagel was born in Poland.  Comprised of a traditional wheat dough formed by hand and first boiled before baking.  This process lends a chewy-crisp exterior and a chewy decadent inside, begging for butter, cream cheese, lox, jam, nutella, or any one of a million toppings.  

   One special item you need for this recipe is non-diastatic malt powder.  This ingredient is available at King Arthur Flour and Amazon. It may be substituted by sugar, but that will not give you that genuine New York delicatessen / bakery flavor that non-diastatic malt will.  What is non-diastatic malt you ask?  Good question.  The better question is; what is the difference between diastatic malt and non-diastatic malt?  The short answer:  Enzymes.  Where does that answer inevitably lead us?  What do enzymes do to bread dough?  More good questions.  Enzymes help convert glutens into sugars, giving yeasts more to eat and resulting in a higher rise... to a point.  Using diastatic malt in small amounts can improve the height of your bread.  Doubling that small amount can help even further, but using too much will result in a collapse of the reaction and also your bread.  Since we aren't looking for a New York high rise and solely a New York flavor profile, using non-diastatic malt fits the recipe.  No enzymes to mess up the Food Porn in process.  Now that we are armed (and dangerous?) with this knowledge, it's time to start the process.

Ingredients:

  • 250 mL warm water (about 100°)
  • 90 mL room temperature Sriracha
  • 5 grams yeast
  • 10 grams kosher salt
  • 15 grams non-diastatic malt flour
  • 455 grams bread flour
Article Photo

Color me red. All's quiet on the yeastern front.

For the boil:

  • 6 L boiling water
  • 55 grams non-diastatic malt powder
  • 5 grams baking soda
  • a kitchen towel with some flour on it (to absorb excess water)
  • Sesame seeds
  • Pizza peel dusted with cornmeal, polenta or flour
Article Photo

Sift


Article Photo

Whisking in process...


Method:

   In a medium sized bowl (about 2.5 L), combine water, Sriracha, Yeast, Salt and non-diastatic malt powder until dissolved.  Sift the flour into a separate bowl and pour the whole mass into the liquid.  Using a dough whisk or wooden spoon, stir until combined.  You may have to wet your fingers and work by hand to incorporate the last bit of flour. Do not knead this dough.  Cover, yet not airtight, and let rise until the dough crests and flattens, about 2 hours.  You can use the dough immediately or refrigerate for up to 2 weeks.  (I like to make bagels with cold dough, as it is easier to work with and the flavor profile gets a bit more complex after a day or so in the refrigerator).

  On baking (and boiling day), Preheat your oven and baking stone in the center to 500°F.  have a broiler tray placed on the lowest rack for the addition of steam water later.  Dust the top of the dough with flour and pull some from the bowl, weigh into 150 gram pieces.  "Cloche" the dough into balls by pushing your fingers into the bottom while rolling your thumbs down the sides, then seal the base of it by moving the base of the ball in a circle loosely in your fingers on your board.  Similar to the technique shown here (FFW to about 1:08 for instant gratification):

Traditional method for making Vera Pizza Napoletana dough balls, including technique for shaping pizza dough.

 Nice watch dude, and thanks.  Welcome to my Food Porn article...

   Cover balls loosely with plastic wrap and rest for 15-20 minutes at room temp.   If you want to make more than five bagels, repeat with the rest of the dough, or store it back in the refrigerator.  While the dough balls are resting, prep a large boil pot with water, malt and baking soda.  Place on high heat until it boils and reduce to a simmer.  Push your thumb through a dough ball to form a hole, then ease it open until the diameter is twice to three times the size of the original dough ball.  Gently lay the formed bagel into the simmering water.  After 1 minute, flip with a slotted spoon or skimmer and simmer (skimmer and simmer, that's fun to say...) for 30 to 40 more seconds.  Remove to the towel coated with some flour and repeat with remaining dough balls, one at a time. 

Article Photo

Pre-boil bagels, 150 grams each

Article Photo

Post-boil and on a floured pizza peel, ready for the oven

   Sprinkle with sesame seeds (or omit. Or use something else, like poppy seeds or dried garlic and onion flakes, it's your world...) and place on a pizza peel dusted with cornmeal, polenta or flour.  Slide directly onto the 500° pizza stone.  Pour 1 cup of boiling water into a broiler tray beneath the stone and quickly close the oven.  Bake 15 to 20 minutes until deeply browned and firm.  Remove from oven and place on wire rack.

   These bagels are so good, you don't need to wait for them to cool all the way.  Use a sharp, serrated knife to cut in half and either top immediately with whatever suits you, or toast and top.  These Sriracha bagels have a sweet heat and pair well with savory flavors.  Perfect as a sandwich with egg and sausage or open faced with lox and cream cheese, boiled egg slices and capers; pickled onions with liverwurst; sliced roast beef and horseradish... I'm rambling... and not sorry for it.  Just let your Food Porn imagination run wild and enjoy these spicy variations of a classic breakfast staple, and if you don't mind, share your experience here.  I'd love to know if you made them and what you think of the recipe.  Is New York ready for a Sriracha bagel?  Hell yes.  And if you don't mind, so am I.

Article Photo

Sriracha bagels, fresh from the oven

Subscribe to RSS - T. Fargo's blog