The Fresh Loaf

A Community of Amateur Bakers and Artisan Bread Enthusiasts.

MarieH's blog

MarieH's picture
MarieH

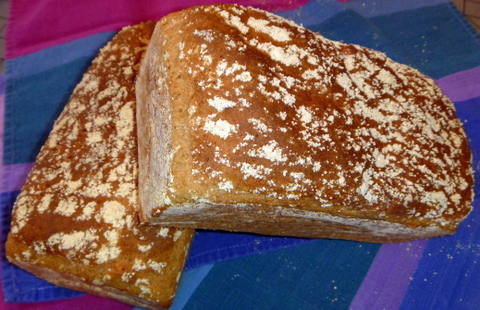
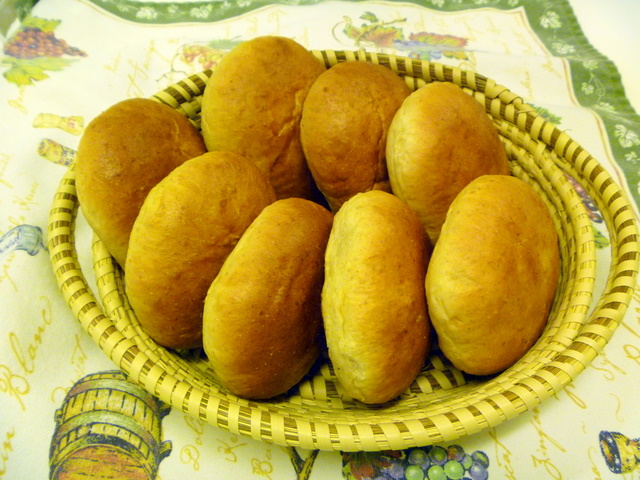
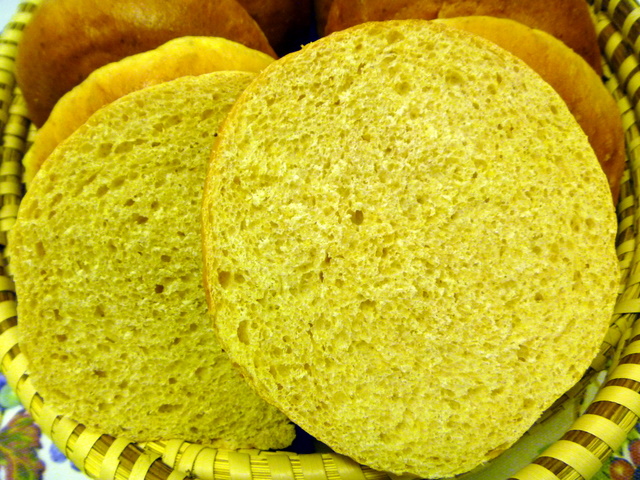
I have been taking a Peter Reinhart’s Artisan Bread class on Craftsy and these loaves are from the rustic bread lesson. Craftsy is an online learning platform for a wide range of subjects such as knitting, baking & cooking, weaving, crochet, quilting, and much more.

I am very impressed with the Craftsy student interface. Video lessons are well presented and can be viewed as many times as desired at any time. Instructors answer questions and class materials are available for downloading. My next class is a free class on knife skills. Just to be clear, I have no affiliation with Craftsy. I am just a very satisfied customer!

So back to the bread. I made 5 mini baguettes and 1 ciabatta. The dough is mixed and retarded overnight. The mini baguettes were fun to make – no shaping or slashing. Cut off a hunk of dough straight out of the fridge, stretch it a bit onto parchment and bake in a steamed oven. The ciabatta was shaped and proofed for 2 hours before baking.

Great flavor and texture and super simple. And Mr. Reinhart is a delightful and engaging teacher. Can’t wait till I get to the lesson on chocolate babka!

MarieH's picture
MarieH

I tried isand66’s recipe for Ricotta Garlic Knots http://www.thefreshloaf.com/node/36664/ricotta-garlic-knots and I am very glad I did. The addition of ricotta and the baking style intrigued me. While this is a straight dough (it uses instant dry yeast), it is bulk fermented in the fridge and baked at a high oven temp with steam. I didn't have kamut flour so I substituted white whole wheat. Here are the rolls after shaping and before proofing.

Since my kitchen was cold this morning (it’s cold even in Florida), I proofed about for about an hour and a half. Ian’s remark about the poke test is a good reminder for new bakers - testing the dough with your hands is a better indicator of readiness than the clock. Even though I have made many different roll shapes over the years I have never made knots. So that was fun! Here is the finished product. Oh so good…

Happy baking, everyone,

Marie

MarieH's picture
MarieH

There have been a lot of English Muffin recipes posted all over the web. While I yearned for a homemade muffin, I didn’t relish the steps to make them. I don’t have a griddle and cooking them in batches in a frying pan seemed problematic.

I have an English Muffin bread recipe that I have used for years. It is posted here. When I read trailrunners blog post about burger buns and saw how the buns were cut into pieces I thought – hey, I can do that with my English Muffin bread dough. The handling is a bit different because the dough is very loose and sticky, more like a batter.

Success! This was a fun experiment with a great outcome. Try them if you’d like to have homemade English Muffins without all the fuss. Start to finish this recipe took about 1 1/2 hours. I have included step-by-step photos since this is an unusual technique.

Prepare the baking pan and heat oven to 400 degrees. Fit a piece of 11" x 15" parchment paper into a 9" x 13" rimmed baking sheet pan, folding 1" of the paper up all four sides of the pan. Buttering the bottom of the pan before putting in the paper will help hold it in place. Lightly butter the bottom of the parchment paper and sprinkle evenly with cornmeal.


Stir together in a large bowl. Note: the oat flour can be substituted with 3 1/4 oz old fashioned oatmeal, finely ground in a food processor.

3 oz (3/4 cup) whole wheat flour

3 1/4 oz (1 cup) oat flour

1/2 tbs sugar

1 tsp salt

1/4 tsp baking soda

2 1/4 tsp instant yeast

1 oz (1/4 cup) bakers milk powder

Heat until 120-130 degrees and add to the dry ingredients. Beat well with a wisk to make a smooth batter. The batter will be quite thin.

9 1/2 oz water

1 oz orange juice

 Add and stir in until well blended to make a loose batter.

5 oz (1 1/4 cups) bread flour


Spoon the batter over the parchment paper and using a wet rubber spatula, spread the batter evenly to the sides of the pan. Wet the spatula as necessary to smooth the top of the batter. Lightly sprinkle top of the batter with cornmeal.


Cover and let rise in a warm place for 30 - 45 minutes until very puffy. It works best to place the pan in a very large, seal-able plastic bag or to use a proofing cover. If using plastic wrap, spray the wrap heavily with cooking spray before placing on top of the batter.

 When ready to bake, score the dough about 1/8" deep into 12 pieces each 3 1/4" x 3". A bench knife that has been sprayed with cooking spray works well.


Bake at 400 degrees for 15 minutes. Remove the pan from the oven and carefully slide the parchment paper onto a flat rimless cookie sheet. Cut the dough into 12 pieces, following the score lines and cutting all the way through. Spread the muffins out a bit leaving about 1/2" between each muffin. Return to oven and bake another 5 minutes until golden brown. Remove from pan and parchment paper to a cooling rack.


When completely cool, use a fork or muffin splitter to split the muffin squares.


Note: the muffin squares seem large but they shrink a bit in the toaster, so resist the temptation to make them smaller.

MarieH's picture
MarieH

I have been working on developing a sourdough sandwich bread. I have taken my inspiration from recipes here on TFL and from King Arthur Flour. I finally settled on a formula that I am really happy with. The bread is soft with a tender crumb but the best part is the flavor. I used a starter to provide a very slight tang to the bread flour and added white whole wheat flour, golden flax meal, whole rye flour, and hi-maize cornmeal. I learned from Jeffrey Hamelman’s formulas that a small amount of an ingredient can have a big impact. If you try this recipe, I hope you like it as much as I do.  ~Marie

Super Sourdough Sandwich Bread

Yield: 2 loaves

11 ounces 100% sourdough starter, fed or unfed (see note)

11 1/2 ounces water

1 ounce vegetable oil

1 ounce sugar

2 1/2 teaspoons salt

1 ounce golden flax meal

3 ounces potato flour

11 1/2 ounces bread flour

4 ounces white whole wheat flour

1 ounce corn meal (I used hi-maize)

2 ounces whole rye (pumpernickel) flour

4 teaspoons instant yeast

Note on the starter: the starter is more for flavor than lift. I usually build the 11 ounces a few days ahead and refrigerate it until I am ready to bake.

Combine all of the ingredients in the bowl of an electric stand mixer and with the dough hook, mix on speed 1 for one minute to create a shaggy dough.

Cover and let rest for 45 minutes.

Knead on speed 2 for 5 minutes.

The dough will start out shaggy, then become stickier as you knead. Don’t adjust with flour or water until you have kneaded for 5 minutes. Scrape the bowl. The dough will stick to the sides of the bowl. It is the right consistency if you can scrape it off the sides of the bowl and it feels firm enough to hold its shape.

Knead for 3 more minutes. Scrape the bowl to create a rough dough ball. Cover the dough, and allow it to rise at 78 degrees for 1 hour (you will need a longer rise at lower temps) until doubled in bulk.

Lightly grease two 8 1/2" x 4 1/2" bread pans. Turn the dough out onto a floured board. The dough is sticky and you will need to flour your hands and the board to prevent sticking and tearing. Gently deflate the risen dough, divide in to two equal pieces, and shape into loafs. Place dough in the pans, cover lightly, and allow it to rise until the dough crests 1 1/2” over the rim of the pans, 1 1/2 to 2 hours.

Towards the end of the rising time, preheat the oven to 350°F. Bake the bread for 30 to 35 minutes, tenting with foil after 20 minutes. When done, the bread will register 190°F on an instant-read thermometer and will be golden brown.

Remove the bread from the oven, remove from pans, and cool completely on a rack.

 After 5 minutes kneading:

After full kneading and scraped down:

Finished Loaves:

MarieH's picture
MarieH

Hi everyone. Even though I have been baking, I haven’t posted in quite awhile. This semolina bread is from Jeffrey Hamelman’s Bread book. It uses a flying sponge which allows the baker to start and finish a bake all in one day. Great for the absentminded who forget to build a levain the night before! A flying sponge uses commercial yeast along with flour and water and ferments for about 75 minutes.

I had mixed the final dough and just put it in the proofer when I noticed the bottle of olive oil on the counter looking forgotten. Aargh – I pulled the bowl out of the proofer, added the oil, and mixed for about a minute till incorporated. No damage. This is why I almost always do mise en place so I don’t miss an ingredient.

I have just one banneton so I used one mixing bowl with a floured linen cloth for proofing. The shaped loaves outside for a quick picture in the Florida sunlight.

Loaded in the proofer with their plastic caps on. I use shower caps (disposable ones from a hotel) to cover the proofing baskets. Shower caps work well on the bowls for building a levain and bulk fermenting and on loaf pans too!

The finished product. The flavor profile is deep and complex even with a flying sponge.

And the texture is creamy and soft. The crust layers are light, flaky, and crisp. Can’t wait to take a bite!

Bake often ~ Marie

MarieH's picture
MarieH

I want to share with you how happy I am with the Brod & Taylor proofer (I am not a paid spokesperson, just a happy customer). It is well worth the investment. Why? Because it provides a consistent, controlled environment for your dough to proof. It works for building a levain, fermenting dough, and final proofing. I can achieve exact dough temps without it being a hassle. I can predict the timing of the dough much better since the temp inside the proffer is consistent. What a difference it has made in the final bread.

I was worried that it wouldn’t be big enough – those worries are gone. It is a great size. And it collapses into a good size for storing in a cupboard. Here are some pictures of the proofer in action.

And if you need one more reason, it tempers chocolate like a dream. If you have tried to temper chocolate, you know that temperature is king. The Brod & Taylor eliminates seizing (no water involved), too high melting temps, and the dreaded blooming. It does take longer to melt the chocolate but it is hands-off time. This is one fine appliance.

MarieH's picture
MarieH

Today I made my first baguettes. I have shied away from the intimidating baguette - the shaping, the proofing, the scary, scary slashing! But I have made enough boules, batards, and rolls to gain confidence in my skills. I am quite pleased with my first attempt. Like all things baking, improvement will come with experience and practice. The recipe is from Hamelman's Bread: Baguettes with Pate Fermentee. While the crumb is not as open as it should be, the flavor is delicious and the texture light and airy. Good enough to do a happy dance in the kitchen (with only the cats to appreciate)! Thanks to all the baguette bakers who have posted inspiration.

Happy baking,

Marie

MarieH's picture
MarieH

I have been tinkering with an oat and whole wheat english muffin loaf for quite a while. I used to make this recipe with AP flour but now we try to eat only whole grain baked goods. This is my latest tinker and I am quite happy with the results. I increased the water for a higher hydration loaf hoping to get bigger nooks and crannies to better simulate an english muffin. The recipe follows the pictures. Happy baking!

  •  6 oz (1 1/2 cup) whole wheat flour
  •  6 1/2 oz (2 cups) oat flour
  •  1 TBS sugar
  •  2 tsp salt
  •  3/8 tsp baking soda
  •  4 1/2 tsp instant yeast
  •  2 oz (1/2 cup) bakers milk powder

Stir together in a large bowl.

Note: If you don't have oat flour, you can grind old-fahioned oatmeal in a food processor until flour-like.

  • 19 1/2 oz water
  • 2 oz orange juice

Heat until 120-130 degrees and add to the dry ingredients. Beat well with a wooden spoon to make a smooth batter. Batter will be quite thin.

  • 10 oz (2 1/2 cups) whole wheat flour

Add and stir in until well blended to make a loose batter. Adjust with water or flour to the consistency of muffin batter.

Grease and sprinkle with cornmeal two 5”x 8” bread pans. Divide batter evenly between the pans and lightly smooth tops with a spatula dipped in water. Lightly sprinkle top of batter with cornmeal.

Cover and let rise in a warm place for 30 - 45 minutes until about 1/2 inch above the top rim of the pan. Batter will be very puffy.

Bake at 400 degrees for 25 minutes. Remove from pans immediately and cool on a rack.

Because this bread has no fat, it should be used in a day or two. It freezes very  well and can be put in the toaster without thawing.

MarieH's picture
MarieH

I baked two sandwich breads yesterday - sandwich buns and a multigrain sandwich loaf. Kind of had a theme...

The sandwich buns are adapted from a King Arthur recipe. I added white whole wheat flour and milled golden flax (both from King Arthur). I have used the golden flax a few times and really like the nutritional goodness and the texture it produces. Pictures first, then the recipe.

For best results (a smooth, slightly soft dough), use the smaller amount of water in a humid
environment, the greater amount in a dry climate and something in between the rest of the time.

Using the paddle attachment in a stand mixer bowl, on the lowest speed mix all of the dough ingredients until they come together.

Switch to the dough hook attachment and knead on speed number 2 for 10 - 15 minutes to make a soft, smooth dough. Cover the dough, and let it rise until it's nearly doubled in bulk - 1 to 2 hours.

6 to 8 ounces lukewarm water

1 ounce soft butter

1 large egg

7 ounces whole wheat flour

7 1/2 ounces AP flour

3 tablespoons ground golden flax

1 3/4 ounces sugar

1 1/4 teaspoons salt

1 tablespoon instant yeast

Gently deflate the dough, and divide it into 10 equal pieces. Shape each piece into a round ball; flatten to about
3" across. Place the buns on a lightly greased or parchment-lined baking sheet, cover, and let rise for about an hour, until noticeably puffy.

Lightly beat 1 large egg and 2 TBS water together and brush the top of the buns. Bake the buns in a preheated 375°F oven for 15 to 18 minutes, until golden brown.

Multigrain Sandwich Loaf

MarieH's picture
MarieH

Hamelman’s Vermont Sourdough is one of my favorite recipes. It is so consistent in both flavor and texture. It’s hard to mess up this formula. It’s still pretty warm in Tallahassee, FL so paying attention to the Desired Dough Temperature (DDT) is important. Following Hamelman’s instructions I needed chilly water.

Desired Dough Temperature           76

Multiplication Factor                         4

Total Temperature Factor                304

Minus Flour Temperature                71

Minus Room Temperature               78

Minus Pre-ferment Temperature     75

Minus Friction Factor                       26

Water Temperature                          54

I started the levain build yesterday at 6:30 p.m. and started the dough at 7:30 a.m. today. I created a timing chart to help me along the way.

The finished batards...

Pages

Subscribe to RSS - MarieH's blog