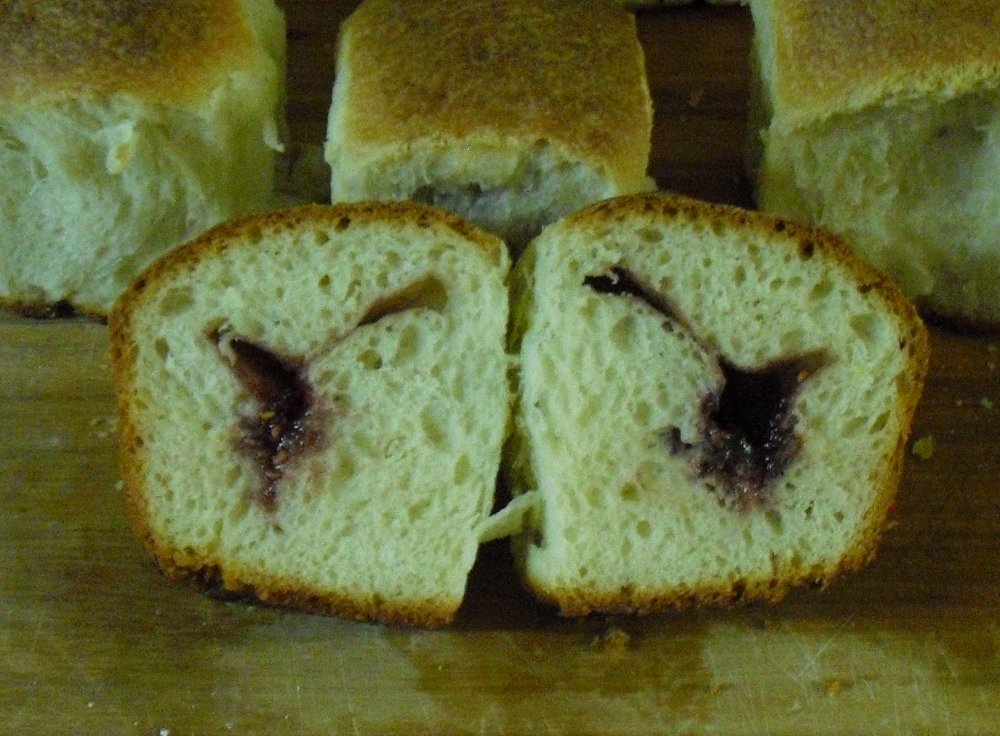
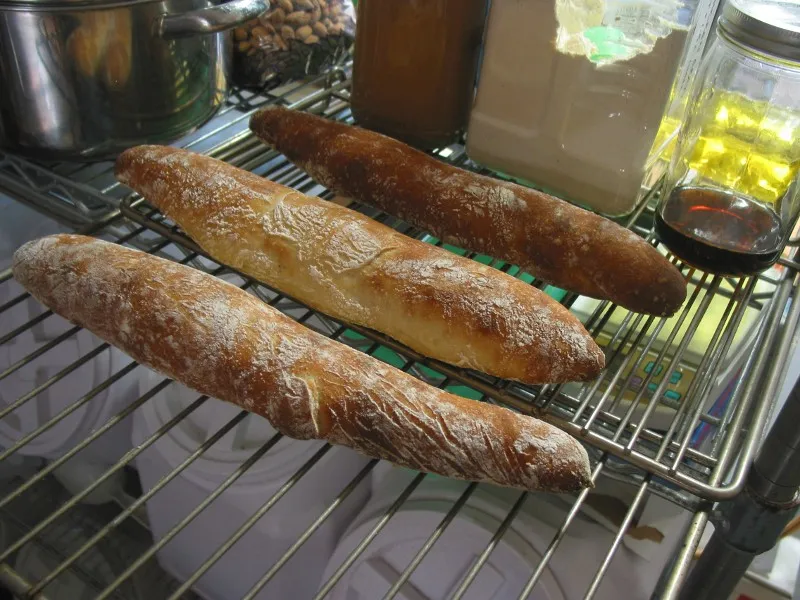
The Fresh Loaf

A Community of Amateur Bakers and Artisan Bread Enthusiasts.

kenlklaser's blog

kenlklaser's picture
kenlklaser

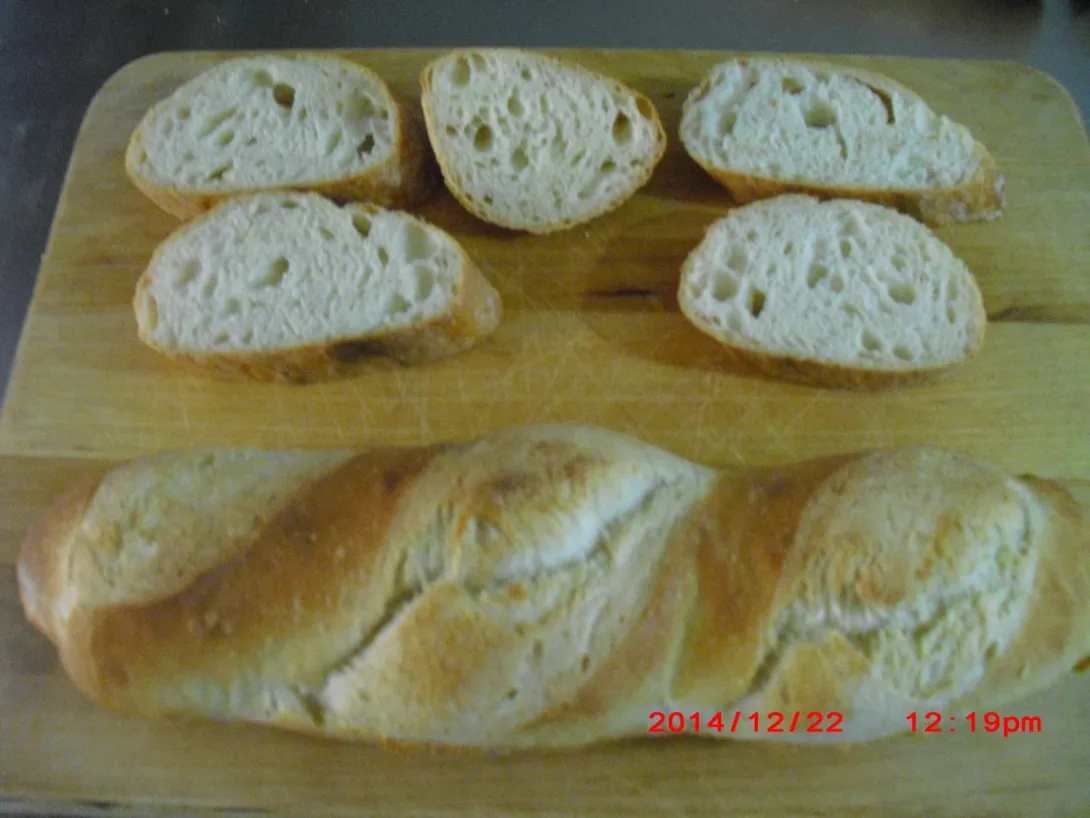
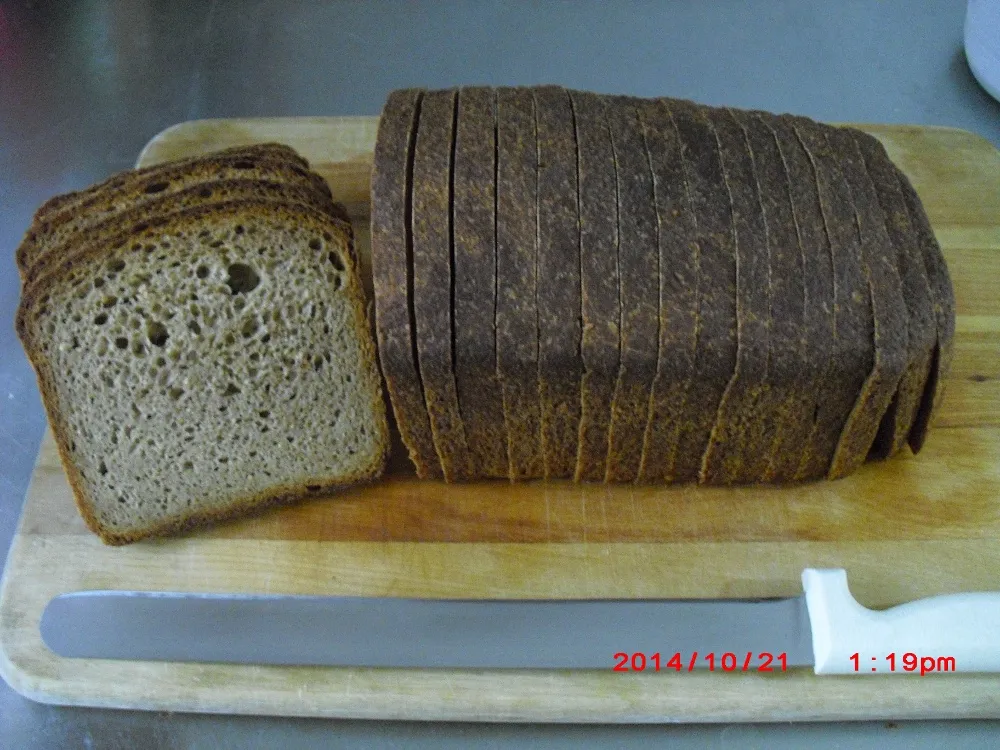
Sort of straight dough, but with 4% over-fermented sponge which I make up ahead of time and keep in the freezer, so I guess it's really sponge and dough.

This post has been edited, dabrownman in the comments below made me realize something was wrong in the formula presentation.  My apologies for any confusion that the flawed formula may have caused.  As a result of this edit, some comments may now be out of context.


 total  final  sponge 
 formula  dough    
 %g %g %g
         
Baker's Flour, 11.8% protein4%30    100%30
Pastry Flour, 9% protein96%720 100%720   
malt, low diastatic2%15 2.08%15   
Instant dry yeast0.775%5.81 0.775%5.58 0.775%0.232
cool water55%412.5 49.79%358.5 180%54
 ~~~hydration rest~~~        
cool water15%112.5 15.63%112.5   
salt2%15 2.08%15   

Sponge instructions are located in a comment of mine below dabrownmans.

Final dough: Mix pastry flour, AB mauri low-diastatic malt, instant dry yeast. Add water, mix briefly until just combined and let rest for 20 minutes.  After the time has elapsed, mix again.

Add salt, sponge, and water, and mix well until gluten is well developed. Warning: Increasing the hydration after autolyze makes for difficult mixing.

Let it bulk ferment to double.  I then refrigerated it overnight (not planned, but unexpected circumstances demanded it), punched it down once. In the morning, weighed, divided into 3 equal weight portions, let it warm a little, shaped, and let it proof to 1.5 gas:dough ratio, scored, and baked in a dry oven at 450°F for 20 minutes.

Not real happy with the crust, not as crispy as I'd like, but this flour seemed the secret of a bread I'd been trying to duplicate for years. It has a nice soft, melt in your mouth crumb, like a restaurant from the 1980s in Bird Rock (San Diego) used to have in their baguettes, The French Pastry Shop.

Update: reheated the batards this evening in a 350°F oven for 10 minutes, and the crust was divine, nice and crispy without being tough. 

kenlklaser's picture
kenlklaser

While these are not perfect, at least they do not have an overpowering yeast flavor.  I increased the lemon zest by 50%, and changed the process point when it was added.  The flavor is light and subtle.

The prior formula used 3.4% compressed yeast, and took about 2 hours in bulk ferment. This formula took 3.5 hours to reach the same gas:dough ratio of 0.9, almost a doubling.

sugar888%                           
Lemon zest13.21.2% 
Water492.844.8% 
flour, 11.46 protein1100100%  Mix until incorporated, cover and let rest 20 minutes, then mix again.
eggs22020%  This ingredient is difficult to incorporate. Mix, rest, mix, rest, mix, rest, etc.
salt222% 
butter-flavored shortening23121% 
yeast, instant dry4.0270.3661% 

 I used 1/2 teaspoon of jam per roll, in total ending up as 13.5% of the flour weight.  The jam could be doubled to 1 teaspoon.

After folding and rolling them and letting them rest a bit, they were oiled before placing in a shortening-coated baking pan.

They proofed for 30 minutes, then were placed into a preheated 350°F oven, and were baked for 40 minutes.  Final temperature was 204°F.  Next time they will bake for 35 minutes. They were easy to remove from the pan.

In this batch, I'm testing how they freeze, and then later thaw. I don't yet know what kind of quality degradation might occur.

kenlklaser's picture
kenlklaser

I happened across a formula for " Buchteln", and decided to try it, but I have to avoid milk and dairy (including butter) as it's poison for me, and the formulas for Buchteln always seem to have milk. My first attempt needs some improvement.


Sugar8.00%                                                                                                                 
Water 136°F44.80% 
flour, 11.46 protein100.00% 
eggs20.00% 
salt2.00% 
Lemon zest0.80% 
butter-flavored shortening21.00% 
yeast, compressed3.40% 

It was too much yeast, these jam filled sort-of-brioches were very yeasty flavored, so I will increase the fermentation time and decrease the inoculation.  The flavor of the yeast overpowered the lemon zest, but I was happy with the crumb. I made a folding error, I believe the jam should be more in the middle, instead of right under the top crust.

I updated with a link to the original recipe which uses real butter and milk, but also 3 g more yeast.  I order ingredients differently, and the process I used is a bit different, sequential in that order.

kenlklaser's picture
kenlklaser

I'm writing this well after making this loaf last week or thereabouts.  Unlike so many of you, I'm boring in my bread tastes, I don't really want to make lots of different varieties, as long as I make this particular loaf and have it on hand for egg sandwiches, I'm reasonably happy.  I do use sourdough in it, as it tastes better with mustard and egg, than when it's made only with sweet yeast.

I evidently made a weighing error early on, the first thing I noted was the dough sticking differently, more, to the bottom of the mixing bowl. I knew then something was wrong, but wasn't yet sure what.  I suppose I could have thrown in a little more flour, but that's not my way, I want every last gram of everything weighed.

When I got to division, two loaves of about 4.5 lbs each, the weight was under 2000g each, instead of slightly over.  Well, at least I knew then that I had made a weighing error, most likely too little flour.  This dough was hydrated more than normal, and sure enough, the holes are, on a few slices, big enough for mayonnaise to slip through and smear all over the fingers.  I'd rather that not happen.


Not only that, because the loaf was hydrated more, it took longer to bake, and never did reach the final temperature I usually use, I finally took it out after realizing the temperature wasn't rising and it was good enough.  It ends up this bread is somewhat dry.  Perhaps I should lower my final temperature slightly, this one was removed at 206°F, and normally I go to 208°F.

Maybe next time I'll pay a little more attention when weighing the ingredients.  This particular bread is somewhat of a hassle to make, I wish I could make it simpler, but haven't yet figured that out. Another thing I'd like to figure out, how to flip the pan dough over during proof.  It's always a little more dense on the bottom than the top.

I preslice it as I store it frozen.

kenlklaser's picture
kenlklaser

One of the reasons I started learning how to make bread was that one of my favorite foods was pizza, and I was never quite happy with my crust, I felt that crusts I got at good pizza places were usually better. My pizza making efforts started in the 1980s. In 2011 I gave up eating cheese, should have never had it due to milk allergy, and I took my last picture of my last cheese pizza (not sure where that photo is) at the same time.

The other day I happened upon a video, New York Pizza Crust by Bruno Di Fabio.

Bruno's NY Style Pizza Dough


He uses an advanced straight dough process with a long cold fermentation.  It wasn't clear to me what temperature he used, but I got the impression it was warmer than 36-38 °F, the temperature of my home refrigerator.


Pizza dough by Bruno di FabioStraight Dough Process
 lbs, oz, vol.lbs%g 
High Gluten Flour50 lbs50100.00%600.00 
water12 qt24.9949.98%299.88 
olive oil24 oz1.53.00%18.00 
eggs6 lrg0.661.32%7.94 
sugar10 oz0.6251.25%7.50 
salt10 oz0.6251.25%7.50IDY
fresh yeast2 oz0.1250.25%1.500.0825%
   157.05%  

So, after doing some conversions (in which I could have made errors), I made two no-cheese pizzas, or whatever they might legally be called, over the last couple of days, one was his crust formula and process, though the water amount was far too stiff.  I wanted my pizza sooner than the long cold ferment, so increased the yeast a little and baked it that evening with a roughly 6 hour rise, and just like most of my straight dough experiments, the result was a pale crust color that didn't want to brown.  But when eating this, OMG, the crumb had reasonably large holes and the bottom was crisp!  


http://www.onegreenplanet.org/plant-based-recipes/caramelized-vegan-onion-tart-with-olives/


The next day I changed the process to sponge and dough, and got better colors on the crust.  The crumb holes were every bit as nice.  


Meat and potato pie.

It seems I need a docker to deal with the oven bubbling. In reviewing this, it is interesting to note that crust bubbling was not an issue with the straight dough, only the sponge dough. I use a big tile, and preheat a home gas oven to 550°F, as hot as it will get.  Opening the door to put the pizza in drops it to 475°F, and during the bake of the next 14 minutes or so, it remains at 475, the gas burner on the whole time, so opening the door to pop a bubble just isn't in the realm of possibility.  I have fantasized about adding electric elements to the oven for additional heating power, though I won't do it for liability reasons, nor can I afford one of the upscale ovens, I'm lucky and grateful to have the one I used.
kenlklaser's picture
kenlklaser

It doesn't get much simpler. The following formula expressed as baker's percents is used to refresh existing sourdough starter:

67% all purpose flour
33% cake flour
160% water

The above combination of flours is approximately 9.6% protein. A 50:50 mix of all purpose and pastry flour is a close alternative, as are several other flour combinations.

Calculate ingredient weights with a particular flour weight

For refreshing existing sourdough starter using a half-gallon sourdough pot, 300 to 500 g for the flour weight may be used, depending on how much is needed to fill the pot.  You may use 400 g for the flour weight, which is enough for about 7 large pancakes.  Multiply the flour weight times each baker's percent:

268 g all purpose flour = 400 g x 67%
132 g cake flour = 400 g x 33%
640 g water = 400 g x 160%

Refreshment ratios are not very important for pancake dough, perhaps other than something greater than 50:50. The objective is to fill the nearly-empty sourdough pot with new dough and mix well with the old dough.

Incubate

Once refreshed, the entire sourdough pot is incubated in a water bath at 88-90°F to favor lactobacilli. A digital stick thermometer is an indispensable kitchen tool.

The water level is about the same as the dough in the sourdough pot.  This water bath technique warms the dough quickly.

When a thin, foamy layer first develops on top of the starter, it is ready to make pancakes or refrigerate.  

Weighing batter & making two large pancakes

300 g starter  (1 1/4 cups)
1 g salt (1/8 tsp)
1.5 g baking soda (1/4 tsp)

Using a 2-cup glass measuring cup, weigh or measure out starter and other ingredients, whip thoroughly and quickly, and immediately pour batter into small squirts of oil in the middle of two large and preheated cast iron pans.

Notes about incubation and storage

Between uses, store the starter in the refrigerator, it will keep for about a month until it must be refreshed.  Incubation is only done after a refreshment.  It is not necessary to incubate every time pancakes are desired, only when the sourdough pot is near empty.

Depending on how long it's been since the sourdough was last refreshed, it usually takes from 1 to 3 hours of incubation. If it's only been a few days since the last refreshment, it takes less time: if it's been nearly a month, it takes longer. How long it takes also depends on the refreshment ratio. With relatively more new dough, incubation takes longer: with relatively less, it goes faster.

When a thin layer of bubbles or foam first develops on top, the starter is ready to make pancakes, or refrigerate. At this point it is still a young culture, it could be incubated for longer, but storing in the fridge at this early point of growth seems to increase storage time.

Record the date of the most recent refreshment on a paper label stuck to the lid of the sourdough pot.  Sometimes it gets forgotten in the back of the fridge, and it's useful to know its age!

Yeasts versus lactobacilli

Sourdough for pancakes is a bit different from sourdough for bread. There are two different kinds of organisms in sourdough, yeasts and lactic acid bacteria. For making bread, you want to favor the yeasts, which make carbon dioxide. For making pancakes, you want to favor lactobacilli, which makes mostly lactic acid.

When making bread, it is the yeast which makes the carbon dioxide which slowly leavens the dough. When making pancakes, the carbon dioxide is created when you add baking soda which combines with the acids, that reaction accelerates when the batter is warmed by the hot pan.

In general, it's much easier to make lactic acid, the starter doesn't require anywhere near as much care. It is more difficult to evoke good yeast growth for making bread.

When you're making sourdough starter for bread, you are trying to optimize yeast growth, traditionally with 3 refreshments before incorporation into bread dough, and you do that at room temperature or optimally at 75-80°F.

Making sourdough for pancakes is much simpler, all that's needed are the acids.  A single refreshment followed by a short incubation at about 89°F is all that's needed.

Calculation of flour weight for any size sourdough pot

To know what flour weight to use to fill up your sourdough pot with new dough, this will get you very close to a full pot no matter how much starter or old dough remains. First you need a few data points or variables:

Formula % = 260% (100% flour + 160% water, the sum of the baker's percents)

Weight of your sourdough pot when empty ⟶ SD pot empty

Weight of only cool water when your empty sourdough pot is filled to desired fill line with water ⟶ Max capacity

Weight of the sourdough pot with a little starter remaining ⟶ Old dough with pot

Old dough with pot − SD pot empty = Old dough weight

Max capacity − Old dough weight = New dough weight

New dough weight ÷ Formula % = Flour weight.

Once you have the flour weight, use baker's percents to calculate the refreshment weights for flours and water to fill your sourdough pot.

Revised on February 23, 2018.

 
kenlklaser's picture
kenlklaser

English muffins.  I started with Gisslen's formula, but have to avoid milk, so take it out.  I am still using a very similar formula, but not with a straight dough process, rather adapted to sponge and dough.  I'm slowly increasing the hydration until I get a somewhat flat top during proof.  Next time I'll try 75%.  Gisslen includes 2.3% milk solids, which have an absorbancy of some value, maybe about 1:1. This is the second time I've used gypsum, the first time it accelerated yeast growth, replacing the calcium removed by the water filter. I've learned when flipping them over on the griddle, great care is needed, the dough seems to degas or collapse to some degree.


100% Baker's flour (Minnesota Girl, 11.8% protein)
74% Water 124°F  (RO water, no minerals or chlorines)
1.5% Sugar
1.5% Shortening
1.5% Salt
0.5% IDY
0.03% Gypsum (calcium sulphate)

600 g total flour weight.

60% flour weight sponge, yeast calculates for 7 hours but only keep for 3 hours at 80°F, then refrigerate overnight, sponge is still young in morning.

These were torn open:


kenlklaser's picture
kenlklaser

I always meant to try Reinhart's Pain à l'Ancienne, and today was the big day.  This was an easy formula and process.

I used a hydration of 70%, whereas Reinhart recommends a value somewhere in the range 70-88%. I diverged slightly from his instructions in a couple of places. 

I use a pressure cooker to pump steam into a gas oven through a copper pipe which I installed in my oven, which is different from Reinhart's pan with a cup of hot water added when the dough is loaded. I did two batches in succession, I ended up steaming both bakes for the first 10 minutes, and stopped the steam for the final 8 minutes of 18 minutes total bake time.  He said they'd begin browning by 8-10 minutes, but with the pressure-cooker steam applied, they hadn't yet browned at 10 minutes when I turned the steam off.

It took about 3 hours for the yeast to wake up from its refrigerated slumber at a room temp of 75 °F, the dough temperature was just hitting 62 °F. When the gas:dough ratio reached 0.2 just a short time later, I shaped the logs and placed them to proof.  I only had enough room on the baking tile to bake three at once in the way I planned it, so I did two batches in succession.  The first one was baked when the gas:dough ratio was 0.7:

The second batch was by necessity 30 minutes later and the gas:dough ratio was 1.0 (a doubling):


I preferred the shape of the batch baked at a 0.7 gas:dough ratio, but believe it's not yet an optimal value.  The 1.0 dough expansion baked flatter, more like a wetter ciabatta.  Both had a reasonably open crumb.

Subscribe to RSS - kenlklaser's blog