The Fresh Loaf

A Community of Amateur Bakers and Artisan Bread Enthusiasts.

bryoria's blog

bryoria's picture
bryoria

I used to make the buttermilk bread from the Laurel's Kitchen Bread Book as our everyday sandwich bread, but then I discovered an overnight fermentation recipe and the colour, texture, and taste are so much better, I don't think I can ever go back to an all-in-one-day bread recipe.
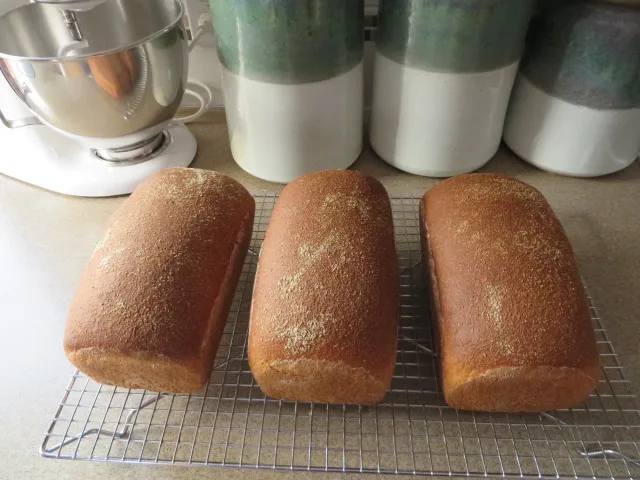
My recipe is based on this one for Traditional Soaked Whole Wheat Bread from The Elliot Homestead website, but I've made several modifications to make it work with freshly ground whole wheat flour and end up with 3 good-sized sandwich loaves.

Here are my modifications from the original recipe:

  • I always use fresh ground flour, right out of the mill (I have a nutrimill), measured by weight (440 grams in soaker, 440 grams in sponge).
  • I use 1 2/3 cup of the milk and water (instead of 1 1/2 cup).
  • I use lemon juice instead of apple cider vinegar.
  • I add 3 Tbsp of wheat gluten and 1 Tbsp instant yeast to the final mix.
  • I bake using the "convect roast" setting on my oven, set to 375F, for 35 minutes.
  • I find this makes three good, decent-sized loaves. The original recipe shows two very flat loaves. Maybe she has huge bread pans?

This bread has a wonderful texture, toasts well, and fits well in our sandwich containers! It does take a very long time to rise in the pans, and I don't rush it. 1 1/2 hours is typical, at room temperature (we keep our house at 19C). I bake it at 375F convect roast setting for 35 minutes.

I have made some observations when using fresh ground flour. This bread is the ultimate if the flour is truly fresh - the flavour is fantastic. I use the flour immediately after milling, while it's warm. If you don't use it within 24 hours, the flour changes and turns into an unruly teenager who will destroy all of the gluten in an overnight ferment. The dough will never firm up - it loses all its elasticity and just spreads into a flat pancake on the counter. I assume this is due to enzyme changes. In that case it is better to age the flour for weeks before trying to use it again, though I will use "teenaged flour" for same-day baking like pancakes, muffins, and cookies.

bryoria's picture
bryoria

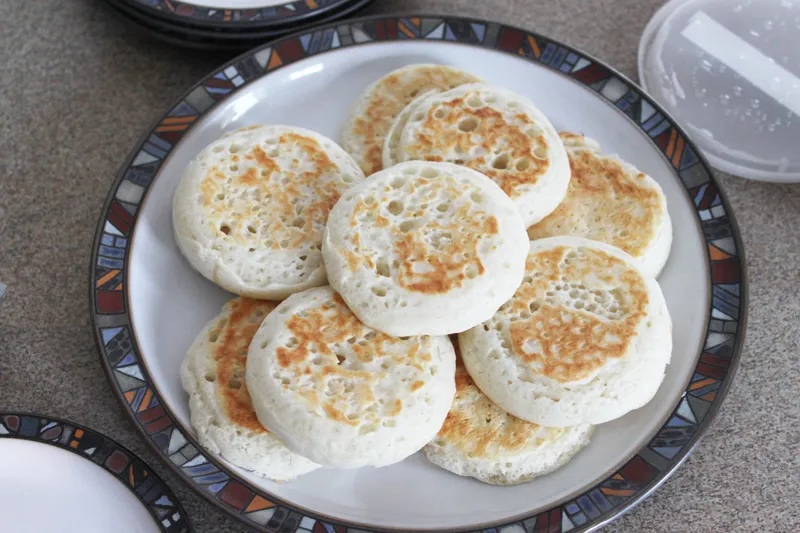
These are quite possibly the best thing I've ever made from my sourdough starter, and by far the quickest and easiest.  Crumpets are my most favorite storebought baked item - they are soft & chewy with big, open holes on the top for the butter and honey to seep into.  They are wonderful, and I had almost given up hope of making my own when I happened across this old recipe on the King Arthur website.

It worked like a charm!

  • For this batch I mixed 1 1/2 cups of my leftover 100% hydration starter (right out of the fridge where I'd been collecting it every time I made bread) with 1.5 teaspoons white granulated sugar, 3/4 teaspoon baking soda, and 3/4 teaspoon salt.  Almost immediately, it gets very, very bubbly. 
  • I poured the batter into 3.5" crumpet rings on my pancake griddle in a big dollop that slowly spread to fill the rings about 1/4 inch deep before rising. 
  • I only have 4 crumpet rings, so once the sides started to set, I removed the rings and poured 4 more while letting the first ones cook until there were lots of bubbles on top and the sides were getting dry. 
  • I flipped them briefly, and took them off the griddle.
  • I ate some hot right off the griddle (soooo good), and heated the rest up the toaster later on.
  • To serve them, spread with butter and honey and watch them disappear into the holes, saturating the crumpet with buttery goodness.  They are not crispy like english muffins.
  • 1 1/2 cups starter made 12 crumpets.

I have since tried this recipe with freshly fed sourdough starter, with less luck.  It seems to work best with the old leftovers I collect in my fridge over several weeks.  I also tried a half whole wheat version, but the texture just isn't the same as with 100% white flour. 

I'll be making these again!

The way they should be eaten!

bryoria's picture
bryoria

I made another batch of 100% whole wheat buttermilk bread from Laurel's Kitchen Bread Book yesterday.  This time I used freshly ground flour (hard red spring wheat) measured by weight, mixed all the ingredients except the butter for 2 minutes and then let the dough sit for 40 minutes in an attempt to hydrate the fresh ground flour a little bit.  Next time I would attempt this without the salt added as per the various threads on this site regarding autloyse - but yesterday I didn't come up with the idea until after I'd already added everything.

After the 40 minute rest I mixed it for 4 more minutes on speed 4 on the KitchenAid and added the butter in cold, small, pieces as per the recipe.  The butter didn't mix in very well so I moved the dough to the counter and kneaded the butter in for another minute or two, then let the dough sit in a covered bowl (in a cold oven with the lights on for warmth).  I let it rise for 2 hours and 15 minutes, giving a stretch and fold every 45 minutes.  Then divided it into two equal pieces, rounded them and let them sit for 15 minutes before forming them into pan loaves. 

I let the loaves rise for 1 hour, then baked them in a pre-heated 350F convect oven for 35 minutes.  They rose in the oven a little more and ended up the perfect size for sandwiches. 

This bread is always delicious and my family loves its softness and flavour for sandwiches and toast.  The fresh-baked heels are amazing and we usually snitch those from the sliced loaf before we freeze it - no one ever wants the heels for toast or sandwiches later anyway!

bryoria's picture
bryoria

I didn't have time to post detailed entries on my latest bread attempts, but here's a quick roundup and some photos of what I've made in the last week:

1. Sunflower Seed Rye

This was a 30% rye recipe/formula that I learned at the artisan bread course I took last fall.  The 70% hydration dough uses my sourdough starter built up with rye flour the night before, and some white flour added the next day along with some toasted sunflower seeds. 

It's mixed for 8 minutes total in the mixer, then the sunflower seeds are added by hand, and then it sits for 2 hours with one stretch & fold in between before loaves are formed.

As an experiment I added a little whole wheat flour in the final dough.  The whole wheat was at an awkward teenaged stage (a few days since milling), but because it was only added on the day of baking, and comprised a small percentage of the flours, I hoped it wouldn't wreak too much havoc in the dough. 

The bread was baked on parchment paper on a baking stone in the oven, with a steam pan underneath.  The sides split during baking but it was otherwise great.  Not sure if the splitting was due to overproofing the loaves at the final stage, the whole wheat flour, the position of the loaves in the oven, or something else.  I've not had that happen before.

2. Sourdough English Muffins

Also this past week I made more sourdough english muffins from this recipe, using the called-for whole wheat flour this time.  I made them a little thicker than my previous attempt, making 9 muffins from the batch, and found they took a long time to bake, about a half hour on the 275F griddle.  They didn't have as many holes as last time.  I think I added a little too much flour during kneading.

3. Good ol' hamburger buns

And finally, I used my recipe for multigrain sourdough to make some hamburger buns:

Not much to say about them other than the 2 loaf recipe made 16 good-sized buns.  I think they're a little sweet for hamburger buns but my family loves them. 

bryoria's picture
bryoria

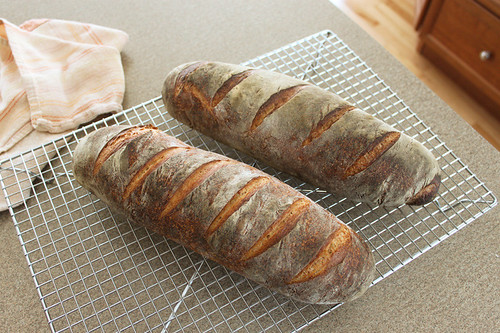
Today's bread was a rustic sourdough using my wild yeast starter:

I was out of aged whole wheat, so used all white flour instead (the recipe usually calls for 13% whole wheat).

  • 300 grams starter (100% hydration)
  • 725 grams white flour
  • 495 grams water
  • 1 tsp malt powder
  • 17 grams salt

Mixed all together with a 30 minute autolyse before adding the salt, then let it sit for 4 hours with one stretch and fold halfway.  Made fairly freeform loaves, being careful not to de-gas the dough, and let them proof at room temperature (on parchment on the back of a cookie sheet) for 45 minutes while the oven preheated.  I cover them with a smooth kitchen towel tucked around the well-floured loaves and put a paper towel roll between the loaves to keep them from spreading into each other.  Very high tech!

After proofing I slashed them and baked them at 425F for 45 minutes, putting a cup of hot water into a hot cookie sheet in the oven at the same time to make steam.  I think the slashes should have maybe been deeper.  When the loaves sprung (?) up the oven they just sort of flattened.   But other than that, I have no complaints. 

I've made the rustic sourdough a few times since I developed the starter last fall and I am always amazed and thrilled when the loaves rise so beautifully in the oven, with no added commercial yeast.  It's very magical.  Also extremely chewy, sour and delicious!

It was dark by the time we sliced it for supper, but I managed to get an okay photo of the crumb:

And as a bonus, while the bread dough was sitting for most of the day in between stretch and folds, I used the rest of my starter to make sourdough english muffins using the recipe from Wild Yeast blog.  This was my first time making english muffins, and I was really pleased. 

My only modification was to use all white flour due the aforementioned whole wheat flour shortage in the house.  The dough was very, very sticky and stayed that way, so I did add a little more flour as I mixed.  I cut them out with a 3" crumpet ring, and proofed them on the back of a baking sheet, covered with plastic wrap.  I baked them on my Oster griddle set to 275F, 8 minutes per side. The griddle is known to stay pretty cool, so I can't guarantee that the 275 setting is really 275, but whatever it was, it worked well.

They ended up looking pretty close to the storebought Costco ones my kids devour when they go to their grandparents, but taste so much better!  And I recognize all the ingredients!  I'll be doing this recipe again, with the whole wheat flour next time.


bryoria's picture
bryoria

Thanks to the advice I received on my last post, I thought I'd try the Buttermilk Bread from the Laurel's Kitchen Bread Book.  What a difference from the oatmeal bread of the other day!

I made the dough exactly to formula, using the larger amount of butter (50 grams) and my own home-milled whole wheat flour which had been aged and stored in the freezer for the past 2 months.  The buttermilk was store-bought, whole buttermilk (3.25% fat).  I didn't amend any of the liquid or flour amounts.  The dough was beautifully soft and pliable, as-is. 

Instead of kneading for 20 minutes by hand (!), I mixed the dough in my stand mixer for about 8 minutes, give or take.  There was a short break in the middle where I had to help one of my kids tend to an injury, but it was only a few minutes.  I then kneaded the dough for another minute or so by hand, just because it was so lovely to work with and I had to get my hands into it.

After that, let it rise for about 2.5 hours in the oven with the lights on to make it warm, giving it a stretch and fold twice in that time. 

I decided to make dinner rolls instead of loaves, so divided the dough into two portions.  One of the portions I made into 12 rolls, and the other into 15 rolls.  I put the rolls into two 9x13 metal pans that I had greased lightly with solid butter.  I let the rolls rise for about 40 minutes in the microwave (trying to keep them out of drafts - we have a bit of a blizzard happening outside) until they were all touching nicely. 

I baked them for 15 minutes in a 400F oven.  I pulled the pan of 15 out right away, and let the pan of 12 bake for another 2 minutes.  The centre of the centre roll measured about 195 F when they came out and they were all beautifully browned: 

I brushed them with melted butter, just because the book suggested it and I'd never tried that before.  It made the rolls shiny and softened the tops:

I confess I didn't wait for full cooling to tear one open.  It was incredibly soft and tender.  This recipe was a huge difference from the previous Oatmeal Bread.  Can't wait until supper!

bryoria's picture
bryoria

This is what happens when one tries to make the Oatmeal Bread from the Laurel's Kitchen Bread Book on a day that turned out to be too busy to make bread! 

The night before, I had cooked 1 1/3 cups of Roger's Porridge Oats* in 2 cups of boiling water, adding 1 Tbsp of salt once the porridge was off the heat.  I left the porridge to cool overnight in a glass bowl covered with plastic wrap. 

*Roger's Porridge Oats are a blend of rolled oats, oat bran, wheat bran and flax

In the morning, not as early as I'd hoped, I ground some fresh whole wheat flour and mixed up the dough as per the recipe.  The flour was straight out of the grinder, still warm.  I found I had to add more water than the recipe called for to make the dough come together.  The dough was still extremely stiff, but because the recipe insisted that the dough would absorb moisture from the oatmeal as it was kneaded, I didn't add more.

Right after mixing, I unexpectedly had to leave the house for a couple of hours.  I hadn't had time to knead the dough (by hand) for more than 2 minutes, and I never did add more water to soften it up.  I put the stiff ball into a bowl, covered it with plastic wrap, and left it on the counter.  The house temp was 17 degrees C.

When I got back a couple of hours later I only had a few minutes before I had to leave again.  The dough had risen about one and a half times.  I put the dough on a board, flattened it gently, folded it a couple of times, made a ball and put it back in the bowl.  It was so stiff that there was no stretching and folding possible - just a patting out, then folding to the middle.

When I came home again 2 hours later, the dough had risen to about one and a half times again and it was almost supper time.  I had no idea how to fix or amend the dough at this point, so I figured I'd get it ready for baking and see what happened.  I divided the dough into two and kneaded each piece briefly.  It tore pretty easily.  It was still quite stiff.  I don't know if that's what I should expect from 100% whole wheat loaves or if the dough does eventually get stretchy if it is handled properly.  I let the two pieces rest for 15 minutes or so, then formed them into loaves and placed them into two loaf pans brushed with pan grease. 

I put the bread to rise in the oven with the lights on and a pan of hot water.  It had been sitting in a cold, dry house all day and I thought I'd finally give it some warmth.  Once it was just over the edge of the pan, I brushed the loaves with warm milk and topped them with more porridge oats that had been soaked in milk for a few minutes.  I removed the steam pan, turned the oven to 400F, and baked the loaves with the cold oven method for 45 minutes, turning the heat to 350 after 20 minutes or so.

The loaves never did rise very well, but the bread turned out very moist and flavourful - way better than I was expecting after having to abandon it for most of the day.  It makes delicious toast.

 Things I was left wondering:

  • Should the dough have been softer?  It was so stiff that kneading was a real chore.
  • If I had kneaded it for more than the 2 minutes I had available, would it have ended up stretchy and gluteny and stopped tearing, or is that too much to expect from a whole grain dough?
  • Did sitting all day help, or hinder, the dough?
  • Could I have amended the dough after it sat all day, when I finally came home for the evening?
  • Can the seeds in the oatmeal actually cut the gluten strands during kneading and ruin them?  Should I use plain oats next time?
  • What can you tell about my bread from looking at the crumb in the photo above?  I don't know anything about "crumb" and that's what I find most intimidating about this site.  Can you experienced bakers take one look at my sliced bread above and shudder and know everything I did wrong in a mere glance? 
bryoria's picture
bryoria

My first post!  I keep my bread notes in a cheap notebook stuck to my fridge, but thought a bread blog might work better, and enable me to share my notes.  I am fairly new to bread baking and find some of the posts here rather intimidating.  I took an artisan bread baking course at our local technical college last fall, developed a wild yeast starter during the class, and was off and running with the longer-fermentation methods.  Before the class I had been making all our bread, but  just plain whole wheat sandwich loaves from my own flour, mixed and kneaded and baked all in one morning. 

Although my freeform sourdough loaves always turn out well, I have not had much luck with 100% whole wheat sandwich loaves using the long fermentation methods, even after experimenting with aging my flour.  I would like to learn how to make a 100% whole wheat sandwich loaf that doesn't crumble in the centre.  Until then, I use my old, all-in-one-day method for sandwich loaves and alternate with the partial white flour sourdoughs I learned in my class.

Today I tried to make buns from one of the recipes we learned in the class, a multigrain sourdough.  It was my first time making buns from one of the class recipes.  They turned out great.

Notes on today's buns:

  • recipe from NAIT course
  • first time trying the dough as buns
  • divided dough into 16 pieces and formed as flat hamburger buns
  • placed on cookie sheets to rise for 30-40 minutes
  • baked on cookie sheets at 400 for 18 minutes, no steam, turning pans halfway through
  • buns softened as they cooled
  • good size for hamburgers
  • flavour fantastic, good texture

(updated to add photo showing crumb)

Subscribe to RSS - bryoria's blog