The Fresh Loaf

A Community of Amateur Bakers and Artisan Bread Enthusiasts.

Stephmo's blog

Stephmo's picture
Stephmo

Tragedy struck last week - I stripped the worm gear in my mixer and while the part's on order, it's out of commission.  So today I was looking for a nice, simple by-hand bread recipe.  You know, because supposedly people do bread all the time without the benefit of mixers.  =)
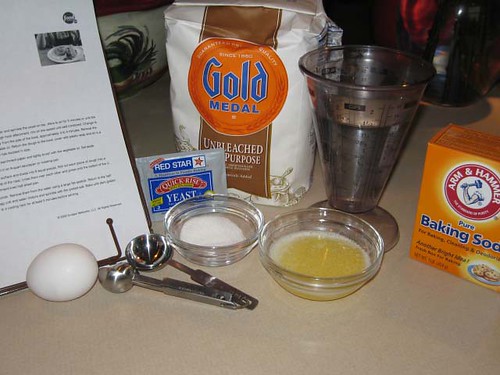
I turned to Savory Baking from the Mediterranean by Anissa Helou and found a recipe for French Country Bread that had only 3 ingredients - 4 if you count water-based ingredients:

1 ½ teaspoons (2/3rds package) active dry yeast
2 2/3 cups unbleached all-purpose flour, plus extra for kneading and shaping
1 ½ teaspoons fine kosher salt or sea salt
10 to 15 ice cubes

So, I got my ingredients together and got ready to go by hand:

I went with Kosher salt and obviously the ice cubes are hiding out in the freezer since they won't be used for a few hours.

From Savory Baking:

1. Dissolve the yeast in ½ cup warm water in a medium bowl. Add 1 cup of the flour. Mix with a spoon to make a very wet dough. Cover with plastic wrap and let rise in a warm, draft-free place for 3 hours. This is the poolish.

This was easy stuff.  The only adjustment I had to make was in the rise time.  Since I was using a quick-rise yeast, I cut the rise time down to 1 hour 45 minutes - the pooish was big and bubbly at that point.  The mixing photos:

From Savory Baking:

2. Combine the remaining 1 2/3 cups flour and the salt in a large bowl and make a well in the center. Add the poolish to the well and gradually and ½ cup warm water, bringing in the flour as you go along. Knead briefly to make a rough, quite wet ball of dough.

I treated this as if I were folding in egg whites to the flour.  It worked really well up until the end, at which point it could only be done by hand.  It wasn't so much that it was "wet" as it was sticky, but definitely workable:

From Savory Baking:

3. Remove the dough to a floured work surface and sprinkle the dough with more flour. Knead for 3 minutes, sprinkling with more flour if necessary. Invert the bowl over the dough and let rest for 15 minutes. Knead the dough for about 2 to 3 minutes more, until it is smooth and elastic. Shape the dough into a ball, place in a lightly floured clean bowl, and cover with plastic wrap. Let rise in a warm, draft-free place for 1 hour. Fold the dough, cover again and let rise for 1 hour more. The dough should have doubled in volume.

The kneading was smooth and as promised:

BUT after the first rise - which I cut down to 30 minutes instead of an hour due to the quick rise - I had already doubled:

At this point, knowing the instructions are calling for yet another rise, I decided to not risk tiring out my yeast.  My dough had huge air bubbles at this point already.  I skipped the 2nd rise from the previous step and I moved onto step 4.

From Savory Baking:

4. Return the dough to the work surface. Shape gently into a tight ball, taking care to deflate as few air balls as possible. Place on a large nonstick baking sheet or on a baking sheet lined with parchment paper or a silicone pastry mat. Cover with a wet but not dripping kitchen towel and let rise for 1 hour, until doubled in volume. Meanwhile, preheat the oven to 450 degrees. Place a medium baking dish on the bottom of the oven.

I made quite a few adjustments.  I decided to heat up my pizza stone for baking, so I didn't bother with baking sheets, parchment paper or silicone baking mats.  I used my pizza peel as a resting/rising surface, dusting it like crazy with flour.  I warmed a cake pan in the oven at the same time I was warming my pizza stone.  The construction for my ball was rather quick since I was trying to be careful with the dough.  My rise seemed to go mostly up:

From Savory Baking:

5. Sift a little flour over the bread. With a lame, preferably, or with a razor blade or very sharp knife, carefully cut a square pattern over the top. Immediately before baking, toss the ice cubes into the baking dish onto the oven bottom to create steam. Bake for 15 minutes, reduce the heat to 350 degrees, and bake for 35 to 40 minutes more, until golden brown. Transfer to a wire rack to cool. Serve warm or at room temperature, or reheated.

At this point, I'm on point with the instructions.  I actually use a very sharp fish fillet knife to score bread - and for fun and games, find the ones where I did not apply a light enough touch!

Baking goes well and the rise up seems to continue:

Even better, a nice substantial bread without being overly heavy:

The taste?  Suprisingly good for so little!  The poolish gives the bread a little bit more oomph in the flavor department with an extra amount of fermentation.  By mixing in just enough flour, the little bit of kosher salt comes through as a plesant suprise.  The steam from the ice cubes, while no steam-injected oven, still offers up a nice chewey crust.

Sure, this guy's a little time-consuming, but when you realize you'll use 3 cups of flour and a little yeast and salt...and you've got to freeze some water...well, what have you got to loose?

Stephmo's picture
Stephmo

I love soft pretzels - who doesn't?  I just never seem to get them outside of fair settings.

And then the other week, Alton Brown did a show on homemade pretzels - it was a sign! So I went to the food network's site and I grabbed the recipe. (http://www.foodnetwork.com/recipes/alton-brown/homemade-soft-pretzels-recipe/index.html)

The Ingredients:

1 1/2 cups warm (110 to 115 degrees F) water

1 tablespoon sugar
2 teaspoons kosher salt
1 package active dry yeast
22 ounces all-purpose flour, approximately 4 1/2 cups
2 ounces unsalted butter, melted
Vegetable oil, for pan
10 cups water
2/3 cup baking soda
1 large egg yolk beaten with 1 tablespoon water
Pretzel salt (note, I simply used Kosher salt)

ALTON: Combine the water, sugar and kosher salt in the bowl of a stand mixer and sprinkle the yeast on top. Allow to sit for 5 minutes or until the mixture begins to foam.

So Alton's all into proofing the yeast - and I must say that I only do this because the instructions say so.  At some point I'll stop since I'm really only convinced this is a leftover from poor production methods of old - but look, it bubbles:

ALTON: Add the flour and butter and, using the dough hook attachment, mix on low speed until well combined. Change to medium speed and knead until the dough is smooth and pulls away from the side of the bowl, approximately 4 to 5 minutes.

Now it's all about letting the KitchenAid do the work. I add the melted butter and the flour. You may notice Alton's recipe does specify flour by weight. I actually do have a scale where I can zero out my mixing bowl with ingredients, so I'm able to pour 22 ounces of flour exactly. From here, I let the mixer do it's thing for 5 minutes until the dough is nice and ready:

ALTON: Remove the dough from the bowl, clean the bowl and then oil it well with vegetable oil. Return the dough to the bowl, cover with plastic wrap and sit in a warm place for approximately 50 to 55 minutes or until the dough has doubled in size.

Rising time. Recipe calls for an hour, but this is fast-acting - in 30 minutes, I'm more than doubled:

ALTON: Preheat the oven to 450 degrees F. Line 2 half-sheet pans with parchment paper and lightly brush with the vegetable oil. Set aside.

Bring the 10 cups of water and the baking soda to a rolling boil in an 8-quart saucepan or roasting pan.

In the meantime, turn the dough out onto a slightly oiled work surface and divide into 8 equal pieces. Roll out each piece of dough into a 24-inch rope. Make a U-shape with the rope, holding the ends of the rope, cross them over each other and press onto the bottom of the U in order to form the shape of a pretzel. Place onto the parchment-lined half sheet pan.

Place the pretzels into the boiling water, 1 by 1, for 30 seconds. Remove them from the water using a large flat spatula. Return to the half sheet pan, brush the top of each pretzel with the beaten egg yolk and water mixture and sprinkle with the pretzel salt. Bake until dark golden brown in color, approximately 12 to 14 minutes. Transfer to a cooling rack for at least 5 minutes before serving.

I tear my into 8 pieces and lightly oil my counter so I can roll these into ropes and form them into pretzel shapes. I'll admit that it's not as supple as I'm expecting it to be, but that's okay. While I do this, I have water boiling on the stove and the oven preheating:

Hint from me to you - do put in the baking soda before the water is boiling - if you think you see white crusty stuff on the sides of the pot, you do. I added the baking soda while the water was boiling and got a mini-science experiment. Luckily no spillover, but I laughed. I basically boiled each pretzel for 30 seconds and scooped it out with a wire scoop (this gives the pretzel texture):

At this point, I give the pretzels an egg wash and bake them for 13 minutes. Look what I get:

If you're wondering - but is it a chewy, doughy piece of pretzel goodness? Well - take a look at this crumb:

Yes, this is good stuff - I will be making this again!


Stephmo's picture
Stephmo

Flatbreads and Flavors by Jeffrey Alford and Naomi Duguid represents a dream job for me - and probably most of us - travelling the world and sampling authentic cuisine so you can write a cookbook that will be widely acclaimed and loved by all.  This book is wonderful and is as much travelogue as it is recipe book.  We decided to sample a Georgian recipe for cheese boat breads.  As they described these, they were presented as something resembling a deep-dish cheese pizza.  This can leave a bit of a false impression, as their version is not overpowered by the cheese.  This bread is a great snack or appetizer and could easily push aside garlic bread, breadsticks or crostini.  Even better, you could easily make a meal by adding a simple green salad.

The recipe will make four boats - I successfully halved the recipe with no problem to make only two boats.

2 cups warm water

pinch of sugar

2 tsp. dry yeast

5 to 6 cups hard unbleached white flour or unbleached all-purpose flour

2 tsp. salt

1 Tbs. olive oil

FILLING

6 oz. soft young goat cheese, at room temperature

2 oz. Gruyere, coarsely grated

1/4 cup plain yogurt

These were my ingredients (water and sugar not pictured):

In my version, I've used unbleached AP flour and I am getting through the Fleishman's "bread machine" yeast which is just faster acting, so I need to check my rise at half the time listed in the recipe. 

INSTRUCTIONS:

You will need a large bread bowl, a medium-sized bowl, unglazed quarry tiles to fit on a rack in your oven, a baker's peel or two baking sheets and a rolling pin (optional).

Place the warm water in a large bowl, stir in the sugar and the yeast, and let stand for several minutes until the yeast has dissolved.  Then gradually add 2 1/2 cups flour, stirring constantly in the same direction, about 1 minute, to develop the gluten.  Sprinkle on the salt, add the oil, and continue adding the flour and blending it onto the dough until it is less sticky.

I've taken to using one of my silicone spatulas instead of a wooden spoon for these jobs - it seems to stick less and mix more.  It could just be a psychological thing too:

Turn the dough out onto a floured surface and knead for 10 minutes, until smooth and elastic, with a slight sheen. Form onto a ball, and place in a lightly oiled clean bowl or on a lightly floured surface to rise, covered with plastic wrap, until doubled in volume, 1 1/2 to 2 hours.

This was my rise after an hour:

Preheat the oven to 450 degrees.  If using quarry tiles, arrange on the bottom oven rack, leaving a 1-inch gap between the tiles and oven walls.  If not, lightly oil two baking sheets.

Gently push down the dough.  On a lightly floured surface, using a sharp knife, cut the dough into 4 equal pieces.  Flatten each piece out with the lightly floured palm of your hand, then cover with plastic wrap while you prepare the filling.

Since I'd halved the recipe, I only had two pieces - that's a standard cookie sheet that they're resting on at the moment.  I should also note that I have a round pizza stone - I had the stone in the oven getting hot while the oven preheated:

Place the cheeses and yogurt in a bowl, and blend together to a smooth consistency.

This is very straightforward (although "smooth" is relative since you're supposed to start out with coarsely grated Gruyere).  What I will say is that for the bite that each of these ingredients has separately, they come together and seem almost sweet.  Husband said it almost reminded him of cheese danish filling.

Work with one piece of dough at a time, leaving the remaining dough covered with plastic wrap.  With your hands or a rolling pin, stretch and flatten the dough in to a long oval 8 to 10 inches long, 5 to 6 inches wide, and no more than 1/4 inch thick.  Place a generous 1/4 cup filling in the center of the oval.  Spread to within an inch of the edges.  Roll the edges over to make a thick rim, pinching the sides together to form a point at the ends.  (The bread should look boat-shaped.)  Shape and fill a second bread.  Slide the breads onto a peel and then onto the quarry tiles, or slide onto the baking sheets and place on the bottom oven rack.  Bake until the crust is golden and the bottom is firm and crusty, about 12 to 15 minutes.  Wrap in a towel to keep warm while you prepare and bake the remaining two breads the same way.  Serve hot.

The construction took less than 5 minutes per boat:

I only did one boat at a time, as my stone is smaller.  The bake time was about 14 minutes for each.  The puff was gorgeous:

Before I forget - crumb:

The cheese really complimented the bread and was great stand-alone, although we probably came up with quite a few variations right away.  We thought a sea salt wash on the crust might be a nice add right off the bat (more for appetizers).  Fresh herbs mixed with the cheese were very obvious.  Very light additions of tomatoes, grapes, golden raisins, figs - anything that wouldn't turn into a heavy pizza - seemed like something worth trying with this bread.

If you haven't been lucky enough to try items from Flatbreads & Flavors, this is one of the many reasons why the book is worth checking out!

Stephmo's picture
Stephmo

In getting started down the path of baking, I'd been having problems with dough failing to rise in the oven or the second time - so the enthusiasm of this bread comes in having the faith to cut my rise times in half sine I was using Fleishman's instant yeast.  Once I did this, I was able to get the bread I finally wanted without the disappointment of a heavy, dense loaf that seemed like it should work.

After reading up on the policy of repriting recipes, it seems I'm okay to share how I got to this point.  If it's a problem, I do hope someone will let me know.  :)

Anyway, husband is a tremendous fan of all things cinnamon and sugar-based, so he was wanting a cinnamon sugar bread since the baking experiment began.  When I'd gotten the King Arthur Flour Baking Companion, he zeroed in on the recipe for Cinnamon Swirl Bread on page 206-207.  It can seem a bit daunting with the Dough, Filling and Topping ingredients, but let's break it down, shall we?

All of the ingredients pictured (some things premixed):

But let's start logically with the DOUGH:

3 cups (12 3/4 oz) unbleached all-purpose flour

1/4 cup (1 1/2 oz) potato flour or 1/3 cup (3/4 oz) potato flakes)

1/4 cup (1 1/4 oz) nonfat dry milk

1 1/4 tsp salt

1/2 tsp cinnamon

3 Tbs (1 1/4 oz) sugar

2 1/2 tsp instant yeast

4 Tbs (1/2 stick, 2 oz) butter

1 cup (8 oz) water

For reference, I opted for the potato flakes and used unsalted butter. All ingredients were at least room temperature.

From KAFBC:

In a large mixingbowl, combine all the dough ingredients, mxing until dough begins to come away from the sides of the bowl.  Knead (about 10 minutes by hand, 5 to 7 minutes by machine) until the dough is smooth and satiny.  Transfer the dough to a lightly oiled bowl, cover the bowl ith plastic wrap and set it aside to rise for 1 to 1 1/2 hours; it will be puffy, if not doubled in bulk.

Once I'm convinced everything's going well enough, I acutally let the mixer do ALL the work on this sucker.  I was doing this after work so I took time to go upstairs and change and came back to see that the dough hook had done its job rather nicely (my mixer and I are good friends now):

I check my rise after 45 minutes and do the "poke" test - where I see if my poke sticks.  As you can see, I do have a doubled dough and a poke that's more than sticking.  So rather than risk tiring out the yeast, I decide to move onto next steps:

Next steps for Cinnamon Swirl Bread involve the FILLING Ingredients:

1/4 cup (1 3/4 oz) sugar

1 1/2 tsp cinnamon

1/4 cup (1 1/2 oz) raisins or currants

2 tsp unbleached all-purpose flour

Egg wash, made from 1 large egg beaten with 1 Tbs water

For my bread, I used raisins.  Husband thinks we could have doubled the swirl ingredients.  From the book:

Pulse the filling igredients except the egg wash in a food processor.

TO ASSEMBLE:  Transfer the dough to a lightly oiled work surface and shape it into a long, narrow rectangle, about 16 x 8 inches.  Brush the dough with some of the egg wash (set the remainder aside) and pat the filling gently onto the dough. Beginning with a short edge, roll the dough into a log.  Pinch the side seam and ends closed (to keep the filling from bubblng out) and palce te log int a lightly greased 8 1/2 x 4 1/2-inch loaf pan.  Cover the pan with lightly greased plastic wrap or a proof cover and let the bread rise for a bout 1 hour at room temperature, or until it's crowned about 1 inch over the rim of the pan.

I actually made this a little bit simpler than it sounds - I laid my loaf pan at one end of the counter and rolled my rectangle towards it as a guide, keeping the width slightly narrower than the pan.  The dough was very silky, so I really just sprayed some Pam on my kitchen island for the "lighly oiled" portion of the instructions.

Here's the dough rolled out - you can see my loaf pan "guide" on the far left.  I don't know if it's just me, but the cinnamon in the dough really seems to come through for me:

The filling was VERY clumpy (raisins!), so it didn't spready as easily as I would have liked.  This is also where the discussion of doubling the filling for future batches came in:

The rolling was actually a snap.  I did the side tucking as I went along and went towards my loaf pan:

Again, with the rising, I checked out the loaf in only HALF the time - and good thing!  Doesn't it look like I'm an inch above the pan?

Now for the good suff - the TOPPING:

2 TBS (1 oz) butter

2 Tbs (7/8 oz) sugar

1/4 tsp cinnamon

1/4 cup (1 oz) unbleached all-purpose flour

I will say that this made MORE than enough of the topping.  From the book:

In a small bowl or mini processor, combine the butter, sugar, cinnamon and flour until the mixture is crumbly,  If you're using a mini processor, watch carefully; topping will go from crumbly to a cohesive mass in just a second or so.

Brush the top of the loaf with some (or all) of the reserved egg wash and gently press on the topping.

Preheat the oven to 350 degrees.  Bake the bread for about 45 minutes, tenting it lightly with aluminum foil or the final 15 minutes or so if it appears to be browning to quickly.  Remove the loaf from the oven, and after about 5 minutes, quicky remove it from the pan.  some of the streusel will fall off, but you can alleviate this by first loosening all around the edges of the loaf with a knife, then turning the pan on its side and gently pulling it away from the loaf.  Topping will continue to fall off as you maneuver the bread -- we've never figured out how htey make that stuff adere so nicely on the store-bought loaves -- but you'll still be left with a lot of the sweet topping.

I did actually score the top of the loaf lightly before baking it - you can't really tell, but I did:

The oven browning was FANTASTIC - we did tent it for a bit to save on some of the browning and you can see that the split did come through (as did a bit of the filling, but that's okay):

Slicing into the bread was amazing - it smelled fantastic and made GREAT toast and snacks.  It was great with cream cheese and peanut butter as well:

Stephmo's picture
Stephmo

A few things converged on this fateful day. I had a craving for hummus, and I was out of pita bread. I didn't really feel like going to the store just for pita bread and then I started wondering how hard pita bread was to make. So to the google! And that's when the Fresh Loaf website informed me of the greatest fact ever. Pita Bread is one of the easiest breads you'll ever make. So the first thing I discover is that it's also one of the cheapest breads that I'll probably ever make. It starts with six ingredients (left to right: kosher salt, instant yeast, flour, buckwheat honey, water and olive oil): I figure that I had less than a buck invested by the time all was said and done. Mostly that's because I'm unsure as to how many cups of flour may actually be in a five pound sack of flour, so I'm guessing 50 cents for the flour. I also find out that my mixer can do most of the work. So mucho credit to the Indigo Master: Okay, an amazing thing happens. The rising part. I set aside the dough in a bowl to rise. It's only supposed to take 90 minutes and double in size. This has been a failure many times before in bread experiments. But LOOK: Here, I've taken my ingredients and transformed them into eight pieces of future pita rounds. These need to rest a bit and you can see the action shot taking place as husband begins to lay the damp kitchen towel over the dough rounds for a 20 minute rest. In the meantime, I heated the oven up and put my pizza stone in the middle to get nice and hot. I had the pizza stone because I like cooking gadgets, but I've never actually done my own dough on it. Once the pizza dough has rested, all that's left to do is roll them into rounds-ishes. This is the fun part as things are actually looking more pita-ish. I do take the extra step of the spray bottle as mentioned in the recipe (I'm paranoid and don't want to chance anything). Mostly, I think I scared the dogs. I do think I could have stood to have rolled everything a bit thinner... Otherwise, I'm incredibly proud of my result - and the pocket that appeared! Of course it was rather late, so the hummus had to wait. This was the beginning of my bread-making adventure. I hope to get more of my stories up here soon!

Subscribe to RSS - Stephmo's blog